- 1. Introduction
- 2. Incubation
- 3. Migration from jBPM 3
- 4. The Process Virtual Machine
- 5. Architecture
- 6. Implementing basic activities
- 7. Process anatomy
- 8. Advanced graph execution
- 9. Configuration
- 10. Persistence
- 11. JobExecutor
- 12. Advanced Mail Support
- 13. Software logging
- 14. History
- 15. JBoss Integration
- 16. Spring Integration
This developers guide is intended for experienced developers that want to get the full flexibility out of jBPM. The features described in this developers guide will not be supported. Use at your own risk.
Chapter 2, Incubation explains the features that are intended to move to the userguide eventually and become part of the supported offering. But incubation features are not yet considered stable.
Chapter 4, The Process Virtual Machine through Chapter 8, Advanced graph execution explain the process virtual machine and how activity and event listener can be build for it.
Chapter 9, Configuration through Chapter 15, JBoss Integration explain internal developer topics.
The source code for jBPM can be found in our SVN repository:
https://anonsvn.jboss.org/repos/jbpm/jbpm4/A description of how to build the sources is available in the wiki:
http://www.jboss.org/community/docs/DOC-12867The jBPM WIKI is located here:
http://www.jboss.org/community/docs/DOC-11184You can use jBPM with the libraries that ship in the distribution. The jbpm.jar
in the distribution contains the classes of many jBPM modules: jbpm-api, jbpm-log, jbpm-test-base, jbpm-pvm,
jbpm-jpdl and jbpm-enterprise. So the single jbpm.jar in the distribution
does not allow to make a compile time distinction between the API classes and the implementation classes.
If you prefer to build your project with only a dependency on jBPM's API, then
our repository can be used directly. It is located here:
http://repository.jboss.com/maven2/org/jbpm/jbpm4/
If you want to install/deploy jBPM into your own application, this is still as easy
as it was before: Just put the right libs in your application classpath. We didn't yet clean
up the dependency description in the maven pom files. So we can't yet give the exact
minimal set of libraries from the lib directory that you need to include
in your application. The versions of the libraties that are in the lib
directory are the ones that we tested with. So we recommend you to use those very versions
of the libs. To help you on your way, here's the current maven dependency list for jPDL:
[INFO] ------------------------------------------------------------------------
[INFO] Building jBPM 4 - jPDL
[INFO]    task-segment: [dependency:tree]
[INFO] ------------------------------------------------------------------------
[INFO] [dependency:tree]
[INFO] org.jbpm.jbpm4:jbpm-jpdl:jar:4.0
[INFO] +- org.jbpm.jbpm4:jbpm-pvm:jar:4.0:compile
[INFO] |  +- org.jbpm.jbpm4:jbpm-api:jar:4.0:compile
[INFO] |  |  \- jboss:jboss-j2ee:jar:4.2.2.GA:compile
[INFO] |  +- org.jbpm.jbpm4:jbpm-log:jar:4.0:compile
[INFO] |  +- org.jbpm.jbpm4:jbpm-test-base:jar:4.0:compile
[INFO] |  |  \- org.hibernate:hibernate-core:jar:3.3.1.GA:compile
[INFO] |  |     +- antlr:antlr:jar:2.7.6:compile
[INFO] |  |     \- commons-collections:commons-collections:jar:3.1:compile
[INFO] |  +- org.apache.ant:ant:jar:1.7.0:compile
[INFO] |  |  \- org.apache.ant:ant-launcher:jar:1.7.0:compile
[INFO] |  +- log4j:log4j:jar:1.2.14:compile
[INFO] |  +- juel:juel:jar:2.1.0:compile
[INFO] |  +- juel:juel-impl:jar:2.1.0:compile
[INFO] |  +- juel:juel-engine:jar:2.1.0:compile
[INFO] |  +- org.slf4j:slf4j-api:jar:1.5.2:compile
[INFO] |  +- org.slf4j:slf4j-jdk14:jar:1.5.2:compile
[INFO] |  +- org.jboss.identity.idm:idm-core:jar:1.0.0.Beta1:compile
[INFO] |  |  +- org.jboss.identity.idm:idm-common:jar:1.0.0.Beta1:compile
[INFO] |  |  +- org.jboss.identity.idm:idm-api:jar:1.0.0.Beta1:compile
[INFO] |  |  +- org.jboss.identity.idm:idm-spi:jar:1.0.0.Beta1:compile
[INFO] |  |  \- com.sun.xml.bind:jaxb-impl:jar:2.1.8:compile
[INFO] |  |     \- javax.xml.bind:jaxb-api:jar:2.1:compile
[INFO] |  |        \- javax.xml.stream:stax-api:jar:1.0-2:compile
[INFO] |  +- org.jboss.identity.idm:idm-hibernate:jar:1.0.0.Beta1:compile
[INFO] |  |  +- javassist:javassist:jar:3.4.GA:compile
[INFO] |  |  +- org.hibernate:hibernate-cglib-repack:jar:2.1_3:compile
[INFO] |  |  \- org.slf4j:slf4j-log4j12:jar:1.5.2:compile
[INFO] |  +- org.hibernate:hibernate-entitymanager:jar:3.4.0.GA:compile
[INFO] |  |  +- org.hibernate:ejb3-persistence:jar:1.0.2.GA:compile
[INFO] |  |  +- org.hibernate:hibernate-commons-annotations:jar:3.1.0.GA:compile
[INFO] |  |  +- org.hibernate:hibernate-annotations:jar:3.4.0.GA:compile
[INFO] |  |  +- dom4j:dom4j:jar:1.6.1:compile
[INFO] |  |  |  \- xml-apis:xml-apis:jar:1.0.b2:compile
[INFO] |  |  \- javax.transaction:jta:jar:1.1:compile
[INFO] |  +- org.livetribe:livetribe-jsr223:jar:2.0.5:compile
[INFO] |  \- javax.mail:mail:jar:1.4.1:compile
[INFO] |     \- javax.activation:activation:jar:1.1:compile
[INFO] +- junit:junit:jar:3.8.1:compile
[INFO] \- hsqldb:hsqldb:jar:1.8.0.7:test
[INFO] ------------------------------------------------------------------------
The jboss idm dependencies in sections
org.jboss.identity.idm:* can be ignored, including the
org.hibernate:hibernate-entitymanager
This list should already get you started to select a small subset of libs instead of
including all the libs from the ${jbpm.home}/lib directory.
In one of the next releases, we'll clean up those dependency descriptions in the pom and include
a good description of which are the minimal libs to get jBPM up and running inside
your own application.
This section documents some of the more advanced activities and features of jPDL that are still in incubation. Meaning these features and activities are not supported yet. But they are available for you to try and use. We don't give any stability guarantees on these activities and features. So use at your own risk.
IMPORTANT NOTE : Timers will be changed before they are moved to the Userguide. See also https://jira.jboss.org/jira/browse/JBPM-2329
A timer can be specified in the transition
element in wait state activities such as states,
tasks, sub-processes and
groups.
When such a timer fires, that transition is taken.
A timer can also be specified in custom events in wait state
activities such as states,
tasks, sub-processes and
groups. The timer element
should then be the first element in the on element representing
the event. In that case the event fires upon the duedate of the timer.
Timers are created when the activity is entered. The timer can fire
when the execution remains in the activity until the duedate.
When the execution leaves the activity, the timer is cancelled.
Table 2.1. timer attributes:
| Attribute | Type | Default | Required? | Description |
|---|---|---|---|---|
duedate | duedate expression | required | Specifies when the timer needs to fire. For
example: 20 minutes or
3 business days
| |
repeat | duedate expression | optional | When a timer fires, this attribute specifies when the timer
needs to fire again. For example: 20 minutes or
3 business days
|
A duedate expression has the following syntax:
quantity [business] {second | seconds | minute | minutes |
                     hour | hours | day | days | week |
                     weeks | month | months | year | years}
where quantity is a positive integer.
And adding the optional indication business means
that only business hours should be taken into account for this duration. Without
the indication business, the duration will be interpreted as an absolute time period.
How to configure business hours is explained in Section 2.1.2, “Business calendar”
Known limitation. The business calendar is not yet configurable. See also JBPM-2334
The default configuration will contain a reference to the file
jbpm.business.calendar.xml. That contains a
configuration of business hours in the following format:
<?xml version="1.0" encoding="UTF-8"?>

<jbpm-configuration xmlns="http://jbpm.org/xsd/cfg">

  <process-engine-context>

      <business-calendar>
        <monday    hours="9:00-12:00 and 12:30-17:00"/>
        <tuesday   hours="9:00-12:00 and 12:30-17:00"/>
        <wednesday hours="9:00-12:00 and 12:30-17:00"/>
        <thursday  hours="9:00-12:00 and 12:30-17:00"/>
        <friday    hours="9:00-12:00 and 12:30-17:00"/>
        <holiday period="01/07/2008 - 31/08/2008"/>
      </business-calendar>

  </process-engine-context>

</jbpm-configuration>
For an example of where the business calendar is used, see ???
Example TimerTransitionTest shows how to put a timer on a transition.

<process name="TimerTransition" xmlns="http://jbpm.org/4.0/jpdl">

  <start>
    <transition to="guardedWait" />
  </start>

  <state name="guardedWait">
    <transition name="go on" to="next step" />
    <transition name="timeout" to="escalation">
      <timer duedate="10 minutes" />
    </transition>
  </state>

  <state name="next step" />
  <state name="escalation" />

</process>
When an process instance for this process is started, it arrives immediately
in the guardedWait state. At that time, a timer is created that will fire
after 10 minutes.
Execution processInstance = executionService
      .startProcessInstanceByKey("TimerTransition");
With the following query, we can query for the timers related to the newly created processInstance. We know that there should be exactly one such timer.
Job job = managementService.createJobQuery()
      .timers()
      .processInstanceId(processInstance.getId())
      .uniqueResult();
In a unit test, we won't use the JobExecutor to execute the timer. Instead, we execute timers directly in the thread of the unit test. That way it is easy to simulate one scenario though an execution.
So as the next step, we assume that the timer will fire. We simulate this by executing the timer programmatically:
managementService.executeJob(job.getDbid());
After that the process instance will have taken the
timeout transition and moved to the escalation state.
processInstance = executionService.findExecutionById(processInstance.getId());
assertEquals("escalation", processInstance.getActivityName());
The second scenario in TimerTransitionTest shows that the
timer is cancelled in case the signal go on is given
before the timer fires. In that case the execution ends up in the
next step.
Example TimerEventTest shows how to put a timer on a custom event.

<process name="TimerEvent" xmlns="http://jbpm.org/4.0/jpdl">

  <start>
    <transition to="guardedWait" />
  </start>

  <state name="guardedWait" >
    <on event="timeout">
      <timer duedate="10 minutes"/>
      <event-listener class="org.jbpm.examples.timer.event.Escalate" />
    </on>
    <transition name="go on" to="next step" />
  </state>

  <state name="next step" />

</process>
In this case, if the execution is not signalled within 10 minutes after the
activity is started, the event timeout is fired
and the event listener org.jbpm.examples.timer.event.Escalate
will be notified.
Again, if the guardedWait activity is ended within
10 minutes, then the timer is cancelled and the Escalate
event listener will not be notified.
Example TimerBusinessTimeTest shows how business time works.
<process name="TimerBusinessTime" xmlns="http://jbpm.org/4.0/jpdl">

  <start>
    <transition to="guardedWait" />
  </start>

  <state name="guardedWait" >
    <transition name="go on" to="next step" />
    <transition name="timeout" to="escalation" >
      <timer duedate="9 business hours" />
    </transition>
  </state>

  <state name="next step" />
  <state name="escalation" />

</process>
Suppose that a new TimerBusinessTime process instance is started
at 11:30am on a tuesday. The default configured business calendar specifies working hours
between 9:00-12:00 and 12:30-17:00. So 9 business hours later results in an actual duedate
for the timer of wednesday 13:00 (1pm).
Since we do not know when the TimerBusinessTimeTest will be ran, we only assert in the test that the actual duedate of the scheduled timer at least 24 hours ahead.
Example TimerRepeatTest shows how to put a timer with a repeat. The attribute
repeat on a timer will cause the timer to be rescheduled automatically
after it is executed.
<process name="TimerRepeat" xmlns="http://jbpm.org/4.0/jpdl">

  <start>
    <transition to="guardedWait" />
  </start>

  <state name="guardedWait">
    <on event="timeout">
      <timer duedate="20 minutes" repeat="10 seconds" />
      <event-listener class="org.jbpm.examples.timer.repeat.Escalate" />
    </on>
    <transition name="go on" to="next step"/>
  </state>

  <state name="next step"/>

</process>
When a new process is started, a timer is created and the duedate will be 20 minutes ahead. When the timer fires, a new timer will be created with a duedate of 10 seconds ahead. When that timer fires, a new timer will be created again 10 seconds ahead. And so on.
New timers will be created each time the timer fires until the
guardedWait state activity is ended with a signal.
When the guardedWait state activity is ended, the
existing timer will be cancelled.
A group groups a set of activities in a process. Contained groups must be hierarchically nested. A group corresponds to a BPMN expanded sub process.
Table 2.2. group elements:
| Element | Multiplicity | Description |
|---|---|---|
| any activity | 0..* | Contained activities. |
transition | 0..* | Outgoing transitions for the group activity. |
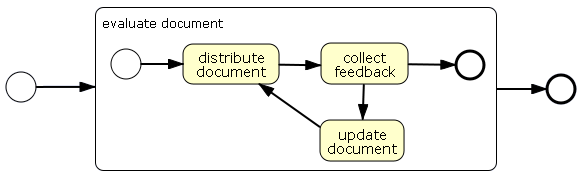
This example scenario shows the basic operations of a group.
<process name="GroupSimple" xmlns="http://jbpm.org/4.0/jpdl">

  <start>
    <transition to="evaluate document" />
  </start>

  <group name="evaluate document">
    <start>
      <transition to="distribute document" />
    </start>
    <state name="distribute document">
      <transition to="collect feedback" />
    </state>
    <state name="collect feedback">
      <transition name="approved" to="done" />
      <transition name="rejected" to="update document" />
    </state>
    <state name="update document">
      <transition to="distribute document" />
    </state>
    <end name="done" />
    <transition to="publish document" />
  </group>

  <state name="publish document" />

</process>
The next code snippet shows a test scenario that rejects a document
when it comes in the collect feedback first time round.
Then it goes through update document, distribute document
and back to collect feedback. The second time,
it will be approved. All activities involved are wait states.
ProcessInstance processInstance = executionService
       .startProcessInstanceByKey("GroupSimple");
String pid = processInstance.getId();
assertEquals("distribute document", processInstance.getActivityName());

processInstance = executionService.signalExecutionById(pid);
assertEquals("collect feedback", processInstance.getActivityName());

processInstance = executionService.signalExecutionById(pid, "rejected");
assertEquals("update document", processInstance.getActivityName());

processInstance = executionService.signalExecutionById(pid);
assertEquals("distribute document", processInstance.getActivityName());

processInstance = executionService.signalExecutionById(pid);
assertEquals("collect feedback", processInstance.getActivityName());

processInstance = executionService.signalExecutionById(pid, "approved");
assertEquals("publish document", processInstance.getActivityName());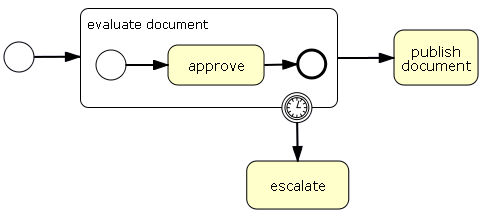
<process name="GroupTimer" xmlns="http://jbpm.org/4.0/jpdl">

  <start>
    <transition to="evaluate document" />
  </start>

  <group name="evaluate document">
    <start>
      <transition to="approve" />
    </start>
    <state name="approve">
      <transition to="done" />
    </state>
    <end name="done" />

    <transition to="publish document" />
    <transition name="timeout" to="escalate">
      <timer duedate="2 business hours" />
    </transition>

  </group>

  <state name="escalate" />
  <state name="publish document" />

</process>
The next code snippet shows a test scenario in which the timer will
fire before the group activity evaluate document completes.
ProcessInstance processInstance = executionService
       .startProcessInstanceByKey("GroupTimer");
Execution approveExecution = processInstance
       .findActiveExecutionIn("approve");
assertNotNull(approveExecution);

List<Job> jobs = managementService
  .createJobQuery()
  .processInstanceId(processInstance.getId())
  .list();

assertEquals(1, jobs.size());

Timer timer = (Timer) jobs.get(0);

managementService.executeJob(timer.getDbid());

processInstance = executionService
       .findProcessInstanceById(processInstance.getId());
assertNotNull(processInstance.findActiveExecutionIn("escalate") );This shows how a group can have multiple exclusive entry points.
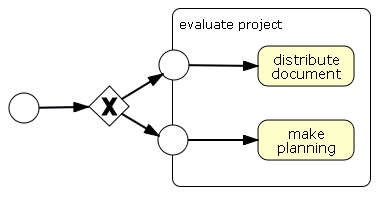
Analogue to multiple entry points, a group can also have multiple exit points.
<process name="GroupMultipleEntries" xmlns="http://jbpm.org/4.0/jpdl">

  <start>
    <transition to="choose strategy" />
  </start>

  <decision name="choose strategy" expr="#{time}">
    <transition name="plenty" to="play" />
    <transition name="running out" to="plan" />
  </decision>

  <group name="evaluate project">
    <start name="play">
      <transition to="distribute document" />
    </start>
    <state name="distribute document" />

    <start name="plan">
      <transition to="make planning" />
    </start>
    <state name="make planning" />
  </group>

</process>
The following scenario will be when there is plenty of time:
Map<String, Object> variables = new HashMap<String, Object>();
variables.put("time", "plenty");

ProcessInstance pi = executionService
    .startProcessInstanceByKey("GroupMultipleEntries", variables);

assertNotNull(pi.findActiveExecutionIn("distribute document"));
The following scenario will be when there is time is running out:
Map<String, Object> variables = new HashMap<String, Object>();
variables.put("time", "running out");

ProcessInstance pi = executionService
    .startProcessInstanceByKey("GroupMultipleEntries", variables);
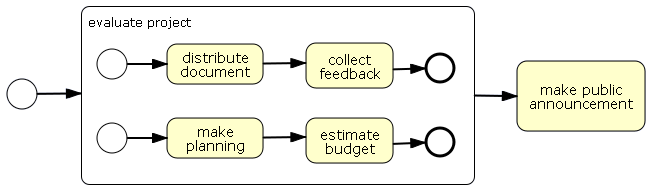
assertNotNull(pi.findActiveExecutionIn("make planning"));This scenario shows how a group can be used to create concurrent paths of execution. When an execution arrives in a group, each activity that doesn't have incoming transitions is started. So the first activities don't have to be start activities. The group takes the default transition out when all contained work is done.
<process name="GroupConcurrency" xmlns="http://jbpm.org/4.0/jpdl">

  <start>
    <transition to="evaluate project" />
  </start>

  <group name="evaluate project">
    <start>
      <transition to="distribute document" />
    </start>
    <state name="distribute document">
      <transition to="collect feedback" />
    </state>
    <state name="collect feedback">
      <transition to="document finished" />
    </state>
    <end name="document finished" />

    <start>
      <transition to="make planning" />
    </start>
    <state name="make planning">
      <transition to="estimate budget" />
    </state>
    <state name="estimate budget">
      <transition to="planning finished" />
    </state>
    <end name="planning finished" />

    <transition to="public project announcement" />
  </group>

  <state name="public project announcement" />

</process>
The following scenario will show a scenario in which all
wait state acitivities are signalled in some random
order till all work is done:
ProcessInstance pi = executionService
    .startProcessInstanceByKey("GroupConcurrency");

String documentExecutionId = pi
    .findActiveExecutionIn("distribute document").getId();

String planningExecutionId = pi
    .findActiveExecutionIn("make planning").getId();

pi = executionService.signalExecutionById(documentExecutionId);
assertNotNull(pi.findActiveExecutionIn("collect feedback"));
assertNotNull(pi.findActiveExecutionIn("make planning"));

pi = executionService.signalExecutionById(planningExecutionId);
assertNotNull(pi.findActiveExecutionIn("collect feedback"));
assertNotNull(pi.findActiveExecutionIn("estimate budget"));

pi = executionService.signalExecutionById(planningExecutionId);
assertNotNull(pi.findActiveExecutionIn("collect feedback"));

pi = executionService.signalExecutionById(documentExecutionId);
assertNotNull(pi.findActiveExecutionIn("public project announcement"));Groups also support that you create transitions over group boundaries. So it's possible to have a tranition from an activity outside the group directly to an activity inside the group without modelling a start activity on the border of the group. Similarly with transitions from activities inside the group to activities outside the group. But shhhhhhhhh! Don't tell anyone cause this is not BPMN compliant.
The identity service methods to create groups are based on component generated ID's.
public class IdentityService {
  /** create a group new group
   * @return the generated id for this group. */
  String createGroup(String groupName);

  /** create a group new group
   * @return the generated id for this group. */
  String createGroup(String groupName, String groupType);

  /** create a group new group
   * @return the generated id for this group. */
  String createGroup(String groupName, String groupType, String parentGroupId);

  ...

}
In the next release we might switch to user provided ID's for these 3 methods.
Task outcomes might be changed as it is still being discussed here
Human interaction happens nowadays most of the times through web interfaces
using some kind of form to capture input of the user. Using jBPM
task forms, a process designer can attach such input forms to a
task activity or a
start activity. When using the jBPM console, the forms will
automatically be displayed for user input when a process instance is started
or when a task is completed. An example process (VacationRequest)
is shipped with the default examples of the distribution demo.
Task form references can be put on start and task activities:
<start form="org/jbpm/examples/taskform/request_vacation.ftl" name="start">
  <transition to="verify_request"/>
</start>
<task candidate-users="mike,peter" form="org/jbpm/examples/taskform/verify_request.ftl" name="verify_request">
  <transition name="reject" to="vacation_rejected"/>
  <transition name="accept" to="vacation_accepted"/>
</task>
Task forms are plain text files containing arbitray content. However, when using the jBPM console, HTML pages containing a form element are required. The default form plugin of the console leverages the freemarker templating library. It builds on the following constraints:
- Templates need to be suffixed *.ftl and be included with the deployment:
deployment.addResourceFromClasspath("org/jbpm/examples/taskform/verify_request.ftl"); - The action of the form must be "${form.action}"
- HTML forms need to provide the correct enctype: "multipart/form-data"
- Form field names become process variables names and vice versa
- A reserved field name is available for signaling execution upon task completion: "outcome"
<html>
  <body>
    <form action="${form.action}" method="POST" enctype="multipart/form-data">
      <h3>Your employee, ${employee_name} would like to go on vacation</h3>
      Number of days: ${number_of_days}<br/>
      <hr>
      In case you reject, please provide a reason:<br/>
      <input type="textarea" name="reason"/><br/>
      <#list outcome.values as transition>
          <input type="submit" name="outcome" value="${transition}">
      </#list>
    </form>
  </body>
</html>
In this example, the process variables employee_name
and number_of_days is displayed on the
screen using a variable reference expression. The value of the input
field reason will be stored as a process
variable.
The jBPM console will render the taskforms automatically:

In building jBPM 4, we have pursued 2 major goals:
- Improve supportability: In jBPM 3 we relied only on community feedback for improving stability and portability. In jBPM 4 we have added a clear indication of which environments and configurations that we support. Those environments will be backed with continuous integration in the JBoss QA Labs. The build now supports all these environments and configurations so that it is easier for us to reproduce and investigate problems if they pop up. This coverage will also guarantee longer lifespan of jBPM 4.
- Lowering the treshold and increasing adoption to the next level: In jBPM 4 we created a clear differentiation between the common, basic usage on the one hand and the advanced usage on the other hand. So it will be easier to get started and harder (but still possible) to leverage the bleeding edge stuff on which developers can burn their fingers.
As part of creating a clear separation between basic and advanced usage, the API has been completely revisited. Basic usage is covered with the public API. The same API is available in all the supported environments. Package names in jBPM 4 are strictly separated from package names in jBPM 3.
Instead of providing a full DB migration, we opted for a strategy to
allow for jBPM 3 and jBPM 4 instances to run concurrently next to each
other. The table prefix is changed from JBPM_ to JBPM4_.
There is no migration tool to convert jBPM 3 runtime database contents
to jBPM 4. We're not sure if we'll be able to build such a tool in one of the
next version. One of the main reasons is that any QA for a data migration of the
DB contents would be impossible for the project team to achieve.
Furthermore, there are some features that are not yet available on jBPM 4. They are ordered from likely to unlikely to get implemented in jBPM 4.
- User provided transasctional resources such as JDBC connections or hibernate connections
- Exception handlers
- Transient variables
- Identity expression to calculate the assignee of a task
- Task form variable-to-parameter conversions
In many cases, a lot of work has been put in the design of JPDL3 process definitions. To avoid a complete manual translation of these processes to the JPDL4 format, the jBPM distribution contains a subdirectory called migration, which contains a command-line tool for converting JPDL3 process definition files to JPDL process XML files.
Translated processes might not be executable any more. The jBPM 4 features might still be missing or the translation itself might not yet be implemented. But the tedious work of reformatting will be handled by the tool. It will also indicate the parts that it can't translate.
The tool itself uses only dom4j to do the translation between the two formats and should be easy extensible (the source code is also in the same directory). The design of the tool is deliberately kept very simple (ie most of the logic can be found in the Jpdl3Converter class). Note that this tool is experimental and tested only a small set of JPDL3 process files.
The jPDL Conversion tool takes a jpdl3 process file as input, and converts it to a jpdl4 process file.
Syntax:
java org.jbpm.jpdl.internal.convert.JpdlConverterTool -v -o <outputfile> <processfile>
- -v (verbose): The tool will print the detail messages while converting the process file. When this argument is used, it will also print the error stacktrace if exceptions are thrown.
- -o (output) Specifies the output file name. By default, the tool will generate a file name ending in 'converted.jpdl.xml' using as a base file name the name derived from the input process file. The output-filename can be an absolute file name path or a relative file name path.
java -jar jpdl-migration-XX.jar simple.jpdl.xml
java -jar jpdl-migration-XX.jar -v simple.jpdl.xml
java -jar jpdl-migration-XX.jar -o /home/scott/simple.converted.xml simple.jpdl.xml
The conversion tool can easily be integrated with regular Java code (or with Maven or Ant). The following code example shows how to call the internal api to convert the process file:
URL url = new URL("simple.jpdl");
Jpdl3Converter jpdlConverter = new Jpdl3Converter(url);
Document jpdl4Doc = jpdlConverter.readAndConvert();

for (Problem problem : jpdlConverter.problems) {
   //do something to handle the problem
}

Writer fileWriter = new FileWriter(outputFile);
OutputFormat format = OutputFormat.createPrettyPrint();
XMLWriter writer = new XMLWriter( fileWriter, format );
writer.write(jpdl4Doc);
writer.close();
This section gives an indication of the most important renamings and changes that were applied in jBPM4
Table 3.1. General name changes
| jBPM 3 | jBPM 4 | Remarks |
|---|---|---|
| Node | Activity | |
| Token | Execution | The root execution is now the same object as the process instance. (In jBPM 3, the ProcessInstance had a pointer to the root token). Also, unlike in jBPM 3, executions in jBPM 4 might get inactivated, create a child execution and let the child execution continue, even when logically this represents only one single path of execution. This happens in scope activities (or composite activities) that have timers or variables declared. |
| Action | Event listener |
Table 3.2. jPDL XML changes
| jBPM 3 | jBPM 4 |
|---|---|
| process-definition | process |
| event type="..." | on event="..." |
| action | event-listener |
| node | custom |
| process-state | sub-process |
| super-state | group (still in incubation) |
Table 3.3. Default changes
| jBPM 3 | jBPM 4 |
|---|---|
| by default, propagated events trigger actions in outer process elements | by default, propagated events do not invoke event-listeners in outer elements, but only in the element on which the event listener is subscribed. |
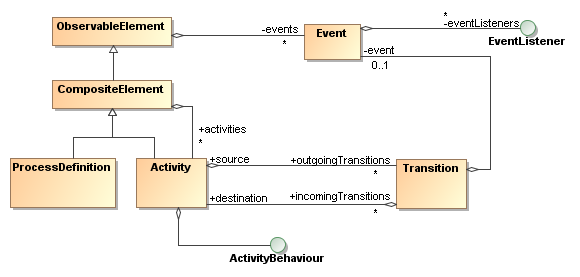
To accomodate multiple process languages and activity pluggability, jBPM is based on the Process Virtual Machine. In essence, the Process Virtual Machine is a framework specifying executable graphs. A process definition represents an execution flow and has a structure that be represented graphically as a diagram.
The Process Virtual Machine separates the structure from a process definition from
the activity behaviours. The Process Virtual Machine takes the execution of a process from
one activity to the next and delegates the behaviour of the activities to pluggable Java classes.
There is an API (ActivityBehaviour) that serves as the interface between
the Process Virtual Machine and the activity behaviour code. Languages like jPDL are
merely a set of ActivityBehaviour implementations and a parser.
Typically, process definitions are static. A process definition is composed of activities and transitions. The runtime behaviour of a activity is encapsulated in a so called Activity and it's decoupled from the process graph structure.
The Process Virtual
Machine doesn't contain any such activity implementations. It only provides the
execution environment and an activity API to write ActivityBehaviour
implementations as Java components. Activities can also be wait states. This means
that the activity control flow goes outside the process system. For example a human task
or invoking an service asynchronously. While the execution is waiting, the runtime state
of that execution can be persisted in a DB.
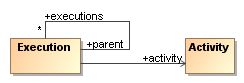
Many executions can be started for one process definition. An execution is a pointer that keeps track of the current activity.

To represent concurrent paths of execution, there is a hierarchical parent-child relation between so that one process instance can cope with concurrent paths of execution.
The Process Virtual Machine has 4 integrated API's that together offer a complete coverage of working with processes in the different execution modes. Each of the APIs has a specific purpose that fits within the following overall architecture.
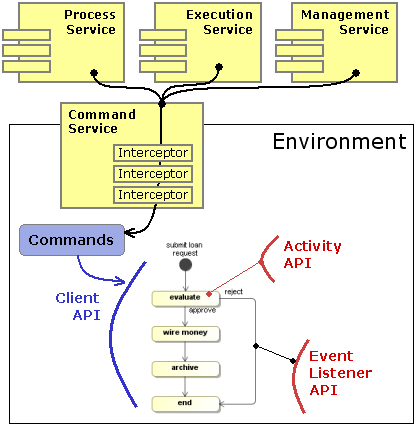
The services interfaces should be used from application code that wants to interact with the Process Virtual Machine which runs in transactional persistent mode, backed by a database. This is the most typical way how users interact with the PVM as a workflow engine.
To execute processes without persistence, the client API can be used to work with process and execution objects directly. The client API expose the methods of the core model objects.
The activity API is used to implement the runtime behaviour of activities. So a activity
type is in fact a component with at the core an implementation of the ActivityBehaviour
interface. ActivityBehaviour implementations can control the flow of execution.
The event listener API serves to write pieces of Java code that should be executed upon process events. It's very similar to the activity API with that exception that event listeners are not able to control the flow of execution.
The activity API allows to implement the runtime activity behaviour in Java.
public interface ActivityBehaviour extends Serializable {
  void execute(ActivityExecution execution) throws Exception;
}
An activity is the behaviour of the activity to which it is associated.
The provided execution is the execution that arrives in the activity.
The interface ActivityExecution exposes special
methods to control the execution flow.
public interface ActivityExecution extends OpenExecution {

  void waitForSignal();
  void take(String transitionName);
  void execute(String activityName);

  ...

}The event listener API allows for listeners to be developed in Java code and that are invoked on specific process events like entering a activity or leaving a activity. It is very similar to the activity API, but the difference is that the propagation of the execution flow cannot be controlled. E.g. when an execution is taking a transition, a listener to that event can be notified, but since the transition is already being taking, the execution flow cannot be changed by the event listeners.
public interface EventListener extends Serializable {

  void notify(EventListenerExecution execution) throws Exception;

}The client API is the interface that exposes the methods for managing executions on the plain process definition and execution objects directly.
At a minimal, the client API and the activity API are needed to create some a process definition with activities and execute it.
In the persistent execution mode, the first purpose of the environment is to enable processes to be executed in different transactional environments like standard Java, enterprise Java, SEAM and Spring.
The PVM code itself will only use transactional resources through self-defined interfaces. For example, the PVM itself has interfaces for some methods on the hibernate session, a async messaging session and a timer session.
The environment allows to configure the actual implementations, lazy initialization of the services on a request-basis and caching the service objects for the duration of the transaction.
An environment factory is static and one environment factory can serve all the threads in an application.
EnvironmentFactory environmentFactory = new PvmEnvironmentFactory("environment.cfg.xml");Environment blocks can surround persistent process operations like this:
Environment environment = environmentFactory.openEnvironment();
try {

  ... inside the environment block...

} finally {
  environment.close();
}
The PVM itself will fetch all it's transactional resources and configurations
from the environment. It's recommended that Activity implementations
do the same.
The org.jbpm.pvm.internal.cfg.JbpmConfiguration acts as Configuration,
ProcessEngine and EnvironmentFactory.
Commands encapsulate operations that are to be executed within an environment block. The main purpose for commands is to capture the logic of
public interface Command<T> extends Serializable {

  T execute(Environment environment) throws Exception;

}There are three main services: RepositoryService,
ExecutionService and ManagementService.
In general, services are session facades that expose methods for persistent
usage of the PVM. The next fragments show the essential methods as example
to illustrate those services.
The RepositoryService manages the repository of
process definitions.
public interface RepositoryService {

  Deployment createDeployment();

  ProcessDefinitionQuery createProcessDefinitionQuery();

  ...

}
The ExecutionService manages the runtime
executions.
public interface ExecutionService {

  ProcessInstance startProcessInstanceById(String processDefinitionId);

  ProcessInstance signalExecutionById(String executionId);

  ...

}
The ManagementService groups all management operations
that are needed to keep the system up and running.
public interface ManagementService {

  JobQuery createJobQuery();

  void executeJob(long jobDbid);

  ...

}
The implementation of all these methods is encapsulated in
Commands. And the three services all delegate the
execution of the commands to a CommandService:
public interface CommandService {

  <T> T execute(Command<T> command);

}
The CommandService is configured in the
environment. A chain of CommandServices can act as interceptors
around a command. This is the core mechanism on how persistence and
transactional support can be offered in a variety of environments.
The default configuration file jbpm.default.cfg.xml
includes following section that configures the services
<jbpm-configuration>

  <process-engine>

    <repository-service />
    <repository-cache />
    <execution-service />
    <history-service />
    <management-service />
    <identity-service />
    <task-service />
And the file jbpm.tx.hibernate.cfg.xml contains the
following command service configuration:
<jbpm-configuration>

  <process-engine-context>
    <command-service>
      <retry-interceptor />
      <environment-interceptor />
      <standard-transaction-interceptor />
    </command-service>
  </process-engine-context>

  ...
The services like e.g. repository-service, execution-service
and management-service will look up the configured
command-service by type. The command-service
tag corresponds to the default command service that essentially does nothing else
then just execute the command providing it the current environment.
The configured command-service results into the following
a chain of three interceptors followed by the default command executor.
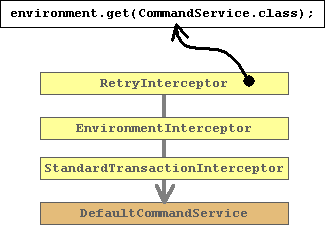
The retry interceptor is the first in the chain and that one that will be exposed as the
CommandService.class from the environment. So the retry interceptor
will be given to the respective services repository-service, execution-service
and management-service.
The retry-interceptor will catch hibernate StaleObjectExceptions
(indicating optimistic locking failures) and retry to execute the command.
The environment-interceptor will put an environment block
around the execution of the command.
The standard-transaction-interceptor will initialize a
StandardTransaction. The hibernate session/transaction will be
enlisted as a resource with this standard transaction.
Different configurations of this interceptor stack will also enable to
- delegate execution to a local ejb command service so that an container managed transaction is started.
- delegate to a remote ejb command service so that the command actually gets executed on a different JVM.
- package the command as an asynchronous message so that the command gets executed asynchronously in a different transaction.
This chapter explains the basics of process definitions, the features offered by the Process Virtual Machine and how activity implementations can be build. At the same time the client API is shown to execute processes with those activity implementations.
The PVM library doesn't have a fixed set of process constructs.
Instead, runtime behaviour of a activity is delegated to an ActivityBehaviour.
In other words, ActivityBehaviour is an interface to implement the runtime
behaviour of process constructs in plain Java.
public interface ActivityBehaviour extends Serializable {

  void execute(ActivityExecution execution) throws Exception;

}
When an activity behaviour is called, it is in full control of the further
propagation of the execution. In other words, an activity behaviour can decide what the execution
should do next. For example, it can take a transition with
execution.take(Transition) or go into a wait state with
execution.waitForSignal(). In case the activity behaviour does not invoke
any of the above execution propagation methods, the execution will
proceed in a default way.
We'll start with a very original hello world example. A Display activity will print a message to the console:
public class Display implements ActivityBehaviour {

  String message;

  public Display(String message) {
    this.message = message;
  }

  public void execute(ActivityExecution execution) {
    System.out.println(message);
  }
}
Let' build our first process definition with this activity:

TODO add ProcessBuilder example code
Now we can execute this process as follows:
Execution execution = processDefinition.startExecution();
The invocation of startExecution will print hello world to the console:
hello
world
One thing already worth noticing is that activities can be configured with properties. In the Display example, you can see that the message property is configured differently in the two usages. With configuration properties it becomes possible to write reusable activities. They can then be configured differently each time they are used in a process. That is an essential part of how process languages can be build on top of the Process Virtual Machine.
The other part that needs explanation is that this activity
implementation does not contain any instructions for the propagation of the
execution. When a new process instance is started, the execution is positioned
in the initial activity and that activity is executed. The method
Display.execute makes use of what is called implicit propagation
of execution. Concretely this means that the activity itself does not
invoke any of the methods on the execution to propagate it. In that case
implicit propagation kicks in. Implicit propagation will take the first
transition if there is one. If not, it will end the execution. This explains
why both activities a and b are executed and that
the execution stops after activity b is executed.
More details about the implicit proceed behaviour can be found in Section 8.2, “Implicit proceed behaviour”
External activities are activities for which the responsibility for proceeding the execution is transferred externally, meaning outside the process system. This means that for the system that is executing the process, it's a wait state. The execution will wait until an external trigger is given.
For dealing with external triggers, ExternalActivityBehaviour
adds one method to the ActivityBehaviour:
public interface ExternalActivity extends Activity {

  void signal(Execution execution,
              String signal,
              Map<String, Object> parameters) throws Exception;

}
Just like with plain activities, when an execution arrives in a activity, the
execute-method of the external activity behaviour is invoked.
In external activities, the execute method typically does something to
transfer the responsibility to another system and then enters a wait
state by invoking execution.waitForSignal(). For
example in the execute method, responsibility could be transferred to a
person by creating a task entry in a task management system and then
wait until the person completes the task.
In case a activity behaves as a wait state, then the execution will
wait in that activity until the execution's signal method
is invoked. The execution will delegate that signal to the ExternalActivityBehaviour
object associated to the current activity.
So the Activity's signal-method is invoked
when the execution receives an external trigger during the wait state. With the
signal method, responsibility is transferred back to the process execution. For
example, when a person completes a task, the task management system calls the
signal method on the execution.
A signal can optionally have a signal name and a map of parameters. Most common way on how activity behaviours interprete the signal and parameters is that the signal relates to the outgoing transition that needs to be taken and that the parameters are set as variables on the execution. But those are just examples, it is up to the activity to use the signal and the parameters as it pleases.
Here's a first example of a simple wait state implementation:
public class WaitState implements ExternalActivity {

  public void execute(ActivityExecution execution) {
    execution.waitForSignal();
  }

  public void signal(ActivityExecution execution,
                     String signalName,
                     Map<String, Object> parameters) {
    execution.take(signalName);
  }
}
The execute-method calls
execution.waitForSignal(). The invocation of
execution.waitForSignal() will bring the process execution
into a wait state until an external trigger is given.
signal-method takes the transition with
the signal parameter as the transition name. So when an execution receives an
external trigger, the signal name is interpreted as the name of an outgoing
transition and the execution will be propagated over that transition.
Here's the same simple process that has a transition from a to b. This time, the behaviour of the two activities will be WaitState's.
ClientProcessDefinition processDefinition = ProcessFactory.build()
    .activity("a").initial().behaviour(new WaitState())
      .transition().to("b")
    .activity("b").behaviour(new WaitState())
.done();
Let's start a new process instance for this process definition:
ClientExecution execution = processDefinition.startProcessInstance();
Starting this process will execute the WaitState activity
in activity a. WaitState.execute will invoke
ActivityExecution.waitForSignal. So when the
processDefinition.startProcessInstance() returns, the execution
will still be positioned in activity a.
assertEquals("a", execution.getActivityName());Then we provide the external trigger by calling the signal
method.
execution.signal();
The execution.signal() will delegate to the activity
of the current activity. So in this case that is the WaitState
activity in activity a. The WaitState.signal
will invoke the ActivityExecution.take(String transitionName).
Since we didn't supply a signalName, the first transition with name null
will be taken. The only transition we specified out of activity a
didn't get a name so that one will be taken. And that transition points to activity
b. When the execution arrives in activity b,
the WaitState in activity b is executed.
Similar as we saw above, the execution will wait in activity b
and this time the signal method will return, leaving the
execution positioned in activity b.
assertEquals("b", execution.getActivityName());In this next example, we'll combine automatic activities and wait states.
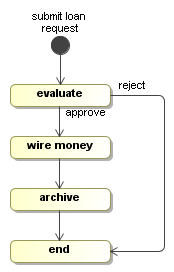
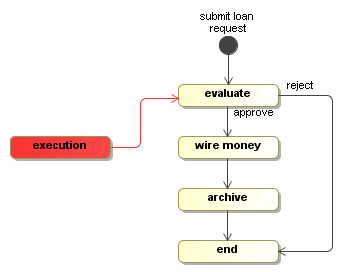
This example builds upon the loan approval process with the WaitState
and Display activities that we've just created. Graphically,
the loan process looks like this:
Building process graphs in Java code can be tedious because you have to keep track of all the references in local variables. To resolve that, the Process Virtual Machine comes with a ProcessFactory. The ProcessFactory is a kind of domain specific language (DSL) that is embedded in Java and eases the construction of process graphs. This pattern is also known as a fluent interface.
ClientProcessDefinition processDefinition = ProcessFactory.build("loan")
  .activity("submit loan request").initial().behaviour(new Display("loan request submitted"))
    .transition().to("evaluate")
  .activity("evaluate").behaviour(new WaitState())
    .transition("approve").to("wire money")
    .transition("reject").to("end")
  .activity("wire money").behaviour(new Display("wire the money"))
    .transition().to("archive")
  .activity("archive").behaviour(new WaitState())
    .transition().to("end")
  .activity("end").behaviour(new WaitState())
.done();
For more details about the ProcessFactory, see the
api docs. An alternative for
the ProcessFactory would be to create an XML language and an XML parser for expressing
processes. The XML parser can then instantiate the classes of package
org.jbpm.pvm.internal.model directly. That approach is typically taken by
process languages.
The initial activity submit loan request and the activity
wire the money are automatic activities. In this example,
the Display implementation of activity
wire the money uses the Java API's to just print a
message to the console. But the witty reader can imagine an alternative
Activity implementation that uses the Java API of a payment
processing library to make a real automatic payment.
A new execution for the process above can be started like this
ClientExecution execution = processDefinition.startProcessInstance();
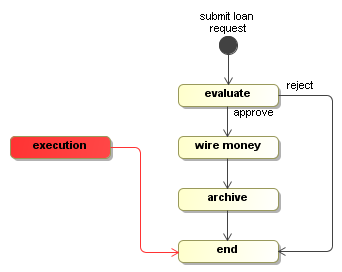
When the startExecution-method returns, the activity
submit loan request will be executed and the execution will be
positioned in the activity evaluate.
Now, the execution is at an interesting point. There are two transitions out of
the state evaluate. One transition is called approve
and one transition is called reject. As we explained above, the WaitState
implementation will take the transition that corresponds to the signal that is given.
Let's feed in the 'approve' signal like this:
execution.signal("approve");The approve signal will cause the execution to take the approve
transition and it will arrive in the activity wire money.
In activity wire money, the message will be printed to the console.
Since, the Display activity didn't invoke the
execution.waitForSignal(), nor any of the other execution propagation
methods, the implicit proceed behaviour will just make the execution continue
over the outgoing transition to activity archive, which is again
a WaitState.

So only when the archive wait state is reached,
the signal("approve") returns.
Another signal like this:
execution.signal("approve");will bring the execution eventually in the end state.
Events are points in the process definition to which a list of
EventListeners can be subscribed.
public interface EventListener extends Serializable {

  void notify(EventListenerExecution execution) throws Exception;

}
The motivation for events is to allow for developers to add programming logic to a process without changing the process diagram. This is a very valuable instrument in facilitating the collaboration between business analysts and developers. Business analysts are responsible for expressing the requirements. When they use a process graph to document those requirements, developers can take this diagram and make it executable. Events can be a very handy to insert technical details into a process (like e.g. some database insert) in which the business analyst is not interested.
Most common events are fired by the execution automatically:
TODO: explain events in userguide
Events are identified by the combination of a process element and an event name. Users and process languages can also fire events programmatically with the fire method on the Execution:
public interface Execution extends Serializable {
  ...
  void fire(String eventName, ProcessElement eventSource);
  ...
}
A list of EventListeners can be associated to an
event. But event listeners can not influence the control flow of the execution since
they are merely listeners to an execution which is already in progress. This is different from
activities that serve as the behaviour for activities. Activity behaviour activities are responsible
for propagating the execution.
We'll create a PrintLn event listener which is
very similar to the Display activity from above.
public class PrintLn implements EventListener {

  String message;

  public PrintLn(String message) {
    this.message = message;
  }

  public void notify(EventListenerExecution execution) throws Exception {
    System.out.println("message");
  }
}
Several PrintLn listeners will be subscribed to events in
the process.
ClientProcessDefinition processDefinition = ProcessFactory.build()
  .activity("a").initial().behaviour(new AutomaticActivity())
    .event("end")
      .listener(new PrintLn("leaving a"))
      .listener(new PrintLn("second message while leaving a"))
    .transition().to("b")
      .listener(new PrintLn("taking transition"))
  .activity("b").behaviour(new WaitState())
    .event("start")
      .listener(new PrintLn("entering b"))
.done();
The first event shows how to register multiple listeners to the same event. They will be notified in the order as they are specified.
Then, on the transition, there is only one type of event. So in that case, the event type must not be specified and the listeners can be added directly on the transition.
A listeners will be called each time an execution fires the event to which the listener is subscribed. The execution will be provided in the activity interface as a parameter and can be used by listeners except for the methods that control the propagation of execution.
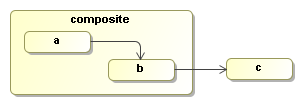
Events are by default propagated to enclosing process elements. The motivation
is to allow for listeners on process definitions or composite activities that get executed
for all events that occur within that process element. For example this feature
allows to register an event listener on a process definition or a composite activity on
end events. Such action will be executed if that activity is
left. And if that event listener is registered on a composite activity, it will also be executed
for all activities that are left within that composite activity.
To show this clearly, we'll create a DisplaySource event listener
that will print the message leaving and the source of the event
to the console.
public class DisplaySource implements EventListener {

  public void execute(EventListenerExecution execution) {
    System.out.println("leaving "+execution.getEventSource());
  }
}
Note that the purpose of event listeners is not to be visible, that's why the event listener
itself should not be displayed in the diagram. A DisplaySource event listener
will be added as a listener to the event end on the composite activity.
The next process shows how the DisplaySource event listener is registered
as a listener to to the 'end' event on the composite activity:
TODO update code snippet
Next we'll start an execution.
ClientExecution execution = processDefinition.startProcessInstance();
After starting a new execution, the execution will be in activity a as
that is the initial activity. No activities have been left so no message is logged. Next a signal
will be given to the execution, causing it to take the transition from a
to b.
execution.signal();
When the signal method returns, the execution will have taken the transition and
the end event will be fired on activity a. That
event will be propagated to the
composite activity and to the process definition. Since our DisplaySource
event listener is placed
on the composite activity, it will receive the event and print the following
message on the console:
leaving activity(a)
Another
execution.signal();
will take the transition from b to c. That will fire two activity-leave events. One on activity b and one on activity composite. So the following lines will be appended to the console output:
leaving activity(b)
leaving activity(composite)
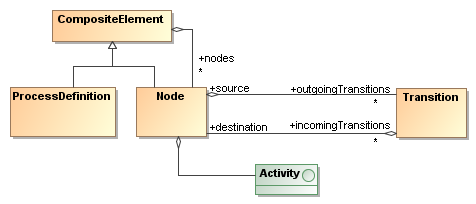
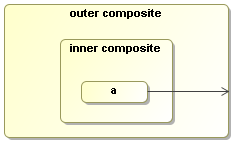
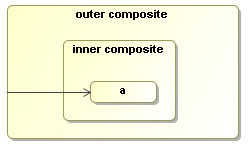
Event propagation is build on the hierarchical composition structure of the process definition. The top level element is always the process definition. The process definition contains a list of activities. Each activity can be a leaf activity or it can be a composite activity, which means that it contains a list of nested activities. Nested activities can be used for e.g. super states or composite activities in nested process languages like BPEL.
So the even model also works similarly for composite activities as it did for the process definition above. Suppose that 'Phase one' models a super state as in state machines. Then event propagation allows to subscribe to all events within that super state. The idea is that the hierarchical composition corresponds to diagram representation. If an element 'e' is drawn inside another element 'p', then p is the parent of e. A process definition has a set of top level activities. Every activity can have a set of nested activities. The parent of a transition is considered as the first common parent for it's source and destination.
If an event listener is not interested in propagated events, propagation can be disabled
with propagationDisabled() while building the process with the
ProcessFactory. The next process is the same process
as above except that propagated events will be disabled on the event listener. The graph diagram
remains the same.
Building the process with the process factory:
TODO update code snippet
So when the first signal is given for this process, again the end
event will be fired on activity a, but now the event listener on the composite
activity will not be executed cause
propagated events have been disabled. Disabling propagation is a property on the individual
event listener and doesn't influence the other listeners. The event will always be fired and
propagated over the whole parent hierarchy.
ClientExecution execution = processDefinition.startProcessInstance();
The first signal will take the process from a to
b. No messages will be printed to the console.
execution.signal();
Next, the second signal will take the transition from b to c.
execution.signal()
Again two end
events are fired just like above on activities b and composite
respectively. The first event
is the end event on activity b. That will be propagated
to the composite activity. So the event
listener will not be executed for this event cause it has propagation disabled. But the
event listener will be executed for the end event on the
composite activity. That is not
propagated, but fired directly on the composite activity. So the event
listener will now be executed
only once for the composite activity as shown in the following console output:
leaving activity(composite)
Above we already touched briefly on the two main process constructs: Activities, transitions and activity composition. This chapter explores in full all the possibilities of the process definition structures.
There are basically two forms of process languages: graph based and composite process languages. First of all, the process supports both. Even graph based execution and activity composition can be used in combination to implement something like UML super states. Furthermore, automatic functional activities can be implemented so that they can be used with transitions as well as with activity composition.
By separating the structure of a process from the behaviour of the activities, any process model can be formed in the PVM. It's up to the activity implementations to use this structure. Activities can also impose restrictions on the diagram structures they can support. Typically activities that control process concurrency will impose restrictions on the process model structures that they can support. Next we'll show a series of example diagram structures that can be formed with the PVM process model.

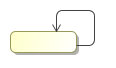

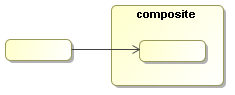
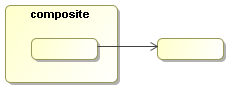
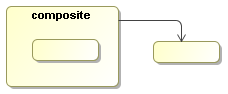
Figure 7.7. Transition of composite activities are inherited. The activity inside can take the transition of the composite activity.
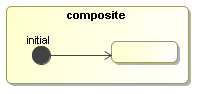
Activities can implement loops based on transitions or on activity composition. Loops can contain wait states.
To support high numbers of automatic loop executions, the Process Virtual Machine tranformed the propagation of execution from tail recursion to a while loop.
An ActivityBehaviour can
explicitely propagate the execution with following methods:
waitForSignal()take(Transition)end(*)execute(Activity)createExecution(*)
As a side note, some of these methods are not exposed in the interfaces, but only in the implementation. Those methods are still in 'incubation'. So if you want to use those, you can use them at your own risk by casting the ActivityExecution interface to the implementation class ExecutionImpl.
When ActivityBehaviour implementations used for activity behviour
don't call any of the following execution propagation methods, then, after
the activity is executed, the execution will apply the implicit proceed behaviour.
The implicit proceed behaviour is defined as follows:
- If the current activity has a default outgoing transition, take it.
- If the current activity has a parent activity, move back to the parent activity.
- Otherwise, end this execution.
Process languages can overwrite the implicit proceed behaviour
by overriding the proceed method in
ExecutionImpl.
ActivityBehaviours that also can be used as event listeners are called functional activities. Examples of automatic activities are sending an email, doing a database update, generating a pdf, calculating an average, etc. All of these are automatic activities that do not change the execution flow. Here's how such activities can be implemented:
public class FunctionalActivity implements ActivityBehaviour, EventListener {
    public void execute(ActivityExecution execution) {
      perform(execution);
    }
    public void notify(EventListenerExecution execution) {
      perform(execution);
    }
    void perform(OpenExecution execution) {
      ...do functional work...
    }
  }
The perform method takes an OpenExecution,
which is the supertype of both ActivityExecution and
EventListenerExecution. OpenExecution
does not allow any of the specific purpose methods, but still
the current state and the process definition can be inspected as well
as the variables, which contain the context information for the process
execution.
None of these methods actually invoke execution propagation methods. So after the perform method is completed, the execution will proceed in the default way.
This section explains how the Process Virtual Machine boroughs the thread from the client to bring an execution from one wait state to another.
When a client invokes a method (like e.g. the signal method) on an execution, by default, the Process Virtual Machine will use that thread to progress the execution until it reached a wait state. Once the next wait state has been reached, the method returns and the client gets the thread back. This is the default way for the Process Virtual Machine to operate. Two more levels of asynchonous execution complement this default behaviour: Asynchronous continuations and in the future we'll also provide a way to invoke service methods asynchronously.
TODO: update the example that is now commented
The benefits of using this paradigm is that the same process definition can be executed in client execution mode (in-memory without persistence) as well as in persistent execution mode, depending on the application and on the environment.
When executing a process in persistent mode, this is how you typically want to bind that process execution to transactions of the database:
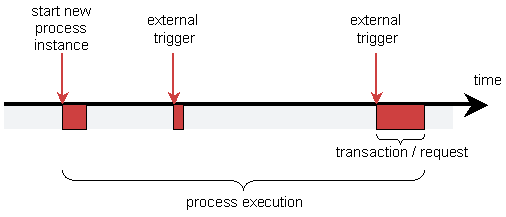
In most situations, the computational work that needs to be done as part of the process after an external trigger (the red pieces) is pretty minimal. Typically transactions combining the process execution and processing the request from the UI takes typically less then a second. Whereas the wait state in business processes typically can span for hours, days or even years. The clue is to clearly distinct when a wait state starts so that only the computational work done before the start of that wait state should be included in the transaction.
Think of it this way: "When an approval arrives, what are all the automated processing that needs to be done before the process system needs to wait for another external trigger?" Unless pdf's need to be generated or mass emails need to be send, the amount of time that this takes is usually neglectable. That is why in the default persistent execution mode, the process work is executed in the thread of the client.
This reasoning even holds in case of concurrent paths of execution. When a single path of execution splits into concurrent paths of execution, the process overhead of calculating that is neglectable. So that is why it makes sense for a fork or split activity implementation that targets persistent execution mode to spawn the concurrent paths sequentially in the same thread. Basically it's all just computational work as part of the same transaction. This can only be done because the fork/split knows that each concurrent path of execution will return whenever a wait state is encountered.
Since this is a difficult concept to grasp, I'll explain it again with other words. Look at it from the overhead that is produced by the process execution itself in persistent execution mode. If in a transaction, an execution is given an external trigger and that causes the execution to split into multiple concurrent paths of execution. Then the process overhead of calculating this is neglectable. Also the overhead of the generated SQL is neglectable. And since all the work done in the concurrent branches must be done inside that single transaction, there is typically no point in having fork/split implementations spawn the concurrent paths of execution in multiple threads.
To make executable processes, developers need to know exactly what the automatic activities are, what the wait states are and which threads will be allocated to the process execution. For business analysts that draw the analysis process, things are a bit simpler. For the activities they draw, they usually know whether it's a human or a system that is responsible. But they typically don't not how this translates to threads and transactions.
So for the developer, the first job is to analyse what needs to be executed within the thread of control of the process and what is outside. Looking for the external triggers can be a good start to find the wait states in a process, just like verbs and nouns can be the rule of thumb in building UML class diagrams.
To model process concurrency, there is a parent-child tree structure on the execution. The idea is that the main path of execution is the root of that tree. The main path of execution is also called the process instance. It is the execution that is created when starting or creating a new process instance for a given process definition.
Now, because the main path of execution is the same object as the process instance, this keeps the usage simple in case of simple processes without concurrency.
To establish multiple concurrent paths of execution, activity implementations
like a fork or split can create child executions with method
ActivityExecution.createExecution. Activity implementations
like join or merge can stop these concurrent paths of execution by calling
method stop on the concurrent execution.
Only leaf executions can be active. Non-leave executions should be inactive. This tree structure of executions doesn't enforce a particular type of concurrency or join behaviour. It's up to the forks or and-splits and to the joins or and-merges to use the execution tree structure in any way they want to define the wanted concurrency behaviour. Here you see an example of concurrent executions.
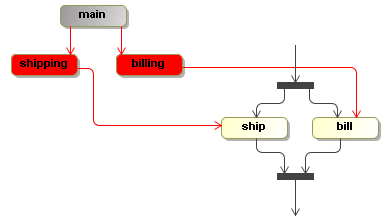
There is a billing and a shipping path of execution. In this case, the
flat bar activities represent activities that fork and join. The execution shows a three
executions. The main path of execution is inactive (represented as gray) and the
billing and shipping paths of execution are active and point to the activity
bill and ship respectively.
It's up to the activity behaviour implementations how they want to use this execution structure. Suppose that multiple tasks have to be completed before the execution is to proceed. The activity behaviour can spawn a series of child executions for this. Or alternatively, the task component could support task groups that are associated to one single execution. In that case, the task component becomes responsible for synchronizing the tasks, thereby moving this responsibility outside the scope of the execution tree structure.
In all the code that is associated to a process
like Activitys, EventListeners and
Conditions, it's possible to associate exception handlers. This
can be thought of as including try-catch blocks in
the method implementations of those implementations. But in order to build more reusable building
blocks for both the delegation classes and the exception handling logic, exception handlers are
added to the core process model.
An exception handler can be associated to any process element. When an exception occurs in a delegation class, a matching exception handler will be searched for. If such an exception handler is found, it will get a chance to handle the exception.
If an exception handler completes without problems, then the exception is considered handled and the execution resumes right after the delegation code that was called. For example, a transition has three actions and the second action throws an exception that is handled by an exception handler, then
Writing automatic activities that are exception handler aware is easy. The
default is to proceed anyway. No method needs to be called on the execution. So
if an automatic activity throws an exception that is handled by an exception handler,
the execution will just proceed after that activity. It becomes a big more difficult
for control flow activities. They might have to include try-finally blocks to
invoke the proper methods on the execution before an exception handler gets a
chance to handle the exception. For example, if an activity is a wait state and
an exception occurs, then there is a risk that the thread jumps over the
invocation of execution.waitForSignal(), causing the execution
to proceed after the activity.
TODO: exceptionhandler.isRethrowMasked
TODO: transactional exception handlers
TODO: we never catch errors
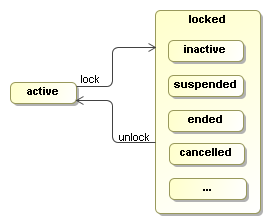
The state of an execution is either active or locked. An active
execution is either executing or waiting for an external trigger. If an
execution is not in STATE_ACTIVE, then it is locked.
A locked execution is read only and cannot receive any external triggers.
When a new execution is created, it is in STATE_ACTIVE. To change the state to a locked state, use lock(String). Some STATE_* constants are provided that represent the most commonly used locked states. But the state '...' in the picture indicates that any string can be provided as the state in the lock method.
If an execution is locked, methods that change the execution will throw a PvmException and the message will reference the actual locking state. Firing events, updating variables, updating priority and adding comments are not considered to change an execution. Also creation and removal of child executions are unchecked, which means that those methods can be invoked by external API clients and activity behaviour methods, even while the execution is in a locked state.
Make sure that comparisons between getState() and the STATE_* constants are done with .equals and not with '==' because if executions are loaded from persistent storage, a new string is created instead of the constants.
An execution implementation will be locked:
- When it is ended
- When it is suspended
- During asynchronous continuations
Furthermore, locking can be used by Activity implementations to make executions read only during wait states hen responsibility for the execution is transferred to an external entity such as:
- A human task
- A service invocation
- A wait state that ends when a scanner detects that a file appears
In these situations the strategy is that the external entity should get full control over the execution because it wants to control what is allowed and what not. To get that control, they lock the execution so that all interactions have to go through the external entity.
One of the main reasons to create external entities is that they can live on after the execution has already proceeded. For example, in case of a service invocation, a timer could cause the execution to take the timeout transition. When the response arrives after the timeout, the service invocation entity should make sure it doesn't signal the execution. So the service invocation can be seen as a activity instance (aka activity instance) and is unique for every execution of the activity.
External entities themselves are responsible for managing the execution lock. If the timers and client applications are consequent in addressing the external entities instead of the execution directly, then locking is in theory unnecessary. It's up to the activity behaviour implementations whether they want to take the overhead of locking and unlocking.
The userguide explains how to install jBPM into the most common runtime environments. That is the most simple and convenient way to get started with jBPM. Please use those instructions. These docs provide some background information for developers that want to understand more about the way how configurations are handled. Use at your own risk :-)
The jbpm.jar contains a number of default configuration files that can be imported by the user configuration file.
This way, it's easy to include or exclude features for users. And also the configuration details are kept in the implementation so users that only import those configuration files will not be affected when we release changes in those configuration files.
Configuration files that can be imported by the user's jbpm.cfg.xml:
- jbpm.businesscalendar.cfg.xml
- jbpm.default.cfg.xml
- jbpm.identity.cfg.xml
- jbpm.jbossremote.cfg.xml
- jbpm.jobexecutor.cfg.xml
- jbpm.tx.hibernate.cfg.xml
- jbpm.tx.jta.cfg.xml
jbpm.default.cfg.xml: Contains the default configurations
like the services, the hibernate configuration (configured from resource jbpm.hibernate.cfg.xml),
hibernate session factory, business calendar and so on.
A typical configuration for standard java would look like this:
<?xml version="1.0" encoding="UTF-8"?>

  <jbpm-configuration>

    <import resource="jbpm.default.cfg.xml" />
    <import resource="jbpm.businesscalendar.cfg.xml" />
    <import resource="jbpm.tx.hibernate.cfg.xml" />
    <import resource="jbpm.jpdl.cfg.xml" />
    <import resource="jbpm.identity.cfg.xml" />
    <import resource="jbpm.jobexecutor.cfg.xml" />

  </jbpm-configuration>
When you want to change the configuration, first consider to change an import with one of the other provided importable configuration files.
For example, in a JTA environment, replace the import of
jbpm.tx.hibernate.cfg.xml
with jbpm.tx.jta.cfg.xml
The second way to define a more customized configuration is to
specify configuration items directly into the jbpm.cfg.xml.
For an example, see Section 9.3, “Customizing the identity component” below.
The more you customize, the more likely you are doing things we didn't
anticipate.
The jbpm.jar contains also following hibernate mapping configuration files:
jbpm.execution.hbm.xml
  jbpm.history.hbm.xml
  jbpm.identity.hbm.xml
  jbpm.repository.hbm.xml
  jbpm.task.hbm.xml
These all map the java domain model objects to a relational database.
Other various configuration files that are included in jbpm.jar:
jbpm.task.lifecycle.xml
  jbpm.variable.types.xml
  jbpm.wire.bindings.xml
  jbpm.jpdl.activities.xml
  jbpm.jpdl.eventlisteners.xml
Normally it is not necessary to dive into the parsing itself. It's most a matter of figuring out how to specify the configuration that you want :-) But just in case: To get started on the parsing for the configuration files, see
- class org.jbpm.pvm.internal.env.JbpmConfigurationParser
- resource modules/pvm/src/main/resources/jbpm.wire.bindings.xml
- package modules/pvm/src/main/java/org/jbpm/pvm/internal/wire/binding
For specifying a different configuration for the default business calendar implementation, see the userguide.
To provide a custom implementation for the business calendar, specify a custom business calendar implementation like this in the jbpm.cfg.xml
<jbpm-configuration>

  <import resource="jbpm.default.cfg.xml" />
  ...

  <process-engine-context>
    <object class="org.jbpm.test.custombusinesscalendarimpl.CustomBusinessCalendar" />
  </process-engine-context>

</jbpm-configuration>
Here's an example implementation
public class CustomBusinessCalendar implements BusinessCalendar {

  public Date add(Date date, String duration) {
    if ("my next birthday".equals(duration)) {
      GregorianCalendar gregorianCalendar = new GregorianCalendar();
      gregorianCalendar.set(Calendar.MONTH, Calendar.JULY);
      gregorianCalendar.set(Calendar.DAY_OF_MONTH, 21);
      return gregorianCalendar.getTime();
    }
    return null;
  }
}There are 2 identity components that we support out of the box:
- jBPM's built-in identity component: ships with the jBPM project distro
- JBoss IDM: ships in the JBoss product platforms
The jboss/build.xml installation scripts can be used
to install jBPM in JBoss using the JBoss IDM component. There is some
property in that build file to overwrite the default built-in identity component
with the value for the JBoss IDM component.
If you want to plug in your own identity component, remove the
following line in the jbpm.cfg.xml:
<import resource="jbpm.identity.cfg.xml" />
And in the same file, add following section
<transaction-context>
  <object class="your.package.YourIdentitySessionImpl" />
</transaction-context>
YourIdentitySessionImpl should implement org.jbpm.pvm.internal.identity.spi.IdentitySession
Making this identity pluggable is not our first target, but it was taken into the design. Let us know how it goes.
Currently jBPM's persistence is based on hibernate. But in the future we might switch to JPA. That is why we recommend to stick with the API as much as possible as the API will hide you from those changes.
Here's the jBPM database schema in an ER diagram. Thanks to MySQL Workbench>.
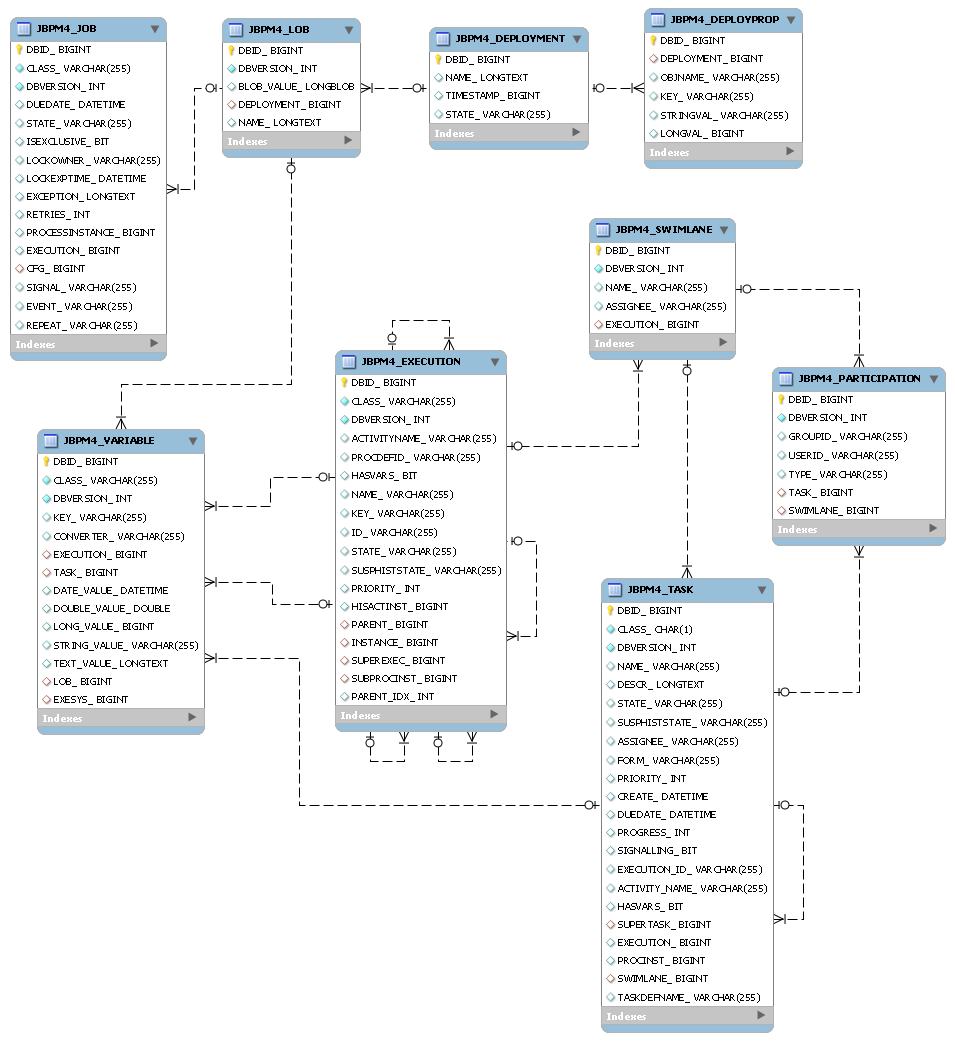

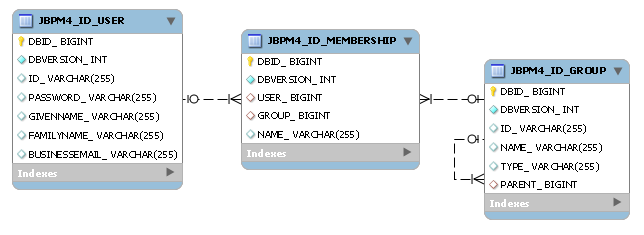
For jPDL features like asynchronous continuations and timers, jBPM relies on transactional asynchronous messaging and timers. Those are not available on the standard Java platform. Therefore, jBPM includes the JobExecutor component, which executes asynchronous messages and timers in any (potentially clustered) environment.
By default, when calling a jBPM service operation (eg. TaskService, ExecutionService, etc.), the jBPM logic is executed on the same thread as where the call came from. In most cases, this is sufficient since most steps in a process don't take much time. This means that signalling a process instance from one wait state to another, passing by several other steps in the business process, can be done in one transaction.
However, in some occasions business processes can be made more efficient by introducing asynchronous continuations. By marking an activity as asynchronous, the jBPM engine will take care that the logic encapsulated in the activity isn't executed on the thread of the caller, but on a separate dedicated thread. The same mechanism is used for timers and asynchronous mailing (which means mails will be sent later, in a separate thread). The following picture shows which components come into play when using this mechanism.
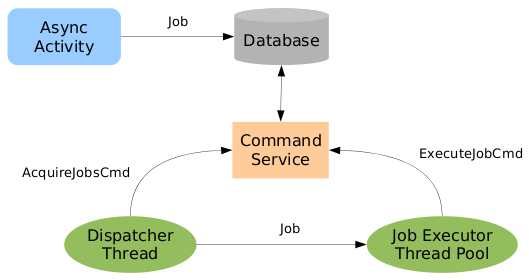
When using timers or asynchronous continuations in a business process, the jBPM engine will store a 'job' into the database (a job contains mainly a duedate and continuation logic). Do note that this mechanism is pluggable, which means that in the future other destinations could be used (JMS, JCR, etc).
Now the JobExecutor comes in to play, which is in fact a manager for several subcomponents:
- A shared BlockingQueue, which is used to temporary store job identifiers of jobs which are executable (e.g. due date is passed).
- Every JobExecutor has one DispatcherThread. This thread will query the database for 'acquirable jobs' (e.g. timers which due date is passed), using a dedicated command through the CommandService. Since the dispatcher uses the CommandService, the command is automatically made transactional and wrapped by the configured interceptors. As long as jobs are available the dispatcher will put job identifiers on the shared queue, until the queue is either full (the thread will automatically be blocked by the JVM until a slot is free) or until no new jobs can be found in the database. If the latter case, the dispatcher will wait for a configured time (ie the 'idle time').
- The JobExecutor also maintains a pool of job executor threads. The number of executor threads can be configured and influences the size of the shared queue used to transfer and hold submitted jobs. Each executor thread will take a job from the queue. The shared queue blocks the executor threads until a job is queued. The new job will be acquired by exactly one waiting executor thread. After taking a job from the queue, the job is transactionally executed using a dedicated command through the CommandService. Therefore, the job will be executed completely on the executor thread instead of the caller thread. In consequence, the order in which the jobs are executed is unknown since there are multiple competing executor threads. However, it is certain that only one job will be done per transaction, except for exclusive jobs. In this case, all exclusive jobs are sequentially executed.
Enabling the jobExecutor is very easy by adding the following line to the jbpm.cfg.xml file (using default settings):
<import resource="jbpm.jobexecutor.cfg.xml" />
Additional attributes can be set to fine-tune the JobExecutor:
- threads: defines the number of JobexecutorThreads (default 3 threads)
- idle: number of milliseconds the dispatcher component waits after no new jobs were found in the database (default 5 seconds)
- idle-max: each time an exception occurs, the idle period will be doubled until the 'idle-max' is reached (back-off mechanism used to avoid a constant load on a failing database)
- lock-millis: Number of milliseconds that a job will be locked after being acquired by the dispatcher. This prevents starvation in case one of more JobExecutorThreads would die (eg when used in a cluster).
		<process-engine-context>

		    <job-executor threads="4" idle="15000" idle-max="60000" lock-millis="3600000" />

		</process-engine-context>
jBPM 4 takes advantage of the JavaMail API to make high-level email services available to business process authors.
Producers are responsible for creating email messages within jBPM. All mail producers
implement the org.jbpm.pvm.internal.email.spi.MailProducer interface.
A default mail producer is available out of the box to address typical email needs.
The default mail producer is capable of creating email messages with text, HTML and attachments from a template. Templates can be provided inline or in the process-engine-context section of the jBPM configuration. Templates may contain expressions which are evaluated through the script manager.
The following listing presents a mail activity with an inline template.
<mail name="rectify" language="juel">                             (1)
  <from addresses='winston@minitrue' />                           (2)
  <to addresses='julia@minitrue, obrien@miniluv'/>                (3)
  <cc users='bigbrother'/>
  <bcc groups='thinkpol, innerparty'/>
  <subject>Part ${part} Chapter ${chapter}</subject>              (4)
  <text>times ${date} reporting bb dayorder doubleplusungood      (5)
    refs ${unpersons} rewrite fullwise upsub antefiling</text>
  <html><table><tr><td>times</td><td>${date}</td>                 (6)
    <td>reporting bb dayorder doubleplusungood
    refs ${unpersons} rewrite fullwise upsub antefiling</td>
    </tr></table></html>
  <attachments>                                                   (7)
    <attachment url='http://www.george-orwell.org/1984/3.html'/>
    <attachment resource='org/example/pic.jpg'/>
    <attachment file='${user.home}/.face'/>
  </attachments>
</mail>
Expressions within the template are written in the scripting language indicated here. If not specified, the default expression language will be assumed.
List of message senders. Senders are either identified directly by their email addresses or appointed by means of the identity model.
Lists of message recipients, categorized as follows: To (primary), CC (carbon copy) and BCC (blind carbon copy). Like senders, recipients are directly identified by their email addresses or appointed by means of the identity model.
Character data contained in element
subjectare used as the message subject.Character data contained in element
textare used as the plain text content of the message.Nodes contained in element
htmlare used as the HTML content of the message.Attachments can be specified as absolute URLs, classpath resources or local files.
Note that every section of the template is amenable to expression evaluation.
For complex emails or custom generation of attachments, see: Extension Points: Custom Emails.
Mail templates are available to externalize commonly used messages from process definitions. Templates are placed in the process-engine-context section of your configuration file. All elements available to inline templates, as described in the previous section are available to external templates. Consider the fragment below.
<jbpm-configuration>
<process-engine-context>
  <mail-template name="rectify-template">
    <!-- same elements as inline template -->
  </mail-template>
</process-engine-context>
</jbpm-configuration>
Each template must have an unique name. Mail activities may reference the template
through the template attribute, as follows.
<mail name="rectify" template="rectify-template />
Mail servers are declared in the configuration file. The mail-server
element describes an SMTP mail server capable of sending email messages.
Because jBPM uses JavaMail to send mail, all properties supported by JavaMail are also
exposed to jBPM. Within the session-properties child element,
the SMTP properties must be provided as shown in the example below.
See the Sun JavaMail API for more information on supported properties: Sun SMTP Properties.
<jbpm-configuration>
<transaction-context>
  <mail-session>
    <mail-server>
      <session-properties>
        <property name="mail.smtp.host" value="localhost" />
        <property name="mail.smtp.port" value="2525" />
        <property name="mail.from" value="[email protected]" />
      </session-properties>
    </mail-server>
  </mail-session>
</transaction-context>
</jbpm-configuration>
If the "From" attribute is not present in an outgoing message, the value of the
mail.from property will be used instead.
Multiple SMTP server support has been added to jBPM 4 to accommodate a wider variety of organizational server structures. For example, this is useful for companies that have both internal and external SMTP servers.
To setup multiple SMTP mail servers, declare multiple mail servers within the
configuration file, as described below. The tag address-filter exists
to define which domains are serviced by each mail server. The address filter consists
of regular expressions that determine whether an address will be processed by a given
server.
See the Sun Pattern API for more information on supported regular expressions: Sun Regex Patterns.
<jbpm-configuration>
<transaction-context>
  <mail-session>
    <mail-server>
      <address-filter>
        <include>[email protected]</include>
      </address-filter>
      <session-properties>
        <property name="mail.smtp.host" value="int.smtp.jbpm.org" />
        <property name="mail.from" value="[email protected]" />
      </session-properties>
    </mail-server>
    <mail-server>
      <address-filter>
        <exclude>[email protected]</exclude>
      </address-filter>
      <session-properties>
        <property name="mail.smtp.host" value="ext.smtp.jbpm.org" />
        <property name="mail.from" value="[email protected]" />
      </session-properties>
    </mail-server>
  </mail-session>
</transaction-context>
</jbpm-configuration>
Address filters follow the logic below to accept an address.
Address is accepted if it is included and not excluded.
Absence of includes implies the address is included.
Absence of excludes implies the address is not excluded.
jBPM 4 allows the creation of your own Mail Producers to address an organization's
specific email needs. To do so, users must implement the
org.jbpm.pvm.internal.email.spi.MailProducer interface. The method
produce will return one or more Message objects,
which will be sent through the MailSession.
Generation of custom attachments at runtime can be easily implemented in jBPM 4.
By extending the default mail producer, or implementing your own with the
MailProducer interface, attachments can be generated and
added to email messages at runtime.
The following is an example of how to extend MailProducerImpl
to add an extra attachment to every outgoing mail.
public class CustomMailProducer extends MailProducerImpl {

  protected void addAttachments(Execution execution, Multipart multipart) {
    // have default mail producer create attachments from template
    super.addAttachments(execution, multipart);

    // create a body part to carry the content
    BodyPart attachmentPart = new MimeBodyPart();

    // set content provided by an arbitrary data handler
    attachmentPart.setDataHandler(...);

    // attach content
    multipart.addBodyPart(attachmentPart);
  }
}PVM can use JDK logging (java.util.logging) or log4j. When the first message is logged, PVM logging will make the selection with following procedure:
- If a
logging.propertiesresource is found on the classpath (using the context classloader), then JDK logging will be used and that file will be used to initialize the JDK logging. - If log4j is found on the classpath, then log4j will be used.
The check for log4j will be done by checking availability of class
org.apache.log4j.LogManagerwith the context classloader. - If none of the above, JDK logging will be used.
The PVM classes use their class name as the category for the logger.
To have a basic understanding of what the PVM classes are doing,
turning on the debug level is great. Level
trace might be spitting out too much for that
purpose.
In JDK logging, debugmaps to fine
and trace maps to finest.
Level finer is not used.
org.jbpm.pvm.internal.log.LogFormatter is part of
the pvm library and it can create a nice one-line output for log messages.
It also has a neat feature that creates a unique indentation per thread.
To configure it, this is a typical logging.properties
handlers = java.util.logging.ConsoleHandler
java.util.logging.ConsoleHandler.level = FINEST
java.util.logging.ConsoleHandler.formatter = org.jbpm.pvm.internal.log.LogFormatter

# For example, set the com.xyz.foo logger to only log SEVERE messages:
# com.xyz.foo.level = SEVERE

.level = SEVERE
org.jbpm.level=FINE
org.jbpm.tx.level=FINE
org.jbpm.pvm.internal.wire.level=FINE
When testing the persistence, following logging configurations can be
valuable. Category org.hibernate.SQL shows the SQL statement that is executed
and category org.hibernate.type shows the values of the parameters that are
set in the queries.
org.hibernate.SQL.level=FINEST
org.hibernate.type.level=FINEST
And in case you get a failed batch as a cause in a hibernate exception, you might want to set the batch size to 0 like this in the hibernate properties:
hibernate.jdbc.batch_size = 0
Also in the hibernate properties, the following properties allow for detailed logs of the SQL that hibernate spits out:
hibernate.show_sql = true
hibernate.format_sql = true
hibernate.use_sql_comments = true
History information is the information that will be maintained in the database for querying purposes. This information is kept in the database after the process or task has ended. But it is always up to date with the runtime information. History information is updated inside of the runtime transaction.
We maintain history information on 4 entities: process instance, activity instance task and variable. Each entity has a list of details associated to it. Preferably use the history queries to access this information through the API.
HistoryEvents are fired during process execution and dispatched to the configured HistorySession. (see HistoryEvent.fire) All the HistoryEvents are delegated to a HistorySession. The default HistorySessionImpl will invoke the process() method on the history events themselves.
The HistoryEvents are temporary events. In the process method, they build up the information in the history model. There is a HistoryProcessInstance and there is a whole class hierarchy starting with HistoryActivityInstance.
In the HistoryEvent.process methods, the history events create model entities or merge information into the history entities. For instance, a ProcessInstanceCreate history event will create a HistoryProcessInstance entity/record. And the ProcessInstanceEnd will set the endTime property in the existing HistoryProcessInstance entity/record.
Similar pattern for the activities. But for automatic activities, there is an optimisation so that only 1 event is created and all the information is stored in one single insert (as all this happens inside 1 transaction).
jBPM provides integration with JBoss 4.2.x and JBoss 5.0.0.GA. As part of the installation, the ProcessEngine and a deployer for jBPM archives will be installed as a JBoss service.
After a successful installation you should see that the ProcessEngine has been started and bound to JNDI:
    [...]
    14:12:09,301 INFO  [JBPMService] jBPM 4 - Integration JBoss 4
    14:12:09,301 INFO  [JBPMService] 4.0.0.Beta1
    14:12:09,301 INFO  [JBPMService] ProcessEngine bound to: java:/ProcessEngine
When jBPM is deployed on a JBoss instance, process deployments are treated like any other deployment artifact (i.e. *.war, *.ear) and processed by the JBPMDeployer. In order to deploy a process archive simply create a *.jpdl archive (zip file) that contains the process definition (*.jpdl.xml) and all required resources to execute the process (i.e. classes, property files):
      Bonanova:Desktop hbraun$ jar -tf OrderProcess.jpdl

      META-INF/MANIFEST.MF
      OrderProcess.jpdl.xml
      org/mycompany/order/*.class
In order to deploy a process archive simply copy it to $JBOSS_HOME/server/<config>/deploy:
      (1) cp OrderProcess.jpdl $JBOSS_HOME/server/default/deploy

      (2) less $JBOSS_HOME/server/default/log
      [...]
      2009-04-08 14:12:21,947 INFO  [org.jbpm.integration.jboss4.JBPMDeployer]
      Deploy file:/Users/hbraun/dev/prj/jboss/tags/JBoss_4_2_2_GA
      /build/output/jboss-4.2.2.GA/server/default/deploy/OrderProcess.jpdl
In order to remove a process simply remove the process archive from the deploy directory.
TBD: A prelimenary explanation cn be found here
As described above the ProcessEngine will be installed as JBoss service and bound to JNDI. This means that any EE component (i.e. servlet, ejb) can access it doing a JNDI lookup:
    private ProcessEngine processEngine;
    [...]

    try
    {
      InitialContext ctx = new InitialContext();
      this.processEngine = (ProcessEngine)ctx.lookup("java:/ProcessEngine");
    }
    catch (Exception e)
    {
      throw new RuntimeException("Failed to lookup process engine");
    }
Once you obtained an instance of the ProcessEngine you can invoke on it as described in chapter services
    UserTransaction tx = (UserTransaction)ctx.lookup("UserTransaction");        (1)
    Environment env = ((EnvironmentFactory)processEngine).openEnvironment();

    try
    {

      ExecutionService execService = (ExecutionService)
              this.processEngine.get(ExecutionService.class);

      // begin transaction
      tx.begin();

      // invoke on process engine
      executionService.signalExecutionById("ICL.82436");

      // commit transaction
      tx.commit();

    }
    catch (Exception e)
    {
      if(tx!=null)
      {
        try
        {
          tx.rollback();
        }
        catch (SystemException e1) {}
      }

      throw new RuntimeException("...", e);

    }
    finally
    {
      env.close();
    }
(1) Wrapping the call in a UserTransaction is not necessary if the invocation comes a CMT component, i.e. an EJB.
The embeddability of the jBPM engine in different environments has always been one of its core strengths, but often extra libraries to do the integration were required. Since jBPM4 however, it is now possible to natively integrate jBPM with Spring. This section will explain which steps are required for such an integration.
The Spring integration has started out as a community effort by Andries Inzé. Do note that Spring integration currently is in 'incubation', before it is moved to the user guide.
The default jBPM behaviour is to open a transaction for each operation that is called on the service API. In a typical Spring setup, applications are accessed from the web tier and enter a transactional boundary by invoking operations on service beans. These service beans will then access the jBPM services. All these operations run typically in a single transaction (ie one transaction per request from the browser), which invalidates the standard jBPM transaction handling approach. Instead of starting and committing a transaction for every service operation, the existing transaction should be used (or a new one started if none exists).
Replace the standard-transaction-interceptor with the spring-transaction-interceptor. The hibernate session needs the attribute current=”true”. Also, the <transaction/> must be removed from the transaction-context if you want the transactions to be handled by Spring only. This forces jBPM to search for the current session, which will be provided by Spring.
	<process-engine-context>
	    <command-service>
	      <spring-transaction-interceptor />
	      ...
	    </command-service>
	    ...
	</process-engine-context>
	<transaction-context>
	    ...
		<hibernate-session current="true"/>
	</transaction-context>
The Spring integration provides a special context, which is added to the set of context where the jBPM engine will look for beans. Using this SpringContext, it is now possible to retrieve beans from the Spring Application Context. For the Spring context to be known, a SpringConfiguration must be created. This class extends the JbpmConfiguration but will add itself as a context. The single constructor take the location of the jBPM configuration.
	<bean id="jbpmConfiguration" class="org.jbpm.pvm.internal.cfg.SpringConfiguration">
   		<constructor-arg value="be/inze/spring/demo/jbpm.cfg.xml" />
	</bean>
The jBPM services can also be defined in the Spring applicationContext, as following:
<bean id="processEngine" factory-bean="jbpmConfiguration" factory-method="buildProcessEngine" />
<bean id="repositoryService" factory-bean="processEngine" factory-method="getRepositoryService" />
<bean id="executionService" factory-bean="processEngine" factory-method="getExecutionService" />
The previous section already showed how the jBPM services can be made accessible for other Spring services. The other use case is calling Spring beans from within a process. This can be done by using an expression which resolves to the name of a Spring bean.
<java name="echo" expr="#{echoService}" method="sayHello" >
    <transition name="to accept" to="join1"/>
 </java>
The scripting engine will look into all contexts from the bean named echoService. If you configured the ScriptManager as above, Spring will be the last context to search for. You can also add a Spring bean to the Spring Application context (eg IdentitySessionImpl with id identitySession) and use it in the jBPM config (eg by adding <env class="identitySession" />)
Use the AbstractTransactionalJbpmTestCase to test a process in isolation (ie without impact on the database). This class extends from the AbstractTransactionalDataSourceSpringContextTests class, which means that testing a process comes down to exactly the same approach as testing a DAO.