NetBeans Module Quick Start Tutorial
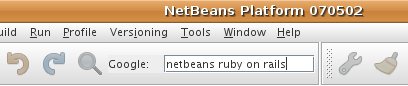
This document demonstrates how to create a module that adds a Google Search toolbar to the IDE or to
any other application based on the NetBeans Platform. It will
look as follows:
To do so, you
use the NetBeans APIs to enhance
the application's feature set. Specifically, you create an action that is invoked by
a button in the toolbar. You then create a Swing JPanel containing a JLabel
and JTextField as GUI components.
Finally, you override the action's
getToolbarPresenter()
method to return the JPanel so that it displays in the toolbar, instead of the button.
When the module is installed, the user types a search string in the JTextField and presses
Enter, at which point the
URLDisplayer class
is used to send the string to the IDE's default browser. The browser opens and displays the Googled results
of the user's search string.
Contents
For more information on working with modules, see
NetBeans Module and Rich Client Application Development on the NetBeans website. If you have
questions, visit the NetBeans
Developer FAQ or use the feedback link at the bottom of this document.
Installing the Software
Before you begin, you need to install the following software on your computer:
- NetBeans IDE 6.0
- Java SE Development Kit (JDK™) version 5.0 or higher
Installing the Sample
To see the end result of this tutorial, install the sample module and test the Google toolbar in the IDE:
- Download and unzip the attached
file.
- In the IDE, choose File > Open Project (Ctrl+Shift+O) and browse to the location
of the unzipped file. Select the module project and click Open Project Folder.
The module project opens in the IDE and you should see the following in the Projects window (expand
nodes as necessary):

- Right-click the project node and choose Install/Reload in Target Platform. By default, the target
platform is the IDE in which you are developing your module project. The target platform opens
and the module is installed.
- Verify that the module is correctly installed by testing its functionality as described below in
Using the Module.
Now that you know what the end result looks like, you can create the module from scratch and learn about
each part while creating it.
Setting up the Module Project
When developing the module, you have to make sure the structure of your project is set up correctly.
NetBeans IDE provides a Module Project wizard that sets up all of the basic files required for a module.
- Choose File > New Project (Ctrl+Shift+N). Under Categories, select NetBeans Plug-in Modules.
Under Projects, select Module Project. Click Next.
- In the Name and Location panel, type GoogleToolbar in the Project Name field.
Change the Project Location to any directory on your computer. Leave the Standalone Module option
and Set as Main Project checkbox selected. Click Next.
- In the Basic Module Configuration panel, replace yourorghere in Code Name Base with
myorg, so that the whole code name base is org.myorg.googletoolbar. Leave the
locations of the localizing bundle and XML layer, that way they will be stored in a package with
the name org/myorg/googletoolbar. Click Finish.
The IDE creates the GoogleToolbar project. The project contains all of your sources and project
metadata, such as the project's Ant build script. The project opens in the IDE. You can view its logical
structure in the Projects window (Ctrl+1) and its file structure in the Files window (Ctrl+2). For
example, the Projects window should now look as follows:
Coding the Module
In order to code the module, you need to complete the following steps:
Creating the Action
- Right-click the project node and choose New > Action (if Action is not displayed, access it by
choosing Other, then in the New File wizard under Categories, select NetBeans Module Development).
Click Next.
- In the Action Type panel keep the default setting, which will let the IDE create an action that
subclasses CallableSystemAction, as shown below:

Click Next.
- In the GUI Registration panel, select Edit from the Category drop-down list. The Category drop-down
list controls where an action is shown in the Keyboard Shortcuts editor in the IDE. Next, deselect
Global Menu Item and select Global Toolbar Button. In the Toolbar drop-down list, select Edit, then
in the Position drop-down list, select Find... - HERE, as shown below:

Click Next.
- In the Name and Location panel, type GoogleAction as the Class Name and Google
Action as the Display Name. Browse to an icon that has a dimension of 16x16 pixels. In fact,
you will not use the icon - instead, you will display the JPanel Form that you create in the next
section. However, the New Action wizard requires you to specify an icon. Therefore, the icon could
be of any dimension, since you will not be using it. Click Finish. Note that GoogleAction.java
is added to the org.myorg.googletoolbar package in the Projects window.
Creating the JPanel
- Right-click the project node and choose New > Other. Under Categories, select Java GUI Forms.
Under Projects, select JPanel Form. Click Next.
- In the Name and Location panel, type GooglePanel as the Class Name and select the package
from the drop-down list. Click Finish. GooglePanel.java is added to the package and is
opened in the Design view in the Source Editor.
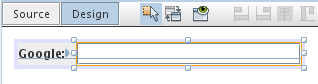
- Place the cursor at the bottom right-hand corner of the JPanel, then select the JPanel and drag the
cursor to resize it, so that its width and length resemble that of a toolbar, as shown below:

- Drag a JTextField item and a JLabel item from the Palette (Ctrl+Shift+8) directly into the JPanel,
then resize the JPanel and the other two items so that they fit snugly together. Finally, click the
JLabel and change its text to Google:, then delete the default text in the JTextField.
Your JPanel should now resemble the image shown below:
- Make sure the Property Inspector is open (Window > Navigating > Inspector), then right-click
the JTextField and choose Events > Key > keyTyped. This generates a jTextField1KeyTyped()
method in the GooglePanel.java source code, which displays in the Source Editor, as shown below:

- In the Source Editor, in the Source view of GooglePanel.java, fill out the
jTextField1KeyTyped() method as follows (inserted text shown in bold):
private void jTextField1KeyTyped(java.awt.event.KeyEvent evt) {
    int i = evt.getKeyChar();
    if (i==10){//The ENTER KEY
        // we display the google url.
        try{
            URLDisplayer.getDefault().showURL
                    (new URL("http://www.google.com/search?hl=en&q="+jTextField1.getText()+"&btnG=Google+Search"));
        } catch (Exception eee){
            return;//nothing much to do
        }
    }
}
If you need to, right-click in the Source Editor and choose Reformat Code (Ctrl+Shift+F).
Resolving Errors
Notice that several lines of code are underlined in red, indicating errors. This is because
required packages have not been imported yet. Place your cursor over the light bulb icon
displayed in the column to the immediate left of the red line for URLDisplayer. A
tooltip displays, indicating the reason for the error:

In order to solve this, you need to make the HtmlBrowser.URLDisplayer class, included in the
org.openide.awt package, accessible to your project. To do so, perform the following steps:
- Right-click the project node in the Projects window and choose Properties. In the Project Properties
dialog that displays, select Libraries under the Categories heading. Then, under Module Dependencies,
click the Add button. The Add Module Dependency Dialog displays.
- In the filter text box displayed at the top of the Add Module Dependency Dialog, start typing
URLDisplayer and notice that the selection of returned modules narrows until the only
remaining listing is the UI
Utilities API:

Click OK, then click OK again to exit the Project Properties dialog.
- Right-click in the Source Editor and choose Fix Imports (Alt+Shift+F). The Fix All Imports dialog
displays, listing suggested paths for unrecognized classes:

Click OK. The IDE creates the following import statements for GooglePanel.java:
import java.net.URL;
import org.openide.awt.HtmlBrowser.URLDisplayer;
Also notice that all errors disappear from the Source Editor.
Overriding getToolbarPresenter()
Because the JPanel you just created is the actual component that will display the Google toolbar, you need
to override the
getToolbarPresenter() method in the action class. In GoogleAction.java, do the
following:
- Beneath the class declaration, declare and set the following variable:
GooglePanel retValue = new GooglePanel();
- Define the getToolbarPresenter() method to return the retValue variable:
public java.awt.Component getToolbarPresenter() {
    return retValue;
}
Compiling, Installing and Using the Module
NetBeans IDE uses an Ant build script to compile and install your module in the IDE. The build script was
created for you when you created the module project in Setting Up the
Module Project above. Now that the module is ready to be compiled and added to the IDE, you can use
NetBeans IDE's support for Ant to do so:
- In the Projects window, right-click the GoogleToolbar project node and choose Install/Reload
in Target Platform. The module is built and installed in a new instance of the IDE (i.e. the target
platform). By default, the default target platform is the version of the IDE you are currently working
in. The target platform opens so that you can try out the new module.
- When it is successfully installed, the module adds a new button in the IDE's Edit toolbar. Note however
that the toolbar button does not display an icon. Instead, it displays the JPanel you created in
Creating the JPanel above:
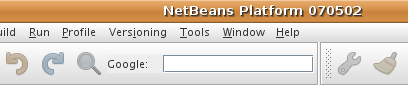
- Type a search string in the text field:
- Press Enter. The IDE's default browser starts up. The Google URL and your search string are sent to the
browser and a search is performed. When the search results are returned, you can view them in the browser.
Sharing the Module
Now that you have built a working module that enhances the IDE, why not share it with other developers?
NetBeans IDE offers an easy way to create a binary NetBeans Module file (.nbm) which is a universal means
of allowing others to experiment with it in own versions of the IDE (in fact, this is what you did in
Installing the Sample above. To create a module binary, do the following:
In the Projects window, right-click the GoogleToolbar project node and choose Create NBM. The
new NBM file is created and you can view it in the Files window (Ctrl+2):

Next Steps
This concludes the NetBeans Google Toolbar Module tutorial. This document has described
how to create a module that adds a Google Search toolbar to the IDE.
For more information about creating and developing modules, see the following resources:

