置换图滤镜Flash Player 9 和更高版本,Adobe AIR 1.0 和更高版本 DisplacementMapFilter 类使用 BitmapData 对象(称为置换图图像)的像素值在新对象上执行置换效果。通常,置换图图像与将要应用滤镜的实际显示对象或 BitmapData 实例不同。置换效果包括置换经过过滤的图像中的像素,即让这些像素离开各自原始位置一定距离。此滤镜可用于产生移位、扭曲或斑点效果。 应用于给定像素的置换位置和置换量由置换图图像的颜色值确定。使用滤镜时,除了指定置换图图像外,还要指定以下值,以便控制置换图图像中计算置换的方式:
若要了解置换图滤镜的工作原理,请查看下面的基本示例。在以下代码中,将加载一个图像,完成加载后使图像在舞台上居中并对它应用置换图滤镜,使整个图像中的像素向左水平移位。 import flash.display.BitmapData;
import flash.display.Loader;
import flash.events.MouseEvent;
import flash.filters.DisplacementMapFilter;
import flash.geom.Point;
import flash.net.URLRequest;
// Load an image onto the Stage.
var loader:Loader = new Loader();
var url:URLRequest = new URLRequest("http://www.helpexamples.com/flash/images/image3.jpg");
loader.load(url);
this.addChild(loader);
var mapImage:BitmapData;
var displacementMap:DisplacementMapFilter;
// This function is called when the image finishes loading.
function setupStage(event:Event):void
{
// Center the loaded image on the Stage.
loader.x = (stage.stageWidth - loader.width) / 2;
loader.y = (stage.stageHeight - loader.height) / 2;
// Create the displacement map image.
mapImage = new BitmapData(loader.width, loader.height, false, 0xFF0000);
// Create the displacement filter.
displacementMap = new DisplacementMapFilter();
displacementMap.mapBitmap = mapImage;
displacementMap.mapPoint = new Point(0, 0);
displacementMap.componentX = BitmapDataChannel.RED;
displacementMap.scaleX = 250;
loader.filters = [displacementMap];
}
loader.contentLoaderInfo.addEventListener(Event.COMPLETE, setupStage);
用于定义置换的属性有:
这些设置可使过滤图像的像素向左移动 250 个像素。移动的方向(向左或向右)和移动量取决于置换图图像中的像素的颜色值。从概念上来说,滤镜会逐一处理过滤图像的像素(至少处理将应用滤镜的区域中的像素,在本例中指所有像素),并对每个像素执行以下操作:
因为没有为 y 分量和 y 缩放比例指定值,所以使用默认值(不发生置换),这就是图像在垂直方向不移位的原因。 由于在本示例中使用了默认滤镜模式设置 WRAP,因此在像素向左移位时,会用移到图像左边缘以外的像素填充右侧空白区域。您可以对此设置试用不同的值以查看不同的效果。例如,如果您在设置置换属性的代码部分中(在 loader.filters = [displacementMap] 行之前)添加以下一行内容,则会使图像在舞台上产生涂抹的效果: displacementMap.mode = DisplacementMapFilterMode.CLAMP; 下面是一个更为复杂的示例,代码清单中使用置换图滤镜在图像上创建放大镜效果: import flash.display.Bitmap;
import flash.display.BitmapData;
import flash.display.BitmapDataChannel;
import flash.display.GradientType;
import flash.display.Loader;
import flash.display.Shape;
import flash.events.MouseEvent;
import flash.filters.DisplacementMapFilter;
import flash.filters.DisplacementMapFilterMode;
import flash.geom.Matrix;
import flash.geom.Point;
import flash.net.URLRequest;
// Create the gradient circles that will together form the
// displacement map image
var radius:uint = 50;
var type:String = GradientType.LINEAR;
var redColors:Array = [0xFF0000, 0x000000];
var blueColors:Array = [0x0000FF, 0x000000];
var alphas:Array = [1, 1];
var ratios:Array = [0, 255];
var xMatrix:Matrix = new Matrix();
xMatrix.createGradientBox(radius * 2, radius * 2);
var yMatrix:Matrix = new Matrix();
yMatrix.createGradientBox(radius * 2, radius * 2, Math.PI / 2);
var xCircle:Shape = new Shape();
xCircle.graphics.lineStyle(0, 0, 0);
xCircle.graphics.beginGradientFill(type, redColors, alphas, ratios, xMatrix);
xCircle.graphics.drawCircle(radius, radius, radius);
var yCircle:Shape = new Shape();
yCircle.graphics.lineStyle(0, 0, 0);
yCircle.graphics.beginGradientFill(type, blueColors, alphas, ratios, yMatrix);
yCircle.graphics.drawCircle(radius, radius, radius);
// Position the circles at the bottom of the screen, for reference.
this.addChild(xCircle);
xCircle.y = stage.stageHeight - xCircle.height;
this.addChild(yCircle);
yCircle.y = stage.stageHeight - yCircle.height;
yCircle.x = 200;
// Load an image onto the Stage.
var loader:Loader = new Loader();
var url:URLRequest = new URLRequest("http://www.helpexamples.com/flash/images/image1.jpg");
loader.load(url);
this.addChild(loader);
// Create the map image by combining the two gradient circles.
var map:BitmapData = new BitmapData(xCircle.width, xCircle.height, false, 0x7F7F7F);
map.draw(xCircle);
var yMap:BitmapData = new BitmapData(yCircle.width, yCircle.height, false, 0x7F7F7F);
yMap.draw(yCircle);
map.copyChannel(yMap, yMap.rect, new Point(0, 0), BitmapDataChannel.BLUE, BitmapDataChannel.BLUE);
yMap.dispose();
// Display the map image on the Stage, for reference.
var mapBitmap:Bitmap = new Bitmap(map);
this.addChild(mapBitmap);
mapBitmap.x = 400;
mapBitmap.y = stage.stageHeight - mapBitmap.height;
// This function creates the displacement map filter at the mouse location.
function magnify():void
{
// Position the filter.
var filterX:Number = (loader.mouseX) - (map.width / 2);
var filterY:Number = (loader.mouseY) - (map.height / 2);
var pt:Point = new Point(filterX, filterY);
var xyFilter:DisplacementMapFilter = new DisplacementMapFilter();
xyFilter.mapBitmap = map;
xyFilter.mapPoint = pt;
// The red in the map image will control x displacement.
xyFilter.componentX = BitmapDataChannel.RED;
// The blue in the map image will control y displacement.
xyFilter.componentY = BitmapDataChannel.BLUE;
xyFilter.scaleX = 35;
xyFilter.scaleY = 35;
xyFilter.mode = DisplacementMapFilterMode.IGNORE;
loader.filters = [xyFilter];
}
// This function is called when the mouse moves. If the mouse is
// over the loaded image, it applies the filter.
function moveMagnifier(event:MouseEvent):void
{
if (loader.hitTestPoint(loader.mouseX, loader.mouseY))
{
magnify();
}
}
loader.addEventListener(MouseEvent.MOUSE_MOVE, moveMagnifier);
代码首先生成两个渐变圆,它们合并在一起构成置换图图像。红色圆创建 x 轴置换 (xyFilter.componentX = BitmapDataChannel.RED),蓝色圆创建 y 轴置换 (xyFilter.componentY = BitmapDataChannel.BLUE)。为帮助您理解置换图图像的外观,代码向屏幕底部添加了原始圆形以及合并后作为置换图图像的圆形。 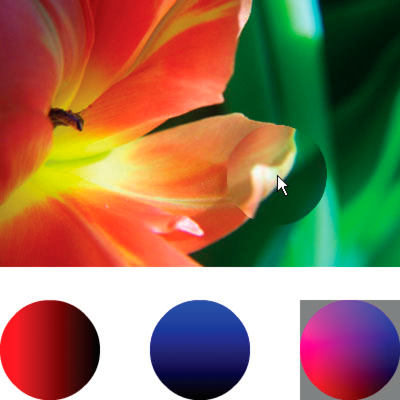 然后,代码加载一个图像,当鼠标移动时,将置换滤镜应用于鼠标下方的图像部分。用作置换图图像的渐变圆使置换区域从指针处向外扩展。请注意,置换图图像的灰色区域不会发生置换。灰色为 0x7F7F7F。该灰色的蓝色和红色通道与这些颜色通道中的中间色度完全匹配,因此在置换图图像的灰色区域不会发生置换。同样,在圆的中心也不会发生置换。由于蓝色和红色是引起置换的颜色,虽然颜色中没有灰色,但该颜色的蓝色通道和红色通道与中度灰的蓝色通道和红色通道完全相同,因此该处不发生置换。 |

|

