Table of Contents
In this chapter, we’ll take a quick tour of CouchDB’s features, familiarizing ourselves with Futon, the built-in administration interface. We’ll create our first document and experiment with CouchDB views.
Installing
From Source
The official source of CouchDB is maintained in Apache’s Subversion repository.
To check it out using subversion:
svn checkout http://svn.apache.org/repos/asf/couchdb/trunk/ couchdb
cd couchdb
If you want to install CouchDB using Git, the best source currently is Halorgium’s CouchDB fork on Github, available at http://github.com/halorgium/couchdb
To download just run git clone git://github.com/halorgium/couchdb.git && cd couchdb
Building from source
From a fresh checkout, run this to build:
./bootstrap && ./configure && make
I like to use the developer make target to avoid running make install after every time I update my checkout. To build and run in developer mode use:
You can set your configuration parameters in the etc/couchdb/local_dev.ini file. Dev mode stores data, logs, and view indexes in the ./tmp directory. If you are deploying a CouchDB application, please do go ahead and run make install as well as checking the README about how to register CouchDB as a service with your operating system.
If you have troubles, detailed information is in the CouchDB README available at http://svn.apache.org/repos/asf/couchdb/trunk/README and in the source you’ve just downloaded.
From Packages
All reasonably recent UNIX and Linux distributions come with CouchDB as part of their package management systems. For Debian or Ubuntu systems you simply run:
On a FreeBSD system, it would be:
cd /usr/ports/databases/couchdb
make install
On RedHat, CentOS or Fedora:
If you’re using Mac OS X you can install CouchDB via MacPorts:
port install couchdb +server
You could also grab a copy of CouchDBX (http://janl.github.com/couchdbx/) for Mac OS X, an all in one option for previewing CouchDB. These packages will give you CouchDB and all the software that it depends on in one go. If you’re interested in building CouchDB for yourself (and there are plenty of reasons to do so) then have a look at the comprehensive installation guide in Appendix B with help for common “gotchas” and tips on securing your installation.
All Systems are Go!
We’ll have a very quick look at CouchDB’s barebone Application Programming Interface (API) by using the command line utility curl. Please note that this is only one way of talking to CouchDB. We will show you plenty more throughout the rest of the book. What’s interesting about curl is that it gives you control over raw HTTP requests and you can see exactly what is going on “underneath the hood” of your database.
Make sure CouchDB is still running and do:
curl http://127.0.0.1:5984/
This issues a GET request to your newly installed CouchDB instance.
The answer back should look something like:
{"couchdb":"Welcome","version":"0.9.0"}
Not all that spectacular, CouchDB is saying “hello” with the running version number.

|
The curl command issues GET requests by default. You can issue POST requests using something like curl -X POST. To make it easy to work with our terminal history we usually use -X option even when issuing GET requests. If we want to send a POST next time, all we have to change is the verb.
HTTP does a bit more under the hood than you can see in the examples here. If you’re interested in every last detail that goes over the wire, pass in the -v option like curl -vX GET which will show you the server curl tries to connect to, the request headers it sends and response headers it receives back. Great for debugging!
|
Next, we can get a list of databases:
curl -X GET http://127.0.0.1:5984/_all_dbs
All we added to the previous request is the _all_dbs string.
The response should look like:
Oh, that’s right, we didn’t create any databases yet! All we see is an empty list.
Let’s create a database:
curl -X PUT http://127.0.0.1:5984/baseball
CouchDB will reply with:
Retrieving the list of databases again shows some useful results this time:
curl -X GET http://127.0.0.1:5984/_all_dbs
|
|
Before we go on, we should mention JavaScript Object Notation (JSON), the data format CouchDB speaks. JSON is a lightweight data interchange format based on JavaScript syntax. Because JSON is natively compatible with JavaScript your Web browser is an ideal client for CouchDB.
Brackets ([]) represent ordered lists and curly braces ({}) represent key/value dictionaries. Keys must be strings, delimited by quotes ("), and values can be strings, numbers, booleans, lists or key/value dictionaries. For a more detailed description of JSON, see Appendix C.
|
Let’s create another database:
curl -X PUT http://127.0.0.1:5984/baseball
CouchDB will reply with:
We already have a database with that name so CouchDB will respond with an error.
Let’s try again with a different database name:
curl -X PUT http://127.0.0.1:5984/plankton
CouchDB will reply with:
Retrieving the list of databases yet again now shows some useful results:
curl -X GET http://127.0.0.1:5984/_all_dbs
CouchDB will respond with:
To round things off, let’s delete the second database:
curl -X DELETE http://127.0.0.1:5984/plankton
CouchDB will reply with:
The list of databases is now the same as it was before:
curl -X GET http://127.0.0.1:5984/_all_dbs
CouchDB will respond with:
For brevity, we’ll skip working with documents, as the next section covers a different and potentially easier way of working with CouchDB that should provide experience with this. As we work through the example, keep in mind that “under the hood” everything is being done by the application exactly like you have been doing here manually. Everything is done using GET, PUT, POST and DELETE with a URI.
Welcome to Futon
After having seen CouchDB’s raw API, let’s get our feet wet by playing with Futon, the built-in administration interface. Futon provides full access to all of CouchDB’s features and makes it easy getting to grips with some of the more complex ideas involved. With Futon we can create and destroy databases, view and edit documents, compose and run MapReduce views, and trigger replication between databases.
To load Futon in your browser, visit:
http://127.0.0.1:5984/_utils/
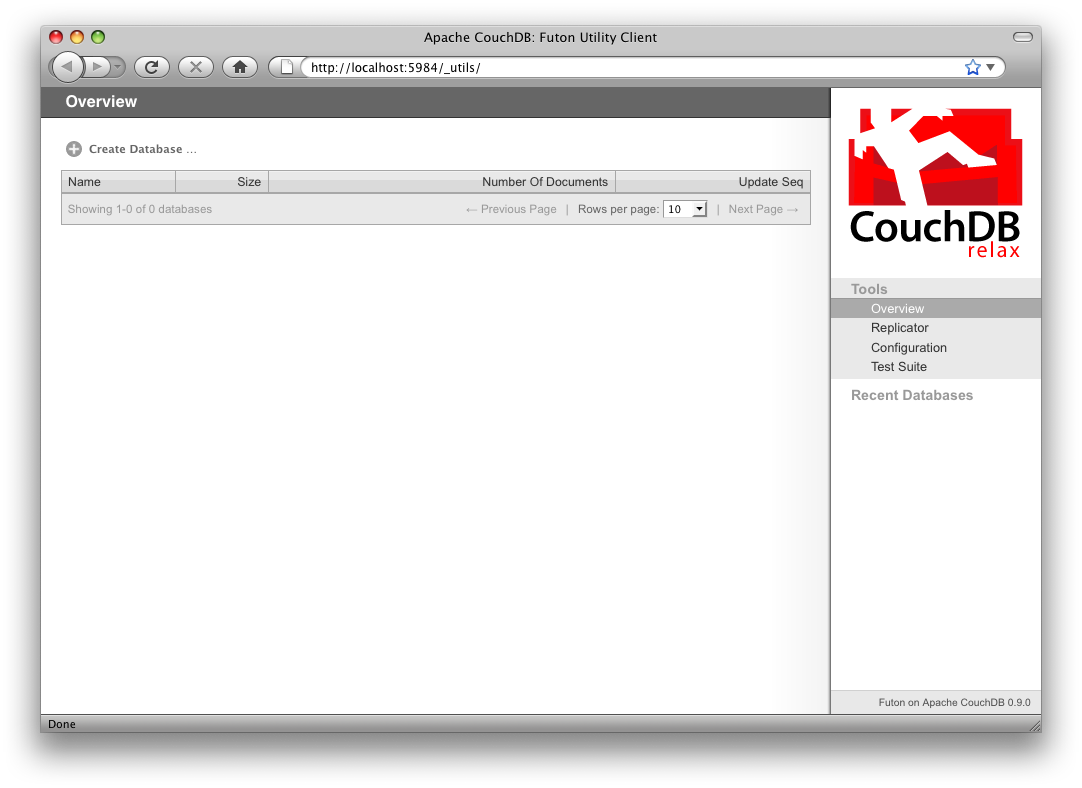
If you’re running version 0.9 or later you should see something similar to Figure 3-1. In later chapters we’ll focus on using CouchDB from server-side languages such as Ruby and Python. As such, this chapter is a great opportunity to showcase an example of natively serving up a dynamic Web application using nothing more than CouchDB’s integrated Web server, something you may wish to do with your own applications.
Figure 3-1: The Futon welcome screen
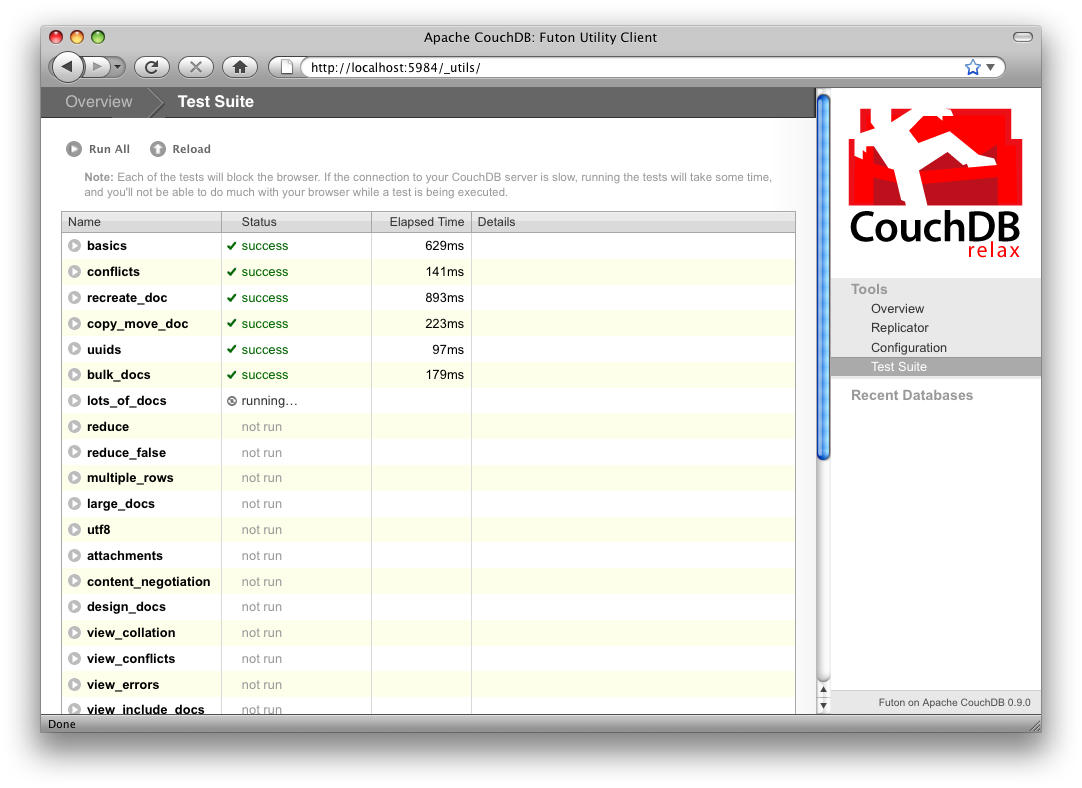
The first thing we should do with a fresh installation of CouchDB is run the test suite to verify that everything is working properly. This assures us that any problems we may run into aren’t due to bothersome issues with our setup. By the same token, failures in the Futon test suite are a red flag, telling us double check our installation before attempting to use a potentially broken database server, saving us the confusion when nothing seems to be working quite like we expect!

|
Some common network configurations cause the replication test to fail when accessed via the localhost address. You can fix this by accessing CouchDB via http://127.0.0.1:5984/_utils/.
|
Navigate to the test suite by clicking Test Suite on the Futon side bar, then click run all at the top of the main frame to kick things off. Figure 3-2 shows the Futon test suite running some tests.
Figure 3-2: The Futon test suite running some test
Because the test suite is run from the browser, not only does it test that CouchDB is functioning properly, it also verifies that your browser’s connection to the database is properly configured, which can be very handy for diagnosing misbehaving proxies or other HTTP middleware.
|
|
If the test suite has an inordinate number of failures, you’ll need to see the troubleshooting section in Appendix B for the next steps to fix your installation.
|
Now that the test suite is finished, you’ve verified that your CouchDB installation is successful and you’re ready to see what else Futon has to offer.
Your First Database and Document
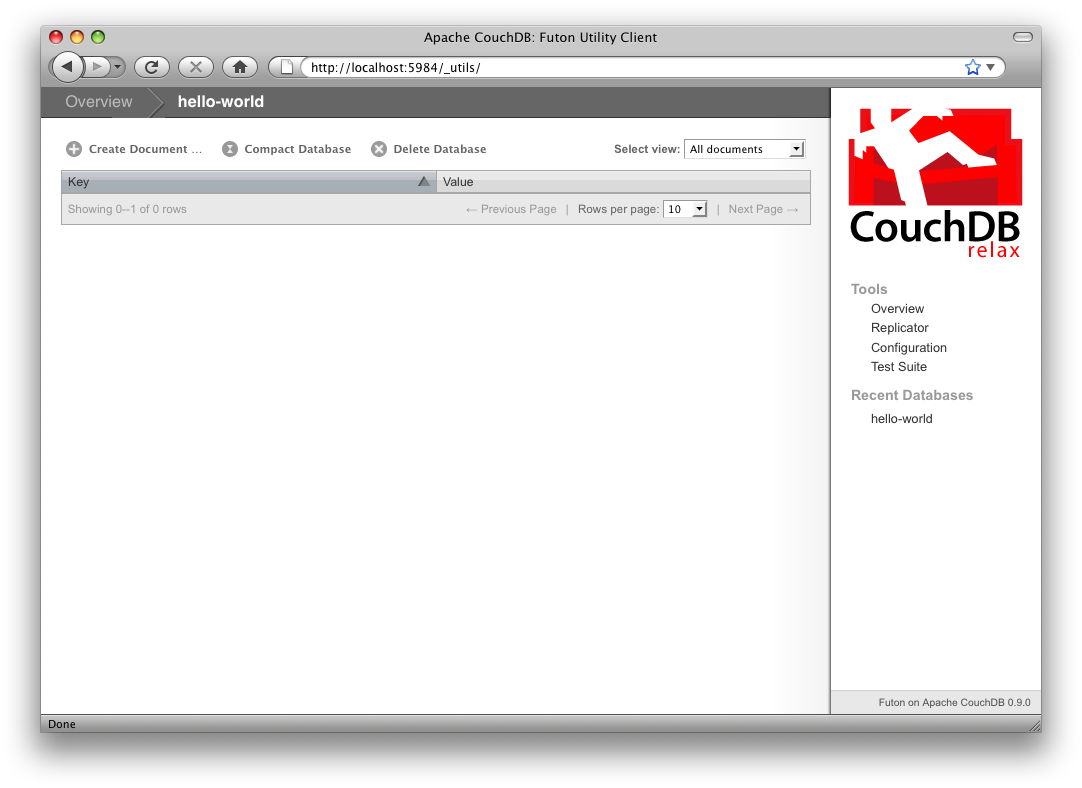
Creating a database in Futon is simple. From the overview page click Create Database. When asked for a name, enter hello-world and click the Create button.
Figure 3-3: An empty database in Futon
After your database has been created Futon will display a list of all its documents, as in Figure 3-3. This list will start out empty, so let’s create a our first document. Click the Create Document link and then the Create button in the pop-up that gets shown. Make sure to leave the document ID blank and CouchDB will generate a UUID for you. For demoing purposes, having CouchDB assign a UUID is fine. When you write your first programs, we recommend assigning your own UUIDs; we’ll explain later why.
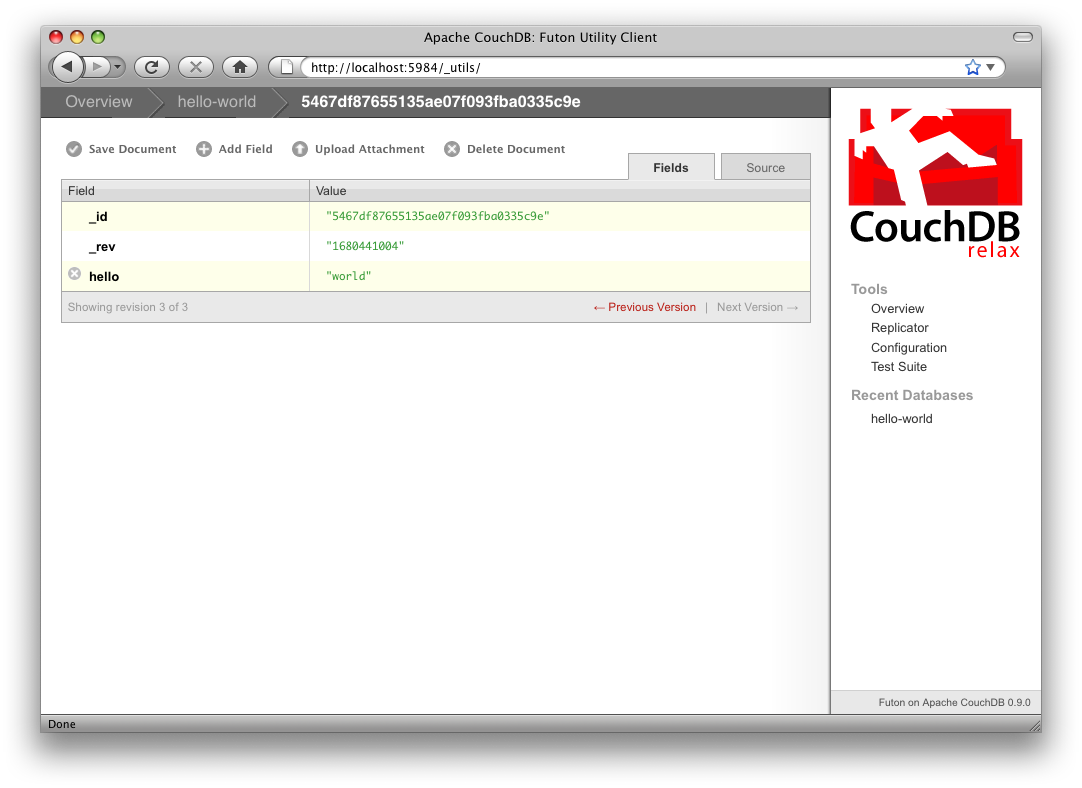
Futon will display the newly created document, with its _id and _rev as the only fields. To create a new field, click the Add Field button. We’ll call the new field hello. Click the green tick icon (or hit the Enter key) to finalize creating the hello field. Double-click the hello field’s value (default null) to edit it.
If you try to enter world as the new value you’ll get an error when you click the value’s green tick icon. CouchDB values must be entered as valid JSON. Instead, enter "world" (with quotes) because this is a valid JSON string you should have no problems saving it. You could experiment with using other JSON values, for example [1, 2, "c"] or {"foo":"bar"}. Once you’ve entered your values into the document, make a mental note of its _rev attribute and click Save Document. The result should look something like Figure 3-4.
Figure 3-4: A “hello world” document in Futon
You’ll notice that the document’s _rev has changed. We’ll go into more detail about this in a later chapter, but for now, the important thing to note is that _rev acts like a safety feature when saving a document. As long as you and CouchDB agree on the most recent _rev of a document, you can successfully save your changes.
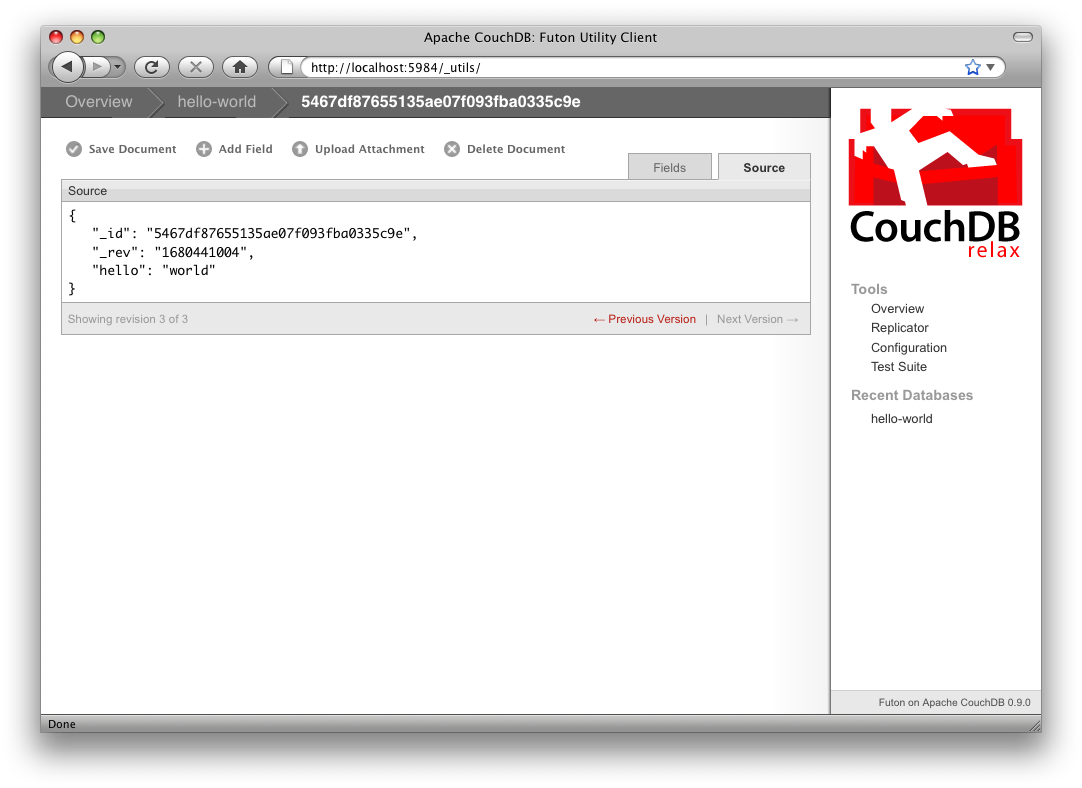
Futon also provides a way to display the underlying JSON data, which can be more compact and easier to read depending on what sort of data you are dealing with. To see the JSON version of our Hello World document, click the Source tab. The result should look something like Figure 3-5.
Figure 3-5: The JSON source of a “hello world” document in Futon
Running a Query Using MapReduce
Traditional relational databases allow you to run any queries you like as long as your data is structured correctly. Instead, CouchDB uses predefined map and reduce functions in a style known as MapReduce. These functions provide great flexibility because they can adapt to variations in document structure, and indexes for each document can be computed independently and in parallel. The combination of a map- and a reduce function is called a view in CouchDB terminology.
|
|
For experienced relational database programmers, MapReduce can take some getting used to. Rather than declaring which rows from which tables to include in a result set and depending on the database to determine the most efficient way to run the query, reduce queries are based on simple range requests against the indexes generated by your map functions.
|
Map functions are called once with each document as the argument. The function can choose to skip the document altogether or emit one or more view rows as key/value pairs. Map functions may not depend on any information outside of the document. This independence is what allows CouchDB views to be generated incrementally and in parallel.
CouchDB views are stored as rows which are kept sorted by key. This makes retrieving data from a range of keys efficient even when there are thousands or millions of rows. When writing CouchDB map functions, your primary goal is to build an index that stores related data under nearby keys.
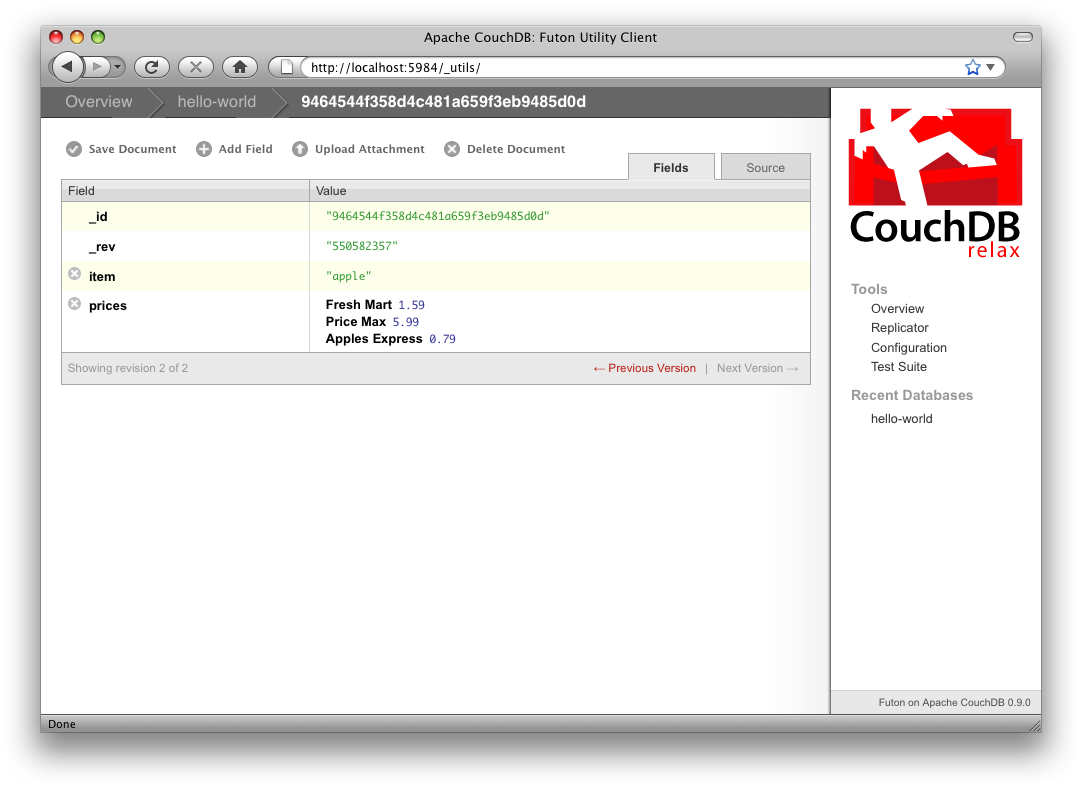
Before we can run an example MapReduce view, we’ll need some data to run it on. We’ll create documents carrying the price of various supermarket items as found at different stores. Let’s create documents for apples, oranges, and bananas. (Allow CouchDB to generate the _id and _rev fields.) Use Futon to create documents that have a final JSON structure that looks like this:
{
    "_id" : "bc2a41170621c326ec68382f846d5764",
    "_rev" : "2612672603",
    "item" : "apple",
    "prices" : {
        "Fresh Mart" : 1.59,
        "Price Max" : 5.99,
        "Apples Express" : 0.79
    }
}
This document should look like Figure 3-6 when entered into Futon.
Figure 3-6: An example document with apple prices in Futon
Okay, now that’s done, let’s create the document for oranges:
{
    "_id" : "bc2a41170621c326ec68382f846d5764",
    "_rev" : "2612672603",
    "item" : "orange",
    "prices" : {
        "Fresh Mart" : 1.99,
        "Price Max" : 3.19,
        "Citrus Circus" : 1.09
    }
}
And finally, the document for bananas:
{
    "_id" : "bc2a41170621c326ec68382f846d5764",
    "_rev" : "2612672603",
    "item" : "banana",
    "prices" : {
        "Fresh Mart" : 1.99,
        "Price Max" : 0.79,
        "Banana Montana" : 4.22
    }
}
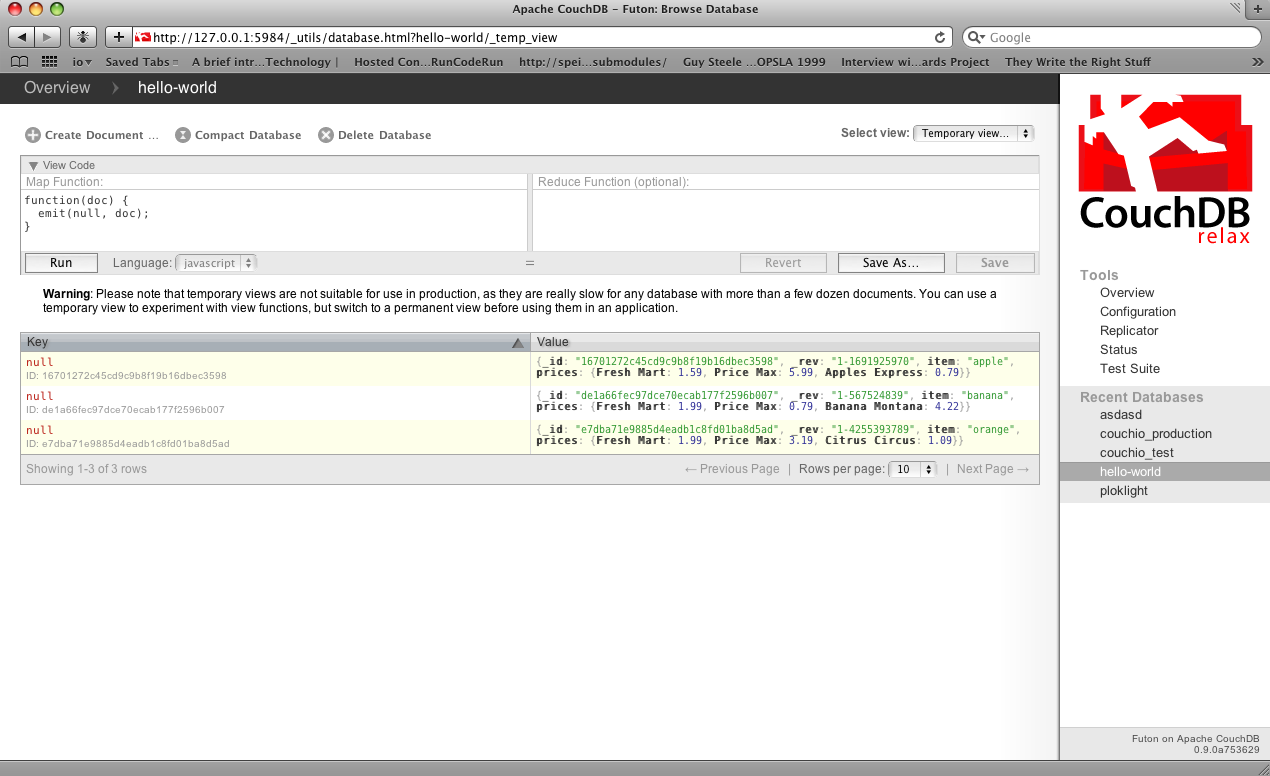
Imagine we’re catering a big luncheon, but the client is very price sensitive. To find the lowest prices we’re going to create our first view, which shows each fruit sorted by price. Click hello-world to return to the hello-world overview, and then from the select view menu choose Temporary view… to create a new view. The result should look something like Figure 3-7.
Figure 3-7: A temporary view in Futon
Edit the map function, on the left, so that it looks like the following:
function(doc) {
    var store, price, value;
    if (doc.item && doc.prices) {
        for (store in doc.prices) {
            price = doc.prices[store];
            value = [doc.item, store];
            emit(price, value);
        }
    }
}
This is a JavaScript function that CouchDB runs for each of our documents as it computes the view. We’ll leave the reduce function blank for the time being.
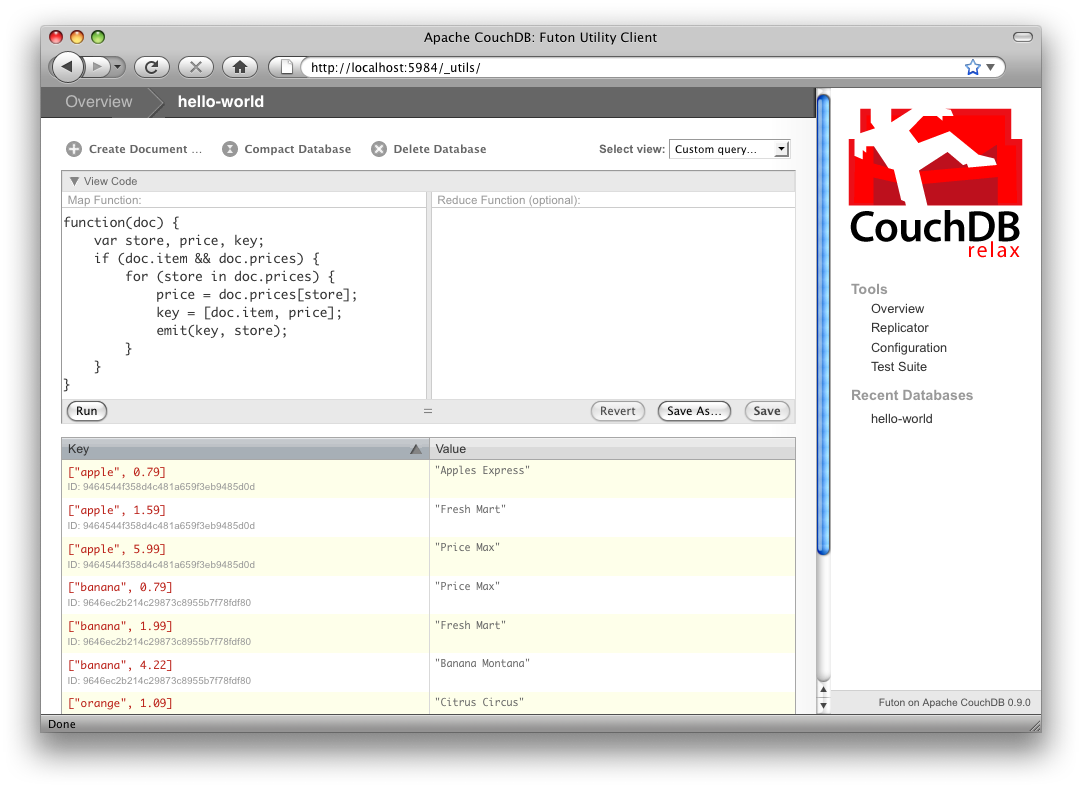
Click Run and you should see result rows like in Figure 3-8, with the various items sorted by price. This map function could be even more useful if it grouped the items by type, so that all the prices for bananas were next to each other in the result set. CouchDB’s key sorting system allows any valid JSON object as a key. To learn more, see the View Collation table on page 225. In this case, we’ll emit an array of [item, price] so that CouchDB groups by item type and price.
Figure 3-8: The results of running a view in Futon
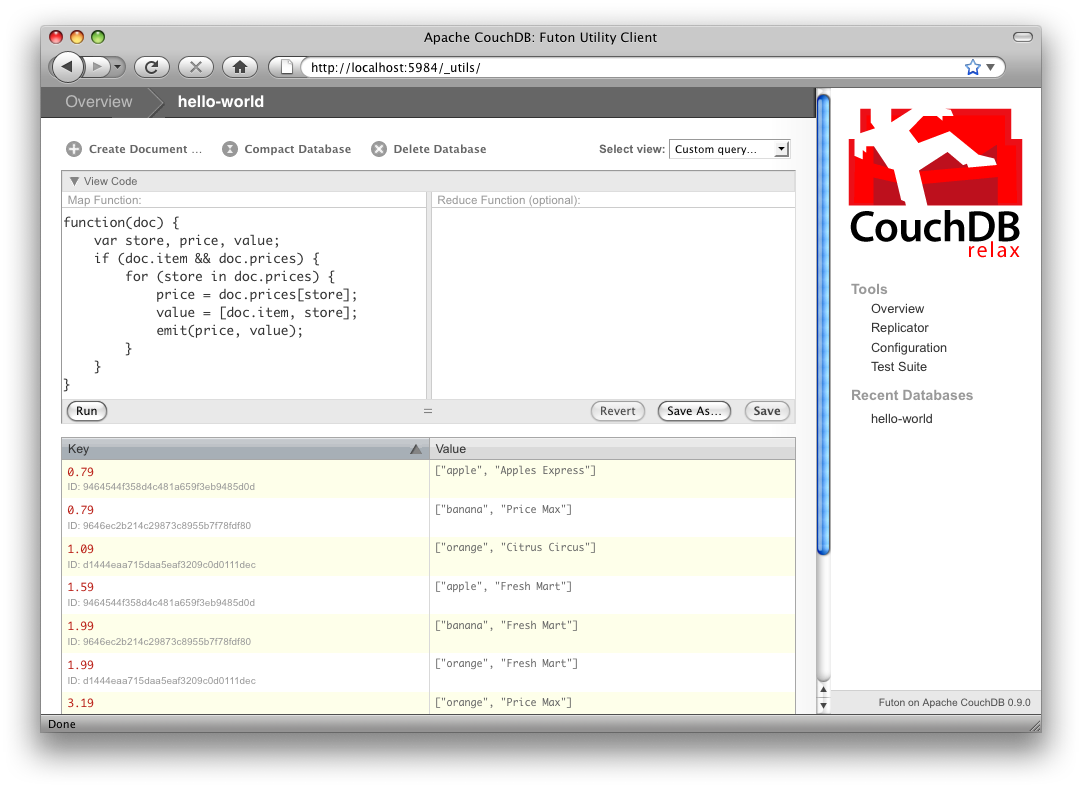
Let’s modify the view function so that it looks like this:
function(doc) {
    var store, price, key;
    if (doc.item && doc.prices) {
        for (store in doc.prices) {
            price = doc.prices[store];
            key = [doc.item, price];
            emit(key, store);
        }
    }
}
In this function, we first check that the document has the fields we want to use. CouchDB recovers gracefully from a few isolated map function failures, but when a map function fails regularly (due to a missing required field or other JavaScript exception), CouchDB shuts off its indexing to prevent any further resource usage. For this reason, it’s important to check for the existence of any fields before you use them. In this case, our map function will skip the first “hello world” document we created without emitting any rows or encountering an errors. The result of this query should look something like Figure 3-9.
Figure 3-9: The results of running a view after grouping by item type and price
Once we know we’ve got a document with an item type and some prices we iterate over the item’s prices and emit key/values pairs. The key is an array of the item and the price and forms the basis for CouchDB’s sorted index. In this case the value is the name of the store where the item can be found for the listed price.
View rows are sorted by their keys, in this example: first by item, then by price. This method of complex sorting is at the heart of creating useful indexes with CouchDB. In Chapter 5 our example application will use JSON arrays as keys to sort blog posts and their comments into consecutive view rows.
|
|
MapReduce can be challenging, especially if you’ve spent years working with relational databases. The important thing to keep in mind is that map functions give you an opportunity to sort your data using any key you choose, and that CouchDB’s design is focused on providing fast, efficient access to data within a range of keys.
|
Triggering Replication
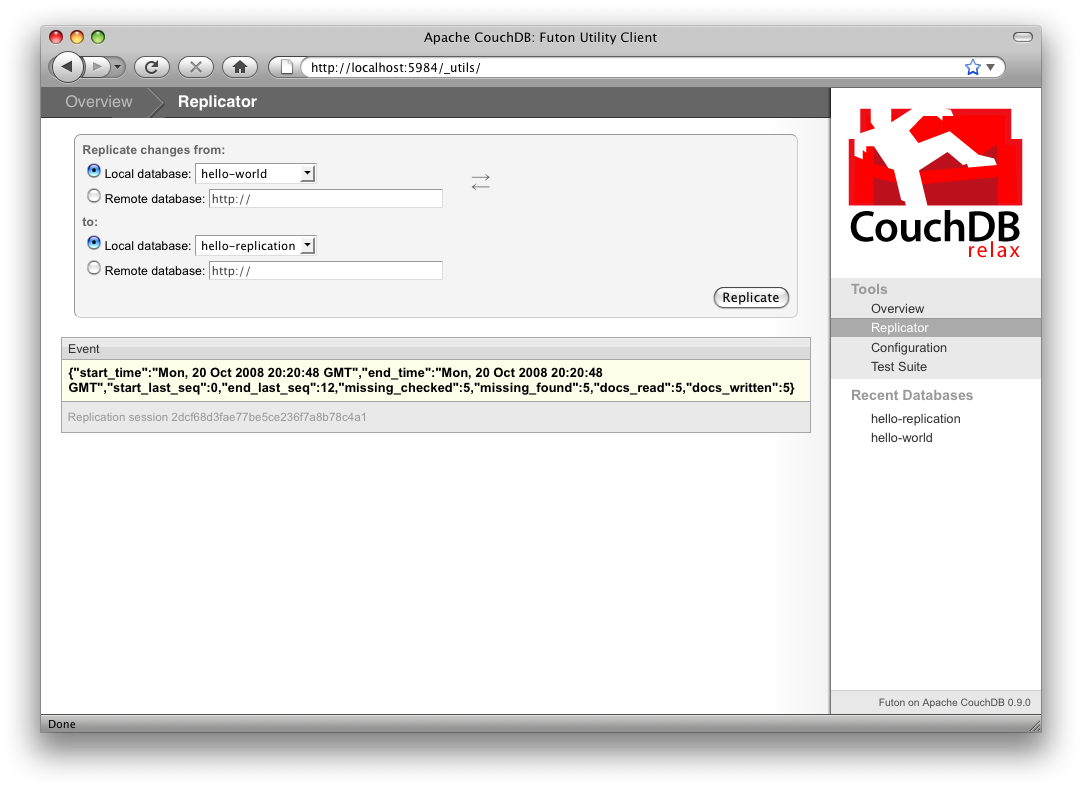
Futon can trigger replication between two local databases, between a local and remote database, or even between two remote databases. We’ll show you how to replicate data from one local database to another, which is a simple way of making backups of your databases as we’re working through the examples.
First we’ll need to create an empty database to be the target of replication. Return to the overview and create a database called hello-replication. Now click Replicator in the sidebar and choose hello-world as the source and hello-replication as the target. Click Replicate to replicate your database. The result should look something like Figure 3-10.
Figure 3-10: Running database replication in Futon
|
|
For larger databases, replication can take much longer. It is important to leave the browser window open while replication is taking place. As an alternative you can trigger replication via curl or some other HTTP client that can handle long-running connections. If your client closes the connection before replication finishes you’ll have to re-trigger it. Luckily, CouchDB’s replication can take over from where it has left off instead of starting from scratch.
|
Wrapping Up
Now that we’ve seen most of Futon’s features, you’ll be prepared to dive in and inspect your data as we build up our example application in the next few chapters. Futon’s pure JavaScript approach to managing CouchDB shows how it’s possible to build a fully featured Web application using only CouchDB’s HTTP API and integrated Web server.
But before we get there, we’ll have another look at CouchDB’s HTTP API; now with a magnifying glass. Let’s curl on the couch and relax ahead.