Launch Services
Launch Services allow you to publish a transformation graph or a jobflow as a Web Service. With Launch Services, CloverETL transformations can be exposed to provide request-response based data interface (e.g. searches, complex lookups, etc.) for other application or directly to users.
Launch Services Overview
The architecture of a Launch Service is layered. It follows the basic design of multi-tiered applications utilizing a web browser.
Launch services let you build a user-friendly form that the user fills in and sends to the CloverETL Server for processing.
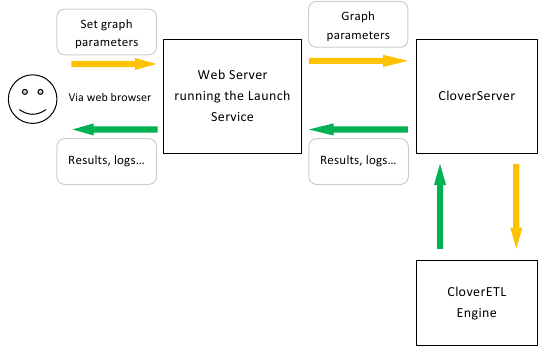 |
Figure 25.3. Launch Services and CloverETL Server as web application back-end
Deploying Graph in Launch Service
To prepare a graph for publishing as a Launch Service, keep this in mind during the design process:
You can define a graph/jobflow listeners to create parameterized calls. Parameters are passed to the graph as Dictionary entries – design the graph so that it uses the Dictionary as input/output for parameters (e.g. file names, search terms, etc.)
The graph will need to be published in the Launch Services section, where you provide the configuration and binding for parameters to dictionary entries.
Using Dictionary in ETL Graph/Jobflow for a Launch Services
A graph or a jobflow published as a service usually means that the caller sends request data (parameters or data) and the transformation processes it and returns back the results.
In a Launch Service definition, you can bind service’s parameters to Dictionary entries. These need to be predefined in the transformation.
Dictionary is a key-value temporary data interface between the running transformation and the caller. Usually, although not restricted to, Dictionary is used to pass parameters in and out the executed transformation.
For more information about Dictionary, read the “Dictionary” section in the CloverETL Designer User’s Guide.
Passing Files to Launch Sevices
If Launch service is designed to pass an input file to a graph or jobflow,
the input dictionary entry has to be of type readable.channel.
Configuring the Job in CloverETL Server Web GUI
Each Launch Service configuration is identified by its name, user, and group restriction. You can create several configurations with the same name, which is valid as long as they differ in their user or group restrictions.
User restrictions can then be used to launch different jobs for different users, even though they use the same launch configuration (i.e. name). For example, developers may want to use a debug version of the job, while the end customers will want to use a production job. The user restriction can also be used to prohibit certain users from executing the launch configuration completely.
Similarly, a group restriction can be used to differentiate jobs based on the user’s group membership.
If multiple configurations match the current user/group and configuration name, the most specific one is picked. (The user name has higher priority than the group name.)
Adding New Launch Configuration
Use the “New launch configuration” button on the Launch Services tab to create a new Launch Service.
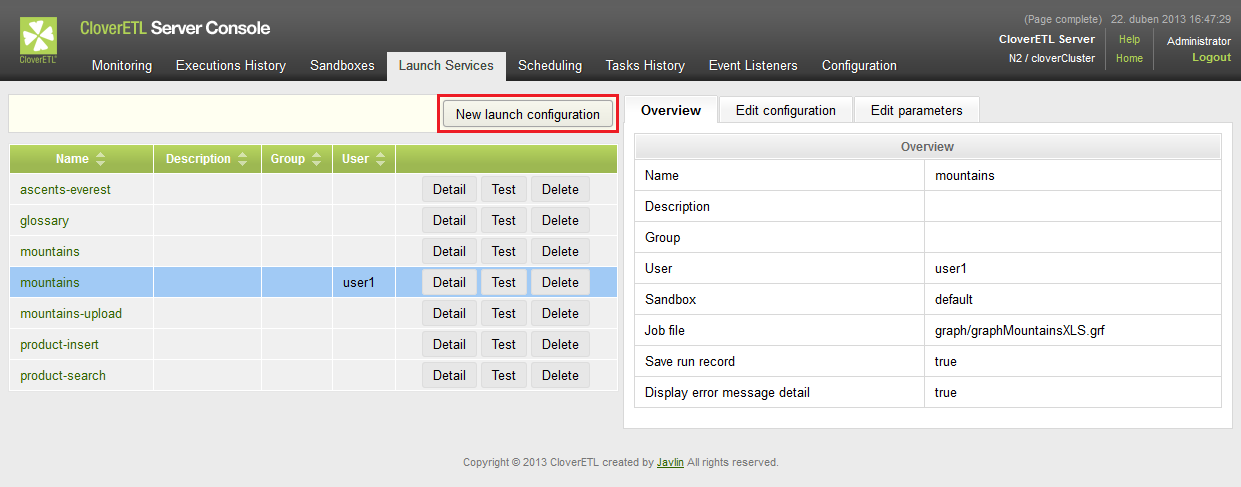 |
Figure 25.4. Launch Services section
The name is the identifier for the service and will be used in the service URL. Then, select a sandbox and either a transformation graph or a jobflow that you want to publish.
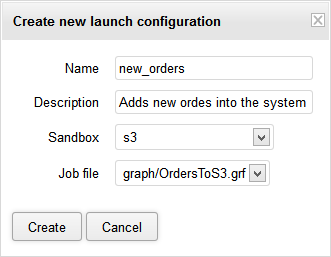
Figure 25.5. Creating a new launch configuration
Once you create the new Launch Service, you can set additional attributes like:
User and group access restrictions and additional configuration options (Edit Configuration)
Bind Launch Service parameters to Dictionary entries (Edit Parameters)
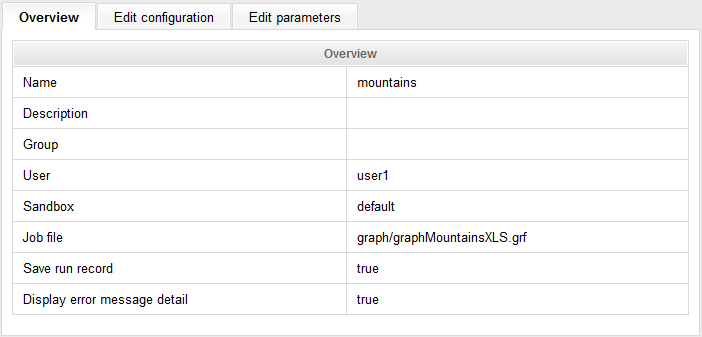 |
Figure 25.6. Overview tab
The Overview tab shows the basic details about the launch configuration. These can be modified in the Edit Configuration tab:
Edit Configuration
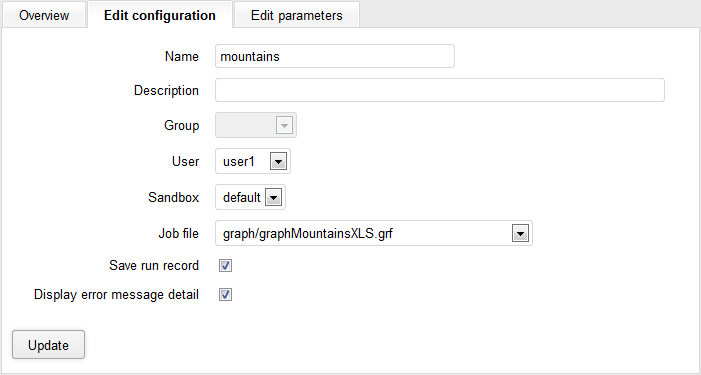 |
Figure 25.7. Edit Configuration tab
Editing configurations:
Name - The name (identifier) under which the configuration will be accessible from the web.
Description - The description of the configuration.
Group - Restricts the configuration to a specific group of users.
User - Restricts the configuration to a specified user.
Sandbox - The CloverETL Sandbox where the configuration will be launched.
Job file - Selects the job to run.
Save run record - If checked, the details about the launch configuration will be stored in the Execution History. Uncheck this if you need to increase performance – storing a run record decreases response times for high frequency calls.
Display error message detail - Check this if you want to get a verbose message in case the launch fails.
Edit Parameters
The “Edit parameters” tab can be used to configure parameter mappings for the launch configuration. The mappings are required for the Launch Service to be able to correctly assign parameters values based on the values sent in the launch request.
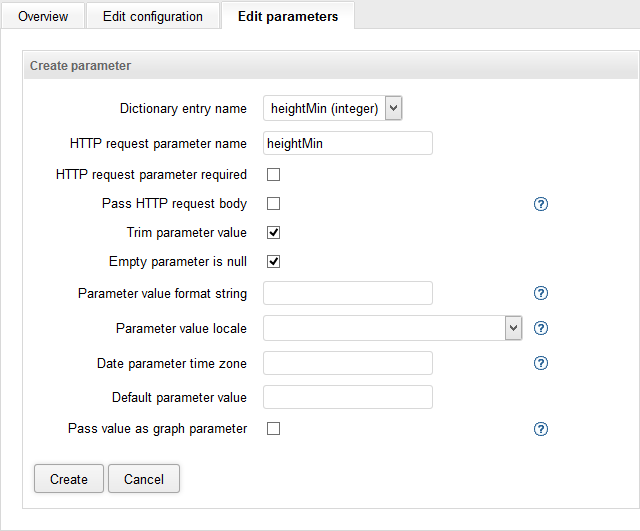 |
Figure 25.8. Creating new parameter
To add a new parameter binding, click on the “Add parameter” button. Every required a graph/jobflow listenerproperty defined by the job needs to be created here.
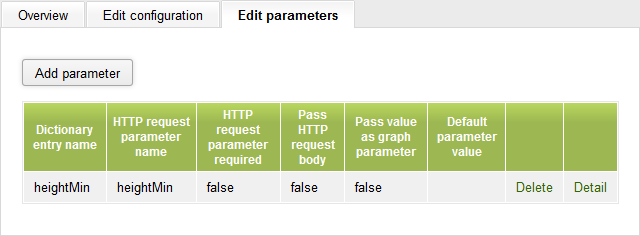 |
Figure 25.9. Edit Parameters tab
You can set the following fields for each property:
Dictionary entry name - The name of the Dictionary entry defined in the graph/jobflow that you want to bind.
HTTP request parameter name - The name of this property as it will be visible in the published service. This name can be different from Name.
HTTP request parameter required - If checked, the parameter is mandatory and an error will be reported if it’s omitted.
Pass HTTP request body - If checked, the request body is set to dictionary entry as readable channel.
Pass value as graph parameter - If checked, the property value will be passed to the job also as a parameter (${ParameterName}, where ParameterName is equal to Name). This lets you use the parameter anywhere in the job definition (not just places that support Dictionary). However, parameters are evaluated during job initialization. Thus, such a job cannot be pooled which decreases performance for high frequency repetitive calls to the service. In this case, consider redesigning the transformation to use Dictionary instead, allowing for pooling.
Default parameter value - The default value applied in case the parameter is omitted in the launch request.
Launch Services Authentication
If you are using launch services, you have two ways how to be logged in: using form-based authentication of Server console or HTTP basic authentication of Launch services.
The form-based authentication of Server console enables user to create or modify Launch services. If you are logged in this way, you act as an administrator of Launch services.
To insert data into the Launch service form you should be logged in using HTTP basic authentication. Follow the link to the Launch service form and web browser will request your credentials. If you are logged in using HTTP-basic authentication you act as an user of Launch services forms.
Sending the Data to Launch Service
A launch request can be sent via HTTP GET or POST methods. A launch request is simply a URL which contains the values of all parameters that should be passed to the job. The request URL is composed of several parts:
(You can use a Launch Services test page, accessible from the login screen, to test drive Launch Services.)
[Clover Context]/launch/[Configuration name]?[Parameters]
[Clover Context]is the URL to the context in which the CloverETL Server is running. Usually this is the full URL to the CloverETL Server (for example, for CloverETL Demo Server this would be http://server-demo.cloveretl.com:8080/clover).[Configuration name]is the name of the launch configuration specified when the configuration was created. In our example, this would be set to “mountains” (case-sensitive).[Parameters]is the list of parameters the configuration requires as a query string. It’s a URL-encoded [RFC 1738] list of name=value pairs separated by the "&" character.
Based on the above, the full URL of a launch request for our example with mountains may look like this: http://server-demo.cloveretl.com:8080/clover/launch/NewMountains?heightMin=4000. In the request above, the value of heightMin property is set to 4000.
Results of the Graph Execution
After the job terminates, the results are sent back to the HTTP client as content of an HTTP response.
Output parameters are defined in the job’s Dictionary. Every Dictionary entry marked as “Output” is sent back as a part of the response.
Depending on the number of output parameters, the following output is sent to the HTTP client:
No output parameters - Only a summary page is returned. The page contains: when the job was started, when it finished, the user name, and so on. The format of the summary page cannot be customized.
One output parameter - In this case, the output is sent to the client as in the body of the HTTP response with its MIME content type defined by the property type in Dictionary.
Multiple output parameters - In this case, each output parameter is sent to the HTTP client as part of the multipart HTTP response. The content type of the response is either multipart/related or multipart/x-mixed-replace, depending on the HTTP client (the client detection is fully automatic). The multipart/related type is used for browsers based on Microsoft Internet Explorer and the multipart/x-mixed-replace is sent to browsers based on Gecko or Webkit.
Launch requests are recorded in the log files in the directory specified
by the launch.log.dir property in the CloverETL Server configuration.
For each launch configuration, one log file named [Configuration name]#[Launch ID].log is created.
For each launch request, this file will contain only one line with
following tab-delimited fields:
(If the property launch.log.dir is not specified, log files are created in
the temp directory [java.io.tmpdir]/cloverlog/launch where "java.io.tmpdir" is system property)
Launch start time
Launch end time
Logged-in user name
Run ID
Execution status FINISHED_OK, ERROR or ABORTED
IP Address of the client
User agent of the HTTP client
Query string passed to the Launch Service (full list of parameters of the current launch)
In the case that the configuration is not valid, the same launch
details are saved into the _no_launch_config.log file in the same directory.
All unauthenticated requests are saved to the same file as well.