Decision tables are a "precise yet compact" (ref. Wikipedia) way of representing conditional logic, and are well suited to "business" level rules.
Drools supports managing rules in a Spreadsheet format. Formats supported are Excel, and CSV. Thus you can use a variety of spreadsheet programs (such as Microsoft Excel, OpenOffice.org Calc amongst others). It is expected that web based decision table editors will be included in a near future release.
Decision tables are an old concept (in software terms) but have proven useful over the years. Very briefly speaking, in Drools decision tables are a way to generate rules driven from the data entered into a spreadsheet. All the usual features of a spreadsheet for data capture and manipulation can be taken advantage of.
You may want to consider decision tables if you have rules that can be expressed as rule templates + data. In each row of a decision table, data is collected that is combined with the templates to generate a rule.
Many businesses already use spreadsheets for managing data, calculations etc. If you are happy to continue this way, you can also manage your business rules this way. This also assumes you are happy to manage packages of rules in .xls or .csv files. Decision tables are not recommenced for rules that do not follow a set of templates, or where there are a small number of rules (or if you don't want to use software like excel or open office). They are ideal in the sense that you can control what "parameters" of rules can be edited, without exposing the rules directly.
Decision tables also provide a degree of insulation from the underlying object model.
Here are some examples of real world decision tables (slightly edited to protect the innocent).


In the above examples, the technical aspects of the decision table have been collapsed away (standard spreadsheet feature).
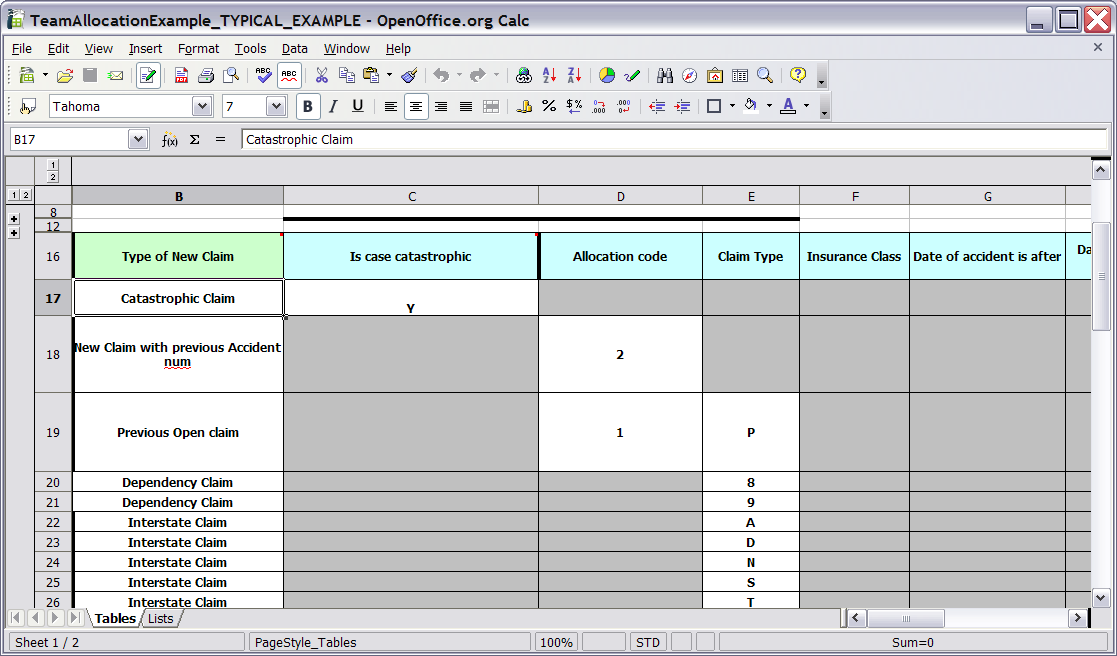
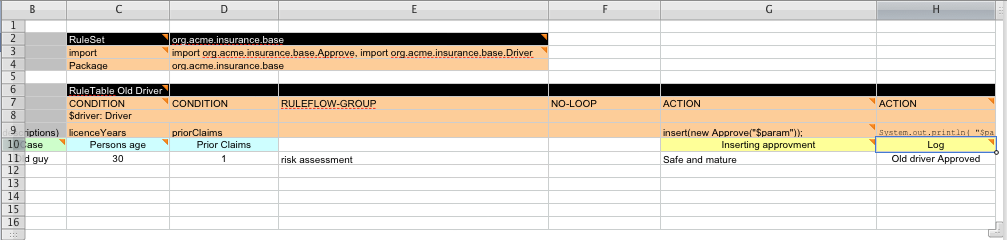
The rules start from row 17 (each row results in a rule). The conditions are in column C, D, E etc.. (off screen are the actions). You can see that the value in the cells are quite simple, and have meaning when you look at the headers in Row 16. Column B is just a description. It is conventional to use color to make it obvious what the different areas of the table mean.
Note that although the decision tables look like they process top down, this is not necessarily the case. It is ideal if you can author rules in such a way as order does not matter (simply as it makes maintenance easier, you are not trying to shift rows around all the time). As each row is a rule, the same principles apply. As the rule engine processes the facts, any rules that match may fire (some people are confused by this - it is possible to clear the agenda when a rule fires and simulate a very simple decision table where the first match exists). Also note that you can have multiple tables on the one spreadsheet (so rules can be grouped where they share common templates - yet at the end of the day they are all combined into a one rule package). Decision tables are essentially a tool to generate DRL rules automatically.
The key point to keep in mind is that in a decision table, each row is a rule, and each column in that row is either a condition or action for that rule.

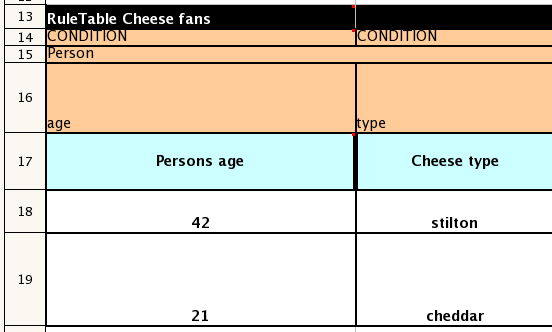
The spreadsheet looks for the "RuleTable" keyword to indicate the start of a rule table (both the starting row and column). Other keywords are also used to define other package level attributes (covered later). It is important to keep the keywords in the one column. By convention the second column ("B") is used for this, but it can be any column (convention is to leave a margin on the left for notes). In the following diagram, C is actually the column where it starts. Everything to the left of this is ignored.
If we expand the hidden sections, it starts to make more sense how it works. Note the keywords in column C.

Now you can see the hidden magic that makes it work. The RuleSet keyword indicates the name to be used in the "rule package" that all the rules will come under (the name is optional, it will have a default but you MUST have the "RuleSet" keyword) in the cell immediately to the right. The other keywords visible in Column C are: Import, Sequential which will be covered later - just note that in general the keywords make up name/value pairs. The RuleTable keyword is important as it indicates that a chunk of rules will follow, based on some rule templates. After the RuleTable keyword there is a name - this name is used to prefix the generated rules names (the row numbers are appended to create unique rule names). The column of RuleTable indicates the column in which the rules start (columns to the left are ignored).
Referring to row 14 (the row immediately after RuleTable): the keywords CONDITION and ACTION indicate that the data in the columns below are for either the LHS or the RHS parts of a rule. There are other attributes on the rule which can also be optionally set this way.
Row 15 contains declarations of "ObjectTypes" - the content in this row is optional (if you are not using it, you must leave a blank row - but you *will* want to use it !). When you use this row, the values in the cells below (row 16) become constraints on that object type. In the above case, it will generate: Person(age=="42") etc (where 42 comes from row 18). In the above example, the "==" is implicit (if you just put a field name, it will assume that you are looking for exact matches). Also note that you can have a ObjectType declaration span columns (via merged cells) - and that means that all columns below the merged range will be combined into the one set of constraints.
Row 16 contains the rule templates themselves: note that they can use the "$para" place holder to indicate where data from the cells below will be populated (you can use $param, or $1, $2 etc to indicate parameters from a comma separated list in a cell below). Row 17 is ignored - it is textual descriptions of the rule template.
Row 18 to 19 shows data, which will be combined (interpolated) with the templates in row 15, to generate rules. If a cell contains no data, then its template is ignored (eg it means that condition, or action, does not apply for that rule-row). Rule rows are read until there is a BLANK row. You can have multiple RuleTables in a sheet. Row 20 contains another keyword, and a value - the row positions of keywords like this do not matter (most people put them at the top) but their column should be the same one where the RuleTable or RuleSet keywords should appear (in this case column C has been chosen to be significant, but you can use column A if you like).
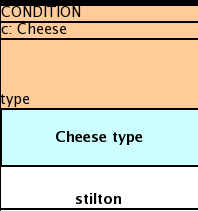
In the above example, rules would be rendered like the following (as it uses the "ObjectType" row):
//row 18
rule "Cheese_fans_18"
  when
    Person(age=="42")
    Cheese(type=="stilton")
  then
    list.add("Old man stilton");
end
Note that the [age=="42"] and [type=="stilton"] are interpreted as single constraints to be added to the respective ObjectType in the cell above (if the cells above were spanned, then there could be multiple constraints on one "column".
The syntax of what goes in the templates is dependent on if it is a CONDITION column or ACTION column. In most cases, it is identical to "vanilla" DRL for the LHS or RHS respectively. This means in the LHS, the constraint language must be used, and in the RHS it is a snippet of code to be executed.
The "$param" place holder is used in templates to indicate where data form the cell will be interpolated. You can also use "$1" to the same effect. If the cell contains a comma separated list of values, $1 and $2 etc. may be used to indicate which positional parameter from the list of values in the cell will be used.
For example: If the templates is [Foo(bar == $param)] and the cell is [ 42 ] then the result will be [Foo(bar == 42)]
If the template is [Foo(bar < $1, baz == $2)] and the cell is [42,42] then the result will be [Foo(bar > 42, baz ==42)]
For conditions: How snippets are rendered depends on if there is anything in the row above (where ObjectType declarations may appear). If there is, then the snippets are rendered as individual constraints on that ObjectType. If there isn't, then they are just rendered as is (with values substituted). If you put just a plain field (as in the example above) then it will assume you mean equality. If you put another operator at the end of the snippet, then the values will put interpolated at the end of the constraint, otherwise it will look for "$param" as outlined previously.
For consequences: How snippets are rendered also depends on if there is anything in the row immediately above it. If there is nothing there, the output is simple the interpolated snippets. If there is something there (which would typically be a bound variable or a global like in the example above) then it will append it as a method call on that object (refer to the above example).
This may be easiest to understand with some examples below.
The above shows how the Person ObjectType declaration spans 2 columns in the spreadsheet, thus both constraints will appear as Person(age == ... , type == ...). As before, as only the field names are present in the snippet, they imply an equality test.

The above condition example shows how you use interpolation to place the values in the snippet (in this case it would result in Person(age == "42")).

The above condition example show that if you put an operator on the end by itself, the values will be placed after the operator automatically.
You can of course put a binding in before the column (the constraints will be added from the cells below). You can put anything in the ObjectType row (eg it could be a pre condition for the columns in the spreadsheet columns that follow).

This shows how the consequence could be done the by simple interpolation (just leave the cell above blank, the same applies to condition columns) - with this style you can put whatever you want in the consequence (not just one method call).
The following table describes the keywords that are pertinent to the rule table structure.
Table 4.1. Keywords
| Keyword | Description | Is required? |
|---|---|---|
| RuleSet | The cell to the right of this contains the ruleset name | One only (if left out, it will default) |
| Sequential | The cell to the right of this can be true or false. If true, then salience is used to ensure that rules fire from the top down | optional |
| Import | The cell to the right contains a comma separated list of java classes to import | optional |
| RuleTable | A cell starting with RuleTable indicates the start of a definition of a rule table. The actual rule table starts the next row down. The rule table is read left-to-right, and top-down, until there is one BLANK ROW. | at least one. if there are more, then they are all added to the one ruleset |
| CONDITION | Indicates that this column will be for rule conditions | At least one per rule table |
| ACTION | Indicates that this column will be for rule consequences | At least one per rule table |
| PRIORITY | Indicates that this columns values will set the 'salience' values for the rule row. Over-rides the 'Sequential' flag. | optional |
| DURATION | Indicates that this columns values will set the duration values for the rule row. | optional |
| NAME | Indicates that this columns values will set the name for the rule generated from that row | optional |
| Functions | The cell immediately to the right can contain functions which can be used in the rule snippets. Drools supports functions defined in the DRL, allowing logic to be embedded in the rule, and changed without hard coding, use with care. Same syntax as regular DRL. | optional |
| Variables | The cell immediately to the right can contain global declarations which drools supports. This is a type, followed by a variable name. (if multiple variables are needed, comma separate them). | optional |
| NO-LOOP | if there is a column with the this keyword, the no-loop attribute will be set for the rule. Setting no-loop column means the attempt to create the Activation for the current set of data will be ignored. | optional |
| ACTIVATION-GROUP | Cell values in this column mean that the rule-row belongs to the given XOR/activation group . An Activation group means that only one rule in the named group will fire (ie the first one to fire cancels the other rules activations). | optional |
| RULEFLOW-GROUP | Cell values in this column mean that the rule-row belongs to the given RULEFLOW-GROUP. Ruleflow allows you to specify the order in which rule sets should be evaluated by using a flow chart. See the documentation for ruleflow on this manual | optional |
| Worksheet | By default, the first worksheet is only looked at for decision tables. | N/A |

The API to use spreadsheet based decision tables is in the drools-decisiontables module. There is really only one class to look at: SpreadsheetCompiler. This class will take spreadsheets in various formats, and generate rules in DRL (which you can then use in the normal way). Also note that if you like you can just use the SpreadsheetComiler to generate partial rule files, and assemble it into a complete rule package after the fact (this allows to you seperate technical and non technical aspects of the rules if needed).
To get started, you can find a sample spreadsheet and base it on that. Alternatively, if you are using the plug in (Rule Workbench IDE) the wizard can generate a spreadsheet for you from a template (to edit it you will need to use an xls compatible spreadsheet editor).

Spreadsheets are well established business tools (in use for over 25 years). Decision tables lend themselves to close collaboration between IT and domain experts, while making the business rules clear to business analysts, it is an ideal separation of concerns.
Typically, the whole process of authoring rules (coming up with a new decision table) would be something like:
Business analyst takes a template decision table (from a repository, or from IT)
Decision table business language descriptions are entered in the table(s)
Decision table rules (rows) are entered (roughly)
Decision table is handed to a technical resource, who maps the business language (descriptions) to scripts (this may involve software development of course, if it is a new application or data model !)
Technical person hands back and reviews the modifications with the business analyst.
The business analyst can continue editing the rule rows as needed (moving columns around is also fine etc).
In parallel, the technical person can develop test cases for the rules (liaising with business analysts) as these test cases can be used to verify rules and rule changes once the system is running.
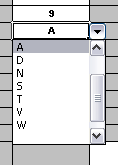
You can use the features of applications like Excel to provide assistance in entering data into spreadsheets, such as validating fields. You can use lists that are stored in other worksheets to provide valid lists of values for cells, like in the following diagram.
Some applications provide a limited ability to keep a history of changes, but it is recommended that an alternative means of revision control is also used. So when you are making changes to rules over time, older versions are archived (many solutions exist for this which are also open source, such as Subversion). http://www.drools.org/Business+rules+in+decision+tables+explained