Chapter 22. Execution
Test executables that have been linked using the Build/Tests operation against the current configuration can be executed by selecting Tools->Run Tests.
When tests are run, the Configuration Tool looks for a platform name corresponding to the currently loaded hardware template. If no such platform is found, a dialog will be displayed for you to define one; this dialog is similar to that displayed by the Add function in the Tools->Platforms dialog, but in this case the platform name cannot be changed.
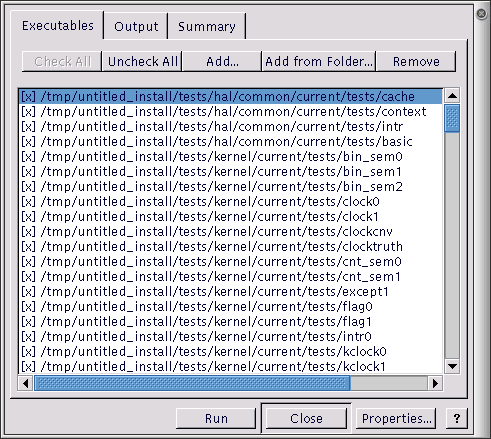
When a test run is invoked, a property sheet is displayed, comprising three tabs: Executables, Output and Summary.
Note that the property sheet is resizable.
Three buttons appear on the property sheet itself: Run/Stop, Close and Properties.
The Run button is used to initiate a test run. Those tests selected on the Executables tab are run, and the output recorded on the Output and Summary tabs. During the course of a run, the Run button changes to “Stop”. The button may be used to interrupt a test run at any point.
Properties
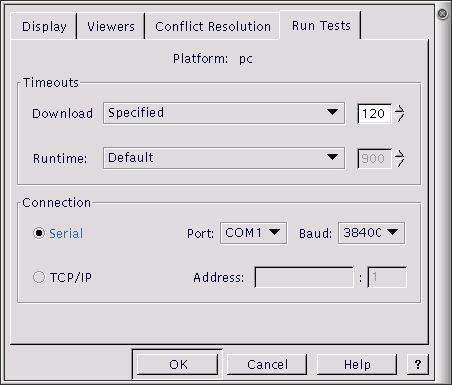
The Properties button is used to change the connectivity properties for the test run.
Download Timeout
This group of controls serves to set the maximum time that is allowed for downloading a test to the target board. If the time is exceeded, the test will be deemed to have failed for reason of “Download Timeout” and the execution of that particular test will be abandoned. This option only applies to tests run on hardware, not to those executed in a simulator. Times are in units of elapsed seconds.
Three options are available using the drop-down list:
Calculated from file size - an estimate of the maximum time required for download is made using the (stripped) executable size and the currently used baud rate
Specified - a user-specified value may be entered in the adjacent edit box
None - no maximum download time is to be applied.
Run time Timeout
This group of controls serves to set the maximum time that is allowed for executing a test on the target board or in a simulator. If the time is exceeded, the test will be deemed to have failed for reason of “Timeout” and the execution of that particular test will be abandoned. In the case of hardware, the time is measured in elapsed seconds: in the case of a simulator it is in CPU seconds.
Three options are available using the drop-down list:
None - no maximum download time is to be applied.
Specified - a user-specified value may be entered in the adjacent edit box
Default - a default value of 30 seconds is used
Connection
The Connection controls may be used to specify how the target board is to be accessed.
If the target board is connected using a serial cable, the Serial radio button should be checked. In this case you can select a port (COM1, COM2, …) and an appropriate baud rate using drop-list boxes.
If the target board is accessed remotely using GDB remote protocol, the “TCP/IP” radio button should be checked. In this case you can select a host name and TCP/IP port number using edit boxes.
Executables Tab
This is used to adjust the set of tests available for execution. A check box against each executable name indicates whether that executable will be included when the Run button is pressed. The Check All and Uncheck All buttons may be used to check or uncheck all items.
When the property sheet is first displayed, it will be pre-populated with those test executables that have been linked using the Build/Tests operation against the current configuration.
You can right-click in the window to display a context menu containing Add and Remove items. Clicking Remove will remove those executables selected. Clicking Add will display a dialog box that allows you to add to the set of items. Equivalently the Add button may be used to add executables, and the DEL key may be used to remove them.
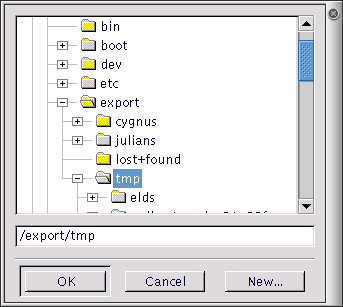
You can use the Add from Folder button to add a number of executables in a specified folder (optionally including subfolders, if you click on Yes when asked).
Output Tab
This tab is used to display the output from running tests. The output can be saved to a file or cleared by means of the popup menu displayed when you right-click in the window.
Summary Tab
This tab is used to display a record, in summary form, of those tests executed. For each execution, the following information is displayed:
Time - the date and time of execution
Host - the host name of the machine from which the test was downloaded
Platform - the platform on which the test was executed
Executable - the executable (file name) of the test executed
Status - the result of executing the test. This will be one of the following:
Not started
No result
Inapplicable
Pass
DTimeout
Timeout
Cancelled
Fail
Assert fail
Size - the size [stripped/unstripped] of the test executed
Download - the download time [mm:ss/mm:ss] used. The first of the two times displayed represents the actual time used: the second the limit time.
Elapsed - the elapsed time [mm:ss] used.
Execution - the execution time [mm:ss/mm:ss] used. The first of the two times displayed represents the actual time used: the second the limit time.
The output can be saved to a file or cleared by means of the popup menu displayed when you right-click in the window.


