|
 |
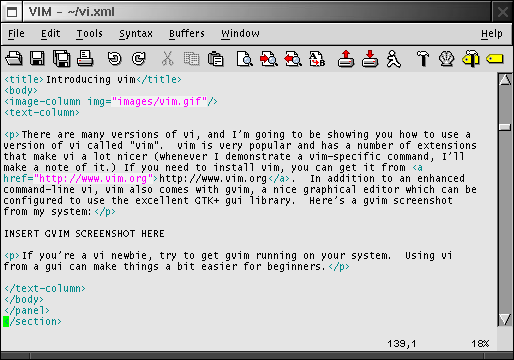
Learning vi -- the "cheatsheet" technique1. Getting Started This tutorial will show you how to use vi, a powerful visual editor. Using a special accelerated cheat sheet method, this tutorial is designed to make you a proficient vi user without requiring a huge time commitment. In this vi tutorial, you'll learn how to move around, edit text, use insert mode, copy and paste text, and use important vim extensions like visual mode and multi-window editing. If you either don't know or aren't comfortable using vi, then you owe it to yourself to take this tutorial and get up to speed with one of the most popular and powerful Linux/UNIX visual editing programs. There's one thing in particular that makes it difficult to learn vi -- vi has lots of commands. In order to use vi effectively, you need to memorize quite a few. This can take a long time, and one of the goals of this tutorial is not to take up a lot of your time. So, initially, we have a challenge -- how exactly do I help you to memorize lots of commands in a short period of time? To tackle this challenge, as we proceed through this tutorial, we're going to gradually put together a vi cheat sheet. This sheet will contain all the important vi commands. After you've completed this tutorial, you'll be able to refer to this cheat sheet if you forget a particular command. Over time, as you memorize commands, you'll gradually become less and less dependent on the cheat sheet. By using the cheat-sheet technique, you'll be able to learn how to use vi faster than ever possible before! In this guide, I'm going to use several techniques to help you learn. First, I'm going to describe how a particular command works, as you'd expect. Then, I'm going to ask you to try to use the command in vi (for practice), and then I'm going to ask you to transcribe the command to the cheat sheet (for later reference.) If you want to learn vi quickly, it's important that you perform all these steps. Trying out a command in vi and transcribing the command onto your cheat sheet will help you to memorize the command. There are many versions of vi, and I'm going to be showing you how to use a version of vi called vim. vim is very popular and has a number of extensions that make vi a lot nicer (whenever I demonstrate a vim-specific command, I'll make a note of it.) If you need to install vim, you can get it from www.vim.org. In addition to an enhanced command-line vi, vim also comes with gvim, a nice graphical editor which can be configured to use the excellent GTK+ gui library. Here's a gvim screenshot from my system:
If you're a vi newbie, try to get gvim running on your system. Using vi from a gui can make things a bit easier for beginners. 2. First Steps Before using vi to edit files, you need to know how to use vi to move around in a file. vi has a lot of movement commands, and we're going to take a look at many of them. For this part of the tutorial, find an unimportant text file and load it into vi by typing:
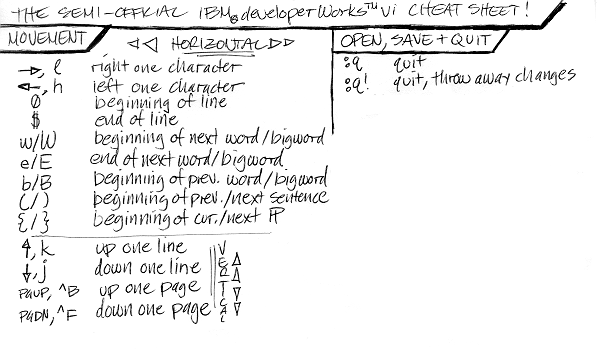
If you have vim installed, type vim myfile.txt. If you'd prefer to use gvim, type gvim myfile.txt. myfile.txt should be the name of a text file on your system. After vi loads, you should see a part of the text file you loaded on your screen. Congratulations -- you're in vi! Unlike many editors, when vi starts up, it is in a special mode called command mode. This means that if you press lon the keyboard, instead of inserting an l into the file at the current cursor position, the cursor will move one character to the right instead. In command mode, the characters on your keyboard are used to send commands to vi rather than insert literal characters into the text. One of the most essential types of commands are movement commands; let's take a look at some. 3. Moving around When in command mode, you can use the h,j,k and l keys to move the cursor left, down, up and right respectively. If you're using a modern version of vi, you can also use the arrow keys for this purpose. The h,j,k and l keys are handy because once you're comfortable with them, you'll be able to move around in the file without moving your fingers from the home keyboard row. Try using h,j,k and l (and the arrow keys) to move around in the text file. Try using h until you get to the beginning of a line. Notice that vi doesn't allow you to "wrap around" to the previous line by hitting h while you're on the first character. Likewise, you can't "wrap around" to the next line by hitting l at the end of a line. vi offers special shortcuts for jumping to the beginning or end of the current line. You can press 0 (zero) to jump to the first character of a line, and $ to jump to the last character of the line. Try 'em and see. Since vi has so many handy movement commands, it makes a great "pager" (like the more or less commands.) Using vi as a pager will also help you to learn all the movement commands very quickly. You can also use <CTR>F and <CTR>B to move forwards and backwards a page at a time. Modern versions of vi (like vim) will also allow you to use the PGUP and PGDOWN keys for this purpose. vi also allows you to move to the left or right by word increments. To move to the first character of the next word, press w. To move to the last character of the next word, press e. To move to the first character of the previous word, press b. Test 'em out. After playing around with the word movement commands, you may have noticed that vi considers words like foo-bar-oni as five separate words! This is because by default, vi delimits words by spaces or punctuation. foo-bar-oni is therefore considered five words: foo, -, bar, - and oni. Sometimes, this is what you want, and sometimes it isn't. Fortunately, vi also understands the concept of a "bigword". vi delimits bigwords by spaces or newlines only. This means that while foo-bar-oni is considered five vi words, it's considered only one vi bigword. To jump around to the next and previous bigword, you can use a capitalized word move command. Use W to jump to the first character of the next bigword, E to jump to the last character of the next bigword, and B to jump to the first character of the previous bigword. Test 'em out, and compare the matching word and bigword movement commands until you understand their differences. We just have a few more commands to cover before it's time to start puting together our cheat sheet. You can use the ( and ) characters to move to the beginning of the previous and next sentence. In addition, you can hit { or } to jump to the beginning of the current paragraph, and the beginning of the next. Test 'em out. 4. Quitting We've covered the basic movement commands, but there are another couple of commands that you need to know. Typing :q will quit vi. If this doesn't work, then you probably accidentally modified the file in some way. To tell vi to quit, throwing away any changes, type :q!. You should now be at the command prompt. In vi, any command that begins with a : is said to be an ex-mode command. This is because vi has a built-in non-visual editor called ex. It can be used similarly to sed to perform line-based editing operations. In addition, it can also be used to quit, as we've just seen. If you ever hit the Q key while in command mode, you'll be transported to ex mode. If this ever happens to you , you'll be confronted with a : prompt, and hitting enter will scroll the entire screen upwards. To get back to good 'ol vi mode, simply type vi and hit enter. 5. The Cheat Sheet The beginnings of the cheat sheet We've covered a lot of commands, and it's time to transcribe them to our cheat sheet. For the cheat sheet, you'll need a US letter or A4 sized piece of paper (we're going to pack a lot of info onto this sheet!) Here's a picture of my cheat sheet after I've transcribed all the commands that we've covered so far. Try to follow my layout if possible so that we can fit everything on one sheet.
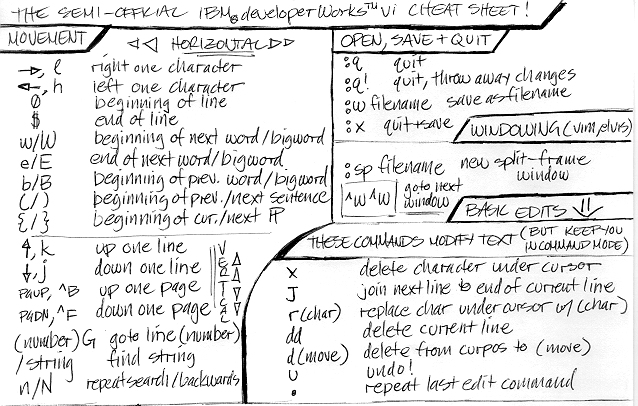
Let's continue our rapid command-covering pace. In command-mode, you can jump to a particularline by typing G. To jump to the first line of a file, type 1G. Note that G is capitalized. If you want to jump to the next occurence of a particular text pattern, type /<regexp> and hit enter. Replace <regexp> with the regular expression you're looking for. If you don't know how to use regular expressions, don't fret -- typing /foo will move to the next occurence of foo. The only thing you'll need to watch out for is when you want to refer to the literal ^, ., $ or \ characters. Prefix these characters with a backslash (\), and you'll be set. For example, /foo\.gif will search for the next occurence of "foo.gif". To repeat the search forwards, hit n. To repeat the search backwards, type N. As always, test these commands out in your very own vi editor. You can also type // to repeat the last search. 6. Saving and Editing We've covered how you can use the ex command :q to quit from vi. If you want to save your changes, type :w. If you want to save your changes to another file, type :w filename.txt to save as filename.txt. If you want to save and quit, type :x or :wq. In vim (and other advanced vi editors, like elvis):w, you can have multiple buffers open at once. To open a file into a new window, type :sp filename.txt. filename.txt will appear open for editing in a new split window. To switch between windows, type <CTR>w<CTR>w (control-w twice). Any :q, :q!, :w and :x commands that you enter will only be applied to the currently-active window. Now, it's time to start learning some of the simple editing commands. The commands that we'll cover here are considered simple because the commands keep you in command mode. The more complex editing commands automatically put you into insert mode -- a mode that allows you to enter literal data from the keyboard. We'll cover those in a bit. For now, try moving over some characters and hitting x repeatedly. You'll see that x will delete the current character under the cursor. Now, move to the middle of the paragraph somewhere in your text file, and hit J (capitalized). You'll see that the J command tells vi to join the next line to the end of the current line. Now, move over a character and hit r, and then type in a new character; you'll see that the original character has been replaced. Finally, move to any line in the file and type dd. You'll see that dd deletes the current line of text. You can repeat any editing command by hitting the . key. If you experiment, you'll see that typing dd... will delete 4 lines, and J...... will join four lines. As usual, vi provides with another handy shortcut. To delete text, you can also use the d command combined with any movement command. For example, dw will delete from the current position to the beginning of the next word; d) will delete up until the end of the next sentence, and d} will delete the remainder of the paragraph. Experiment with the d command and the other editing commands until you're comfortable with them. Now that we're experimenting with deletion, it would be a good time to learn how to undo any changes. By pressing u, the original version of vi allowed you to undo the last edit only. However, modern versions of vi like vim will allow you to repeatedly press u to continue to undo changes to your file. Try combining some d and u commands together. Time to update the cheat sheet! After adding all the commands we've covered so far, your cheat sheet should look like this:
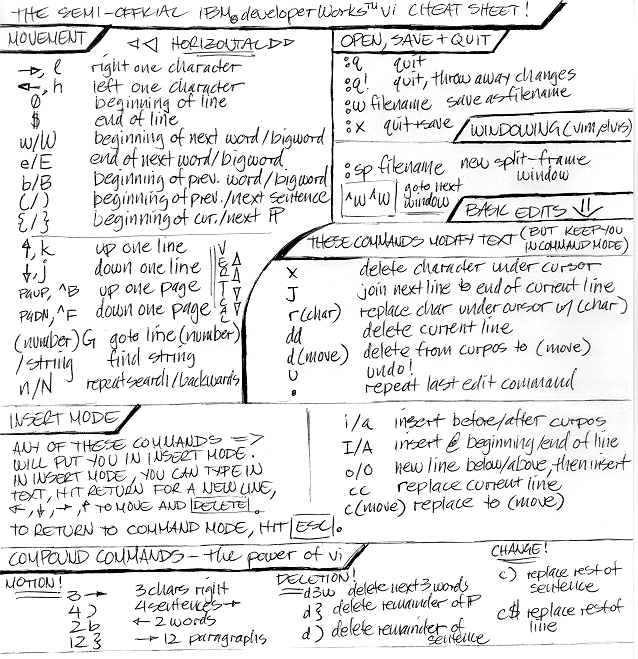
7. Insert mode So far, we've covered how to move around in vi, perform file i/o, and perform basic editing operations. However, I still haven't shown you how to actually type in free-form text! This was intentional, because vi's insert mode is a bit complicated at first. However, after you become comfortable with insert mode, its complexity (and flexibility) will become an asset. In vi insert mode, you'll be able to enter text directly to the screen just like you can in many other visual editors. Once you've entered your modifications, you can hit escape to return to command mode. You can enter insert mode by pressing i or a. If you press i, your text will be inserted before the current character, and if you hit a, your text will be appended after the current character. Remember, after you enter your text, hit <ESC> to return to command mode. Go ahead and try using the a and i commands. Hit either a or i, type some text, and then hit escape to get back to command mode. After hitting a or i, try hitting <ENTER>, and see what happens. Try using the arrow keys and the <DEL> key to get a feel for how insert mode works. By using the arrow keys and <DEL> key, you can perform significant editing steps without repeatedly entering and leaving insert mode. Here are some other handy ways to enter insert mode. Press A (captial) to begin appending to the end of the current line, regardless of your current position on the line. Likewise, press I (capital) to begin inserting text at the beginning of the current line. Press o to create a new blank line below the current line into which you can insert text, and press O (capital) to create a new line above the current line. To replace the entire current line with a new line, press cc. To replace everything from the current position to the end of the line, type c$. To replace everything from the current position to the beginning of the line, type c0. In addition to performing a special operation, every one of these commands will put you into insert mode. After typing in your text, hit <ESC> to return to command mode. We've used the c (change) command a little bit so far when we typed cc, c0 and c$. cc is a special form of the change command, similar to dd. the c0 and c$ commands are examples of using the change command in combination with a movement command. In this form, c works similarly to d, except that it leaves you in insert mode so that you can enter replacement text for the deleted region. Try combining some movement commands with c and test them out on your file (hint: cW, ce, c( .) 8. Compound Commands vi really becomes powerful when you start using compound ("combo") commands, like d{ and cw. In addition to these commands, you can also combine a number with any movement command, such as 3w, which will tell vi to jump three words to the right. Here are some more movement "combo" command examples: 12b, 4j. vi, in addition to allowing (number)(movement command) combinations, also allows d or c to be combined with a number or movement command. So, d3w will delete the next three words, d2j will delete the current and next two lines, etc. Test out some c and d combo moves to get a feel for how powerful and concise vi editing can be. Once these commands are second-nature, you'll be able to edit files at blazing speed. Time to update the cheat sheet again. Here's what it looks like so far:
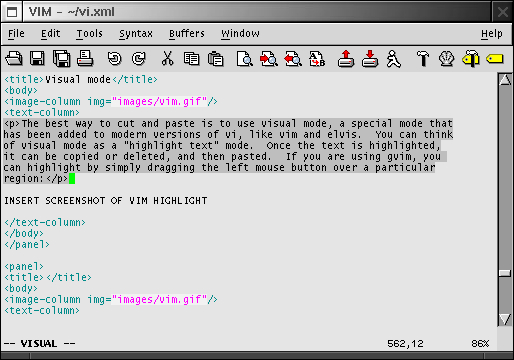
So far, we've covered how to move, save and quit, perform simple edits and deletions, and use insert mode. With everything listed on the cheat sheet so far, you should be able to use vi to perform almost any task. However, vi also has many more powerful commands. In this section, you'll learn how to cut, copy and paste, search and replace, and use autoindent features. These commands will help make vi more fun and productive. The best way to cut and paste is to use visual mode, a special mode that has been added to modern versions of vi, like vim and elvis. You can think of visual mode as a "highlight text" mode. Once the text is highlighted, it can be copied or deleted, and then pasted. If you are using gvim, you can highlight by simply dragging the left mouse button over a particular region:
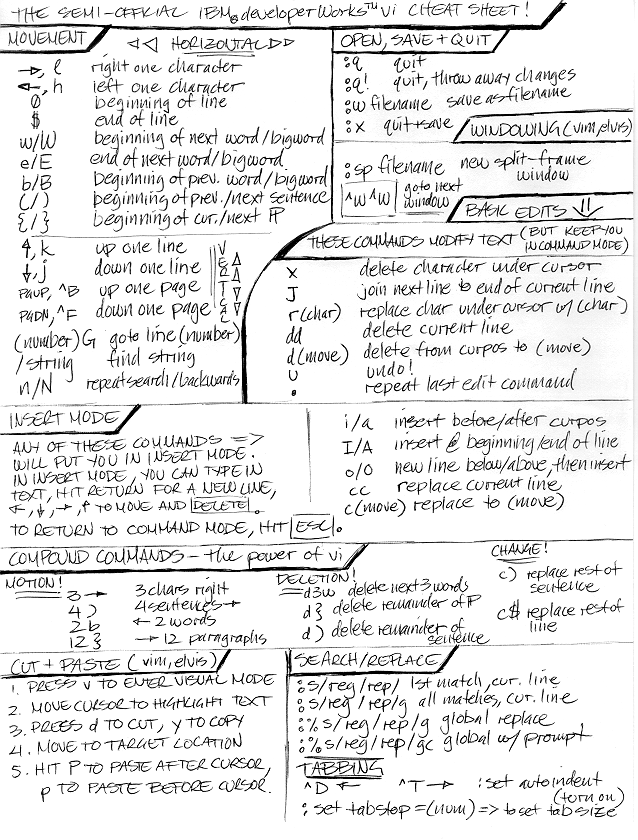
In addition, you can also enter visual mode by hitting v (this may be your only option if you are using vi from the console.) Then, by moving the cursor using movement commands (typically the arrow keys), you'll be able to highlight a region of text. Once highlighted, we are ready to cut or copy the text. If you're copying the text, hit y (which stands for "yank"). If you're cutting the text, hit d. You'll be placed back in command mode. Now, move to the position where you'd like to insert the cut or copied text, and hit P to insert before the cursor, or p to insert after the cursor. Voila, the cut/copy and paste is complete! Test out several copy/cut and paste operations before advancing to the next section. To replace patterns of text, we use ex mode. If you'd like to replace the first pattern that appears on the current line, type :s/<regexp>/<replacement>/ and hit <ENTER>, where <regexp> is the pattern you'd like to match and <replacement> is the replacement string. To replace all matches on the current line, type :s/<regexp>/<replacement>/g and hit enter. To replace every occurence of this pattern in your file (normally what you want), type :%s/<regexp>/<replacement>/g. If you'd like to do a global replace, but have vi prompt you for each change, type :%s/<regexp>/<replacement>/gc (stands for "confirm") and hit <ENTER>. vi supports autoindentation, for when you are editing source code. Most modern versions of vi (like vim) will auto-enable autoindent mode when you are editing a source file (like a .c file, for example). When autoindent is enabled, you can use <CTR>d (control-d) to move one indent level to the left, and <CTR>t (control-t) to move one indent level to the right. If autoindent wasn't enabled automatically, you can manually enable it by typing in the ex command :set autoindent. You can also tell vi to set the tab size to your favorite setting by using the :set tabstop command; :set tabstop=4 is quite popular. Well, we've reached the end of the vi tutorial! After adding all the advanced editing commands to your cheat sheet, it should look like this:
Keep your cheat sheet handy, and begin using vi to edit files and compose emails. Refer to the cheat sheet when needed; you'll find that within the week, you'll have nearly all the commands memorized and your vi productivity will shoot through the roof! If you want to use vi as your default editor make the following change to /etc/rc.conf:
Here are some resources you may find helpful as you continue to learn more about vi:
The original version of this article was first published on IBM developerWorks, and is property of Westtech Information Services. This document is an updated version of the original article, and contains various improvements made by the Gentoo Linux documentation team. |
|