Tutorial: Styling Data with CSS
This tutorial will walk through using CSS to style the (USA) states example data that is included with the default GeoServer installation. It also shows you the equivalent SLD code.
What you need before starting this tutorial:
- An installed copy of GeoServer 2.0 or greater. See Installation if you have not already installed GeoServer.
- The states layer from the default GeoServer configuration
- The CSS plugin installed. See Installing the CSS Module if you have not already installed the plugin.
What’s in the Box?
The CSS extension adds a page to the GeoServer web UI, linked from the sidebar. This page is only visible to logged-in administrators since it can modify the styles in GeoServer.
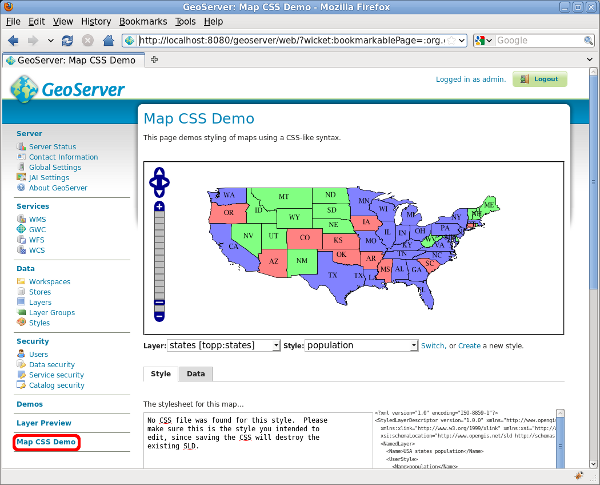
The CSS demo page can be used to switch between layers and styles. Note the sidebar link, highlighted in red.
After loading the CSS page, you can view any of the layers and styles in GeoServer by selecting them in the drop-down boxes directly beneath the map, then clicking the Switch link. You can overwrite any style by entering CSS into the form, but it is recommended that you avoid editing pre-existing styles since existing SLD styles are not reflected in the CSS. The Create link allows creating a new style with a CSS file attached to it.
Creating a States Style
The SLD file for the default states layer looks like this:
<?xml version="1.0" encoding="ISO-8859-1"?>
<StyledLayerDescriptor
version="1.0.0"
xmlns="http://www.opengis.net/sld"
xmlns:ogc="http://www.opengis.net/ogc"
xmlns:xlink="http://www.w3.org/1999/xlink"
xmlns:xsi="http://www.w3.org/2001/XMLSchema-instance"
xmlns:gml="http://www.opengis.net/gml"
xsi:schemaLocation="http://www.opengis.net/sld
http://schemas.opengis.net/sld/1.0.0/StyledLayerDescriptor.xsd
">
<NamedLayer>
<Name>USA states population</Name>
<UserStyle>
<Name>population</Name>
<Title>Population in the United States</Title>
<Abstract>A sample filter that filters the United States into three
categories of population, drawn in different colors</Abstract>
<FeatureTypeStyle>
<Rule>
<Title>< 2M</Title>
<ogc:Filter>
<ogc:PropertyIsLessThan>
<ogc:PropertyName>PERSONS</ogc:PropertyName>
<ogc:Literal>2000000</ogc:Literal>
</ogc:PropertyIsLessThan>
</ogc:Filter>
<PolygonSymbolizer>
<Fill>
<!-- CssParameters allowed are fill (the color) and fill-opacity -->
<CssParameter name="fill">#4DFF4D</CssParameter>
<CssParameter name="fill-opacity">0.7</CssParameter>
</Fill>
</PolygonSymbolizer>
</Rule>
<Rule>
<Title>2M - 4M</Title>
<ogc:Filter>
<ogc:PropertyIsBetween>
<ogc:PropertyName>PERSONS</ogc:PropertyName>
<ogc:LowerBoundary>
<ogc:Literal>2000000</ogc:Literal>
</ogc:LowerBoundary>
<ogc:UpperBoundary>
<ogc:Literal>4000000</ogc:Literal>
</ogc:UpperBoundary>
</ogc:PropertyIsBetween>
</ogc:Filter>
<PolygonSymbolizer>
<Fill>
<!-- CssParameters allowed are fill (the color) and fill-opacity -->
<CssParameter name="fill">#FF4D4D</CssParameter>
<CssParameter name="fill-opacity">0.7</CssParameter>
</Fill>
</PolygonSymbolizer>
</Rule>
<Rule>
<Title>> 4M</Title>
<!-- like a linesymbolizer but with a fill too -->
<ogc:Filter>
<ogc:PropertyIsGreaterThan>
<ogc:PropertyName>PERSONS</ogc:PropertyName>
<ogc:Literal>4000000</ogc:Literal>
</ogc:PropertyIsGreaterThan>
</ogc:Filter>
<PolygonSymbolizer>
<Fill>
<!-- CssParameters allowed are fill (the color) and fill-opacity -->
<CssParameter name="fill">#4D4DFF</CssParameter>
<CssParameter name="fill-opacity">0.7</CssParameter>
</Fill>
</PolygonSymbolizer>
</Rule>
<Rule>
<Title>Boundary</Title>
<LineSymbolizer>
<Stroke>
<CssParameter name="stroke-width">0.2</CssParameter>
</Stroke>
</LineSymbolizer>
<TextSymbolizer>
<Label>
<ogc:PropertyName>STATE_ABBR</ogc:PropertyName>
</Label>
<Font>
<CssParameter name="font-family">Times New Roman</CssParameter>
<CssParameter name="font-style">Normal</CssParameter>
<CssParameter name="font-size">14</CssParameter>
</Font>
<LabelPlacement>
<PointPlacement>
<AnchorPoint>
<AnchorPointX>0.5</AnchorPointX>
<AnchorPointY>0.5</AnchorPointY>
</AnchorPoint>
</PointPlacement>
</LabelPlacement>
</TextSymbolizer>
</Rule>
</FeatureTypeStyle>
</UserStyle>
</NamedLayer>
</StyledLayerDescriptor>
Now, let’s start on a CSS file that accomplishes the same thing. First, use the Create link to start a new style.
This creates an example style with the following source:
* {
  fill: lightgrey;
  stroke: black;
  mark: symbol(square);
}
This demonstrates the basic elements of a CSS style:
A selector that identifies some part of the data to style. Here, the selector is *, indicating that all data should use the style properties.
Properties inside curly braces ({}) which specify how the affected features should be styled. Properties consist of name/value pairs separated by colons (:).
We can also see the basics for styling a polygon (fill), line (stroke), or point marker (mark). Note that while the stroke and fill use colors, the marker simply identifies a Well-Known Mark with the symbol function.
See also
The Filter Syntax and Property Listing pages in this manual provide more information about the options available in CSS styles.
Let’s use these basics to start translating the states style. The first Rule in the SLD applies to states where the PERSONS field is less than two million:
<Rule>
<Title>< 2M</Title>
<ogc:Filter>
<ogc:PropertyIsLessThan>
<ogc:PropertyName>PERSONS</ogc:PropertyName>
<ogc:Literal>2000000</ogc:Literal>
</ogc:PropertyIsLessThan>
</ogc:Filter>
<PolygonSymbolizer>
<Fill>
<!-- CssParameters allowed are fill (the color) and fill-opacity -->
<CssParameter name="fill">#4DFF4D</CssParameter>
<CssParameter name="fill-opacity">0.7</CssParameter>
</Fill>
</PolygonSymbolizer>
</Rule>
Using a CQL-based selector, and copying the names and values of the CssParameters over, we get:
[PERSONS < 2000000] {
  fill: #4DFF4D;
  fill-opacity: 0.7;
}
For the second style, we have a PropertyIsBetween filter, which doesn’t directly translate to CSS:
<Rule>
  <Title>2M - 4M</Title>
  <ogc:Filter>
    <ogc:PropertyIsBetween>
      <ogc:PropertyName>PERSONS</ogc:PropertyName>
      <ogc:LowerBoundary>
        <ogc:Literal>2000000</ogc:Literal>
      </ogc:LowerBoundary>
      <ogc:UpperBoundary>
        <ogc:Literal>4000000</ogc:Literal>
      </ogc:UpperBoundary>
    </ogc:PropertyIsBetween>
  </ogc:Filter>
  <PolygonSymbolizer>
     <Fill>
        <!-- CssParameters allowed are fill (the color) and fill-opacity -->
        <CssParameter name="fill">#FF4D4D</CssParameter>
        <CssParameter name="fill-opacity">0.7</CssParameter>
     </Fill>
  </PolygonSymbolizer>
</Rule>
However, PropertyIsBetween can easily be replaced by a combination of two comparison selectors. In CSS, you can apply multiple selectors to a rule by simply placing them one after the other. Selectors separated by only whitespace must ALL be satisfied for a style to apply. Multiple such groups can be attached to a rule by separating them with commas (,). If a feature matches any of the comma-separated groups for a rule then that style is applied. Thus, the CSS equivalent of the second rule is:
[PERSONS > 2000000] [PERSONS < 4000000] {
  fill: #FF4D4D;
  fill-opacity: 0.7;
}
The third rule can be handled in much the same manner as the first:
[PERSONS > 4000000] {
  fill: #4D4DFF;
  fill-opacity: 0.7;
}
The fourth and final rule is a bit different. It applies a label and outline to all the states:
<Rule>
  <Title>Boundary</Title>
  <LineSymbolizer>
    <Stroke>
      <CssParameter name="stroke-width">0.2</CssParameter>
    </Stroke>
  </LineSymbolizer>
  <TextSymbolizer>
    <Label>
      <ogc:PropertyName>STATE_ABBR</ogc:PropertyName>
    </Label>
    <Font>
      <CssParameter name="font-family">Times New Roman</CssParameter>
      <CssParameter name="font-style">Normal</CssParameter>
      <CssParameter name="font-size">14</CssParameter>
    </Font>
    <LabelPlacement>
      <PointPlacement>
        <AnchorPoint>
          <AnchorPointX>0.5</AnchorPointX>
          <AnchorPointY>0.5</AnchorPointY>
        </AnchorPoint>
      </PointPlacement>
    </LabelPlacement>
  </TextSymbolizer>
</Rule>
This introduces the idea of rendering an extracted value (STATE_ABBR) directly into the map, unlike all of the rules thus far. For this, you can use a CQL expression wrapped in square braces ([]) as the value of a CSS property. It is also necessary to surround values containing whitespace, such as Times New Roman, with single- or double-quotes (", '). With these details in mind, let’s write the rule:
* {
  stroke-width: 0.2;
  label: [STATE_ABBR];
  label-anchor: 0.5 0.5;
  font-family: "Times New Roman";
  font-style: normal;
  font-size: 14;
}
Putting it all together, you should now have a style that looks like:
[PERSONS < 2000000] {
  fill: #4DFF4D;
  fill-opacity: 0.7;
}

[PERSONS > 2000000] [PERSONS < 4000000] {
  fill: #FF4D4D;
  fill-opacity: 0.7;
}

[PERSONS > 4000000] {
  fill: #4D4DFF;
  fill-opacity: 0.7;
}

* {
  stroke-width: 0.2;
  label: [STATE_ABBR];
  label-anchor: 0.5 0.5;
  font-family: "Times New Roman";
  font-style: normal;
  font-size: 14;
}
Press the Submit button at the bottom of the CSS form to save your changes and see your style applied to the states layer.
Surprise! The borders are missing. What happened? In the GeoServer CSS module, each type of symbolizer has a “key” property which controls whether it is applied. Without these “key” properties, subordinate properties are ignored. These “key” properties are:
- fill, which controls whether or not Polygon fills are applied. This specified the color or graphic to use for the fill.
- stroke, which controls whether or not Line and Polygon outline strokes are applied. This specifies the color (or graphic fill) of the stroke.
- mark, which controls whether or not point markers are drawn. This identifies a Well-Known Mark or image URL to use.
- label, which controls whether or not to draw labels on the map. This identifies the text to use for labeling the map, usually as a CQL expression.
- halo-radius, which controls whether or not to draw a halo around labels. This specifies how large such halos should be.
See also
The Property Listing page in this manual for information about the other properties.
Since we don’t specify a stroke color, no stroke is applied. Let’s add it, so that that last rule ends up looking like:
* {
  stroke: black;
  stroke-width: 0.2;
  label: [STATE_ABBR];
  label-anchor: 0.5 0.5;
  font-family: "Times New Roman";
  font-style: normal;
  font-size: 14;
}
Refining the Style
Removing Duplicated Properties
The style that we have right now is only 23 lines, a nice improvement over the 103 lines of XML that we started with. However, we are still repeating the fill-opacity attribute everywhere. We can move it into the * rule and have it applied everywhere. This works because the GeoServer CSS module emulates cascading, the “C” part of “CSS”. While SLD uses a painter’s model where each rule is processed independently, a cascading style allows you to provide general style properties and override only specific properties for particular features. Anyway, this takes the style down to only 21 lines:
[PERSONS < 2000000] {
  fill: #4DFF4D;
}

[PERSONS > 2000000] [PERSONS < 4000000] {
  fill: #FF4D4D;
}

[PERSONS > 4000000] {
  fill: #4D4DFF;
}

* {
  fill-opacity: 0.7;
  stroke-width: 0.2;
  label: [STATE_ABBR];
  label-anchor: 0.5 0.5;
  font-family: "Times New Roman";
  font-style: normal;
  font-size: 14;
}
Scale-Dependent Styles
The labels for this style are nice, but at lower zoom levels they seem a little crowded. We can easily move the labels to a rule that doesn’t activate until the scale denominator is below 2000000. We do want to keep the stroke and fill-opacity at all zoom levels, so we can separate them from the label properties:
* {
  fill-opacity: 0.7;
  stroke-width: 0.2;
}

[@scale < 20000000] {
  label: [STATE_ABBR];
  label-anchor: 0.5 0.5;
  font-family: "Times New Roman";
  font-style: normal;
  font-size: 14;
}
Setting Titles for the Legend
So far, we haven’t set titles for any of the style rules. This doesn’t really cause any problems while viewing maps, but GeoServer uses the title in auto-generating legend graphics. Without the titles, GeoServer falls back on the names, which in the CSS module are generated from the filters for each rule. Titles are not normally a part of CSS, so GeoServer looks for them in specially formatted comments before each rule. We can add titles like so:
/* @title Population < 2M */
[PERSONS < 2000000] {
  fill: #4DFF4D;
  fill-opacity: 0.7;
}

/* @title 2M < Population < 4M */
[PERSONS > 2000000] [PERSONS < 4000000] {
  fill: #FF4D4D;
  fill-opacity: 0.7;
}

/* @title Population > 4M */
[PERSONS > 4000000] {
  fill: #4D4DFF;
  fill-opacity: 0.7;
}

/* @title Boundaries */
* {
  stroke-width: 0.2;
  label: [STATE_ABBR];
  label-anchor: 0.5 0.5;
  font-family: "Times New Roman";
  font-style: normal;
  font-size: 14;
}
Because of the way that CSS is translated to SLD, each SLD rule is a combination of several CSS rules. This is handled by combining the titles with the word “with”. If the title is omitted for a rule, then it is simply not included in the SLD output.