# apt-get install xlibs xserver-xfree86 xbase-clients xfonts-base xterm
理論上,Debian 會自動補足其他所需要的軟體。
我們只需要選擇一套 Window Manager 就足夠了,每套 Window Manager 都有完整的管理視窗能力,但是實作上的外觀則大異其趣,如果您都不是很了解,建議您不妨先到每個 Window Manager 的官方站台去了解一番再來決定,當然最快的方法就是每套都裝,然後分別執行看看,實際操作是最快熟悉的不二法門喔。
apt-get install afterstep
apt-get install blackbox
apt-get install englihtenment
apt-get install fvwm
apt-get install icewm
apt-get install wmaker
搜尋相關 dock :
apt-cache search dock | grep wmaker
其他更詳細的資訊請參閱: Window Maker 使用大全
安裝完後,怎麼指定使用某套 Window Manager 呢?,請參閱 .xinitrc 小節說明。
# This file lists locales that you wish to have built. You can find a list
# of valid supported locales at /usr/share/doc/locales/SUPPORTED.gz. Other
# combinations are possible, but may not be well tested. If you change
# this file, you need to rerun locale-gen.

en_US ISO-8859-1
zh_TW BIG5
# apt-get install xfonts-intl-chinese
載入 『 xtt 』模組
把 /etc/XF86Config-4 的 module section 裡面的 Load "freetype" 改成 Load "xtt"。
Section "Module"
        Load    "xtt"  # 加入 xtt 模組
        Load    "ddc"
        Load    "GLcore"
        Load    "dbe"
        Load    "dri"
        Load    "extmod"
        Load    "glx"
        Load    "pex5"
        Load    "record"
        Load    "xie"
        Load    "bitmap"
        Load    "speedo"
        Load    "type1"
        Load    "vbe"
        Load    "int10"
EndSection
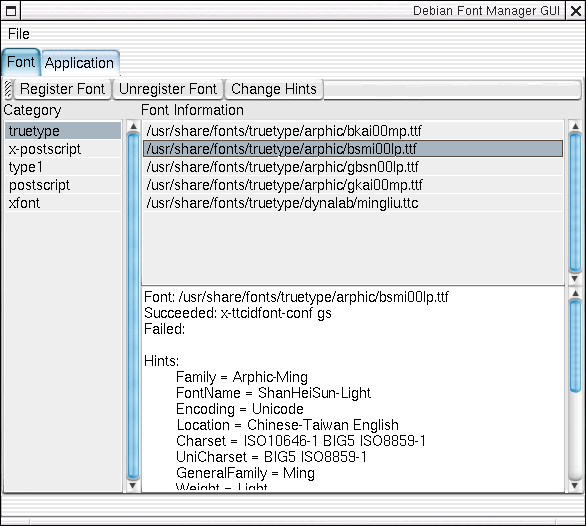
Debian 管理 TTF 與 CID 字型的大總管: Defoma
講句坦白話,我真的覺得微軟新細明體的中文字好漂亮,嘿嘿!現在我們就把他安裝進我們的 Debian 裡頭,第一步請找台有合法 Windows 的電腦把裡頭有個名叫 『 mingliu.ttc 』的檔案拷貝出來。
為了方便管理,我們將他放到:
/usr/share/fonts/truetype/dynalab/
理論上你可以擺在任何一個地方,上面的路徑只是個人習慣。
defoma-hints truetype mingliu.ttc > ttf-dynalab-mingliu.hints
它會產生基本的 hints ,我只在他產生的 .hints 加上一行
TTCap = halfwidth-bw=0.5 italic-angle=0.167 no-roblique no-oblique no-ritalic
如果不加這一行,細明體的英文會變成和中文一樣寬,很難看。 其他字型好像不加也沒關係!!不知道為什麼。
示範檔:
category truetype
begin /usr/share/fonts/truetype/dynalab/mingliu.ttc
  FaceNum = 2
  Family = MingLiU
  FontName = MingLiU-Regular
  Encoding = Unicode
  Location = Chinese-Taiwan English
  Charset = ISO10646-1 BIG5 ISO8859-1
  UniCharset = BIG5 ISO8859-1
  GeneralFamily = Ming
  Weight = Medium
  Width = Fixed
  Shape = Upright
  Alias = MingLiU
  Foundry = Dynalab
  Priority = 20
  X-Family = MingLiU
  TTCap = halfwidth-bw=0.5 italic-angle=0.167 no-roblique no-oblique no-ritalic
  Family1 = PMingLiU
  FontName1 = PMingLiU-Regular
  Encoding1 = Unicode
  Location1 = Chinese-Taiwan English
  Charset1 = ISO10646-1 BIG5 ISO8859-1
  UniCharset1 = BIG5 ISO8859-1
  GeneralFamily1 = Ming
  Weight1 = Medium
  Width1 = Fixed
  Shape1 = Upright
  Alias1 = PMingLiU
  Foundry1 = Dynalab
  Priority1 = 20
  X-Family1 = PMingLiU
  TTCap1 = halfwidth-bw=0.5 italic-angle=0.167 no-roblique  no-oblique no-ritalic
end
下達底下的命令,把 mingliu 的 hints 註冊到 defoma:
defoma-font reregister-all /etc/defoma/hints/ttf-dynalab-mingliu.hints
把 "/var/lib/defoma/x-ttcidfont-conf.d/dirs/TrueType" 路徑加入 /etc/X11/XF86Config-4,底下為 /etc/X11/XF86Config-4:
Section "Files"
#       FontPath        "unix/:7100"                    # local font server
        # if the local font server has problems, we can fall back on these
        FontPath        "/var/lib/defoma/x-ttcidfont-conf.d/dirs/TrueType"
        FontPath        "/var/lib/defoma/x-ttcidfont-conf.d/dirs/CID"
        FontPath        "/usr/lib/X11/fonts/100dpi"
        FontPath        "/usr/lib/X11/fonts/misc"
        FontPath        "/usr/lib/X11/fonts/cyrillic"
        FontPath        "/usr/lib/X11/fonts/100dpi/:unscaled"
        FontPath        "/usr/lib/X11/fonts/75dpi/:unscaled"
        FontPath        "/usr/lib/X11/fonts/Type1"
        FontPath        "/usr/lib/X11/fonts/Speedo"
        FontPath        "/usr/lib/X11/fonts/75dpi"
EndSection

LC_ALL=zh_TW.Big5
LC_ALL=zh_TW.Big5
XMODIFIERS="@im=xcin"
如果你是使用 bash 可以將這些環境變數寫入 $HOME/.bashrc
如下:
              export LC_ALL=zh_TW.Big5
              export LANG=zh_TW.Big5
              export XMODIFIERS="@im=xcin"
系統預設環境設定,如果想讓系統預設就在繁體中文的環境,可以設定如下:
LANG=zh_TW
這樣設定後,系統上的任何使用者都會在繁體中文的環境底下。
以 gtk+ toolkit 所撰寫程式 ( 如 GNOME 、gedit 、galeon ..) 之中文字型使用設定檔。
我的 /etc/gtk/gtkrc.zh_TW.big5 :
# $(gtkconfigdir)/gtkrc.zh_TW
#
# This file defines the fontsets for Chinese language (ch) using
# the traditional chinese Big5 encoding as used in Taiwan (TW)
#
# 1999, Pablo Saratxaga <[email protected]>
#

# IMPORTANT NOTE: The name of this file *MUST* be "gtkrc.zh_TW.big5"
# the lowercasing of "big5" is done on purpose, if you change it it won't work

style "gtk-default-zh-tw" {
        fontset = "-adobe-helvetica-medium-r-normal--16-*-*-*-*-*-iso8859-1,\
                  -default-mingliu-medium-r-normal--16-160-72-72-m-160-big5-0,\
                  -default-mingliu-bold-i-normal--16-160-72-72-c-160-big5-0,*-r-*"
}
class "GtkWidget" style "gtk-default-zh-tw"
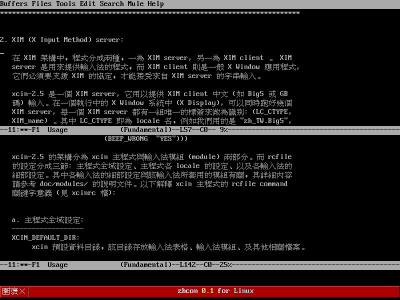
由 startx 指令啟動 X Window 會來讀取的設定檔,我們可以把想一進入 X 就執行的程式寫在這裡面,最常看到的這類軟體就是 IM ( Input Method ) ,例如: xcin,而螢幕保護程式也可以在這裡啟動,不管任何程式都請注意要在背景執行 ( 就是加上 『 & 』背景執行符號 ),此外我也習慣把一些相關的環境變數一併在這裡設定如:XMODIFIERS。
這個設定檔的設定技巧在於最後一行通常是指定 Window Manager ( 如:wmaker 、 icewm 、afterstep 、 fvwm ..) ,而且記得一定要是前景執行 ( 就是不能在命令後面加上 『 & 』 背景執行符號 )。
注意!如果您的 $HOME 底下沒有 .xinitrc 這個檔案,請自行產生吧!
我的 $HOME/.xinitrc:
#!/bin/sh
#
export LC_ALL=zh_TW.Big5
export LANG=zh_TW.Big5
export XMODIFIERS="@im=xcin"
exec xcin &
exec myterm &
exec esd -nobeeps &
exec xscreensaver -no-splash -lock-mode -timeout 5 &
exec wmaker
如果您是由 xdm ( 或 Login.app 、 gdm 、 kdm ..) 登入,則 X 會讀取 .xsession 這個設定檔,不過用法是與 .xinitrc 相同的。
安裝印表機需要的套件有下面兩種方案:
apt-get install cupsys cupsys-client cupsys-bsd cupsomatic-ppd
使用 kde 2.2 的人要再加上:
apt-get install kdelibs3-cups
打開您愛用的瀏覽器,執行 http://localhost:631 來設定印表機,裡面有線上說明,很方便。(kde 使用者也可以經由 control center 來設定印表機)
只要下 apt-get install printtool,其餘套件會自動補齊。然後以 root 的身份執行printtool,選好印表機型號就可以了。
第一種方案支援的印表機種類比較多。
安裝 defoma 和 x-ttfcidfont-conf 等相關套件,然後再安裝下列套件:gs、gs-cjk-resource、gsfonts* 、cmap-adobe-*、psfontmgr、gv。
關於這一方面, defoma 和其相關套件真的是很方便的工具。只要安裝了 defoma、x-ttcidfont-conf、psfontmgr、cmap-adobe-* 等套件,以後我們在安裝 truetype 字型時,系統就會自動幫我們設定好 x 和 gs 的字型 (gs 6.51 可以使用 truetype)。但是還是少了一個步驟,因為 gs 會跟我們抱怨它找不到字型,我們必須為各字型編寫相對應的 gsf 字型描述檔,底下是小弟的 Arphic-Kai-Eten-B5-H.gsf 內容:
          /Arphic-Kai-Eten-B5-H
          /ZenKai-Medium (Zenkai-Medium)
          /Eten-B5-H (Eten-B5-H)

          1 index /CMap resourcestatus
          {pop pop pop}
          {runlibfile} ifelse
          /CMap findresource

          3 1 roll
          1 index /CIDFont resourcestatus
          {pop pop pop}
          {runlibfile} ifelse
          /CIDFont findresource

          [ exch ] composefont pop
底下是小弟的 Arphic-Kai-Eten-B5-V.gsf 的內容:
          /Arphic-Kai-Eten-B5-V
          /ZenKai-Medium (ZenKai-Medium)
          /Eten-B5-V (Eten-B5-V)

          1 index /CMap resourcestatus
          {pop pop pop}
          {runlibfile} ifelse
          /CMap findresource

          3 1 roll
          1 index /CIDFont resourcestatus
          {pop pop pop}
          {runlibfile} ifelse
          /CIDFont findresource

          [ exch ] composefont pop
底下是 Arphic-Ming-Eten-B5-H.gsf 的內容:
/Arphic-Ming-Eten-B5-H
/ShanHeiSun-Light (ShanHeiSun-Light)
/Eten-B5-H (Eten-B5-H)

1 index /CMap resourcestatus
{pop pop pop}
{runlibfile} ifelse
/CMap findresource

3 1 roll
1 index /CIDFont resourcestatus
{pop pop pop}
{runlibfile} ifelse
/CIDFont findresource

[ exch ] composefont pop
底下是 Arphic-Ming-Eten-B5-V.gsf 的內容:
/Arphic-Ming-Eten-B5-V
/ShanHeiSun-Light (ShanHeiSun-Light)
/Eten-B5-V (Eten-B5-V)

1 index /CMap resourcestatus
{pop pop pop}
{runlibfile} ifelse
/CMap findresource

3 1 roll
1 index /CIDFont resourcestatus
{pop pop pop}
{runlibfile} ifelse
/CIDFont findresource

[ exch ] composefont pop
編寫完 gsf 檔以後,將上面四個檔案放在 /var/lib/defoma/gs.d/dirs/fonts/ 這個目錄底下。接下來在自己家目錄底下的 .bashrc 裡面加入: export GS_FONTPATH=/home/username/ (/home/username 就是您的家目錄囉) 接著在自己的家目錄增加一個檔案 Fontmap,其內容加下 (注意分號之前必須要有 一個空格):
/Arphic-Kai-Eten-B5-H (Arphic-Kai-Eten-B5-H.gsf) ;
/Arphic-Kai-Eten-B5-H (Arphic-Kai-Eten-B5-H.gsf) ;
/Arphic-Ming-Eten-B5-H (Arphic-Ming-Eten-B5-H.gsf) ;
/Arphic-Ming-Eten-B5-H (Arphic-Ming-Eten-B5-H.gsf) ;
/MSung-Light-B5-H /Arphic-Ming-Eten-B5-H ;
以上是以普通使用者的身份去作設定,所以只有這位使用者可以使用這個設定。假 如您想要讓系統裡所有的使用者都可以使用這個設定的話,您可以登入成系統管理 者的身份,將 Fontmap 放在您自訂的目錄裡 (例如 /usr/local/etc/Fontmap), 並且在 /etc/bash.bashrc 設定好您要 export GS_FONTPATH 的路徑就可以了 (例 如 export GS_FONTPATH=/usr/local/etc/)。這樣的設定方式的好處是我們再也不 必擔心每次有任何 ttf 字型套件或是 gs 套件的更新,我們又要修改一次設定了。
另外值得一提的是 windows 的 mingliu 不能拿來做列印使用,雖然在 x 下的字 型小於 20 的顯示效果很棒,但是列印出來的都是支離破碎的字體。如果有將 mingliu 註冊到 defoma 的網友可能必須將 /var/lib/defoma/gs.d/dirs/fonts/CIDFnmap 裡面的 /MOESung-Regular/MingLiU-Medium 給去掉,免得應用程式在使用 MOESung 時會被 MingLiU 給取代。
安裝 cupsys 的網友在執行非 kde 的應用程式來作列印工作之前,要檢 查送出來的列印指令為 lp 而不是 lpr (例如mozilla、abiword、gv、gedit.... 等等)
有些文字編輯器在列印或是輸出成 ps 檔時是預設使用 MSung-Light-B5-H。您也可以按照下列網址的步驟安裝教育部的字型 (感謝李柏鋒兄的文章): http://lists.debian.org/debian-chinese/1999/debian-chinese-199912/msg00057.html
(裡面的下載網址有誤,要把 orilly 改成 oreilly,CMap 不必下載,因為已經有 cmap-adoube-* 等套件)。在 /home/username/Fontmap (或是您自己設定的檔名) 裡面您可以自行決定要把 MSung-Light-B5-H 指向 Arphic-MingB5 或是
MOESung-Regular-ETen-B5-H。以下是小弟的 Fontmap 範例:
/MOEKai-Regular-ETen-B5-H (MOEKai-Regular-ETen-B5-H.gsf) ;
/MOEKai-Regular-ETen-B5-V (MOEKai-Regular-ETen-B5-V.gsf) ;
/MOESung-Regular-ETen-B5-H (MOESung-Regular-ETen-B5-H.gsf) ;
/MOESung-Regular-ETen-B5-V (MOESung-Regular-ETen-B5-V.gsf) ;
/MSung-Light-B5-H /MOESung-Regular-ETen-B5-H ;
/Arphic-Kai-ETen-B5-H (Arphic-Kai-ETen-B5-H.gsf) ;
/Arphic-Kai-ETen-B5-V (Arphic-Kai-ETen-B5-V.gsf) ;
/Arphic-Ming-ETen-B5-H (Arphic-Ming-ETen-B5-H.gsf) ;
/Arphic-Ming-ETen-B5-V (Arphic-Ming-ETen-B5-V.gsf) ;
這邊只是補充說明,已經安裝 "cups + cupsomatic-ppd" 或是 "printtool + printfilter-ppd" 的使用者可以不用管這邊的說明。
使用哪個 Filter (driver) 跟 gv 能不能顯示中文應該是沒有關係 ,只要上面所 提的設定弄好後,應該就可以正常顯示中文了;可是 Filter (driver) 卻跟印表 機可不可以印出中文有很大的關係。原本小弟使用 cupsys-driver-gimpprint 的 "EPSON Stylus Color 460, CUPS+GIMP-Print V4.1.99-b1",即使 gv 可以正常顯 示 ps 檔裡面的中文,可是印出來的還是框框。但是小弟改用 cupsomatic-ppd 的 "Epson Stylus Color 460, Foomatic+stc.upp"後就可以印出漂亮的中文了,小弟 也不清楚為什麼。
以上是針對 cups 的使用者,如果是使用 printtool 和 printfilter-ppd 的人就 沒有這個問題,他們可以直接列印中文,但是 printtool + printfilter-ppd 所 支援的印表機型號比較少。
測試環境為 Debian testing,使用的套件皆為 testing 裡面的套件。
修改 /usr/lib/mozilla/defaults/pref/unix.js 的後面幾行:
pref("print.postscript.nativecode.zh-TW", "big5");
pref("print.postscript.nativefont.zh-TW", "Arphic-Ming-ETen-B5-H");
(直接在 Mozilla 下列印中文的情況與其他簡易文字編輯器一樣,只能固定一種字型。)