NPACI Rocks Cluster Distribution: Reference Guide: 
| ||
|---|---|---|
| Prev | Chapter 2. Roll Developers Guide | Next |
This section guides developers on how to build a Roll.
To get started, login to a Rocks frontend and mirror the Rocks distribution and perform a CVS checkout of the Rocks code.
After the CVS checkout is completed, go to the top-level roll directory:
# cd rocks/src/roll |
You should see something similar to:
bin cacl etc hpc metaroll.mk patch birn condor gfarm intel nbcr pbs birn-oracle1 CVS grid java ninf sge birn-oracle2 demo grid-rocks-ca Makefile optiputer top500 |
Now create a new directory for your roll -- the direcory name will be the name of your roll. For example, let's say you want your roll to be called skel:
# mkdir skel |
To describe what directories and files you need to build your roll, we'll use the intel roll as a guide. In the directory intel, you'll see:
CVS graphs Makefile nodes RPMS src SRPMS version.mk |
Copy the files Makefile and version.mk into your roll:
# cp Makefile version.mk ../skel/ |
The first file, Makefile, should remain unchanged. It includes other files in order to drive the roll building process.
The second file, version.mk, should only be modified if you wish to change the version number or release number of your roll.
Now make the directories: graphs, nodes, RPMS, SRPMS and src. Your roll should look like:
< roll name > ----+ | +- graphs -+ | +- nodes -+ | +- RPMS -+ | +- SRPMS -+ | +- src -+ | +- version.mk | +- Makefile |
Inside the nodes directory, you will put your Rocks-based XML configuration files. These files are used to install packages and to configure their respective services.
In the Intel Roll, the file roll/intel/nodes/intel.xml has the package names for the compilers to be installed on specific hardware architectures. For example, the intel-icc8 is installed with the line:
<package>intel-icc8</package> |
Inside the nodes directory, you will put your Rocks-based XML configuration files. These files are used to install packages and to configure their respective services. See the Kickstart XML section for node file syntax.
In the Intel Roll, the file roll/intel/nodes/intel.xml has the package names for the compilers to be installed on specific hardware architectures. For example, the intel-icc8 is installed with the line:
<package>intel-icc8</package> |
The <post> section of the node roll/intel/nodes/intel.xml shows how the packages are configured after they are installed.
Inside the graphs directory, you should create another directory named default.
Looking back at the Intel Roll, there is one file in its graphs/default directory called: roll/intel/graphs/default/intel.xml.
This file describes how all the files in the nodes directory are linked together in the kickstart graph. For example, in roll/intel/graphs/default/intel.xml we see that the XML configuration node file roll/intel/nodes/intel.xml is linked into the frontend node.
To see how this works, below is an excerpt from the kickstart graph when the Intel Roll is installed:
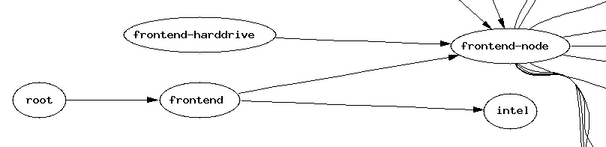
The edge which travels from the node labeled frontend to the node labeled intel is result of the specification found in roll/intel/graphs/default/intel.xml which looks like:
<edge from="frontend">
        <to>intel</to>
</edge> |
See the Graph XML section for graph file syntax.
This section describes how to use the nodes and graphs files to direct the installer to add packages to the frontend or the compute nodes.
Say you have 4 packages and they're named: package-one, package-two, package-three and package-four. You want to add package-one and package-two to the frontend and you want to add package-three and package-four to the compute nodes. Also, say the name of your roll is diamond.
First, in your development source tree, you'll create the file roll/diamond/nodes/diamond-frontend.xml which looks like:
<?xml version="1.0" standalone="no"?> <kickstart> <description> The Diamond Roll. </description> <changelog> </changelog> <package>package-one</package> <package>package-two</package> <post> <!-- post configuration scripts go here --> </post> </kickstart> |
Then you'll create the file roll/diamond/nodes/diamond-compute.xml which looks like:
<?xml version="1.0" standalone="no"?> <kickstart> <description> The Diamond Roll. </description> <changelog> </changelog> <package>package-three</package> <package>package-four</package> <post> <!-- post configuration scripts go here --> </post> </kickstart> |
Now you'll create the graph file roll/diamond/graphs/default/diamond.xml. This file is what links the nodes files diamond-frontend.xml and diamond-compute.xml into the full kickstart graph that is created on the frontend during the frontend's installation.
The graph file for the diamond roll:
<?xml version="1.0" standalone="no"?> <graph> <description> The Diamond Roll. </description> <changelog> </changelog> <edge from="frontend"> <to>diamond-frontend</to> </edge> <edge from="compute"> <to>diamond-compute</to> </edge> </graph> |
During the installation of the frontend, the frontend's kickstart graph will be generated after all the rolls have been inserted by the user. That is, when the user answers 'No' to the the install screen that asks 'Do you have a Roll CD/DVD?', the installer will traverse the graph files and node files from all the rolls that were added to the frontend and build a RedHat-compliant kickstart file based on which nodes it traverses. The installation of the frontend is dictated by this generated kickstart file.
In the above example, for a frontend installation, the node file diamond-frontend will be traversed (and therefore included in the frontend's kickstart file), but the node file diamond-compute will not.
But, after the frontend is installed and when compute nodes are being installed, the node file diamond-compute will be traversed (and therefore included in the computes' kickstart file), but the node file diamond-frontend will not.
If you have any pre-built RPMS (for example, an RPM that you downloaded), you should place them in the RPMS directory.
All RPMS that you build from scratch (which will be built out of the files found under the src directory) will be automatically put in this directory.
If you have any pre-built SRPMS (for example, an SRPM that you downloaded), you should place them in the SRPMS directory.
All SRPMS that you build from scratch (which will be built out of the files found under the src directory) will be automatically put in this directory.
If your roll requires RPMs to be built from source, you'll place the tarballs under the src directory. If your roll doesn't need to build any source code, that is, it only includes downloaded pre-built RPMS, then the src directory is not needed and you should skip this step.
Looking at the Intel Roll, you'll see the file: roll/intel/src/Makefile. Copy this file into your src directory. You will not need to modify this file -- it simply drives the source code building process.
Now, in the Intel Roll, you'll see the directory: roll/intel/src/mpich-eth. Inside that directory, you'll see: Makefile, mpich-1.2.5.2.tar.gz, mpich.spec.in and patch-files.
The file mpich-1.2.5.2.tar.gz is the tarball as downloaded from the MPICH web site.
The directory patch-files is used to patch some of the files inside the mpich tarball. If you don't need to patch any files, ignore this directory.
The file mpich.spec.in is a RedHat spec file that directs rpmbuild on how to assemble the RPM. For an in-depth description of spec files, see Maximum RPM.
The file Makefile drives the building of the RPM.
Copy the files Makefile and mpich.spec.in to your src directory and experiment with them in order to build an RPM for your source code.