

|
|
|
Populate a distributed database with tables that already exist in local databases by registering those tables in your distributed database. To do this, use the Register as Link Statement. However, StarView provides an easy way to search for, select, and register local tables in your distributed database.
StarView also allows you to delete the registration of these tables using the Remove operation. Removing the registration of a table from your distributed database does not affect the underlying tables in the local database. To delete the table from a local database, you must quit StarView and use the drop statement.
|
|
|
To register tables in your distributed database, follow these steps:
The StarView main frame is displayed.
The Node Status and Local Database Types frame is displayed.
As an alternative to Steps 1, 2, and 3, at the operating system command line type starview distdbname. The Node Status and Local Database Types frame is displayed.
The Distributed Database Contents frame is displayed.
A pop-up window listing the nodes is displayed.
A pop-up window listing the databases on your selected node is displayed.
The pop-up window listing all the objects in your selected database is displayed:
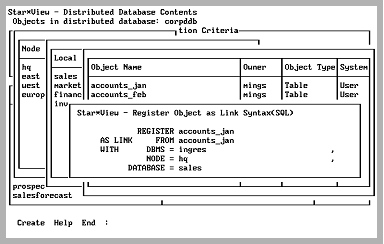
The following Register Object as Link Syntax pop-up window is displayed:
If an object is highlighted when you choose the Register operation, the REGISTER, FROM, NODE, and DATABASE fields are completed for you automatically by StarView.
To register a table with a different registered name to its local name, enter the name in the REGISTER field of the Register Object as Link Syntax window and choose Create from the menu.
To register a table with a registered name that is the same as its local name, simply choose Create from the menu.
|
|
|
To register other types of local database objects such as views in your distributed database, you follow exactly the same procedure as for registering tables.