| Inkscape » Positioning and Transforming » Alignment and Distribution of Objects |    |
|---|
| Inkscape » Positioning and Transforming » Alignment and Distribution of Objects | |
|---|
This section describes the
Align and Distribute dialog
( →
![]() Align and Distribute...
(Shift+Ctrl+A))
which allows the positioning of objects with respect to other
objects or to the selection, drawing, or page. Two types of positioning
are available: alignment where the centers or edges of
objects are aligned to one another, and distributing
where objects are distributed in some direction based on their
centers or edges.
Align and Distribute...
(Shift+Ctrl+A))
which allows the positioning of objects with respect to other
objects or to the selection, drawing, or page. Two types of positioning
are available: alignment where the centers or edges of
objects are aligned to one another, and distributing
where objects are distributed in some direction based on their
centers or edges.
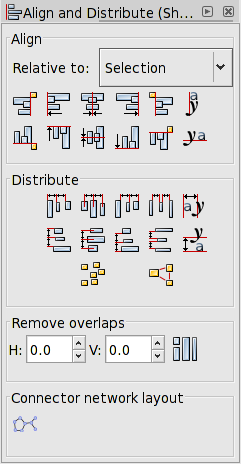
The alignment of objects is with respect to an anchor. The anchor can be an object or be defined by the selection, drawing, or page; the choice of what is used is set in the pull-down menu Relative to. The object may be specified to be the first or last object selected. If multiple objects are selected at the same time, this is equivalent to the top or bottom object in z-order. Alternatively, the object can be specified to be the biggest or smallest item, where size is determined by the size of the bounding box, the width for vertical alignment and the height for horizontal alignment. The bounding box sides are used as the reference points for alignment except for text, where the baseline is used.
The various alignment options are:
Horizontal:
![]() Align right sides to left side of anchor.
Align right sides to left side of anchor.
![]() Align right sides to right side of anchor.
Align right sides to right side of anchor.
![]() Align horizontal centers to center of anchor.
Align horizontal centers to center of anchor.
![]() Align left sides to left side of anchor.
Align left sides to left side of anchor.
![]() Align left sides to right side of anchor.
Align left sides to right side of anchor.
![]() Align baselines of text to anchor, horizontally.
Align baselines of text to anchor, horizontally.
Vertical:
![]() Align top sides to bottom side of anchor.
Align top sides to bottom side of anchor.
![]() Align top sides to top side of anchor.
Align top sides to top side of anchor.
![]() Align vertical centers to center of anchor.
Align vertical centers to center of anchor.
![]() Align bottom sides to bottom side of anchor.
Align bottom sides to bottom side of anchor.
![]() Align bottom sides to top side of anchor.
Align bottom sides to top side of anchor.
![]() Align baselines of text to anchor, vertically.
Align baselines of text to anchor, vertically.
The distribute part of the Align and Distribute dialog allows objects to be evenly spaced in the horizontal or vertical direction based on some criteria. Two options are included in this part of the dialog, which perhaps should be included separately: randomizing the center of objects and unclumping. They will be considered in the next section.
The distribution of objects is between the two objects at the extremes (i.e., the leftmost and rightmost objects for horizontal distribution). The definition of which is the leftmost and rightmost object is made using the objects' bounding boxes, and it may depend on the type of distribution selected. For example, if a distribution is based on the rightmost edge of the objects, then the objects rightmost edge will be used to determine which objects are at the extremes.
The various distribution options are:
Horizontal:
![]() Distribute left sides evenly.
Distribute left sides evenly.
![]() Distribute centers evenly.
Distribute centers evenly.
![]() Distribute right sides evenly.
Distribute right sides evenly.
![]() Distribute with uniform gaps between objects.
Distribute with uniform gaps between objects.
![]() Distribute baseline anchors evenly.
Distribute baseline anchors evenly.
Vertical
![]() Distribute left sides evenly.
Distribute left sides evenly.
![]() Distribute centers evenly.
Distribute centers evenly.
![]() Distribute top sides evenly.
Distribute top sides evenly.
![]() Distribute with uniform gaps between objects.
Distribute with uniform gaps between objects.
![]() Distribute baseline anchors evenly.
Distribute baseline anchors evenly.
The distribute part of the Align and Distribute dialog has two options that modify the distribution of objects in a non-uniform way. Both affect the horizontal and vertical distributions at the same time.
The two options are:
![]() Randomize the center of objects.
Randomize the center of objects.
![]() Unclump objects (i.e., move objects to more evenly space the
edge-to-edge distances). Repeated application approaches the use of the Distribute
with uniform gaps commands described above.
Unclump objects (i.e., move objects to more evenly space the
edge-to-edge distances). Repeated application approaches the use of the Distribute
with uniform gaps commands described above.
Another section of the Align and Distribute dialog allows one to move objects just enough that they don't overlap. Two entry boxes, one for the horizontal direction and the other for the vertical direction, allow the addition of a minimum space between adjacent objects.
Used to be called Grid Arrange.
The
Rows and Columns dialog
( →
![]() Rows and Columns...
)
can be used to arrange an arbitrary number of objects into
a two-dimensional grid.
Rows and Columns...
)
can be used to arrange an arbitrary number of objects into
a two-dimensional grid.
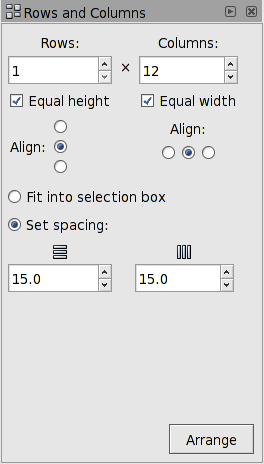
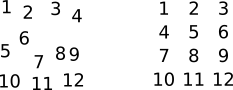
To use the dialog, first select all the objects you wish to arrange into a grid. The dialog will default to a one-dimensional array. You can use the Row and Column entry boxes to change the number of rows and columns. If you use the up/down arrows to change the number of rows, the number of columns will change to give you the minimum number required to include all the objects in the selection. A similar change to the number of rows will happen if you change the number of columns. The maximum number of rows or columns is 100.
The algorithm for determining the order the objects are placed in the array attempts to preserve any existing rows. For this algorithm, the bounding box of each object is used. Technically, the objects are first sorted by their vertical positions. Then objects that overlap vertically are sorted by their horizontal positions. Finally, the objects are placed from left to right and from top to bottom in the array. The algorithm works pretty well but cannot handle all situations since determining what objects are in a row is objective. (If in the vertical direction A overlaps B and B overlaps C but A does not overlap C, are A and C in the same row?)
For placing objects, the grid is divided into cells. First, the cell size and placement is determined and then the objects are positioned inside the cells, one object to one cell.
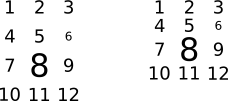
Cells are given the height of the tallest object if the Equal height box is checked; otherwise, they are given the height of the tallest object in their row. A similar policy is followed for width.
If the Fit into selection option is selected, the rows and columns of cells are evenly spaced with the edge rows and columns flush against the bounding box of the selection. If the Set spacing option is selected, the rows and columns are separated by the amount entered in the Row spacing and Column spacing entry boxes. The spacing can be negative.
Once the cell positions have been determined, the objects are placed inside the cell according to the selected Align options (top, middle, bottom; left, center, right).
Note that the bounding box of all the objects after alignment may not be the same as the bounding box of the selection prior to alignment even though the Fit to selection option has been chosen. This is because the selection bounding box has been used to place the cells. The objects within the cells may not touch the cell walls. (There also appears sometimes to be a gratuitous shift: Bug?)
| |  | |
| Snapping |  | Chapter 6. Geometric Shapes |
© 2005-2008 Tavmjong Bah. | Get the book. |