Incorporating Media in Your Application
This section introduces some practical examples on creating a media player and incorporating it in your application. You can find the complete code of all demos in the Source Files directory. To compile and run the demos use the following instructions:
- Download the movie.avi file and save it locally together with the source files
- Add the location of the JavaFX Preview SDK bin directory to your PATH variable
- Compile the demo using the javafxc command
- Run it using the javafx command
Simple Player
For a start, consider a task of creating a simple player embedded in a frame as shown on the Figure 1.
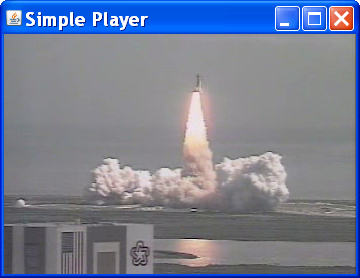
Figure 1: Simple Player |
SwingFrame {
  title: "Player Demo"
  content: Canvas {
      content:
      MediaView {
        mediaPlayer: MediaPlayer {
                        autoPlay: true
                        media: Media {source: "movie.avi"}
                     }
      }

   }
  visible: true
  closeAction: function() {java.lang.System.exit(0);}
}
The source attribute of the Media class defines a file to playback.
Media {source: "movie.avi"}
Then the Media object is passed to the media attribute of MediaPlayer and along with the autoPlay attribute defines the player to embed in the MediaView panel. We set up the autoPlay attribute to enable media starting immediately on the application launch.
Player with a Control Widget
Now, enhance the demo and add a floating ball widget to start and pause the AVI file. A single mouse click on the ball changes its color to green and pauses the media. The second mouse click produces the opposite effect, it changes the ball's color to red and starts playback. The ball's movement is bound to the perspective transformation of the media panel. In addition to the media functionality, the PlayerControl demo employs the following JavaFX Runtime features: rendering graphics, applying transformation effects, and data binding.
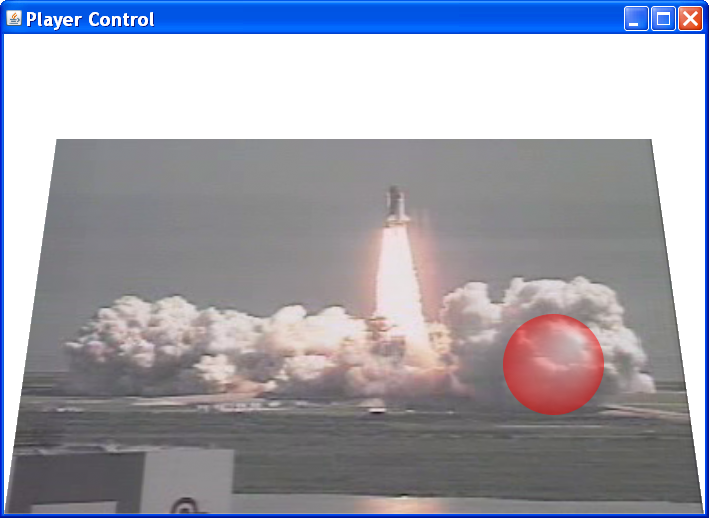
Figure 2: Player Control |
First, define the frame and its elements: the player and the control widget.
SwingFrame {
  title: "Player Control"
  content: Canvas {
    background: Color.WHITE
    content: [
      MediaView {
        mediaPlayer: player
        ....
        }
      },
      Circle { ... }
Then, create a MediaPlayer specifying media, autoPlay, and repeatCount attributes. Note, we set up the player variable to enable the control widget to retrieve and change the playback status.
var player = MediaPlayer {
  autoPlay: true
  repeatCount: MediaPlayer.REPEAT_FOREVER
  media: bind Media {
    source: "movie.avi"
  }
}
The following code applies a transformation effect to the MediaView panel.
MediaView {
        mediaPlayer: player
        effect: PerspectiveTransform {
          var delta = bind 200 * (1 - y);
          ulx: bind       delta   uly: bind delta * 2
          urx: bind 700 - delta   ury: bind delta * 2
          lrx:      700           lry:      480
          llx:        0           lly:      480
        }
}
To expose details of the control ball implementation consider the following code.
      Circle {
        var color = bind if (player.paused)
                         then Color.GREEN
                         else Color.RED
        translateX: bind 50 + 600 * x
        translateY: bind 50 + 380 * y
        radius:     50
        opacity:    0.5
        stroke:     bind color
        fill: bind RadialGradient {
          radius: 50
          focusX: 25
          focusY: -25
          proportional: false
          stops: [
            Stop {offset: 0   color: Color.WHITE},
            Stop {offset: 1   color: color}
          ]
        }
        onMouseClicked: function (e) {
          if (player.paused) {
            player.play()
          } else {
            player.pause()
          }
        }
      }
This code draws a circle applying the radial gradient filling, then specifies the translateX and translateY attributes to enable transformation of the ball, and finally implements the onMouseClicked function to start and stop media playback.
The following code shows two timelines that use linear interpolation to change position of the ball and to enable perspective transformation of the media panel.
var x: Number;

Timeline {
  repeatCount: Timeline.INDEFINITE
  autoReverse: true
  keyFrames: [
    at ( 0s) {x => 0.0},
    at (11s) {x => 1.0 tween Interpolator.LINEAR},
  ]
}.start();


var y: Number;

Timeline {
  repeatCount: Timeline.INDEFINITE
  autoReverse: true
  keyFrames: [
    at ( 0s) {y => 1.0},
    at (19s) {y => 0.0 tween Interpolator.LINEAR},
  ]
}.start();
Both ball and panel coordinates are bound to the x and y variables using the data binding mechanism. Each time the x variable changes the translateX attribute of Circle updates.
translateX: bind 50 + 600 * x
Binding is also employed in the PlayerControl demo to set dependence between the circle color and its stroke. Since the color can be either green or red, this is an easy way to update the stroke accordingly.
stroke: bind color
Source code of all demos mentioned in this section are available in the Source Files directory.
Controlling Audio Output
For further enhancement, use the following code for translate attributes of the Circle to bind the volume level and balance to the ball's position.
        translateX: bind 350 + 300 * player.balance
        translateY: bind 50 + 380 * player.volume
When the ball rises, the volume increases, reaching its maximum at the ball's highest position at the border of the frame. When the ball descends the volume decreases. Any side-to-side movement of the ball creates sound floating from the right speaker to the left one.
Note: the implementation of the volume and balance attributes is unstable in the JavaFX Preview SDK release. For more information consult the API Documentation.