Guided Tour of Subversion for NetBeans IDE 6.0
NetBeans IDE 6.0 now provides tight integration with Subversion client versions
1.3.x and higher. The IDE's Subversion support is designed to help streamline
the development process for groups working from a shared repository, enabling
you to perform versioning tasks directly from your project system within the IDE.
This document demonstrates how to perform basic versioning tasks in the IDE by
guiding you through the standard workflow when using versioning software. It also
introduces you to some of the new Subversion features included in NetBeans IDE
6.0.
Subversion is a popular open source
version control system that is becoming the next-generation replacement for CVS.
It provides various improved features, for example:
- Full version history is provided for renamed, moved or removed files.
- Commit operations are atomic, meaning that a collection of modifications
either enter the repository completely or, in the event of connection failure,
not at all.
- Versioning of project metadata is provided.
Expected duration: 40 minutes

The following topics are covered below:
Before you can take advantage of the IDE's Subversion support, you need to
have Subversion client software installed on your computer. The IDE's Subversion
support works by interacting with the Subversion client to carry out versioning
commands. Depending on your system, and whether you install the Subversion
client to a non-default location, you may also need to register the path to the
Subversion executable in the IDE.
Getting the Software
Make sure you have the following software installed on your computer:
- NetBeans IDE 6.0
- Subversion client software (download)
Note: In order to install and run NetBeans IDE 6.0, you also
require the Java SE Development Kit (JDK) version 5.0 or higher.
Specifying the Path to the Subversion Executable
By default, the Subversion executable file is installed in the /usr/local/bin/
folder on UNIX and Mac OS X machines and in C:\Program Files\Subversion\bin\
for Windows XP.
NetBeans IDE automatically tries to identify the location of the Subversion
executable file by using the $PATH system variable on your computer.
Depending on your platform however, or whether you installed the Subversion
client to a different location, it may be necessary to specify the path to
the executable file explicitly. To set the path to the Subversion executable
file in the IDE:
- Choose Tools > Options from the main menu. The Options dialog opens.
- Select the Miscellaneous icon along the top of the dialog, then click the
Versioning tab. In the left pane under Versioning Systems, select Subversion.
User-defined options for Subversion display in the main window of the dialog:
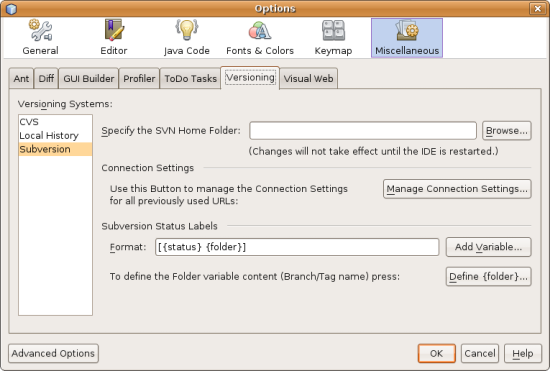
- In the Specify the SVN Home Folder text field, either type in the path to the
executable file or click Browse to navigate to it on your system. Note that
you need not include the Subversion executable file in the path.
- Click OK, then restart the IDE to allow changes to take effect.
Synchronizing Local Files with a Repository
When using a version control system, you work by synchronizing local files
with a repository, making changes to your local copy, then committing them to
the repository. The following list describes various ways you can synchronize
a project in NetBeans IDE, depending on your specific situation:
Opening a Subversion Project in the IDE
If you already have a Subversion versioned project which you have been working
with outside of the IDE, you can open it in the IDE and versioning features
will automatically become available to you. The IDE scans your open projects
and if they contain .svn directories, file status and context-sensitive
support automatically becomes active for Subversion versioned projects.
Checking out Files from a Repository
If you want to connect to a remote repository from the IDE, then check out
files and immediately begin working with them, do the following:
- In NetBeans IDE, choose Versioning > Subversion > Checkout from
the main menu. The Checkout wizard opens.
Note: The IDE's drop-down menus are context-sensitive,
i.e. the available options depend on the item currently selected.
Therefore, if you are already working within a Subversion project, you
can choose Versioning > Checkout from the main menu.
- In the first panel of the wizard, enter a URL that contains the connection
protocol and location of the repository you want to connect to.
The IDE supports the following protocol types:
| Protocol |
Access Method |
Example |
| file |
Direct repository access (on local disk) |
file:///repository_path |
| http |
Access via WebDAV protocol to a Subversion-aware server |
http://hostname/repository_path |
| https |
Access via HTTP protocol with SSL encryption |
https://hostname/repository_path |
| svn |
Access via custom protocol to an svnserve server |
svn://hostname/repository_path |
| svn+ssh |
Access via SVN protocol through an external SSH tunnel |
svn+ssh://hostname/repository_path |
Depending on the protocol you are using, you may need to enter other
information, such as username and password (e.g. for http://,
https://, or svn://), or in the case of svn+ssh://,
you must supply the command to establish the external tunnel.
Note: If you are trying to implement certificated authentication
with https, see: How
to connect to a Subversion repository using user-certified authentication.
For more help with svn+ssh, see:
How do I set
up SVN with SSH Subversion?
- If you are using a proxy, be sure to click the Proxy Configuration button
and enter any required information. When you are certain your connection
settings to the repository are correct, click Next.
- In the Folders to Checkout panel of the wizard, specify the folder that
you want to check out in the Repository Folder(s) field. If you do not
know the name of the folder you want to check out, click the Browse button
to view all folders currently maintained in the repository. From the Browse
Repository Folders dialog that appears, select any of the listed folders
and click OK. The selected folder is then added to the Repository Folder(s)
field ('MyProject' entered in screen capture below):
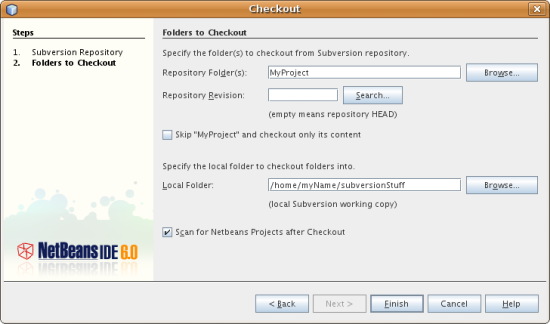
- Enter a Revision number in the Repository Revision field, otherwise leave
it empty, implying that you want to check out the folder HEAD, or
most recent revision.
- In the Local Folder field, enter a location on your computer where you want
files to be checked out to. Leave the Scan for NetBeans Projects after
Checkout option selected, then click Finish to initiate the check out
action. The IDE checks out the specified sources and the IDE's status bar
indicates the progress of the files downloading from the repository to your
local working directory. You can also view files as they are being checked
out from the Output window (Ctrl-4).
Note: If the checked out sources contain NetBeans projects,
a dialog appears prompting you to open them in the IDE. If the sources do not
contain a project, the dialog appears prompting you to create a new project
from the sources and then open them in the IDE. If you create a new project
for such sources, select the appropriate project category (i.e. in the New
Project wizard) and then use the With Existing Sources option within that
category.
Importing Files into a Repository.
Alternately, you can import a project you have been working on in the IDE to
a remote repository, then continue to work on it in the IDE after it has
become synchronized.
Note: While you are actually exporting files
from your system, the term 'import' is used in version control systems to
signify that files are being imported into a repository.
To import a project to a repository:
- From the Projects window (Ctrl-1), select an unversioned project and
choose Versioning > Import into Subversion Repository from the
node's right-click menu. The Subversion Import wizard opens.
- In the Subversion Repository panel of the Import wizard, specify the
protocol and location of the Subversion
repository as defined by the Subversion URL. Depending on your selection,
you may need to specify further settings, such as repository username
and password, or, in the case of svn+ssh://, you must specify
the tunnel command to establish the external tunnel. See the Subversion
User FAQ for further details. Click Next.
- In the Repository Folder panel, specify the repository folder in which you
want to place the project in the repository. A folder containing the name
of your project is suggested for you in the Repository Folder text field
by default.
- In the text area beneath Specify the Message, enter a description of the
project you are importing into the repository.
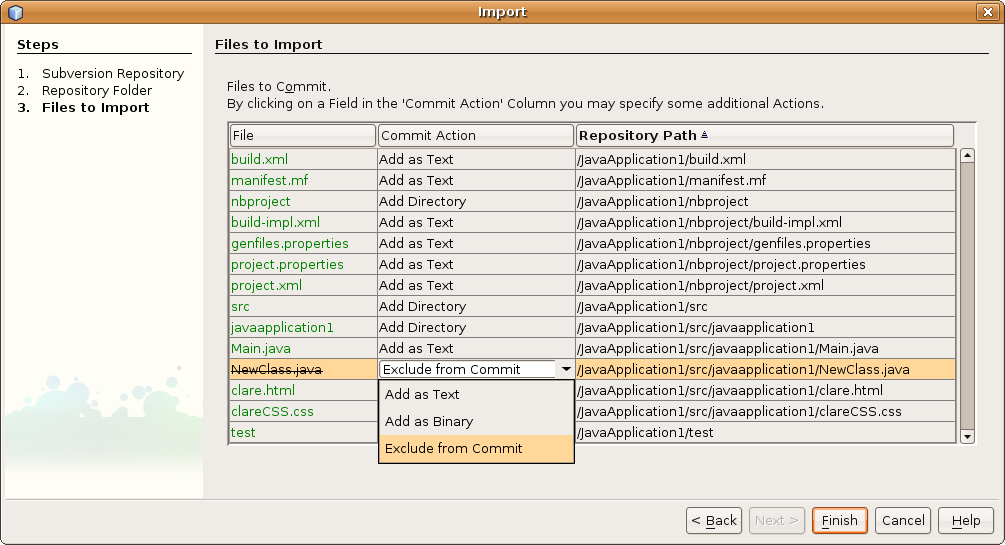
- Click Finish to initiate the import, or optionally, click Next to continue
to a third panel that enables you to preview all files that are prepared
for import. From this panel, you can choose to exclude individual files
from the import (as shown below), or identify the MIME types of files before
importing.
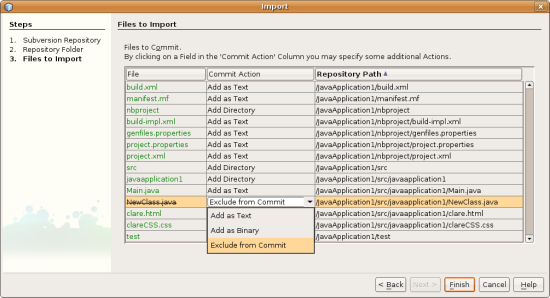
Upon clicking Finish, the IDE uploads the project files to the repository
and the Output window opens to display the progress.
Editing Sources
Once you have a Subversion versioned project opened in the IDE, you can begin
making changes to sources. As with any project opened in NetBeans IDE, you can
open files in the Source Editor by double-clicking on their nodes, as they
appear in the IDE's windows (e.g. Projects (Ctrl-1), Files (Ctrl-2), Favorites
(Ctrl-3) windows).
When working with sources in the IDE, there are various UI components at your
disposal, which aid in both viewing and operating version control commands:
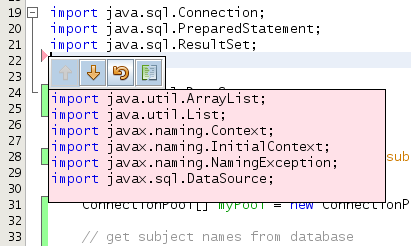
Viewing Changes in the Source Editor
When you open a versioned file in the IDE's Source Editor, you can view real-time
changes occurring to your file as you modify it against your previously checked-out
base version from the repository. As you work, the IDE uses color encoding in the
Source Editor's margins to convey the following information:
| Blue
( ) |
Indicates lines that have been changed since the earlier revision. |
| Green
( ) |
Indicates lines that have been added since the earlier revision. |
| Red
( ) |
Indicates lines that have been removed since the earlier revision. |
The Source Editor's left margin shows changes occurring on a line-by-line basis.
When you modify a given line, changes are immediately shown in the left margin.
You can click on a color grouping in the margin to call versioning commands. For
example, the screen capture below left shows widgets available to you when clicking
a red icon, indicating that lines have been removed from your local copy.
The Source Editor's right margin provides you with an overview that displays
changes made to your file as a whole, from top to bottom. Color encoding is
generated immediately when you make changes to your file.
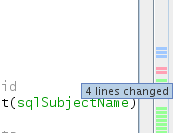
Note that you can click on a specific point within the margin to bring your
inline cursor immediately to that location in the file. To view the number of
lines affected, hover your mouse over the colored icons in the right margin:

Left margin |
Right margin |
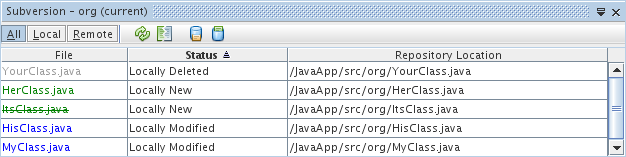
Viewing File Status Information
When you are working in the Projects (Ctrl-1), Files (Ctrl-2), Favorites
(Ctrl-3), or Versioning windows, the IDE provides several visual features
that aid in viewing status information about your files. In the example
below, notice how the badge (e.g.
 ), color of the file name, and adjacent status
label, all coincide with each other to provide you with a simple but
effective way to keep track of versioning information on your files:
), color of the file name, and adjacent status
label, all coincide with each other to provide you with a simple but
effective way to keep track of versioning information on your files:
Badges, color coding, file status labels, and perhaps most importantly,
the Versioning window all contribute to your ability to effectively
view and manage and versioning information in the IDE.
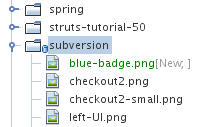
Badges and Color Coding
Badges are applied to project, folder, and package nodes and
inform you of the status of files contained within that node:
The following table displays the color scheme used for badges:
| UI Component |
Description |
| Blue Badge
() |
Indicates the presence of files that have been locally modified, added or
deleted. For packages, this badge applies only to the package itself and
not its subpackages. For projects or folders, the badge indicates changes
within that item, or any of the contained subfolders. |
Red Badge
( ) ) |
Marks projects, folders or packages that contain conflicting
files (i.e. local versions that conflict with versions maintained in
the repository). For packages, this badge applies only to the package
itself and not its subpackages. For projects or folders, the badge
indicates conflicts within that item, or any of the contained subfolders. |
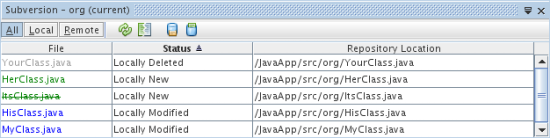
Color coding is applied to file names in order to indicate their current
status against the repository:
| Color |
Example |
Description |
| Blue |
 |
Indicates that the file has been locally modified. |
| Green |
 |
Indicates that the file has been locally added. |
| Red |
 |
Indicates that the file contains conflicts between your local
working copy and the repository's version. |
| Gray |
 |
Indicates that the file is ignored by Subversion and will not
be included in versioning commands (e.g. Update and Commit). Files
can only be made to be ignored if they have not yet been versioned. |
| Strike-Through |
 |
Indicates that the file is excluded from commit operations. Strike-through
text only appears in specific locations, such as the Versioning window or
Commit dialog, when you choose to exclude individual files from a commit
action. Such files are still affected by other Subversion commands, such
as Update. |
File Status Labels
File status labels provide a textual indication of the status of versioned files
in the IDE's windows. By default, the IDE displays the revision number and status
(new, modified, ignored, etc.) in gray text to the right of files, as they are
listed in windows:

File status labels can be toggled on and off by choosing View > Show Versioning
Labels from the main menu.
The Versioning Window
The Subversion Versioning window provides you with a real-time list of all
of the changes made to files within a selected folder of your local working
copy. It opens by default in the bottom panel of the IDE, listing added,
deleted or modified files.
To open the Versioning window, select a versioned file or folder (e.g. from
the Projects, Files, or Favorites window) and either choose Subversion >
Show Changes from the right-click menu, or choose Versioning > Show Changes
from the main menu. The following window appears in the bottom of the IDE:
By default, the Versioning window displays a list of all modified files within
the selected package or folder. Using the buttons in the toolbar, you can
choose to display all changes or limit the list of displayed files to either
locally or remotely modified files. You can also click the column headings
above the listed files to sort the files by name, status or location.
The Versioning window toolbar also includes buttons that enable you to invoke
the most common Subversion tasks on all files displayed in the list. The
following table lists the Subversion commands available in the toolbar of the
Versioning window:
| Icon |
Name |
Function |
 |
Refresh Status |
Refreshes the status of the selected files and
folders. Files displayed in the Versioning window can be
refreshed to reflect any changes that may have been made
externally. |
 |
Diff All |
Opens the Diff Viewer providing you with a side-by-side
comparison of your local copies and the versions maintained in the
repository. |
 |
Update All |
Updates all selected files from the repository. |
 |
Commit All |
Enables you to commit local changes to the repository. |
You can access other Subversion commands in the Versioning window by selecting a table
row that corresponds to a modified file, and choosing a command from the right-click menu:
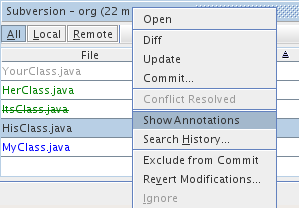
For example, you can perform the following actions on a file:
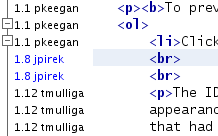
- Show Annotations:
Displays author and revision number information in the left
margin of files opened in the Source Editor.
|
 |
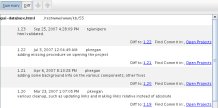
- Search History:
Enables you to search for and compare multiple revisions of
the selected file in the IDE's History Viewer.
|
 |
- Exclude from Commit:
Allows you to mark the file to be excluded when performing
a commit.
|
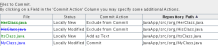 |
- Revert Delete:
Opens the Revert Modifications dialog, enabling you to revert any
delete actions that you have committed to files in your local working copy.
The specified file(s) are retrieved from the IDE's local history archive
and reinstated into your local working copy.
(This action only displays when you have deleted items from the
selected folder.)
|
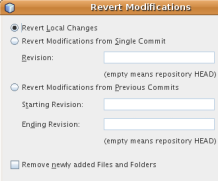 |
- Revert Modifications:
Opens the Revert Modifications dialog which you can use to
specify parameters for reverting any local changes to revisions
maintained in the repository.
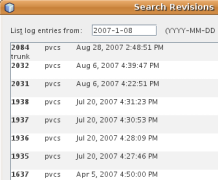
When specifying revision(s), you can click Search to open
the Search Revisions dialog. This scans the repository and lists
all file revisions based on the date you specify.
|
 |
Comparing File Revisions
Comparing file revisions is a common task when working with versioned
projects. The IDE enables you to compare revisions by using the Diff
command, which is available from the right-click menu of a selected
item (Subversion > Diff), as well as from the Versioning window.
In the Versioning window, you can perform diffs by either double-clicking
a listed file, otherwise you can click the Diff All icon () located in
the toolbar at the top.
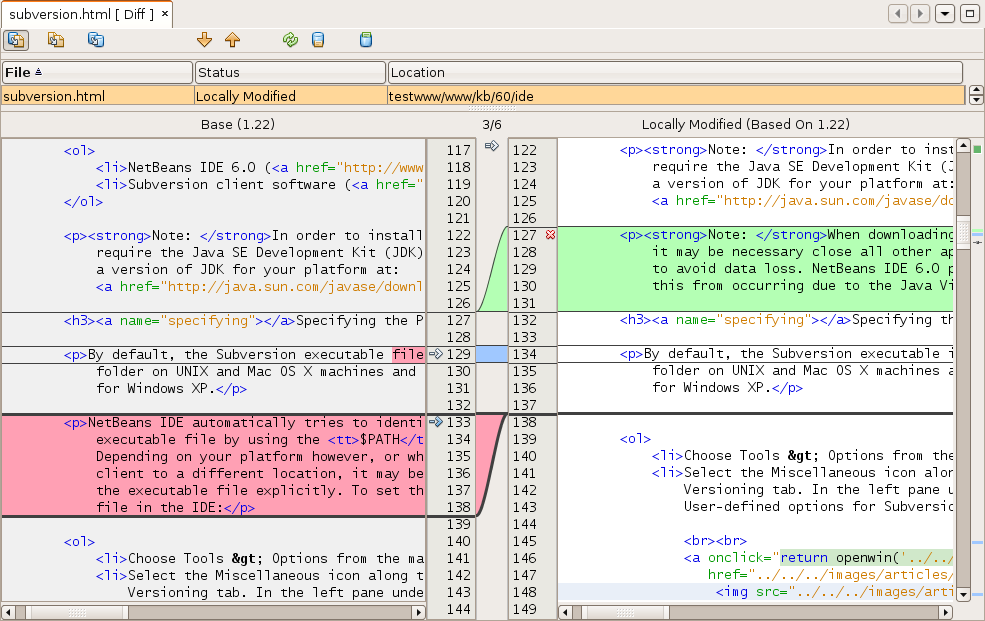
When you perform a diff, a graphical Diff Viewer opens for the selected
file(s) and revisions in the IDE's main window. The Diff Viewer displays
two copies in side-by-side panels. The more current copy appears on the
right side, so if you are comparing a repository revision against your
working copy, the working copy displays in the right panel:
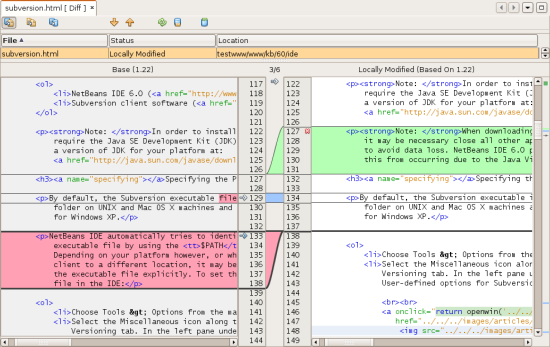
The Diff Viewer makes use of the same color encoding
used elsewhere to display version control changes. In the screen capture
displayed above, the green block indicates content that has been added to
the more current revision. The red block indicates that content from the
earlier revision has been removed from the later. Blue indicates that
changes have occurred within the highlighted line(s).
Also, when performing a diff on a group of files, such as on a project,
package, or folder, or when clicking Diff All
(), you can switch between diffs by clicking files
listed in the upper region of the Diff Viewer.
The Diff Viewer also provides you with the following functionality:
Make Changes to your Local Working Copy
If you are performing a diff on your local working copy, NetBeans IDE 6.0
enables you to make changes directly from within the Diff Viewer. To do
so, you can either place your cursor within the right pane of the Diff
Viewer and modify your file accordingly, otherwise make use of the inline
icons that display adjacent to each highlighted change:
Replace ( ): ): |
Inserts the highlighted text from the previous revision into
the current revision |
Move All ( ): ): |
Reverts the file's current revision to the state of the selected
previous revision |
Remove ( ): ): |
Removes the highlighted text from the current revision so that it
mirrors the previous revision |
Navigate among Differences between Compared Files
If your diff contains multiple differences, you can navigate among them by
using the arrow icons displayed in the toolbar. The arrow icons enable you
to view differences as they appear from top to bottom:
Previous
( ): ): |
Goes to previous difference displayed in the diff |
Next
( ): ): |
Goes to next difference displayed in the diff |
Change Viewing Criteria
You can choose whether to view files containing changes from the local
working copy, the repository, as well as both simultaneously:
Local
( ): ): |
Displays locally modified files only |
Remote
( ): ): |
Displays remotely modified files only |
Both
( ): ): |
Displays both locally and remotely modified files |
After making changes to sources, you commit them to the repository. It is
generally a good idea to update any copies you have against the repository
prior to performing a commit in order to ensure that conflicts do not arise.
Conflicts can occur however, and should be thought of as a natural event
when numerous developers are working on a project simultaneously. The IDE
provides flexible support that enables you to perform all of these functions.
It also provides a Conflict Resolver which allows you to safely deal with any
conflicts as they occur.
Updating Local Copies
You can perform updates by choosing Subversion > Update from the
right-click menu of any versioned item in the Projects, Files, or
Favorites windows. When working directly from the Versioning window,
you need only right-click a listed file and choose Update.
To perform an update on sources that you have modified, you can click
the Update All icon (), which displays in the toolbars located
at the top of both the Versioning Window,
as well as the Diff Viewer. Any changes that
may have occurred in the repository are displayed in the Versioning
Output window.
Resolving Conflicts
When you perform an update or a commit, the IDE's Subversion support
compares your files with repository sources to make sure that other
changes have not already occurred in the same locations. When your
previous checkout (or update) no longer matches the repository HEAD
(i.e. most current revision), and the changes that you applied
to your local working copy coincide with areas in the HEAD that
have also changed, your update or commit results in a conflict.
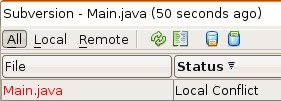
As indicated in Badges and Color Coding, conflicts
are displayed in the IDE with red text and are accompanied by a red badge
() when viewed in the Projects, Files, or Favorites windows.
When working in the Versioning window, conflicts are also indicated
by a file's status:
Any conflicts that arise must be resolved before you commit files to the
repository. You can resolve conflicts in the IDE using the Merge Conflicts
Resolver. The Merge Conflicts Resolver provides an intuitive interface
that enables you to address individual conflicts sequentially while viewing
merged output as you make changes. You can access the Merge Conflicts
Resolver on a file that is in conflict by right-clicking that file and
choosing Subversion > Resolve Conflicts.
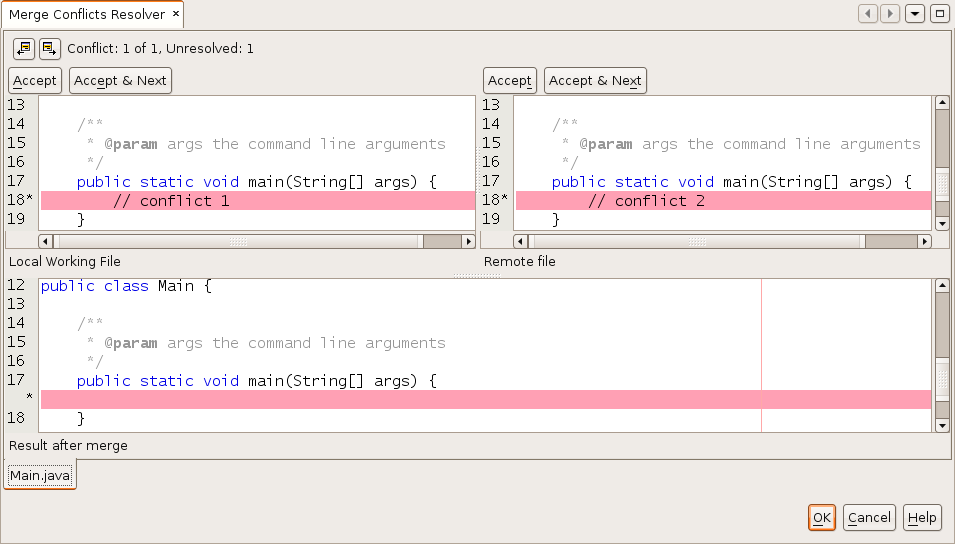
The Merge Conflicts Resolver displays the two conflicting revisions
side-by-side in the top pane, with the conflicting areas highlighted.
The lower pane depicts the file as it appears while merges for individual
conflicts between the two revisions occur:

You resolve a conflict by accepting one of the two revisions displayed
in the top pane. Click the Accept button of the revision you want to
accept. The IDE merges the accepted revision with the source file, and
you can immediately see the results of the merge in the bottom pane of
the Merge Conflicts Resolver. Once all conflicts are resolved, click OK
to exit the Merge Conflicts Resolver and save the modified file. The
conflict badge is removed and you can now commit the modified file to
the repository.
Performing the Commit
After editing source files, performing an update and resolving any conflicts,
you commit files from your local working copy to the repository. The IDE
enables you to call the commit command in the following ways:
- From the Projects, Files or Favorites windows, right-click new or
modified items and choose Subversion > Commit.
- From the Versioning window or Diff Viewer, click the Commit All
() button located in the toolbar.
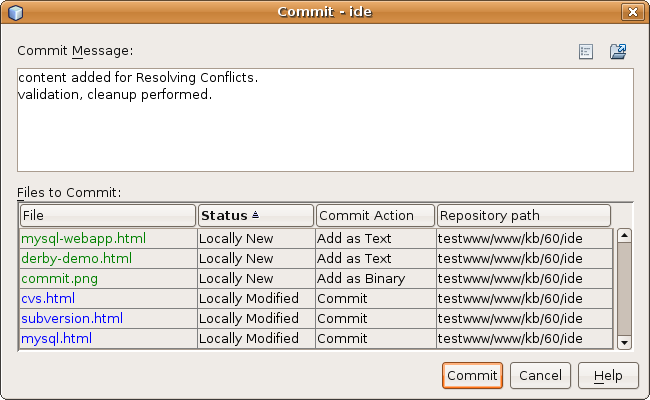
The Commit dialog opens, displaying files that are about to be committed
to the repository:

The Commit dialog lists:
- all locally modified files
- all files that have been deleted locally
- all new files (i.e. files that do not yet exist in the repository)
- all files that you have renamed. Subversion handles renamed files by
deleting the original file, and creating a duplicate using the new
name.
From the Commit dialog, it is possible to specify whether to exclude
individual files from the commit. To do so, click the Commit Action column
of a selected file and choose Exclude from Commit from the drop-down
list. Similarly, when new files are included, you can specify the MIME
type by choosing Add as Binary or Add as Text from the drop-down list.
To perform the commit:
- Type in a commit message in the Commit Message text area. Alternatively,
click the Recent Messages (
 ) icon located in the upper right corner to
view and select from a list of messages that you have previously used.
) icon located in the upper right corner to
view and select from a list of messages that you have previously used.
- After specifying actions for individual files, click Commit. The IDE
executes the commit and sends your local changes to the repository.
The IDE's status bar, located in the bottom right of the interface,
displays as the commit action takes place. Upon a successful commit,
versioning badges disappear in the Projects, Files and Favorites windows,
and the color encoding of committed files returns to black.
Next Steps
This concludes the Guided Tour of Subversion for NetBeans IDE 6.0. This
document demonstrated how to perform basic versioning tasks in the IDE by
guiding you through the standard workflow when using the IDE's Subversion
support. It has shown how to set up a versioned project and perform basic
tasks on versioned files while introducing you to some of the new Subversion
features included in NetBeans IDE 6.0.
For related documents, see the following resources:
top