In this tutorial, you will be introduced to aspects of the new NetBeans 6.0 "Retouche" APIs. Prior to 6.0, the Java language infrastructure that supported the Java editor, including Java code generation and Java refactoring, was based on something called "JMI for Java" (also known as "MDR"). JMI for Java had a few architectural issues such as single-read lock. In other words, a lock had to be acquired just to read information from its model, while this is normally required when doing write actions only. Over a period of a few years, JMI was debugged and improved in terms of performance. But another issue was that it used its own internal copy of the Java parser, which meant it had its own approach to interpreting Java source, which differed from the JDK's Java compiler. With the introduction of generics in JDK 5, which introduced a lot more complicated and subtle Java constructs, that divergence became harder to manage. Therefore, because of JMI's performance issues and because a formal language model was developed to make the JDK Java compiler a programmatically accessible tool, the JMI for Java was replaced with a new approach, based on the JDK Java compiler.
That is when Retouche, a French word meaning "touch up", was born. Retouche is the new and fast Java language infrastructure in NetBeans IDE, capable of supporting all the cool Java editor features that have been realised in NetBeans 6.0. At the heart of it, Retouche wraps an instance of the JDK Java compiler and consumes its artifacts, such as the abstract syntax tree (also known as "AST") and the symbolic resolutions that are emitted in various phases of parsing. When working with Retouche, you need to deal with some of these artifacts. The Compiler Tree API is one of these, for example. The package naming of classes in the Compiler Tree API is com.sun.*. Therefore, technically, this is a non-JDK API, but it does come from the JDK Java compiler. Another example of the JDK Java compiler's artifacts that you work with in relation to Retouche is the formal language model in the JDK APIs, provided by the javax.language.model.* packages.
This tutorial presents an introductory scenario of using the new "Retouche" approach in NetBeans IDE 6.0.
|
|
The following resources have been provided specifically to help you get acquainted with the Retouche APIs:
For more information on creating NetBeans modules, see the NetBeans Development Project home on the NetBeans website. If you have questions, visit the NetBeans Developer FAQ or use the feedback link at the bottom of this page.
Before you begin, you need to install the following software on your computer:
Note: If you want to refer to the completed module project, you can download it here.
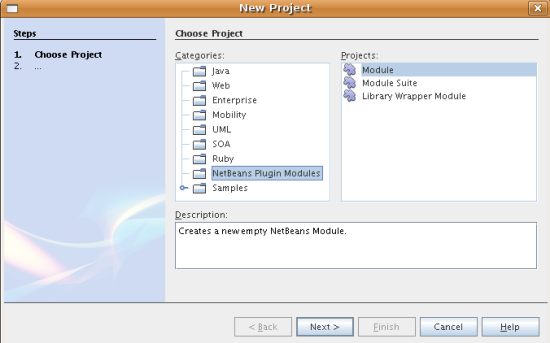
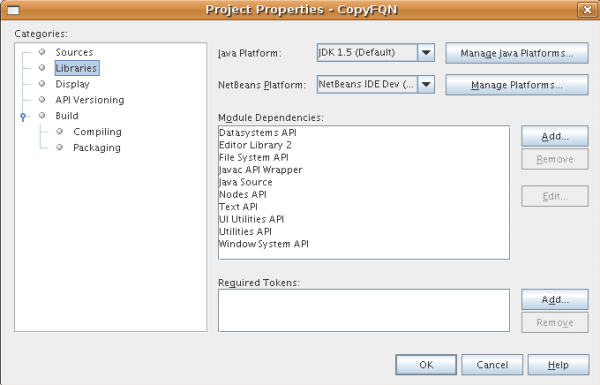
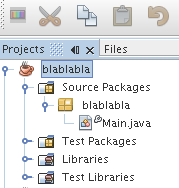
In this section, we use wizards to create a module project and to set dependencies on relevant NetBeans modules.
Click Next.
You should now see this:
Click OK.
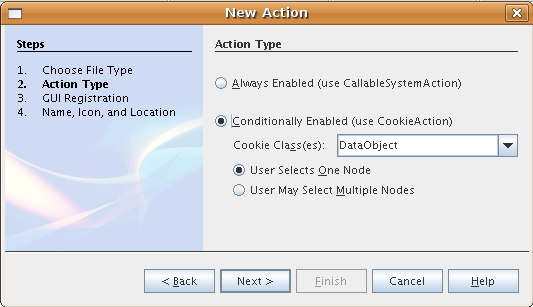
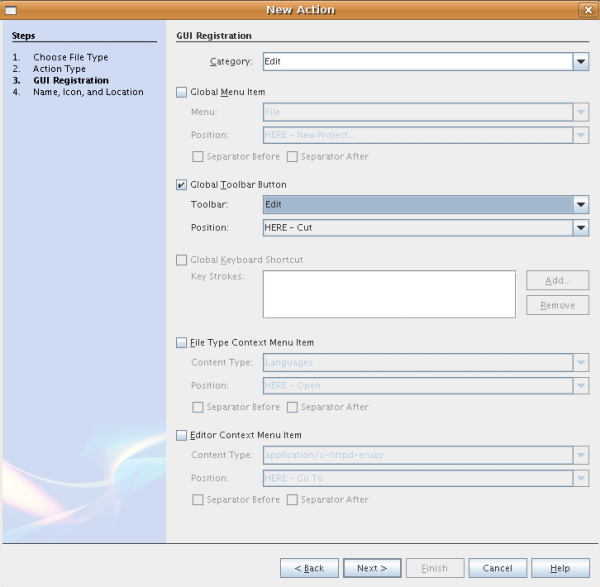
In this section, we create a context-aware button in the toolbar. This has nothing to do with the new Retouche APIs, but gives us a user interface element for interacting with our implementation of the Retouche APIs, later in this tutorial.
Click Next.
You should now see the following:
Click Next.
![]()
Click Finish.
You should now see the following code in your new CopyFQNAction.java class:
public final class CopyFQNAction extends CookieAction {

    protected void performAction(Node[] activatedNodes) {
        DataObject dataObject = activatedNodes[0].getLookup().lookup(org.openide.loaders.DataObject.class);
        // TODO use dataObject
    }

    protected int mode() {
        return CookieAction.MODE_EXACTLY_ONE;
    }

    public String getName() {
        return NbBundle.getMessage(CopyFQNAction.class, "CTL_CopyFQNAction");
    }

    protected Class[] cookieClasses() {
        return new Class[] {
            DataObject.class
        };
    }

    protected String iconResource() {
        return "org/netbeans/modules/copyfqn/icon.png";
    }

    public HelpCtx getHelpCtx() {
        return HelpCtx.DEFAULT_HELP;
    }

    protected boolean asynchronous() {
        return false;
    }

}
Note: All the work we will do in the remainder of this tutorial will focus on the performAction() method above.
You have now created an action that is sensitive to data objects. Let's see what that means right away.
Once the module is installed, you should see a new button in the toolbar.

However, if you select a node representing a project, the button is disabled, as shown below:
In the next section, we will go further than distinguishing between project nodes and file/folder nodes—we will distinguish between file nodes for Java classes versus all other kinds of file nodes.
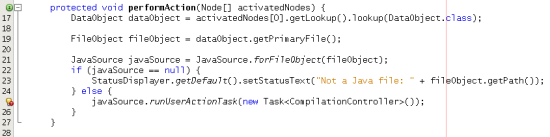
In this section, we begin using one of the new "Retouche" APIs, called Java Source. Here we use the JavaSource class, which represents a Java source file. We return an instance of this class for the file object associated with our data object. If null is returned, the file object is not a Java source file. We display the result in the status bar, when the button is clicked while a file is selected.
protected void performAction(Node[] activatedNodes) {
    DataObject dataObject = activatedNodes[0].getLookup().lookup(org.openide.loaders.DataObject.class);
    // TODO use dataObject

    FileObject fileObject = dataObject.getPrimaryFile();

    JavaSource javaSource = JavaSource.forFileObject(fileObject);
    if (javaSource == null) {
        StatusDisplayer.getDefault().setStatusText("Not a Java file: " + fileObject.getPath());
    } else {
        StatusDisplayer.getDefault().setStatusText("Hurray! A Java file: " + fileObject.getPath());
    }
}
import org.netbeans.api.java.source.JavaSource;
import org.openide.awt.StatusDisplayer;
import org.openide.filesystems.FileObject;
import org.openide.loaders.DataObject;
import org.openide.nodes.Node;
import org.openide.util.HelpCtx;
import org.openide.util.NbBundle;
import org.openide.util.actions.CookieAction;
Notice that the "Hurray!" message only appears when you select a Java file, as shown below:

An alternative approach would be to only enable the button when a Java file is selected. To implement this, override the CookieAction.enable() method as follows:
@Override
protected boolean enable(Node[] activatedNodes) {
    if (super.enable(activatedNodes)) {
        DataObject dataObject = activatedNodes[0].getLookup().lookup(org.openide.loaders.DataObject.class);
        FileObject fileObject = dataObject.getPrimaryFile();
        JavaSource javaSource = JavaSource.forFileObject(fileObject);
        if (javaSource == null) {
            return false;
        }
        return true;
    }
    return false;
}
The above method filters out any file that is not a Java file. As a result, the button is only enabled if the current file is a Java file.
In this section, we are introduced to our first explicitly invoked "Retouche" task. Such a task is provided by the JavaSource class's runUserActionTask method. A task of this kind lets you control the phases of a parsing process, which is applicable when you want to respond immediately to the user's input. Everything done within the task is done as a single unit. In our case, we want the invocation of our action, represented by a button in the toolbar, to be immediately followed by the display of a text in the status bar.
javaSource.runUserActionTask(new Task<CompilationController>());
You should now see a lightbulb in the editor's left sidebar, as shown here:
protected void performAction(Node[] activatedNodes) {
    DataObject dataObject = activatedNodes[0].getLookup().lookup(org.openide.loaders.DataObject.class);
    // TODO use dataObject

    FileObject fileObject = dataObject.getPrimaryFile();

    JavaSource javaSource = JavaSource.forFileObject(fileObject);
    if (javaSource == null) {
        StatusDisplayer.getDefault().setStatusText("Not a Java file: " + fileObject.getPath());
     } else {

            try {
                javaSource.runUserActionTask(new Task<CompilationController>() {

                    public void run(CompilationController arg0) throws Exception {
                        throw new UnsupportedOperationException("Not supported yet.");
                    }
                }, true);
            } catch (IOException ex) {
                Exceptions.printStackTrace(ex);
            }

     }

}
public void run(CompilationController compilationController) throws Exception {

      compilationController.toPhase(Phase.ELEMENTS_RESOLVED);

      Document document = compilationController.getDocument();
      if (document != null) {
         StatusDisplayer.getDefault().setStatusText("Hurray, the Java file is open!");
      } else {
         StatusDisplayer.getDefault().setStatusText("The Java file is closed!");
      }

}
import java.io.IOException;
import javax.swing.text.Document;
import org.netbeans.api.java.source.CompilationController;
import org.netbeans.api.java.source.JavaSource;
import org.netbeans.api.java.source.JavaSource.Phase;
import org.netbeans.api.java.source.Task;
import org.openide.awt.StatusDisplayer;
import org.openide.filesystems.FileObject;
import org.openide.loaders.DataObject;
import org.openide.nodes.Node;
import org.openide.util.Exceptions;
import org.openide.util.HelpCtx;
import org.openide.util.NbBundle;
import org.openide.util.actions.CookieAction;
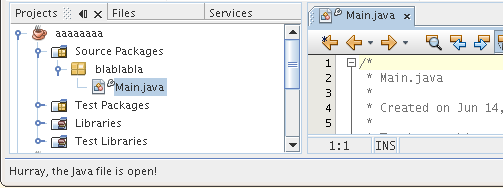
Notice that the "Hurray!" message only appears when you select a Java file that is open in the Java editor, as shown here:
In this section, now that we know that we are dealing with a Java file and that it is open, we can begin detecting the type of element that is under the caret at any given time.
public void run(CompilationController compilationController) throws Exception {

    compilationController.toPhase(Phase.ELEMENTS_RESOLVED);
    Document document = compilationController.getDocument();

    if (document != null) {
        new MemberVisitor(compilationController).scan(compilationController.getCompilationUnit(), null);
    } else {
        StatusDisplayer.getDefault().setStatusText("The Java file is closed!");
    }

}
private static class MemberVisitor extends TreePathScanner<Void, Void> {
private CompilationInfo info;
public MemberVisitor(CompilationInfo info) {
this.info = info;
}
@Override
public Void visitClass(ClassTree t, Void v) {
Element el = info.getTrees().getElement(getCurrentPath());
if (el == null) {
StatusDisplayer.getDefault().setStatusText("Cannot resolve class!");
} else {
TypeElement te = (TypeElement) el;
List enclosedElements = te.getEnclosedElements();
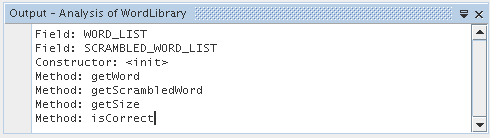
InputOutput io = IOProvider.getDefault().getIO("Analysis of "
+ info.getFileObject().getName(), true);
for (Element enclosedElement : enclosedElements) {
if (enclosedElement.getKind() == ElementKind.CONSTRUCTOR) {
io.getOut().println("Constructor: "
+ enclosedElement.getSimpleName());
} else if (enclosedElement.getKind() == ElementKind.METHOD) {
io.getOut().println("Method: "
+ enclosedElement.getSimpleName());
} else if (enclosedElement.getKind() == ElementKind.FIELD) {
io.getOut().println("Field: "
+ enclosedElement.getSimpleName());
} else {
io.getOut().println("Other: "
+ enclosedElement.getSimpleName());
}
}
io.getOut().close();
}
return null;
}
}
private static class MemberVisitor extends TreePathScanner<Void, Void> {
private CompilationInfo info;
public MemberVisitor(CompilationInfo info) {
this.info = info;
}
@Override
public Void visitClass(ClassTree t, Void v) {
try {
JTextComponent editor = EditorRegistry.lastFocusedComponent();
if (editor.getDocument() == info.getDocument()) {
int dot = editor.getCaret().getDot();
TreePath tp = info.getTreeUtilities().pathFor(dot);
Element el = info.getTrees().getElement(tp);
if (el == null) {
StatusDisplayer.getDefault().setStatusText("Cannot resolve class!");
} else {
InputOutput io = IOProvider.getDefault().getIO("Analysis of "
+ info.getFileObject().getName(), true);
if (el.getKind() == ElementKind.CONSTRUCTOR) {
io.getOut().println("Hurray, this is a constructor: "
+ el.getSimpleName());
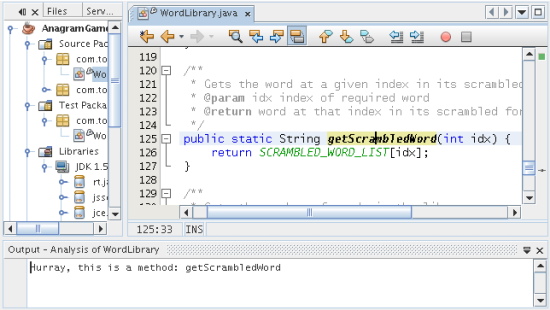
} else if (el.getKind() == ElementKind.METHOD) {
io.getOut().println("Hurray, this is a method: "
+ el.getSimpleName());
} else if (el.getKind() == ElementKind.FIELD) {
io.getOut().println("Hurray, this is a field: "
+ el.getSimpleName());
} else {
io.getOut().println("Hurray, this is something else: "
+ el.getSimpleName());
}
io.getOut().close();
}
}
} catch (IOException ex) {
Exceptions.printStackTrace(ex);
}
return null;
}
}
@Override
public Void visitClass(ClassTree t, Void v) {
    try {
        JTextComponent editor = EditorRegistry.lastFocusedComponent();
        if (editor.getDocument() == info.getDocument()) {
            int dot = editor.getCaret().getDot();
            TreePath tp = info.getTreeUtilities().pathFor(dot);
            Element el = info.getTrees().getElement(tp);
            if (el == null) {
                StatusDisplayer.getDefault().setStatusText("Cannot resolve class!");
            } else {
                InputOutput io = IOProvider.getDefault().getIO("Analysis of "
                    + info.getFileObject().getName(), true);
                String te = null;
                if (el.getKind() == ElementKind.CONSTRUCTOR) {
                    te = ((TypeElement) ((ExecutableElement) el).getEnclosingElement()).getQualifiedName().toString();
                    io.getOut().println("Hurray, this is a constructor's qualified name: " + te);
                } else if (el.getKind() == ElementKind.METHOD) {
                    te = ((ExecutableElement) el).getReturnType().toString();
                    io.getOut().println("Hurray, this is a method's return type: " + te);
                } else if (el.getKind() == ElementKind.FIELD) {
                    te = ((VariableElement) el).asType().toString();
                    io.getOut().println("Hurray, this is a field's type: " + te);
                } else {
                    io.getOut().println("Hurray, this is something else: "
                        + el.getSimpleName());
                }
                io.getOut().close();
            }
        }
    } catch (IOException ex) {
        Exceptions.printStackTrace(ex);
    }
    return null;
}
At this stage, we are able to detect whether we are dealing with a Java file, whether the document is open, and the type of element that is under the caret. But what can we do with this information? In the next section, a simple scenario is presented where our newly acquired knowledge will prove useful.
In this section, we set the contents of the clipboard, provided by java.awt.datatransfer.Clipboard, based on the element under the caret. When you press the button, the element under the caret will be put in the clipboard, so that you can paste the content elsewhere in your code.
private Clipboard clipboard;

public CopyFQNAction() {
    clipboard = Lookup.getDefault().lookup(ExClipboard.class);
    if (clipboard == null) {
        clipboard = Toolkit.getDefaultToolkit().getSystemClipboard();
    }
}
setClipboardContents(te);
Do the same for the other "Hurray!" lines, making sure to pass the correct string to the method.
Note: Because you have not defined the setClipboardContents method yet, each of the lines you add in this step is underlined in red. In the next step, we add the new method.
private void setClipboardContents(String content) {
    if (clipboard != null) {
        if (content == null) {
            StatusDisplayer.getDefault().setStatusText("");
            clipboard.setContents(null, null);
        } else {
            StatusDisplayer.getDefault().setStatusText("Clipboard: " + content);
            clipboard.setContents(new StringSelection(content), null);
        }
    }
}
For more information about creating and developing NetBeans Module, see the following resources: