This tutorial demonstrates how to create and add code snippets to the HTML/JSP Component Palette. Code snippets are small pieces of code that can be dragged from a component palette and dropped in the Source Editor. They serve to speed up coding. The HTML/JSP Component Palette has several code snippets already, but you might want to add some additional ones and share them with others. When you use the IDE to create a NetBeans module that contains your code snippets, the IDE provides facilities for creating a binary NetBeans Module (NBM) file, distributing it, and having its recipients install it via the Plugin Manager.
To create a code snippet, you use the NetBeans Palette API. A code snippet requires the following files:
After you have created or added the above files to the NetBeans module, you declare them in a resource declaration XML file, which you register in the NetBeans System Filesystem by using the layer.xml file.
|
|
For more information on working with modules, see the NetBeans Development Project home on the NetBeans website. If you have questions, visit the NetBeans Developer FAQ or use the feedback link at the top of this page.
Before you begin, you need to install the following software on your computer:
Take the following steps to install the sample:
In the IDE, choose File > Open Project and browse to the folder that contains the unzipped file. Open the module project. It should look as follows:

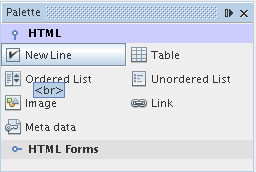
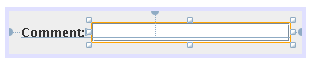
Right-click the Newhtmlsnippets project node, choose New > File/Folder, and select HTML File in the Other category. Click Next and then click Finish. The HTML file opens, displaying the Component Palette with one additional code snippet, with a tooltip that displays the result of dragging-and-dropping the item:
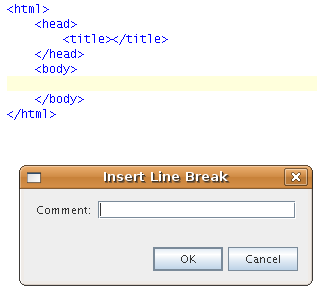
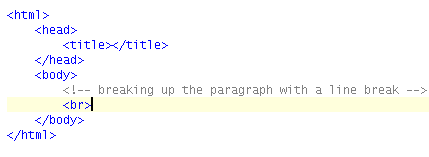
Note: Above, the text "breaking up the paragraph with a line break" was typed into the customizer.
Now that you know what the end result looks like, you will create the module from scratch and learn about each part while creating it.
Before you start writing the module, you have to make sure you that your project is set up correctly. The IDE provides a wizard that sets up all the basic files needed for a module.
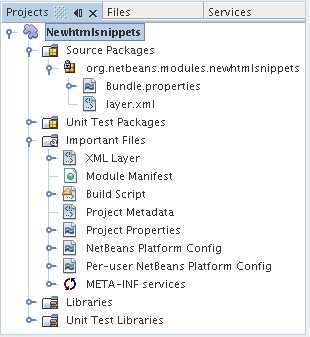
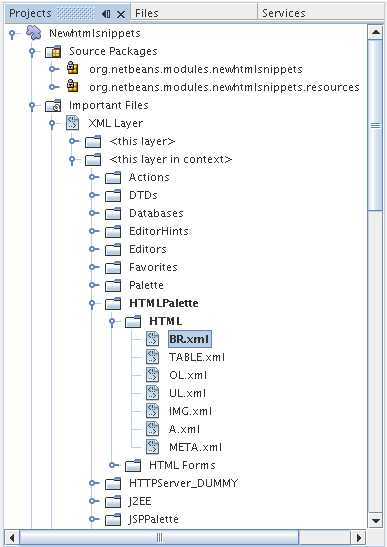
The IDE creates the Newhtmlsnippets project. The project contains all of your sources and project metadata, such as the project's Ant build script. The project opens in the IDE. You can view its logical structure in the Projects window (Ctrl-1) and its file structure in the Files window (Ctrl-2). For example, the Projects window should now look as follows:
For basic information on each of the files above, see the Introduction to NetBeans Module Development.
You will need to use several classes that belong to the NetBeans APIs. Each has to be declared as a module dependency. Use the Project Properties dialog box for this purpose.
For each of "Common Palette", "Text API", and "Utilities API", click "Add...", select the name from the Module list, and then click OK to confirm it:
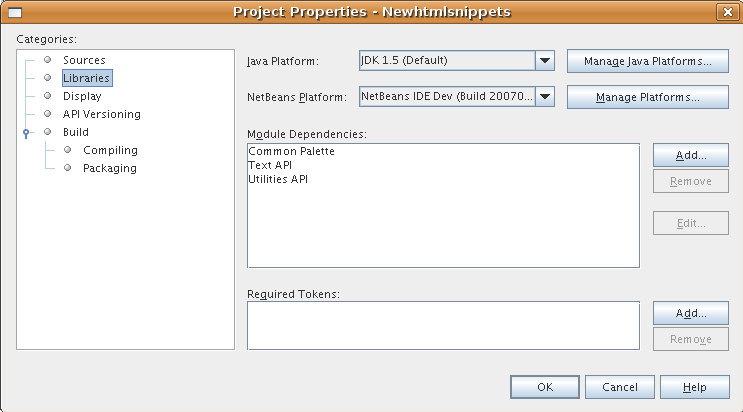
Click OK to exit the Project Properties dialog box.
In this section, you create BR.java, which defines
a code snipper for an HTML line break. By implementing the
ActiveEditorDrop class,
you let the NetBeans APIs provide the infrastructure for
a palette item for NetBeans editors. You also
create HTMLPaletteUtilities.java, which defines
the insertion of the tag in the editor.
package org.netbeans.modules.newhtmlsnippets;

import javax.swing.text.BadLocationException;
import javax.swing.text.JTextComponent;
import org.netbeans.modules.newhtmlsnippets.HTMLPaletteUtilities;
import org.openide.text.ActiveEditorDrop;

public class BR implements ActiveEditorDrop {

    public BR() {
    }

    private String createBody() {
        String Br = "<br>";
        return Br;
    }

    public boolean handleTransfer(JTextComponent targetComponent) {
        String body = createBody();
        try {
            HTMLPaletteUtilities.insert(body, targetComponent);
        } catch (BadLocationException ble) {
            return false;
        }
        return true;
    }

}
Right-click in the Source Editor and choose Reformat Code (Ctrl-Shift-F).
package org.netbeans.modules.newhtmlsnippets;

import javax.swing.text.BadLocationException;
import javax.swing.text.Caret;
import javax.swing.text.Document;
import javax.swing.text.JTextComponent;
import javax.swing.text.StyledDocument;
import org.openide.text.NbDocument;

public class HTMLPaletteUtilities {

    public static void insert(final String s,final JTextComponent target) throws BadLocationException {

        final StyledDocument doc = (StyledDocument)target.getDocument();

        class AtomicChange implements Runnable {

            public void run() {
                Document value = target.getDocument();
                if (value == null)
                    return;
                try {
                    insert(s, target, doc);
                } catch (BadLocationException e) {}
            }
        }

        try {
            NbDocument.runAtomicAsUser(doc, new AtomicChange());
        } catch (BadLocationException ex) {}

    }

    private static int insert(String s, JTextComponent target, Document doc) throws BadLocationException {

        int start = -1;

        try {

            //firstly, find selected text range:
            Caret caret = target.getCaret();
            int p0 = Math.min(caret.getDot(), caret.getMark());
            int p1 = Math.max(caret.getDot(), caret.getMark());
            doc.remove(p0, p1 - p0);

            //then, replace selected text with the inserted one:
            start = caret.getDot();
            doc.insertString(start, s, null);

        } catch (BadLocationException ble) {}

        return start;

    }

}
Right-click in the Source Editor and choose Reformat Code (Ctrl-Shift-F).
Optionally, you can let a JPanel appear when the palette item is dropped. In the JPanel, you can let the user define values for attributes that relate to the tag that is about to be created. However, note that adding such a customizer is optional. In the case of a line break, which is what we are creating in this tutorial, there are no attributes that relate to the BR tag. For that reason, to illustrate the customizer functionality, we will add a comment before the BR tag, by means of a customizer.
Note: If you check out the html module from the NetBeans sources, you will find many examples of customizers in the org/netbeans/modules/html/palette/items package.
private Dialog dialog = null;
private DialogDescriptor descriptor = null;
private boolean dialogOK = false;

BR br;
JTextComponent target;
public BRCustomizer(BR br, JTextComponent target) {
    this.br = br;
    this.target = target;

    initComponents();
}
public boolean showDialog() {

    dialogOK = false;

    String displayName = "";
    try {
        displayName = NbBundle.getBundle("org.netbeans.modules.newhtmlsnippets.Bundle").getString("NAME_html-BR"); // NOI18N
    } catch (Exception e) {}

    descriptor = new DialogDescriptor
            (this, NbBundle.getMessage(BRCustomizer.class, "LBL_Customizer_InsertPrefix") + " " + displayName, true,
            DialogDescriptor.OK_CANCEL_OPTION, DialogDescriptor.OK_OPTION,
            new ActionListener() {
        public void actionPerformed(ActionEvent e) {
            if (descriptor.getValue().equals(DialogDescriptor.OK_OPTION)) {
                evaluateInput();
                dialogOK = true;
            }
            dialog.dispose();
        }
    }
    );

    dialog = DialogDisplayer.getDefault().createDialog(descriptor);
    dialog.setVisible(true);
    repaint();

    return dialogOK;

}
private void evaluateInput() {

   String comment = jTextField1.getText();
   br.setComment(comment);

}
LBL_Customizer_InsertPrefix=Insert
NAME_html-BR=Line Break
package org.netbeans.modules.newhtmlsnippets;

import javax.swing.text.BadLocationException;
import javax.swing.text.JTextComponent;
import org.netbeans.modules.newhtmlsnippets.HTMLPaletteUtilities;
import org.openide.text.ActiveEditorDrop;

public class BR implements ActiveEditorDrop {

    private String comment = "";

    public BR() {
    }

    private String createBody() {
        String comment = getComment();
        String Br = "<!-- " + comment + " -->"
                + "\n        <br>";
        return Br;
    }

    public boolean handleTransfer(JTextComponent targetComponent) {

        BRCustomizer c = new BRCustomizer(this, targetComponent);
        boolean accept = c.showDialog();
        if (accept) {
            String body = createBody();
            try {
                HTMLPaletteUtilities.insert(body, targetComponent);
            } catch (BadLocationException ble) {
                accept = false;
            }
        }
        return accept;

    }

    public String getComment() {
        return comment;
    }

    public void setComment(String comment) {
        this.comment = comment;
    }

}
Code snippets are registered in two phases. Firstly, you declare a code snippet in an XML file that conforms to the NetBeans Editor Palette Item DTD. In this XML file, you declare your ActiveEditorDrop implementation class, a 16x16 pixel icon, a 32x32 pixel icon, a display name, and a tooltip.
Note: Use the 1.0 version of the DTD if you want the display name and tooltip to be defined in a properties file. Use the 1.1 version of the DTD if you want to declare the display name and tooltip witin the XML file itself.
Secondly, you register the XML file in the layer.xml file,
in the palette's folder.
The NetBeans Editor Palette Item is used to declare the ActiveEditorDrop class, the icons, the display name, and the tooltip.
<?xml version="1.0" encoding="UTF-8"?>
<!DOCTYPE editor_palette_item PUBLIC "-//NetBeans//Editor Palette Item 1.0//EN"
  "http://www.netbeans.org/dtds/editor-palette-item-1_0.dtd">

<editor_palette_item version="1.0">

    <class name="org.netbeans.modules.newhtmlsnippets.BR" />

    <icon16 urlvalue="org/netbeans/modules/newhtmlsnippets/resources/BR16.png" />
    <icon32 urlvalue="org/netbeans/modules/newhtmlsnippets/resources/BR32.png" />

    <description localizing-bundle="org.netbeans.modules.newhtmlsnippets.Bundle"
               display-name-key="NAME_html-BR"
               tooltip-key="HINT_html-BR" />

</editor_palette_item>
In the 1.1 DTD, you can define the display name and tooltip without using a properties file. Below, only the difference with the previous XML file definition is highlighted:
<?xml version="1.0" encoding="UTF-8"?>
<!DOCTYPE editor_palette_item PUBLIC "-//NetBeans//Editor Palette Item 1.1//EN"
  "http://www.netbeans.org/dtds/editor-palette-item-1_1.dtd">

<editor_palette_item version="1.0">

    <class name="org.netbeans.modules.newhtmlsnippets.BR" />

    <icon16 urlvalue="org/netbeans/modules/newhtmlsnippets/resources/BR16.png" />
    <icon32 urlvalue="org/netbeans/modules/newhtmlsnippets/resources/BR32.png" />

    <inline-description>
       <display-name>New Line</display-name>
       <tooltip>
           <b>
              br
           </b>
       </tooltip>
    </inline-description>

</editor_palette_item>


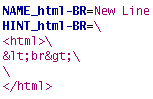
If you want to use a properties file for declaring the palette item's display name and tooltip, add the following to the Bundle.properties file:
The layer.xml file registers the user interface elements of your module in your application, which in this case is the IDE. Here, we need to register the palette item in the layer.xml file so that the item will appear in the HTML Palette.
<folder name="HTMLPalette">
   <folder name="HTML">
      <file name="BR.xml" url="resources/BR.xml"/>
   </folder>
</folder>
When you right-click on the node, several options are available, such as "Delete" and "Copy".
As an experiment, drag the BR.xml node and drop it right below the TABLE.xml node. Double-click the Layer XML node in the Important Files node, notice that two new tags have been added, one before and one after the <file name="BR.xml" url="resources/BR.xml"/> line:
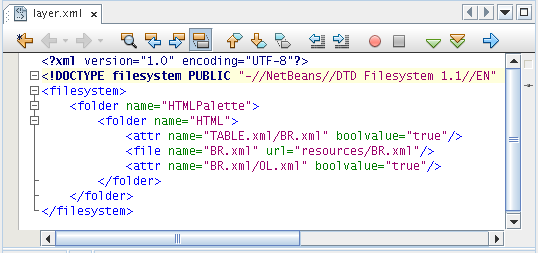
When you dragged and dropped the BR.xml node in the <this layer in context> node, the IDE created <attr> tags for positioning the new component snippet between the existing component snippets.
Now we need to think about installation and distribution. In the first section below, we install the code snippet, next we create an NBM file and examine distribution channels.
Install and try out the code snippet, by following the steps below.
The module is built and installed in the target platform. The target platform opens so that you can try out your new module. The default target platform is the installation used by the current instance of the development IDE.
Create a new HTML file in the IDE. When the HTML file opens, it displays the Component Palette (Ctrl-Shift-8) with one additional code snippet, called "New Line", with a tooltip that displays the result of dragging-and-dropping the item:
An NBM file is the binary version of the module that provides the code snippet. Below, using one menu item, we create the NBM file.
The NBM file is created and you can view it in the Files window (Ctrl-2), as shown below:

For more information about creating and developing NetBeans modules, see the following resources:
|
Version
|
Date
|
Changes
|
Open Issues
|
| 1 | 28 November 2005 | Initial version |
|
| 2 | 2 December 2005 |
|
|
| 3 | 8 December 2005 |
|
|
| 4 | 1 June 2007 |
|