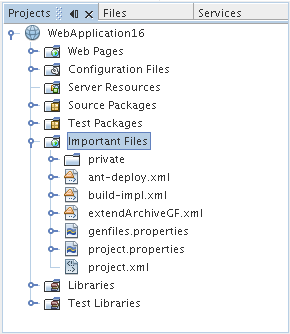
This tutorial demonstrates how to extend an existing project type. New APIs in NetBeans IDE 6.0 enable you to add new nodes to an existing project type's logical view, additions to an existing project type's lookup, and new panels to an existing project type's Project Properties dialog box. To illustrate these extensions, we extend the web application project type, by adding a new 'Important Files' node, exposing the content of the project's 'nbproject' folder, as shown here:
Prior to NetBeans IDE 6.0, no APIs existed for extending existing project types. Instead, you would need to create new ones from scratch. From 6.0 onwards, you are recommended to extend existing project types rather than create new ones. This will keep the number of project types to a minimum and avoid a large number of project types with very small differences.
|
|
For more information on working with NetBeans modules, see the NetBeans Development Project home on the NetBeans website. If you have questions, visit the NetBeans Developer FAQ or use the feedback link at the end of this page.
Before you begin, you need to install the following software on your computer:
You will also make use of this icon, which you
can right-click here and download: 
We begin by working through the New Module Project wizard. At the end of it, we will have a basic source structure, with some default files, that every NetBeans module requires.
Click Next.
Click Next.
Click Finish.
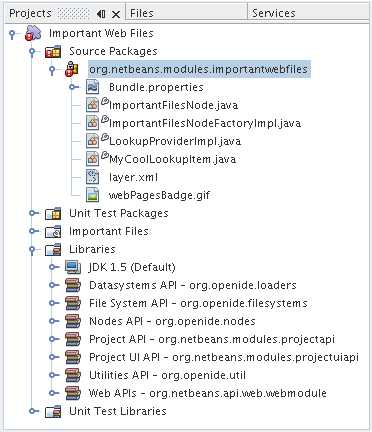
The IDE creates the Important Web Files project. The project contains all of your sources and project metadata, such as the project's Ant build script. The project opens in the IDE. You can view its logical structure in the Projects window (Ctrl-1) and its file structure in the Files window (Ctrl-2).
For basic information on each of the files above, see the Introduction to NetBeans Module Development.
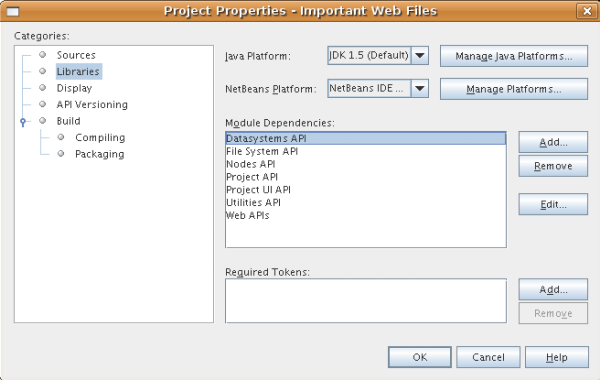
We will need to make use of several NetBeans APIs. In this step, we select the modules that provide the NetBeans APIs that we will need.
The Project Properties dialog box opens.
The Libraries panel should now look as follows:
Before we create the classes that implement the APIs that we registered above, we will add entries to the layer file.
<folder name="Projects">

    <folder name="org-netbeans-modules-web-project">

        <folder name="Lookup">
            <file name="org.netbeans.modules.importantwebfiles.LookupProviderImpl.instance"/>
        </folder>

        <folder name="Nodes">
            <file name="org.netbeans.modules.importantwebfiles.ImportantFilesNodeFactoryImpl.instance">
                <attr name="position" intvalue="1200"/>
            </file>
        </folder>

    </folder>

</folder>
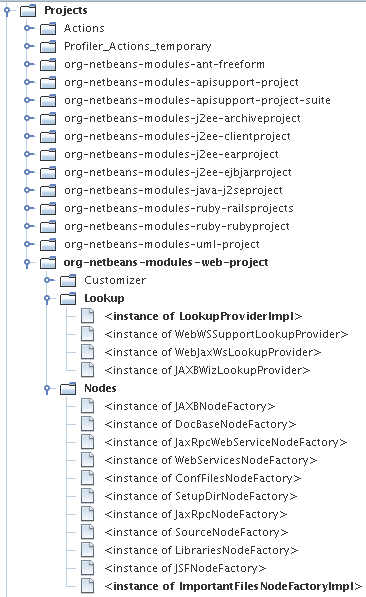
Note: The visual view above is very useful in showing you the names of the project types, so that you can correctly register extensions to them in the layer file.
We start by implementing the LookupProviderImpl class, which we registered in the layer file in the previous section.
public class LookupProviderImpl implements LookupProvider {

    public Lookup createAdditionalLookup(Lookup lookup) {

        Project prj = lookup.lookup(Project.class);

        //If there is a web module provider in the
        //project's lookup, add a new lookup item to
        //the lookup, which we will look for to determine
        /whether a node should be created:
        WebModuleProvider wmp = lookup.lookup(WebModuleProvider.class);
        if (wmp != null) {
            return Lookups.fixed(new MyCoolLookupItem(prj));
        }

        //If there is no web module in the lookup,
        //we do not add a new item to our lookup,
        //so that later a node will not be created:
        return Lookups.fixed();

    }

}
public class MyCoolLookupItem {

    public MyCoolLookupItem(Project prj) {
    }

}
We start by implementing the LookupProviderImpl class, which we registered in the layer file in the previous section.
public class ImportantFilesNodeFactoryImpl implements NodeFactory {

    Project proj;

    public NodeList createNodes(Project project) {

        this.proj = project;

        //If there is no 'nbproject' folder,
        //return an empty list of nodes:
        if (proj.getProjectDirectory().getFileObject("nbproject") == null) {
            return NodeFactorySupport.fixedNodeList();
        }

        //If our item is in the project's lookup,
        //return a new node in the node list:
        MyCoolLookupItem item = project.getLookup().lookup(MyCoolLookupItem.class);
        if (item != null) {
            try {
                ImportantFilesNode nd = new ImportantFilesNode(proj);
                return NodeFactorySupport.fixedNodeList(nd);
            } catch (DataObjectNotFoundException ex) {
                Exceptions.printStackTrace(ex);
            }
        }

        //If our item isn't in the lookup,
        //then return an empty list of nodes:
        return NodeFactorySupport.fixedNodeList();

    }

}
public class ImportantFilesNode extends FilterNode {

    private static Image smallImage =
          Utilities.loadImage("/org/netbeans/modules/importantwebfiles/webPagesBadge.gif"); // NOI18N

    public ImportantFilesNode(Project proj) throws DataObjectNotFoundException {
        super(DataObject.find(proj.getProjectDirectory().getFileObject("nbproject")).getNodeDelegate());
    }

    public String getDisplayName() {
        return "Important Files";
    }

    //Next, we add icons, for the default state, which is
    //closed, and the opened state; we will make them the same.
    //Icons in project logical views are
    //based on combinations--you must combine the node's own icon
    //with a distinguishing badge that is merged with it. Here we
    //first obtain the icon from a data folder, then we add our
    //badge to it by merging it via a NetBeans API utility method:

    public Image getIcon(int type) {
        DataFolder root = DataFolder.findFolder(Repository.getDefault().getDefaultFileSystem().getRoot());
        Image original = root.getNodeDelegate().getIcon(type);
        return Utilities.mergeImages(original, smallImage, 7, 7);
    }

    public Image getOpenedIcon(int type) {
        DataFolder root = DataFolder.findFolder(Repository.getDefault().getDefaultFileSystem().getRoot());
        Image original = root.getNodeDelegate().getIcon(type);
        return Utilities.mergeImages(original, smallImage, 7, 7);
    }

}
Finally, we install the module and make use of the result.
For more information about creating and developing NetBeans modules, see the following resources: