 How to Create DHCP Options (DHCP Manager)
In DHCP Manager, select the Options tab.
See How to Start and Stop DHCP Manager for information about DHCP Manager.
Choose Create from the Edit menu.
The Create Options dialog box opens.
Type a short descriptive name for the new option.
The name can contain up to 128 alphanumeric characters and spaces.
Type or select values for each setting in the dialog box.
Refer to Table 15-5 for information about each setting, or view the DHCP Manager help.
Select Notify DHCP Server of Change if you are finished creating options.
This selection tells the DHCP server to reread the dhcptab table to put the change into effect immediately after you click OK.
Click OK.
You can now add the option to macros, and assign a value to the option to pass to clients.
 How to Create DHCP Options (dhtadm)
Become superuser or assume a role or user name that is assigned to the DHCP Management profile.
For more information about the DHCP Management profile, see Setting Up User Access to DHCP Commands.
Roles contain authorizations and privileged commands. For more information about roles, see "Configuring RBAC (Task Map)" in System Administration Guide: Security Services.
Create a DHCP option by typing a command using the following format:
# dhtadm -A -s option-name -d 'category,code,data-type,granularity,maximum' -g
option-name
Is an alphanumeric string of 128 characters of less.
category
Is one of the following: Site, Extend, or Vendor=list-of-classes. list-of-classes is a space-separated list of vendor client classes to which the option applies. See Table 15-5 for information about how to determine the vendor client class.
code
Is a numeric value that is appropriate to the option category, as explained in Table 15-5.
data-type
Is specified by a keyword that indicates the type of data that is passed with the option, as explained in Table 15-5.
granularity
Is specified as a nonnegative number, as explained in Table 15-5.
maximum
Is a nonnegative number, as explained in Table 15-5.
Example 15-3 Creating a DHCP Option With dhtadm
The following command would create an option called NewOpt, which is a Site category option. The option's code is 130. The option's value can be set to a single 8-bit unsigned integer.
# dhtadm -A -s NewOpt -d 'Site,130,UNUMBER8,1,1' -g
The following command would create an option called NewServ, which is a Vendor category option that applies to clients whose machine type is SUNW,Sun-Blade-100 or SUNW,Sun-Blade-1000. The option's code is 200. The option's value can be set to one IP address.
# dhtadm -A -s NewServ -d 'Vendor=SUNW.Sun-Blade-100 \
SUNW.Sun-Blade-1000,200,IP,1,1' -g
Modifying DHCP Options
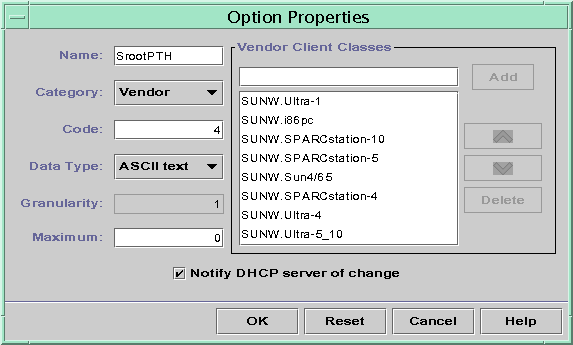
If you have created options for your DHCP service, you can change the properties for these options. You can use the dhtadm -M -s command or DHCP Manager's Option Properties dialog box to modify options.
Note that you should modify the Solaris DHCP client's option information to reflect the same modification that you make to the DHCP service. See Modifying the Solaris DHCP Client's Option Information.
The following figure shows DHCP Manager's Option Properties dialog box.
Figure 15-18 Option Properties Dialog Box in DHCP Manager

 How to Modify DHCP Option Properties (DHCP
Manager)
In DHCP Manager, select the Options tab.
See How to Start and Stop DHCP Manager for information about DHCP Manager.
Select the option that you want to modify.
Choose Properties from the Edit menu.
The Option Properties dialog box opens.
Edit the properties as needed.
See Table 15-5 for information about the properties, or view the DHCP Manager help.
Select Notify DHCP Server of Change when you are finished with options.
The change is made to the dhcptab table. The DHCP server is signaled to reread the dhcptab table to put the changes into effect.
Click OK.
 How to Modify DHCP Option Properties (dhtadm)
Become superuser or assume a role or user name that is assigned to the DHCP Management profile.
For more information about the DHCP Management profile, see Setting Up User Access to DHCP Commands.
Roles contain authorizations and privileged commands. For more information about roles, see "Configuring RBAC (Task Map)" in System Administration Guide: Security Services.
Modify an option by typing a command using the following format:
# dhtadm -M -s option-name -d 'category,code,data-type,granularity,maximum' -g
option-name
Specifies the name of the option that you want to change.
category
Can be Site, Extend, or Vendor=list-of-classes. list-of-classes is a space-separated list of vendor client classes to which the option applies. For example, SUNW.Sun-Blade-100 SUNW.Ultra-80 SUNWi86pc.
code
Specifies a numeric value that is appropriate to the option category, as explained in Table 15-5.
data-type
Specifies a keyword that indicates the type of data that is passed with the option, as explained in Table 15-5.
granularity
Is a nonnegative number, as explained in Table 15-5.
maximum
Is a nonnegative number, as explained in as explained in Table 15-5.
Note that you must specify all of the DHCP option properties with the -d switch, not just the properties that you want to change.
Example 15-4 Modifying a DHCP Option With dhtadm
The following command would modify an option called NewOpt. The option is a Site category option. The option's code is 135. The option's value can be set to a single 8-bit unsigned integer.
# dhtadm -M -s NewOpt -d 'Site,135,UNUMBER8,1,1'
The following command would modify an option called NewServ, which is a Vendor category option. The option now applies to clients whose machine type is SUNW,Sun-Blade-100 or SUNW,i86pc. The option's code is 200. The option's value can be set to one IP address.
# dhtadm -M -s NewServ -d 'Vendor=SUNW.Sun-Blade-100 \
SUNW.i86pc,200,IP,1,1' -g

 Previous