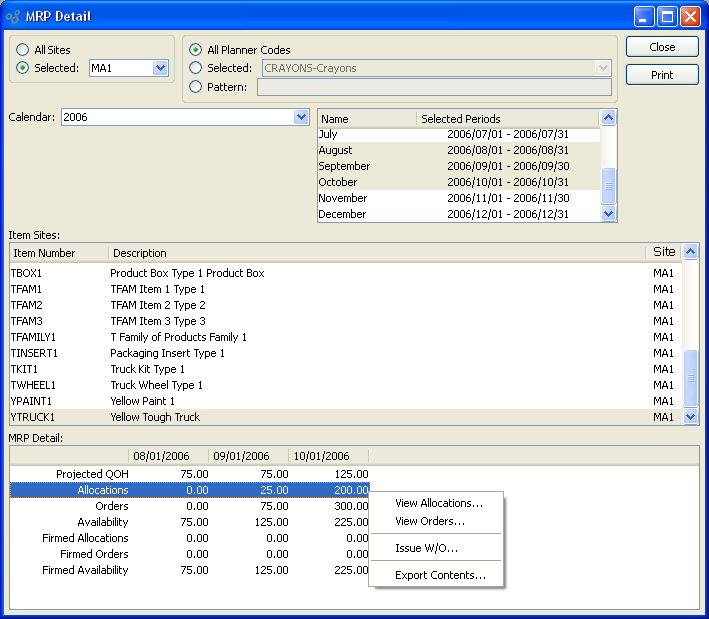
To display a time-phased view of Material Requirements Planning (MRP) detail, select the "MRP Detail" option. The following screen will appear:

Note
Only firm Planned Orders will be included in the MRP Detail display. If a Planned Order is not firmed, it will not be recognized. This limitation pertains also to MRP Items which may be associated with MPS or Planning Items. While firm MPS Orders may exist, Planned Orders for the underlying MRP Items must be firmed (or released) before the MRP Detail display will recognize them.
When displaying MRP detail, you are presented with the following options:
- All Sites
Select to display MRP detail for all Sites.
- Selected
Specify Site whose MRP detail you want to display.
- All Planner Codes
Select to display MRP detail for all Planner Codes.
- Selected
Specify Planner Code whose MRP detail you want to display.
- Pattern
Enter a Planner Code pattern to select a range of Planner Codes. Refine your search using Regular Expressions.
- Calendar
Select the Calendar you want to use for the report. Associated Calendar periods will be displayed.
Tip
When setting up a planning Calendar, be sure to include dates that are past due in the first period of the Calendar.
- Name/Selected Periods
Select as many periods as you want to display. Selected periods correspond to Calendar specified in the "Calendar" field. Select individual periods or groups of periods together. To select an individual period, highlight the period using your mouse button. The period is now selected. To select a sequence of periods, highlight the first in the sequence using your mouse button. Then, holding down the SHIFT key on your keyboard, highlight the last period in the sequence. The entire sequence is now selected. To select periods that are out of sequence (e.g., January, April, July, October), highlight the first period in the group. Then, holding down the CTRL key on your keyboard, highlight the next period you want to select. Continue highlighting periods with the CTRL key depressed until all desired periods are selected. The entire group is now selected.
- Item Sites
Display lists Items matching the specified parameters. When you have selected a Calendar type and corresponding Calendar period(s), highlight an Item to display MRP detail for the Item in the "MRP Detail" display below.
Tip
To refresh the MRP Detail display, double-click on the Item Site whose detail you want to refresh.
- MRP Detail
-
Display lists MRP detail for the Item you selected in the "Site Items" display above.
MRP detail will include the following rows: projected Quantity on Hand (based on Allocations and Orders for specified future periods); Allocations (demand from Sales Orders); Orders (based on Work Orders or Purchase Orders); Availability (based on current Allocations and Orders); Firmed Allocations (firmed planned requirements); Firmed Orders (firm Planned Orders); and firmed Availability (based on Availability and firm Planned Orders).
To the far right of the screen, the following buttons are available:
- CLOSE
Closes the screen, returning you to the application desktop.
Runs the report associated with this screen.
Right-clicking on a Line Item in the MRP Detail display enables you to select from the following context-sensitive options.
You will only be able to view Allocations if Allocations are showing a positive value in the period where you right-click your mouse. Similarly, you will only be able to view Orders if Orders are showing a positive value in the period where you right-click your mouse. If the Line Item is a purchased Item, the following additional options will be available:
If the Line Item is a manufactured Item, the following additional option will be available: