Inventory transactions section.
To make a Miscellaneous Adjustment to the Quantity on Hand value for an Item, select the "Miscellaneous Adjustment" option. The following screen will appear:
Note
Use the Miscellaneous Adjustment utility to handle Inventory adjustments not covered by another transaction type—for example, Receipt from Purchasing, Receipt from Manufacturing, Scrap, etc. For a complete list of Inventory transaction Types, see Appendix A, Additional References.
When creating a Miscellaneous Adjustment, you are presented with the following options:
- Transaction Date
Specify the date you want the transaction to be posted to the General Ledger. The current day's date will display by default.
- Item Number
Enter the Item Number of the Item you want to create a Miscellaneous Adjustment for.
- UOM
Inventory Unit of Measure.
- Site
Specify the Site where the Miscellaneous Adjustment should be recorded. If an Item is located in more than one Site, be sure to specify the correct Site for the Miscellaneous Adjustment.
- Adjustment Qty.
The number entered will adjust the Quantity on Hand for the specified Item. Field accepts positive and negative numbers. To enter a negative number, simply prefix the number with a minus symbol.
- Relative
Select to make a relative adjustment to the Item's Quantity on Hand. The "Before" value, which represents current Quantity on Hand, will increase or decrease relative to the number entered in the "Adjustment Qty." field. The new Quantity on Hand value will appear beneath the "After" heading. Non-netable Quantity on Hand is not included in these values.
- Absolute
Select to make an absolute adjustment to the Item's Quantity on Hand. The "Before" value, which represents current Quantity on Hand, will be changed to the new value entered in the "Adjustment Qty." field. This absolutely new Quantity on Hand value will appear beneath the "After" heading. Non-netable Quantity on Hand is not included in these values.
- Document #
Creates a user-defined reference for the Miscellaneous Adjustment. The Document reference will be posted with the General Ledger (G/L) transaction record when the Miscellaneous Adjustment is generated. This field may be used for internal tracking and auditing purposes.
- Adjust Value
The Cost tab will be visible only if Average Costing is enabled on the Configure Inventory screen. The Cost tab will be enabled only if Average Costing is the Cost Method selected for the Item Site being adjusted. If Adjust Value is checked then the transaction will affect the value of perpetual inventory using the following Costs:
- Calculated
Use the average cost calculation to determine perpetual Inventory value and distribute costs for this transaction.
- Manual
Use the total cost entered to determine perpetual Inventory value and distribute costs for this transaction.
To enter Notes related to the Miscellaneous Adjustment, select the "Notes" tab. The following screen will appear:
When entering Notes related to a Miscellaneous Adjustment, you are presented with the following options:
- Notes
This is a scrolling text field with word-wrapping for entering Notes related to the adjustment.
To the far right of the screen, the following buttons are available:
- CANCEL
Closes the screen without posting an adjusted value, returning you to the application desktop.
- POST
Posts the adjusted value to the Quantity on Hand balance. Additional steps will be necessary if the specified Item is stored in multiple Locations.
To Scrap Items from Inventory, select the "Scrap" option. The following screen will appear:
When entering a Scrap transaction, you are presented with the following options:
- Transaction Date
Specify the date you want the transaction to be posted to the General Ledger. The current day's date will display by default.
- Item Number
Enter the Item Number of the Item you want to enter a Scrap transaction for.
- UOM
Inventory Unit of Measure.
- Site
Specify Site where the Item Site for the Scrap transaction is located.
- Scrap Qty.
Enter the quantity of Inventory UOM identified as Scrap. The number entered will appear as a deduction in the "After" column. Non-netable Quantity on Hand is not included in these values.
- Document #
Creates a user-defined reference for the Scrap transaction. The Document reference will be posted with the General Ledger (G/L) transaction record when the Scrap transaction is generated. This field may be used for internal tracking and auditing purposes.
- Comments
This is a scrolling text field with word-wrapping for entering Comments related to the Scrap transaction.
To the far right of the screen, the following buttons are available:
- CANCEL
Closes the screen without posting an Inventory Scrap transaction, returning you to the application desktop.
- POST
Posts the Scrap transaction. Generates an Inventory Scrap transaction and decrements Quantity on Hand. Additional steps will be necessary if the specified Item is stored in multiple Locations.
Expense transactions are a form of miscellaneous Inventory transaction. Expense transactions can be used to remove Items from Inventory, while assigning the transactions to preset Expense Categories (e.g., Trade Show Expense). To remove Items from Inventory and assign the transaction to an Expense Category, select the "Expense" option. The following screen will appear:
When entering an Expense transaction, you are presented with the following options:
- Transaction Date
Specify the date you want the transaction to be posted to the General Ledger. The current day's date will display by default.
- Item Number
Enter the Item Number of the Item you want to enter an Expense transaction for.
- UOM
Inventory Unit of Measure.
- Site
Specify Site where the Item Site for the Expense transaction is located.
- Quantity
Enter the quantity of Inventory UOM you want to enter an Expense transaction for. The number entered will appear as a deduction in the "After" column. Non-netable Quantity on Hand is not included in these values.
- Document #
Creates a user-defined reference for the Expense transaction. The Document reference will be posted with the General Ledger (G/L) transaction record when the Expense transaction is generated. This field may be used for internal tracking and auditing purposes.
- Expense Category
Specify the Expense Category you want to assign the Expense transaction to.
- Notes
This is a scrolling text field with word-wrapping for entering Comments related to the Expense transaction.
To the far right of the screen, the following buttons are available:
- CANCEL
Closes the screen without posting an Expense transaction, returning you to the application desktop.
- POST
Posts the Expense transaction. Issues an Expense transaction and decrements Quantity on Hand. Additional steps will be necessary if the specified Item is stored in multiple Locations.
To record the receipt of materials into Inventory, select the "Material Receipt" option. The following screen will appear:
Note
If an Item is Lot/Serial Number controlled, you will be given the opportunity to assign a Lot/Serial Number to incoming material during the receiving process.
When entering a Material Receipt, you are presented with the following options:
- Transaction Date
Specify the date you want the transaction to be posted to the General Ledger. The current day's date will display by default.
- Item Number
Enter the Item Number of the material you are receiving into Inventory.
- UOM
Inventory Unit of Measure.
- Site
Specify Site where material is being received.
- Receipt Qty.
Record the quantity of the Item being received. The Item's Quantity on Hand before and after the material receipt will also be displayed. Non-netable Quantity on Hand is not included in these values. If the material is issued directly to a Work Order, the before and after display will be bypassed.
- Immediate Issue to Work Order
Check to issue material immediately to a Work Order. Any Work Order Material Requirements having an issue method of either "Mixed" or "Push" may be issued to a Work Order using this option. Because "Pull" Items are issued to Work Orders using a material backflush, they may not be issued from this screen.
Note
The full quantity being received will be issued to the Work Order if the "Immediate Issue" option is selected. This means the quantity issued may exceed or fall short of the Work Order Material Requirement quantity. In such cases, adjustments at the Work Order level may have to be made to bring the issued quantity into alignment with the required quantity. To avoid having to manage discrepancies, do not select this option. Instead, consider issuing materials manually.
- Work Order #
Enter the Work Order Number of the Work Order you want to issue the received materials to. The browse button located to the right of the field leads to a searchable Work Orders list. The list will include Work Orders whose supplying Site matches the Site the materials are being received into.
- Site
Specifies supplying Site for the Work Order's parent Item.
- Item Number
Displays Item Number for the Work Order's parent Item.
- UOM
Inventory Unit of Measure.
- Status
Displays the Status of the selected Work Order.
- Document #
Creates a user-defined reference for the Material Receipt. The Document reference will be posted with the General Ledger (G/L) transaction record when the Material Receipt is generated. This field may be used for internal tracking and auditing purposes.
- Adjust Value
The Cost tab will be visible only if Average Costing is enabled on the Configure Inventory screen. The Cost tab will be enabled only if Average Costing is the Cost Method selected for the Item Site being adjusted. If Adjust Value is checked then the transaction will affect the value of perpetual inventory using the following Costs:
- Calculated
Use the average cost calculation to determine perpetual inventory value and distribute costs for this transaction.
- Manual
Use the Total Cost entered to determine perpetual inventory value and distribute costs for this transaction.
To enter Notes related to the Material Receipt, select the "Notes" tab. The following screen will appear:
When entering Notes related to a Material Receipt, you are presented with the following options:
- Notes
This is a scrolling text field with word-wrapping for entering Notes related to the Material Receipt.
To the far right of the screen, the following buttons are available:
- CANCEL
Closes the screen without posting and crediting the Material Receipt, returning you to the application desktop.
- POST
Posts and credits the Material Receipt. Additional steps will be necessary if the specified Item is stored in multiple Locations.
Transformation is the process of converting quantity of one Item into quantity of another Item. The Transform utility can be applied in multiple scenarios. For example, let's say you manufacture an Item—but when supplies run low, you purchase replenishment quantity from a Vendor. You would receive the replenishment quantity using an Item Number having the "purchased" Item Type. This purchased quantity would then be transformed into quantity of your manufactured Item.
Note
You may only transform an Item if the source Item is located in the same Site as the target Item.
To transform Inventory quantity, select the "Transform" option. The following screen will appear:
When transforming Inventory quantity, you are presented with the following options:
- Transaction Date
Specify the date you want the transaction to be posted to the General Ledger. The current day's date will display by default.
- Item Number
Enter the Item Number of the source Item whose quantity you want to transform.
- UOM
Inventory Unit of Measure.
- Site
Specify Site where desired source Item quantity is located.
- Source
Displays available Site Locations. Highlight the Location containing quantity you want to transform. If the Item is multiply-located in the specified Site, all Locations having valid quantity will display.
- Target Item Number
Specify which Item you want to transform the source Item quantity to. Target Item Numbers are defined using the "Transformations" tab on the Item master for the source Item. If no target Item is defined on the Item master, no transformations may occur.
- Qty. to Transform
Specify the source Item quantity you want to transform into target Item quantity.
To the far right of the screen, the following buttons are available:
- CLOSE
Closes the screen without transforming Inventory quantity, returning you to the application desktop.
- POST
Posts the Inventory transformation.
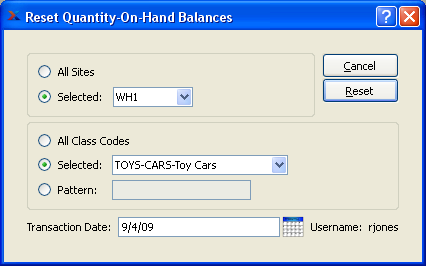
To avoid the unnecessary confusion that can occur if negative Quantity on Hand (QOH) balances are used for planning purposes, the system gives you the ability to quickly and easily reset negative QOH values to "0". To reset negative Quantity on Hand balances to zero, either globally or locally, select the "Reset QOH Balances" option. The following screen will appear:
Tip
Be sure to thaw any Item Site whose negative Quantity on Hand balance you want to reset to "0". An Item Site must be unfrozen before its QOH balance can be reset.
When resetting Quantity on Hand balances, you are presented with the following options:
- All Sites
Select to reset Quantity on Hand balances for all Sites.
- Selected
Specify Site where Quantity on Hand balances are to be reset.
- All Class Codes
Select to reset Quantity on Hand balances for all Class Codes.
- Selected
Specify Class Code whose Quantity on Hand you want to reset.
- Pattern
Enter a Class Code pattern to select a range of Class Codes. Refine your search using Regular Expressions.
- Transaction Date
Specify the date you want the transaction to be posted to the General Ledger. The current day's date will display by default.
To the far right of the screen, the following buttons are available:
- CANCEL
Closes the screen without resetting Quantity on Hand, returning you to the application desktop.
- RESET
Resets Quantity on Hand balances for Sites and Class Codes specified above.
Note
Additional steps will be necessary if any Items within the specified Class Code(s) are stored in multiple Locations.
To transfer quantity of an Item from one Site to another, select the "Inter-Site Transfer" option. The following screen will appear:
Tip
An Inter-Site Transfer can only be executed if the specified Item is located in more than one Site. To add an additional Site for an Item, go to the Enter Item Sites section of the Item Sites menu. Locate the desired Item Number using the Item Number lookup feature. Then select a new Site in the "Site" field. Enter all other required fields and save your results. The Item will now also be located in the additional Site. Repeat as often as necessary.
When creating an Inter-Site Transfer, you are presented with the following options:
- Transaction Date
Specify the date you want the transaction to be posted to the General Ledger. The current day's date will display by default.
- Item Number
Enter the Item Number of the Item you want to transfer from one Site to another.
- UOM
Inventory Unit of Measure.
- From Site
Specify the source Site for the transaction. If an Item is located in more than one Site, be sure to specify the correct Site you want to transfer the Item from. The "Before" column displays current Quantity on Hand for the Item.
- To Site
: Specify the destination Site for the transaction. If an Item is located in more than one Site, be sure to specify the correct Site you want to transfer the Item to. The "Before" column displays current Quantity on Hand for the Item
- Transferred Qty.
The number entered will adjust the Item's Quantity on Hand in both the "From" and "To" Sites. The values displayed in the "After" column represent the new Quantity on Hand in each Location. Non-netable Quantity on Hand is not included in these values.
- Document #
Creates a user-defined reference for the Inter-Site Transfer. The Document reference will be posted with the General Ledger (G/L) transaction record when the Inter-Site Transfer is generated. This field may be used for internal tracking and auditing purposes.
- Comments
This is a scrolling text field with word-wrapping for entering Comments related to the transfer.
To the far right of the screen, the following buttons are available:
- CANCEL
Closes the screen without posting an Inter-Site Transfer, returning you to the application desktop.
- POST
Posts the Inter-Site Transfer. Creates two transactions, one at each affected Site. The Site receiving Inventory is credited with the new Inventory amount, while the Site being relieved of Inventory is debited. Additional steps will be necessary if the specified Item is stored in multiple Locations.
To relocate Inventory from one Location to another, select the "Relocate Inventory" option. The following screen will appear:
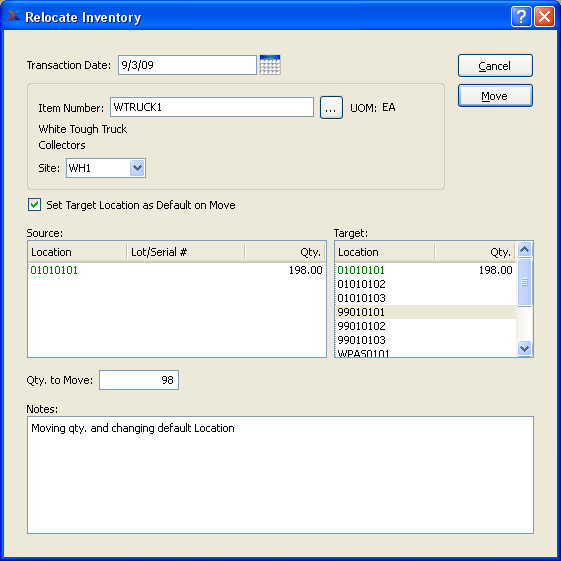
When relocating Inventory from one Location to another, you are presented with the following options:
- Transaction Date
Specify the date you want the transaction to be posted to the General Ledger. The current day's date will display by default.
- Item Number
Enter the Item Number of the Inventory you are relocating.
- UOM
Inventory Unit of Measure.
- Site
Specify Site where Inventory is located.
- Set Target Location as Default on Move
Select to change the default Location for the Item Site to the target Location once the MOVE button is selected. Performing this action means the target Location will become the new default Location for the Item Site. This option will only be available if your site is configured to allow on-the-fly changes to the default Location. To learn more about this configuration option, see Section 12.2, “Configure Inventory”.
- Source
Display lists source Locations for the specified Item. Select the source Location Inventory is to be transferred from.
- Target
Display lists target Locations for the specified Item. Select the target Location Inventory is to be transferred to.
- Qty. to Move
Enter the quantity of the specified Item you want to move from the source Location to the target Location.
- Notes
This is a scrolling text field with word-wrapping for entering Comments related to the Inventory relocation.
To the far right of the screen, the following buttons are available:
- CANCEL
Closes the screen without relocating Inventory, returning you to the application desktop.
- MOVE
Moves specified quantity of Inventory from source Location to target Location. Additional steps will be necessary if the specified Item is stored in multiple Locations.