Inventory Master Information section.
Because Sites may serve multiple purposes―as warehouses, stores, etc.―the concept of Site Types allows you to categorize how Sites are used. To access the master list of Site Types, select the "Site Types" option. The following screen will appear.
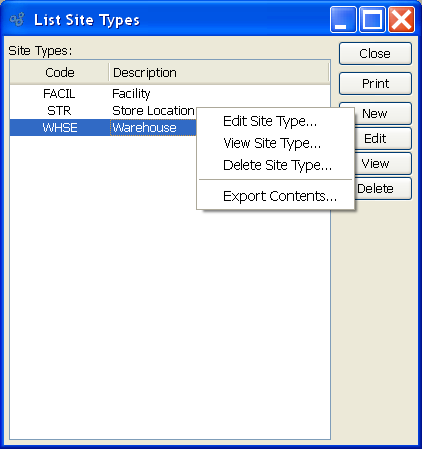
The Site Types screen displays information on all existing Site Types, including Site Type code and Site Type description.
To the far right of the list, the following buttons are available:
- CLOSE
Closes the screen, returning you to the application desktop.
Runs the report associated with this screen.
- NEW
Opens screen for creating a new Site Type.
- EDIT
Enables you to edit highlighted Site Type. The edit screen is the same as that for creating a new Site Type—except that when editing, the fields will contain Site Type information. Double-clicking on a Site Type will also bring you to the editing screen.
- VIEW
Highlight a Site Type and then select this button to reach a read-only view of the "Edit" screen.
- DELETE
Highlight a Site Type and then select this button to remove the Site Type from the list.
To create a new Site Type, select the NEW button. The following screen will appear:
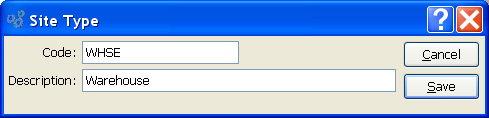
When creating a new Site Type, you are presented with the following options:
- Code
Enter a unique code to identify the Site Type.
- Description
Enter a description to further identify the Site Type.
To the far right of the screen, the following buttons are available:
- CANCEL
Closes the screen without creating a Site Type, returning you to the previous screen.
- SAVE
Creates the Site Type and adds it to the master list of Site Types.
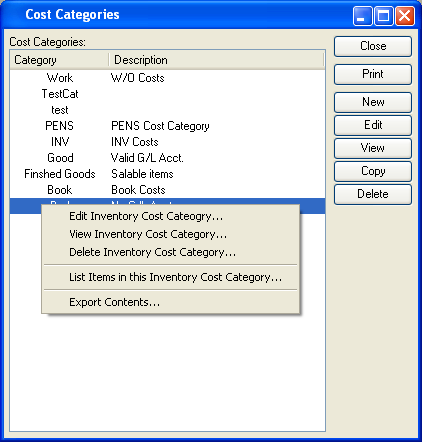
Cost Categories are applied to Item Sites as a mechanism for specifying how Costs should be distributed to the General Ledger whenever Inventory is received, moved, consumed, produced, shipped, scrapped, or returned. To access the master list of Cost Categories, select the "Cost Categories" option.
Note
Cost Categories define Cost distributions for Inventory Items. The distribution of Costs for non-Inventory Items are determined by Expense Categories.
The "Cost Categories" screen displays information on all existing Cost Categories, including Cost Category code and Cost Category description.
To the far right of the screen, the following buttons are available:
- CLOSE
Closes the screen, returning you to the application desktop.
Runs the report associated with this screen.
- NEW
Opens screen for creating a new Cost Category.
- EDIT
Enables you to edit highlighted Cost Categories. The edit screen is the same as that for creating a new Cost Category—except that when editing, the fields will contain Cost Category information. Double-clicking on a Cost Category will also bring you to the editing screen.
- VIEW
Highlight a Cost Category and then select this button to reach a read-only view of the "Edit" screen.
- COPY
Highlight a Cost Category and then select this button to reach a screen for copying the Cost Category master.
- DELETE
Highlight a Cost Category and then select this button to remove the category from the list.
To create a new Cost Category, select the NEW button. The following screen will appear:
Tip
The Account Numbers assigned to Cost Categories should not all be the Inventory Account. Instead, they should be individual accounts selected specifically for each Cost-tracking purpose. This will increase your visibility into your Inventory Costs and valuation.
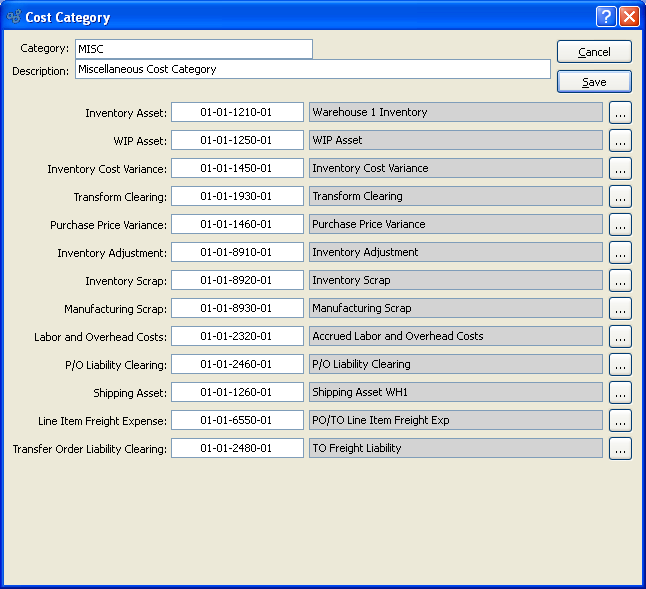
When creating a new Cost Category, you are presented with the following options:
- Category
Enter the Cost Category name.
- Description
Enter a brief description of the Cost Category.
- Inventory Asset
Identify a General Ledger (G/L) Account to distribute Inventory assets to. This is an Asset Account. It will be debited when Inventory is received and credited whenever Inventory Items are removed from Inventory.
- WIP Asset
Identify a General Ledger (G/L) Account to distribute work-in-process (WIP) assets to. This is an Asset Account. It will be credited and/or debited with labor, material, and overhead Costs while a Work Order is in-process. The sense of the transaction record depends on the circumstances of the transaction.
- Inventory Cost Variance
Identify a General Ledger (G/L) Account to distribute Inventory Cost variances to. This is an Asset Account. It is used in several scenarios: 1) If there is a difference between new Actual Cost and old Standard Cost when posting Actual Costs to Standard; 2) during Work Order processing if too many materials are issued to a Work Order, or if a Work Order is closed without the full quantity being posted; or 3) when posting cycle counts there is a difference between the new counted quantity and the quantity recorded in the system. The sense of the transaction record depends on the circumstances of the transaction.
- Transform Clearing
Identify a General Ledger (G/L) Account to distribute Transform transactions to. This is an Asset Account. It will be credited when a source Item quantity is transformed, and debited for an equal amount when the target Item quantity is received into Inventory.
- Purchase Price Variance
Identify a General Ledger (G/L) Account to distribute purchase Price variances to. This is an Asset Account. It will be credited or debited with the value of any variance that may arise when a Voucher is posted. The sense of the transaction record depends on the circumstances of the transaction.
- Inventory Adjustment
Identify a General Ledger (G/L) Account to distribute Inventory adjustments to. This is an Expense Account. It will be credited or debited with the value of any variance that may arise when a Miscellaneous Adjustment transaction or Cycle Count transaction is posted against an Item. The sense of the transaction record depends on the circumstances of the transaction.
- Inventory Scrap
Identify a G/L Account to distribute Inventory Scrap to. This is an Expense Account. It will be credited when a Scrap transaction is posted against an Item.
- Manufacturing Scrap
Identify a G/L Account to distribute Manufacturing Scrap to. This is an Expense Account. It will be credited when Work Order Material Requirements are scrapped from a Work Order.
- Labor and Overhead Costs
Overhead Costs: Identify a General Ledger (G/L) Account to distribute labor and overhead Costs to. This is a Liability Account. It will be debited and/or credited with labor and overhead Costs when Work Orders are in-process or posted. The sense of the transaction record depends on the circumstances of the transaction.
- P/O Liability Clearing
Identify a General Ledger (G/L) Account to distribute Purchase Order liability clearing to. This is a Liability Account. It will be credited when a Purchase Order Receipt is posted and debited when a Voucher is posted.
- Shipping Asset
Identify a General Ledger (G/L) Account to distribute shipping assets to. This is an Asset Account. It will be debited with the Standard Cost of a Sales Order Item when the Item is issued to Shipping and credited once the Item has been shipped.
- Line Freight Expense
Identify a General Ledger (G/L) Account to distribute Purchase Order or Transfer Order Line Item freight expenses to. This is an Expense Account. It will be debited when Purchase Order or Transfer Order Line Items are received. The Account may be debited or credited when correcting Purchase Order Receipts.
- Transfer Order Liability Clearing
Identify a General Ledger (G/L) Account to distribute Transfer Order Liability Clearing to. This is a Liability Account. It is used for recognizing liability related to transportation costs related to Transfer Orders. It will be credited when Transfer Orders receipts having freight charges are posted. It should be debited when the Freight (or other Vendor) is paid by Miscellaneous Check.
To the far right of the screen, the following buttons are available:
- CANCEL
Closes the screen without creating a Cost Category, returning you to the previous screen.
- SAVE
Creates the Cost Category and adds it to the master list of Cost Categories.
Expense Categories are used to identify the General Ledger (G/L) Accounts to be used when processing the following:
Non-Inventory Purchase Order Items
Miscellaneous Vouchers
Miscellaneous A/P Checks
Expense Transactions
For example, when entering a Purchase Order for a non-Inventory Item, you must select an Expense Category—thereby identifying the G/L Accounts the purchasing transaction will be distributed to. To access the master list of Expense Categories, select the "Expense Categories" option. The following screen will appear:
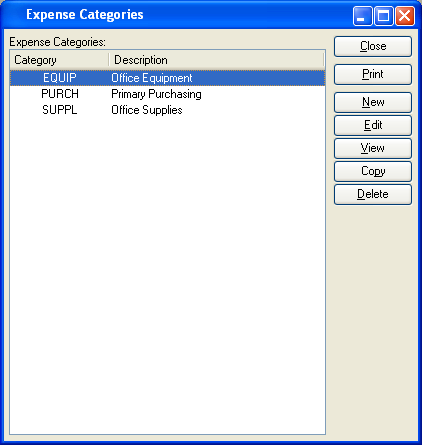
The "Expense Categories" screen displays information on all existing Expense Categories, including Expense Category code and Expense Category description.
To the far right of the screen, the following buttons are available:
- CLOSE
Closes the screen, returning you to the application desktop.
Runs the report associated with this screen.
- NEW
Opens screen for creating a new Expense Category.
- EDIT
Enables you to edit highlighted Expense Categories. The edit screen is the same as that for creating a new Expense Category—except that when editing, the fields will contain Expense Category information. Double-clicking on an Expense Category will also bring you to the editing screen.
- VIEW
Highlight an Expense Category and then select this button to reach a read-only view of the "Edit" screen.
- COPY
Highlight an Expense Category and then select this button to reach a screen for copying the Expense Category master.
- DELETE
Highlight an Expense Category and then select this button to remove the category from the list.
To create a new Expense Category, select the NEW button. The following screen will appear:
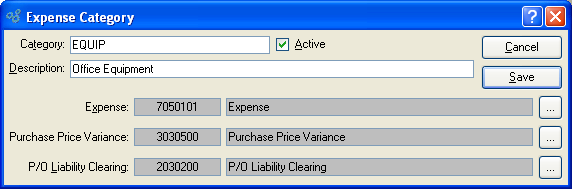
When creating a new Expense Category, you are presented with the following options:
- Category
Enter the Expense Category name.
- Description
Enter a brief description of the Expense Category.
- Active
Select to show the Expense Category as active. Not selecting means the Expense Category will be considered inactive. To re-activate an Expense Category, simply select this option.
- Expense
Identify a General Ledger (G/L) Account to distribute Purchasing Expenses to. This is an Expense Account. It will be debited when transactions using Expense Categories are posted.
- Purchase Price Variance
Identify a General Ledger (G/L) Account to distribute purchase Price variances to. This is an Asset Account. It will be credited or debited with the value of any variance that may arise when a Voucher is posted for non-Inventory Items.
- P/O Liability Clearing
Identify a General Ledger (G/L) Account to distribute Purchase Order liability clearing to. This is a Liability Account. It will be credited when non-Inventory Items are received, and debited when a Voucher for these Items is posted.
To the far right of the screen, the following buttons are available:
- CANCEL
Closes the screen without creating an Expense Category, returning you to the previous screen.
- SAVE
Creates the Expense Category and adds it to the master list of Expense Categories.
Characteristics may be used to create additional layers of information about Items, Customers, CRM Accounts, and more. For example, Characteristics defined on an Item master may be associated with Sales Order Items. And, if the Sales Order leads to the automatic generation of additional Orders (i.e., Work Orders or Purchase Orders), then the subsequent Orders will inherit the parent Sales Order Characteristics.
To access the master list of Characteristics, select the "Characteristics" option. The following screen will appear.
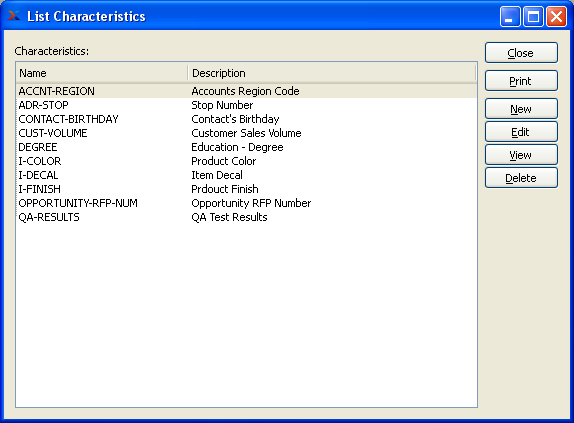
The "Characteristics" screen displays information on all existing Characteristics, including Characteristic name and Characteristic description.
To the far right of the list, the following buttons are available:
- CLOSE
Closes the screen, returning you to the application desktop.
Runs the report associated with this screen.
- NEW
Opens screen for creating a new Characteristic.
- EDIT
Enables you to edit highlighted Characteristics. The edit screen is the same as that for creating a new Characteristic—except that when editing, the fields will contain Characteristic information. Double-clicking on a Characteristic will also bring you to the editing screen.
- VIEW
Highlight a Characteristic and then select this button to reach a read-only view of the "Edit" screen.
- DELETE
Highlight a Characteristic and then select this button to remove the Characteristics from the list.
To create a new Characteristic, select the NEW button. The following screen will appear:
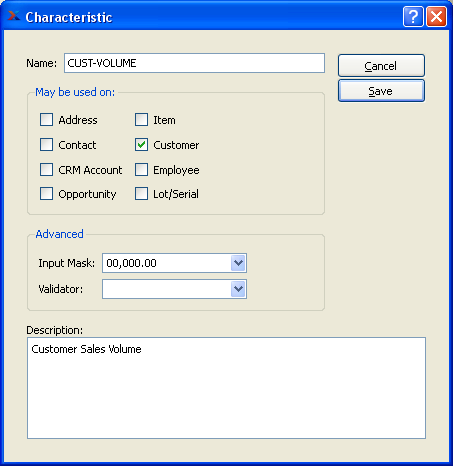
When creating a new Characteristic, you are presented with the following options:
- Name
Enter a unique name for the Characteristic.
- May be used on
Select one of the following Characteristic assignment options:
- Address
Select to make Characteristic available for Address Characteristics.
- Contact
Select to make Characteristic available for Contact Characteristics.
- CRM Account
Select to make Characteristic available for CRM Account Characteristics.
- Opportunity
Select to make Characteristic available for Opportunity Characteristics.
- Item
Select to make Characteristic available for Item Characteristics.
- Customer
Select to make Characteristic available for Customer Characteristics.
- Employee Characteristics
Select to make Characteristic available for Employee Characteristics.
- Lot/Serial
Select to make Characteristic available for Lot/Serial Characteristics.
- Advanced
Select from the following advanced features, if needed. These advanced options are not required, but if used they will enforce greater consistency and control over the values entered for your Characteristics. Typically when using these advanced validation features, you will specify either an input mask or a validator. If you decide to use both at once, they must be coordinated and consistent―otherwise users will experience difficulties when attempting to enter Characteristic values.
- Input Mask
Select from the available options―or manually enter an input mask of your own design. An input mask creates a template to guide users as they enter values for a Characteristic. It is a form of light data validation. For example, if you specify the input mask 00/00/0000, then users will be presented with the following template when they are entering values for the Characteristic : "__/__/____". In this case, users will simply have to fill in the blanks between the separators.
- 00/00/0000
Select this format to prompt users to enter a date format with the pattern shown (e.g., MM/DD/YYYY).
- ### - ### - ####
Select this format to prompt users to enter a numerical format with the pattern shown. This example would be a good match for telephone numbers (e.g., 757-555-1111).
- ### - ## - ####
Select this format to prompt users to enter a numerical format with the pattern shown. This example would be a good match for social security numbers (e.g., 012-34-5678).
- 00,000.00
Select this format to prompt users to enter a price format with the pattern shown.
- Validator
Select from the available options―or manually enter a validator of your own design. A validator is used to strictly enforce the format of data users can enter in a field. If you specify a validator for a Characteristic, then users will have to conform to the format when entering values for the Characteristic. Values which do not conform will not be accepted.
- [Y/N]
Select this boolean validator to require users to enter "Y" or "N" for Yes or No.
- \S+
Select this validator to require users to enter one or more non-white-space characters. So, for example, this validator would accept the value "Inventory" but not "Inventory Availability".
- [1-9]\d{0,3}
Select this validator to require users to enter a number from 1-9999.
- [A-Z]\d{5}[1-9]
Select this validator to require users to enter a value where the first character is A-Z, the next five characters are numbers 0-9, and the last character is a number 1-9. While this pattern may not be very useful for most people, it does illustrate how you can create your own regular expressions to design a validator to meet your own custom needs.
- www\S?(\.com|net|org)
Select this validator to require users to enter a website address (e.g., www.xtuple.com)
- Description
Enter a brief description of the Characteristic.
To the far right of the screen, the following buttons are available:
- CANCEL
Closes the screen without creating a Characteristic, returning you to the previous screen.
- SAVE
Creates the Characteristic and adds it to the master list of Characteristics.