Schedule Reports section.
Planned Items Reports section.
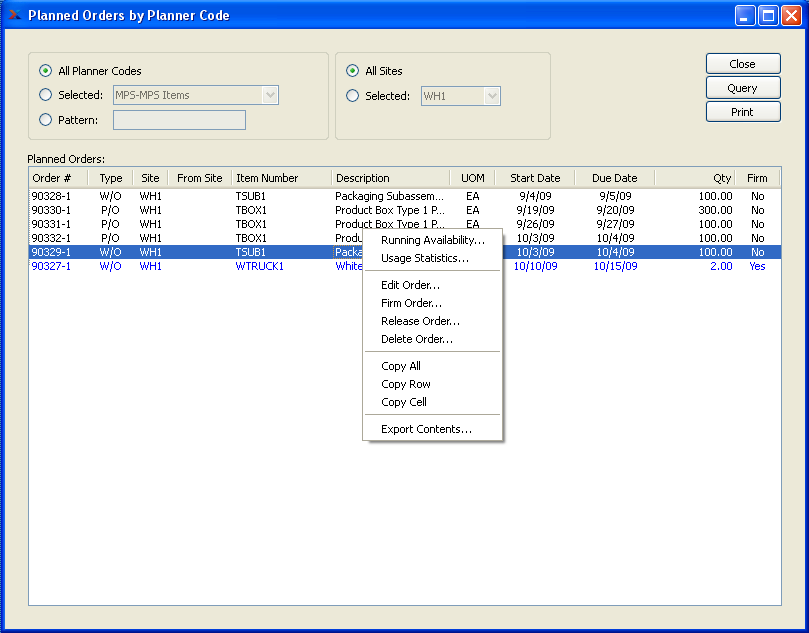
To view Planned Orders by Planner Code, select the "Planned Orders by Planner Code" option. The following screen will appear:
Note
When a Planned Work Order is released, the Create Work Order screen will appear with Work Order details automatically filled in. Releasing a Planned Purchase Order results in a Purchase Request, which may in turn be released from the Purchase Request reports.
When displaying Planned Orders by Planner Code, you are presented with the following options:
- All Planner Codes
Select to display Planned Orders for all Planner Codes.
- Selected
Specify Planner Code whose Planned Orders you want to display.
- Pattern
Enter a Planner Code pattern to select a range of Planner Codes. Refine your search using Regular Expressions.
- All Sites
Select to display Planned Orders by Planner Code for all Sites.
- Selected
Specify Site whose Planned Orders by Planner Code you want to display.
Note
In the case of Planned Purchase Orders, the quantity will always be represented in the Inventory Unit of Measure (UOM)—regardless of the Vendor UOM used on any existing Purchase Orders.
- Planned Orders
Display will show Planned Orders by Planner Code, using the specified parameters. Firm Planned Orders will display in blue.
Tip
Planned Orders must be firm before they will be considered as a valid source of supply by Material Requirements Planning (MRP) when MRP is run.
To the far right of the screen, the following buttons are available:
- CLOSE
Closes the screen, returning you to the application desktop.
- QUERY
Select to generate the display, using the specified parameters.
Runs the report associated with this screen.
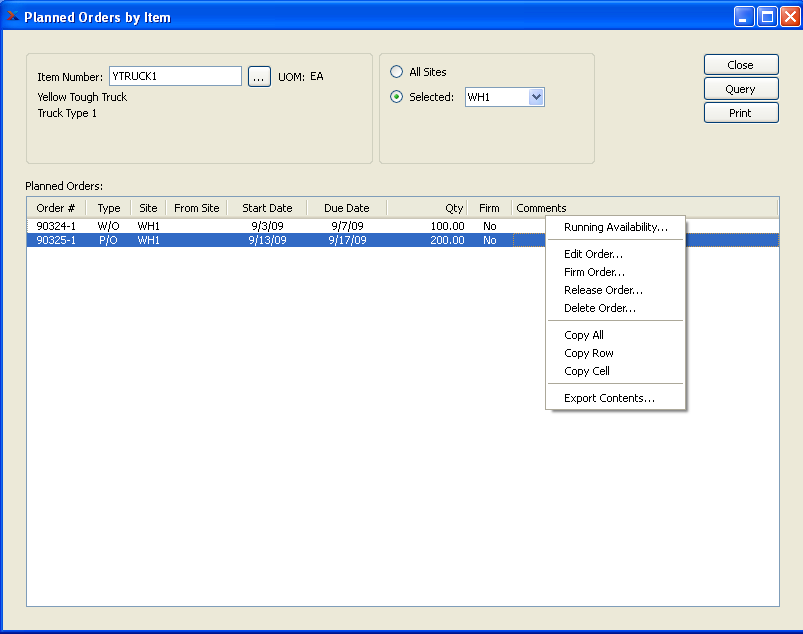
To view Planned Orders by Item, select the "Planned Orders by Item" option. The following screen will appear:
Note
When a Planned Work Order is released, the Create Work Order screen will appear with Work Order details automatically filled in. Releasing a Planned Purchase Order results in a Purchase Request, which may in turn be released from the Purchase Request reports.
When displaying Planned Orders by Item, you are presented with the following options:
- Item Number
Enter the Item Number of the Item whose Planned Orders you want to display. The browse button located to the right of the field leads to a searchable list of make and buy items.
- UOM
Inventory Unit of Measure.
Note
In the case of Planned Purchase Orders, the quantity will always be represented in the Inventory Unit of Measure (UOM)—regardless of the Vendor UOM used on any existing Purchase Orders.
- All Sites
Select to display Planned Orders by Item for all Sites.
- Selected
Specify Site whose Planned Orders by Item you want to display.
- Planned Orders
Display will show Planned Orders by Item, using the specified parameters. Firm Planned Orders will display in blue.
Tip
Planned Orders must be firm before they will be considered as a valid source of supply by Material Requirements Planning (MRP) when MRP is run.
To the far right of the screen, the following buttons are available:
- CLOSE
Closes the screen, returning you to the application desktop.
- QUERY
Select to generate the display, using the specified parameters.
Runs the report associated with this screen.
To view Running Availability, select the "Running Availability" option. The following screen will appear:
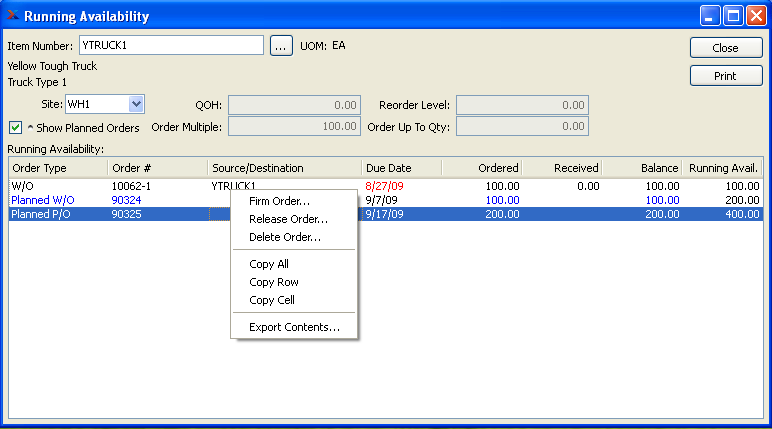
When displaying Running Availability, you are presented with the following options:
- Item Number
Enter the Item Number of the Item whose Running Availability you want to display.
- UOM
Inventory Unit of Measure.
Note
When quantity appears in the "Ordered" column, this refers to quantity that is on order through either a Work Order or Purchase Order. In the case of Purchase Orders, the quantity will always be represented in the Inventory Unit of Measure (UOM)—regardless of the Vendor UOM used on the Purchase Order.
- Site
Specify Site whose Running Availability you want to display.
- Show Planned Orders
Select to show Planned Orders in the display. Planned Orders will display in blue type.
- QOH
Displays Quantity on Hand for specified Item.
- Order Multiple
Displays Order Multiple specifying the increments the Item must be ordered in. Order Multiple is maintained in the Item Site master.
- Reorder Level
Displays the Reorder Level specifying the minimum Quantity on Hand allowed before an Item must be reordered. Reorder Level is maintained in the Item Site master.
- Order Up To Qty
Indicates the quantity level that MRP Planned Replenishment Orders will order up to.
- Running Availability
Display lists Running Availability for the selected Item, using the specified parameters. Red lettering indicates the due date has passed or Running Availability has dropped below 0.
To the far right of the screen, the following buttons are available:
- CLOSE
Closes the screen, returning you to the application desktop.
Runs the report associated with this screen.
To view time-phased Availability, select the "Time-Phased Availability" option. The following screen will appear:
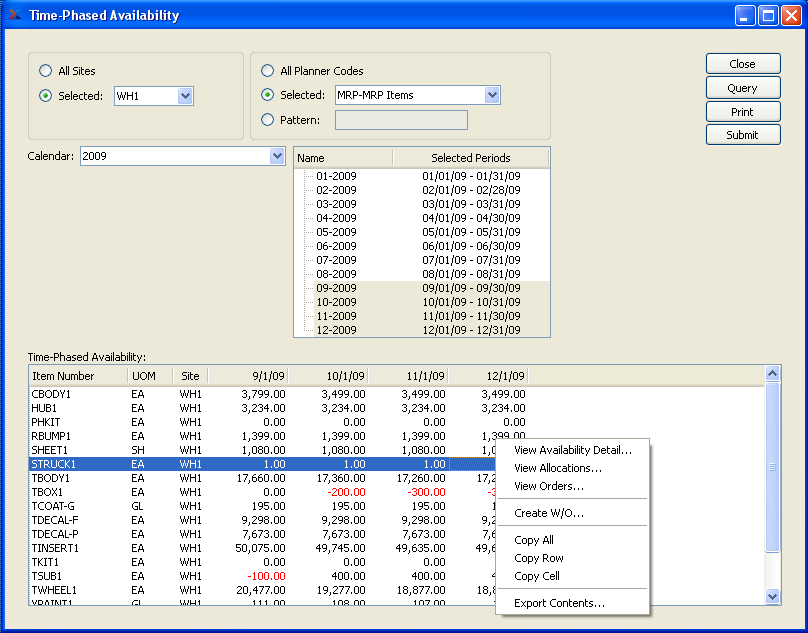
When displaying time-phased Availability, you are presented with the following options:
- All Sites
Select to display time-phased Availability for all Sites.
- Selected
Specify Site whose time-phased Availability you want to display.
- All Planner Codes
Select to display time-phased Availability for all Planner Codes.
- Selected
Specify Planner Code whose time-phased Availability you want to display.
- Pattern
Enter a Planner Code pattern to select a range of Planner Codes. Refine your search using Regular Expressions.
- Calendar
Select the Calendar you want to use for the report. Associated Calendar periods will be displayed.
- Name/Selected Periods
Select as many periods as you want to display. Selected periods correspond to Calendar specified in the "Calendar" field. Select individual periods or groups of periods together. To select an individual period, highlight the period using your mouse button. The period is now selected. To select a sequence of periods, highlight the first in the sequence using your mouse button. Then, holding down the SHIFT key on your keyboard, highlight the last period in the sequence. The entire sequence is now selected. To select periods that are out of sequence (e.g., January, April, July, October), highlight the first period in the group. Then, holding down the CTRL key on your keyboard, highlight the next period you want to select. Continue highlighting periods with the CTRL key depressed until all desired periods are selected. The entire group is now selected.
- Time-Phased Availability
Display lists time-phased Availability, using the specified parameters. Negative values will display in red type.
To the far right of the screen, the following buttons are available:
- CLOSE
Closes the screen, returning you to the application desktop.
- QUERY
Select to generate the display, using the specified parameters. Start date and end date must be entered for calculation to proceed. Results will be displayed in the "Time-Phased Availability" display.
Runs the report associated with this screen.
- SUBMIT
Select to submit report to the Batch Manager.
To view the Master Production Schedule (MPS), select the "MPS Detail" option. The following screen will appear:
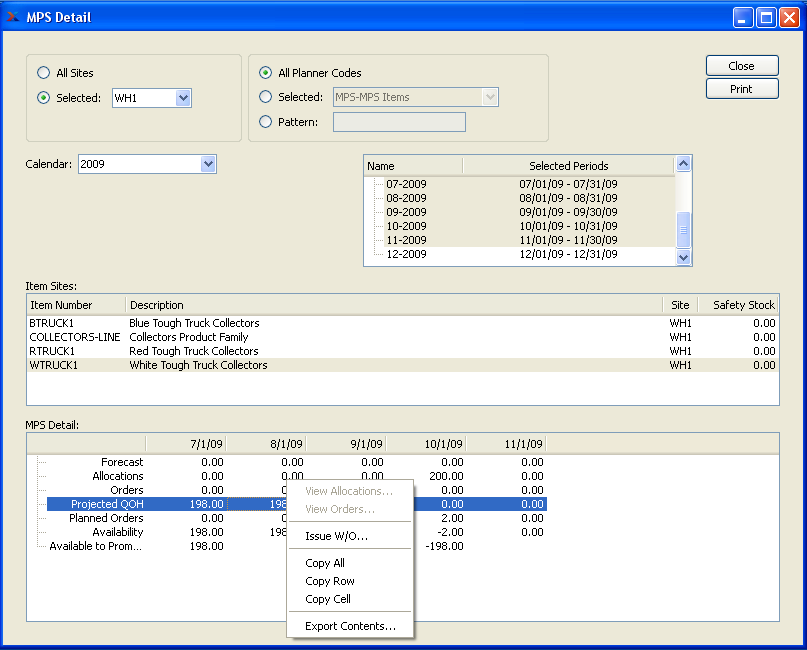
When viewing the Master Production Schedule, you are presented with the following options:
- All Sites
Select to display MPS detail for all Sites.
- Selected
Specify Site whose MPS detail you want to display.
- All Planner Codes
Select to display MPS detail for all Planner Codes.
- Selected
Specify Planner Code whose MPS detail you want to display.
- Pattern
Enter a Planner Code pattern to select a range of Planner Codes. Refine your search using Regular Expressions.
- Calendar
Select the Calendar you want to use for the report. By default, the Calendar defined at the system level will be used. Associated Calendar periods will be displayed.
Tip
When setting up a planning Calendar, be sure to include past due information in the first period of the Calendar.
- Name/Selected Periods
Select as many periods as you want to display. Selected periods correspond to Calendar specified in the "Calendar" field. Select individual periods or groups of periods together. To select an individual period, highlight the period using your mouse button. The period is now selected. To select a sequence of periods, highlight the first in the sequence using your mouse button. Then, holding down the SHIFT key on your keyboard, highlight the last period in the sequence. The entire sequence is now selected. To select periods that are out of sequence (e.g., January, April, July, October), highlight the first period in the group. Then, holding down the CTRL key on your keyboard, highlight the next period you want to select. Continue highlighting periods with the CTRL key depressed until all desired periods are selected. The entire group is now selected.
- Item Sites
Display lists Item Sites for Items matching the specified parameters. When you have selected a Calendar type and corresponding Calendar period(s), highlight an Item Site to display MPS detail for the Item Site in the "MPS Detail" display below.
- MPS Detail
Display lists MPS detail for the Item Site you selected in the "Item Sites" display above. MPS detail will include the following rows: Forecast (based on MPS reading of Production Plans); Allocations (requirements from Customer Orders or Work Orders); Orders (based on Work Orders or Purchase Orders); Projected Quantity on Hand (based on Allocations and Orders for specified future periods); Planned Orders (system-generated Orders showing requirements needed to meet negative Availability); Availability (based on current Allocations and Orders); Available to Promise (uncommitted quantity available to support new Sales Orders).
To the far right of the screen, the following buttons are available:
- CLOSE
Closes the screen, returning you to the application desktop.
Runs the report associated with this screen.
Note
You will only be able to view Allocations if Allocations are showing a positive value in the period where you right-click your mouse. Similarly, you will only be able to view Orders if Orders are showing a positive value in the period where you right-click your mouse.
To display a time-phased view of Material Requirements Planning (MRP) detail, select the "MRP Detail" option. The following screen will appear:
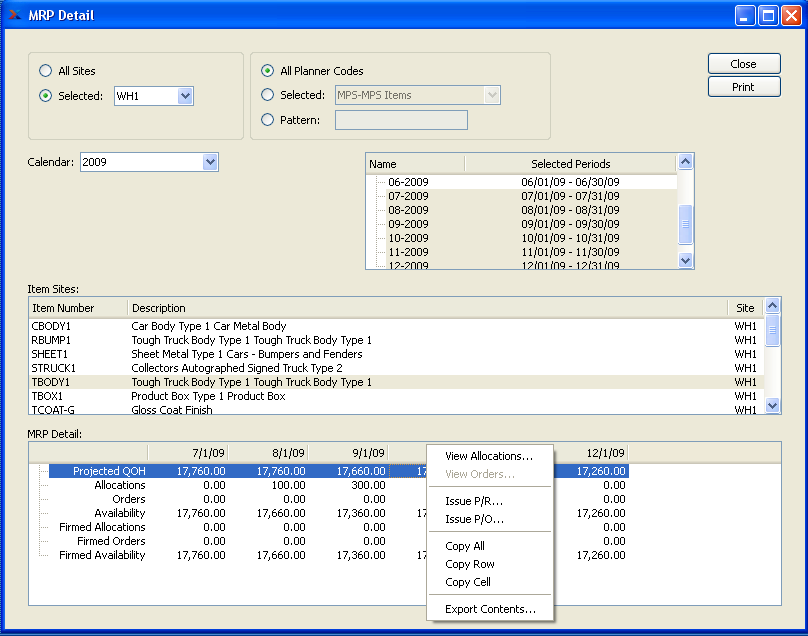
Note
Only firm Planned Orders will be included in the MRP Detail display. If a Planned Order is not firmed, it will not be recognized. This limitation pertains also to MRP Items which may be associated with MPS or Planning Items. While firm MPS Orders may exist, Planned Orders for the underlying MRP Items must be firmed (or released) before the MRP Detail display will recognize them.
When displaying MRP detail, you are presented with the following options:
- All Sites
Select to display MRP detail for all Sites.
- Selected
Specify Site whose MRP detail you want to display.
- All Planner Codes
Select to display MRP detail for all Planner Codes.
- Selected
Specify Planner Code whose MRP detail you want to display.
- Pattern
Enter a Planner Code pattern to select a range of Planner Codes. Refine your search using Regular Expressions.
- Calendar
Select the Calendar you want to use for the report. Associated Calendar periods will be displayed.
Tip
When setting up a planning Calendar, be sure to include dates that are past due in the first period of the Calendar.
- Name/Selected Periods
Select as many periods as you want to display. Selected periods correspond to Calendar specified in the "Calendar" field. Select individual periods or groups of periods together. To select an individual period, highlight the period using your mouse button. The period is now selected. To select a sequence of periods, highlight the first in the sequence using your mouse button. Then, holding down the SHIFT key on your keyboard, highlight the last period in the sequence. The entire sequence is now selected. To select periods that are out of sequence (e.g., January, April, July, October), highlight the first period in the group. Then, holding down the CTRL key on your keyboard, highlight the next period you want to select. Continue highlighting periods with the CTRL key depressed until all desired periods are selected. The entire group is now selected.
- Item Sites
Display lists Items matching the specified parameters. When you have selected a Calendar type and corresponding Calendar period(s), highlight an Item to display MRP detail for the Item in the "MRP Detail" display below.
Tip
To refresh the MRP Detail display, double-click on the Item Site whose detail you want to refresh.
- MRP Detail
Display lists MRP detail for the Item you selected in the "Site Items" display above.
MRP detail will include the following rows: projected Quantity on Hand (based on Allocations and Orders for specified future periods); Allocations (demand from Sales Orders); Orders (based on Work Orders or Purchase Orders); Availability (based on current Allocations and Orders); Firmed Allocations (firmed planned requirements); Firmed Orders (firm Planned Orders); and firmed Availability (based on Availability and firm Planned Orders).
To the far right of the screen, the following buttons are available:
- CLOSE
Closes the screen, returning you to the application desktop.
Runs the report associated with this screen.
Note
You will only be able to view Allocations if Allocations are showing a positive value in the period where you right-click your mouse. Similarly, you will only be able to view Orders if Orders are showing a positive value in the period where you right-click your mouse.
An Expedite Exception is an indication that an Order is late. These late Orders need to be acted on—or expedited. Examples of late Orders would include a Work Order whose start date is past due or a Planned Purchase Order which has not yet been released. To view a list of late Orders requiring action, select the "Expedite Exceptions by Planner Code" option. The following screen will appear:
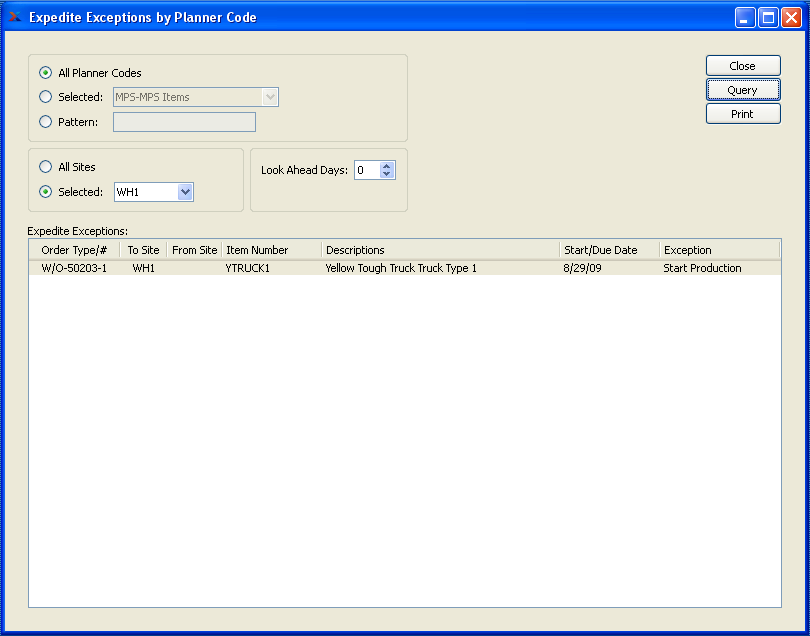
When displaying Expedite Exceptions by Planner Code, you are presented with the following options:
- All Planner Codes
Select to display Expedite Exceptions for all Planner Codes.
- Selected
Specify Planner Code whose Expedite Exceptions you want to display.
- Pattern
Enter a Planner Code pattern to select a range of Planner Codes. Refine your search using Regular Expressions.
- All Sites
Select to display Expedite Exceptions by Planner Code for all Sites.
- Selected
Specify Site whose Expedite Exceptions by Planner Code you want to display.
- Look Ahead Days
Select a number using the arrow buttons, or manually enter a value up to a maximum of 1000. Expedite Exceptions by Planner Code will be displayed based on the value entered here.
- Expedite Exceptions
Display lists Expedite Exceptions by Planner Code, using the specified parameters.
To the far right of the screen, the following buttons are available:
- CLOSE
Closes the screen, returning you to the application desktop.
- QUERY
Select to generate the display, using the specified parameters.
Runs the report associated with this screen.
A Reorder Exception is an indication that an Item Site's projected Availability will drop below the Reorder Level for that Item Site. To view a list of Items requiring Orders to correct projected deficits, select the "Reorder Exceptions by Planner Code" option. The following screen will appear:
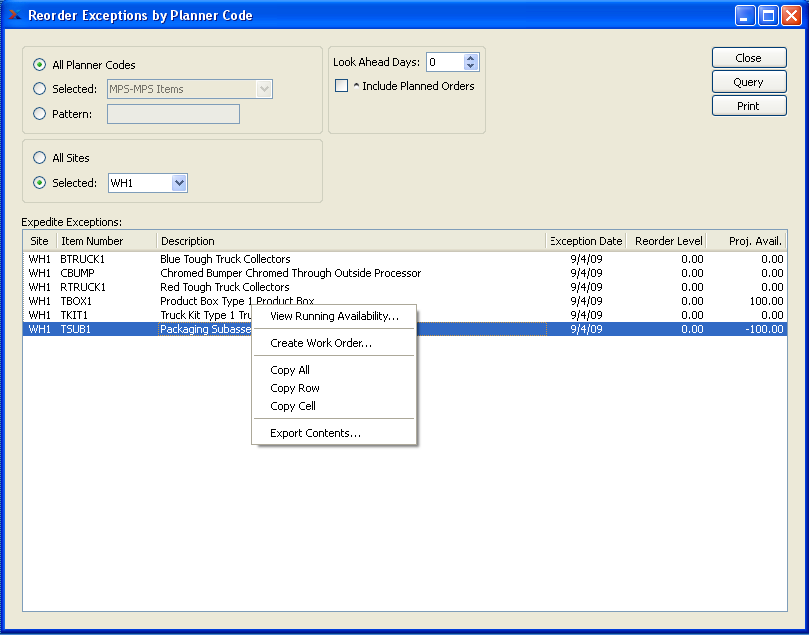
When displaying Reorder Exceptions by Planner Code, you are presented with the following options:
- All Planner Codes
Select to display Reorder Expedite Exceptions for all Planner Codes.
- Selected
Specify Planner Code whose Reorder Expedite Exceptions you want to display.
- Pattern
Enter a Planner Code pattern to select a range of Planner Codes. Refine your search using Regular Expressions.
- All Sites
Select to display Reorder Expedite Exceptions by Planner Code for all Sites.
- Selected
Specify Site whose Reorder Expedite Exceptions by Planner Code you want to display.
- Look Ahead Days
Select a number using the arrow buttons, or manually enter a value up to a maximum of 1000. Reorder Expedite Exceptions by Planner Code will be displayed based on the value entered here.
- Include Planned Orders
Select to include Planned Orders in the display.
- Expedite Exceptions
Display lists Reorder Expedite Exceptions by Planner Code, using the specified parameters.
To the far right of the screen, the following buttons are available:
- CLOSE
Closes the screen, returning you to the application desktop.
- QUERY
Select to generate the display, using the specified parameters.
Runs the report associated with this screen.
A Rough Cut Capacity Plan takes into account both Planned and Actual Orders—and calculates the labor and machine Capacity required to fulfill the Production Plan generated by MPS. This differs from a Capacity Plan, which only considers Actual Orders. To view a rough cut Capacity Plan by Work Center, select the "Rough Cut Capacity Plan by Work Center" option. The following screen will appear:
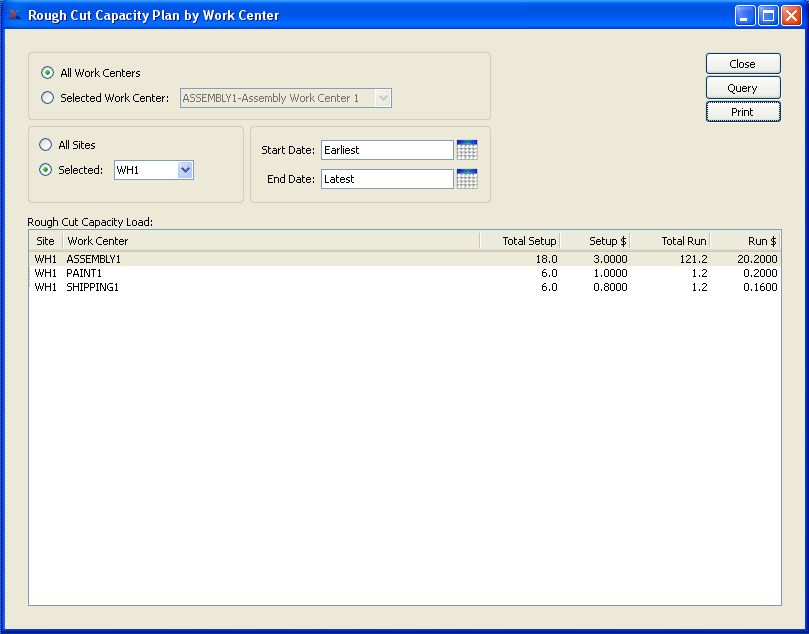
When displaying a rough cut Capacity Plan by Work Center, you are presented with the following options:
- All Work Centers
Select to display rough cut Capacity Plan by Work Center for all Work Centers.
- Selected
Specify Work Center whose rough cut Capacity Plan you want to display.
- All Sites
Select to display rough cut Capacity Plan by Work Center for all Sites.
- Selected
Specify Site whose rough cut Capacity Plan by Work Center you want to display.
- Start Order Date
Planned and Actual Orders started on or after this date will be displayed. Start date and end date must be entered for calculation to proceed.
- End Order Date
Planned and Actual Orders ending on or before this date will be displayed. Start date and end date must be entered for calculation to proceed.
- Rough Cut Capacity Load
Display lists rough cut Capacity Plan by Work Center, using the specified parameters.
To the far right of the screen, the following buttons are available:
- CLOSE
Closes the screen, returning you to the application desktop.
- QUERY
Select to generate the display, using the specified parameters. Start date and end date must be entered for calculation to proceed. Results will be displayed in the "Rough Cut Capacity Load" display.
Runs the report associated with this screen.
To view a rough cut Capacity Plan by Work Center showing detail over Calendar periods you define, select the "Time-Phased Rough Cut Capacity Plan by Work Center" option. The following screen will appear:
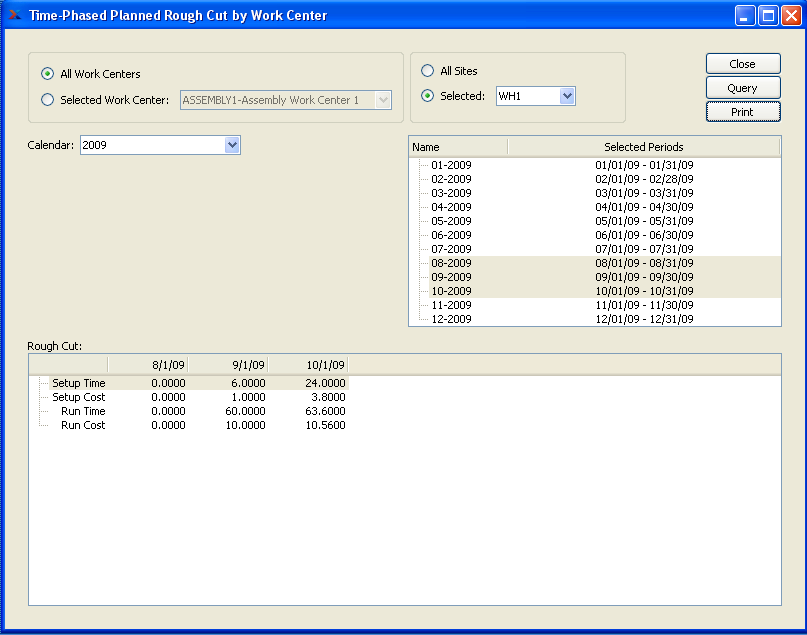
When displaying a time-phased rough cut Capacity Plan by Work Center, you are presented with the following options:
- All Work Centers
Select to display time-phased rough cut Capacity Plan by Work Center for all Work Centers.
- Selected
Specify Work Center whose time-phased rough cut Capacity Plan you want to display.
- All Sites
Select to display time-phased rough cut Capacity Plan by Work Center for all Sites.
- Selected
Specify Site whose time-phased rough cut Capacity Plan by Work Center you want to display.
- Calendar
Select the Calendar you want to use for the report. Associated Calendar periods will be displayed.
- Name/Selected Periods
Select as many periods as you want to display. Selected periods correspond to Calendar specified in the "Calendar" field. Select individual periods or groups of periods together. To select an individual period, highlight the period using your mouse button. The period is now selected. To select a sequence of periods, highlight the first in the sequence using your mouse button. Then, holding down the SHIFT key on your keyboard, highlight the last period in the sequence. The entire sequence is now selected. To select periods that are out of sequence (e.g., January, April, July, October), highlight the first period in the group. Then, holding down the CTRL key on your keyboard, highlight the next period you want to select. Continue highlighting periods with the CTRL key depressed until all desired periods are selected. The entire group is now selected.
- Rough Cut
Display lists time-phased rough cut Capacity Plan by Work Center, using the specified parameters.
To the far right of the screen, the following buttons are available:
- CLOSE
Closes the screen, returning you to the application desktop.
- QUERY
Select to generate the display, using the specified parameters. Start date and end date must be entered for calculation to proceed. Results will be displayed in the "Rough Cut" display.
Runs the report associated with this screen.
To view planned Revenue/Expenses by Planner Code, select the "Planned Revenue/Expenses by Planner Code" option. The following screen will appear:
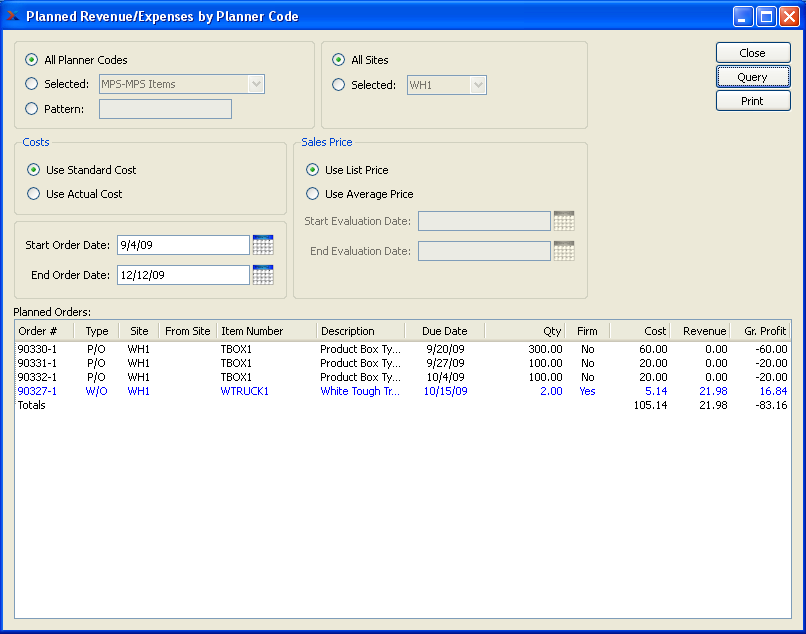
When displaying planned Revenue/Expenses by Planner Code, you are presented with the following options:
- All Planner Codes
Select to display planned Revenue/Expenses for all Planner Codes.
- Selected
Specify Planner Code whose planned Revenue/Expenses you want to display.
- Pattern
Enter a Planner Code pattern to select a range of Planner Codes. Refine your search using Regular Expressions.
- Costs
Sort the information using one of the following costing parameters:
- Use Standard Cost
Select to display Standard Cost.
- Use Actual Cost
Select to display Actual Cost.
- Start Order Date
Planned Revenue/Expenses by Planner Code generated on or after this date will be displayed. Start date and end date must be entered for calculation to proceed.
- End Order Date
Planned Revenue/Expenses by Planner Code generated on or before this date will be displayed. Start date and end date must be entered for calculation to proceed.
- All Sites
Select to display planned Revenue/Expenses by Planner Code for all Sites.
- Selected
Specify Site whose planned Revenue/Expenses by Planner Code you want to display.
- Sales Price
Sort the information using one of the following pricing parameters:
- Use List Price
Select to display the List Price.
- Use Average Price
Select to display Average Price. Average Price is based on the Item's average selling Price.
- Start Evaluation Date
Specify date to start evaluating average Price. This is a required field.
- End Evaluation Date
Specify date to stop evaluating average Price. This is a required field.
- Planned Orders
Display lists planned Revenue/Expenses by Planner Code, using the specified parameters. If gross profit is a negative amount, the number will display in red type.
To the far right of the screen, the following buttons are available:
- CLOSE
Closes the screen, returning you to the application desktop.
- QUERY
Select to generate the display, using the specified parameters. Start date and end date must be entered for calculation to proceed. Results will be displayed in the "Planned Orders" display.
Runs the report associated with this screen.
To view time-phased planned Revenue/Expenses by Planner Code, select the "Time-Phased Planned Revenue/Expenses by Planner Code" option. The following screen will appear:
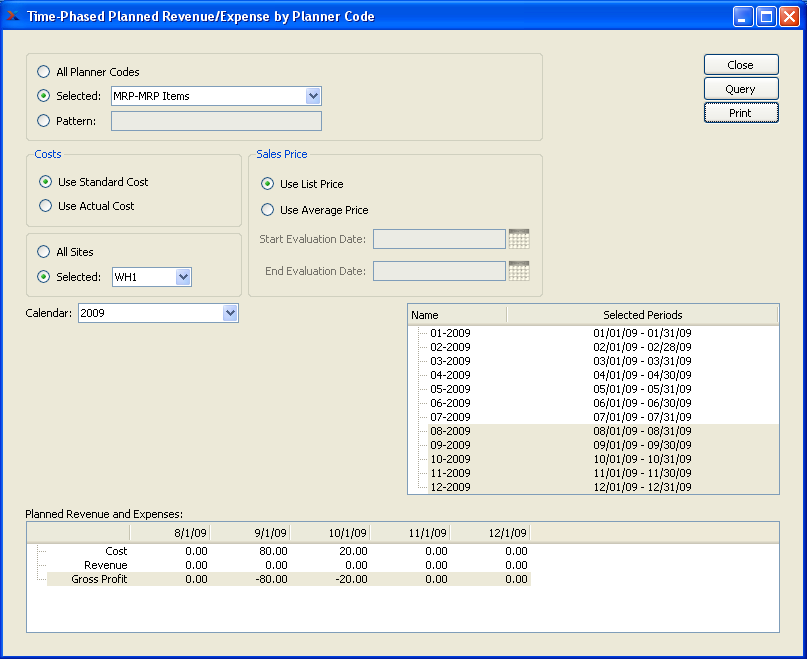
When displaying time-phased planned Revenue/Expenses by Planner Code, you are presented with the following options:
- All Planner Codes
Select to display time-phased planned Revenue/Expenses for all Planner Codes.
- Selected
Specify Planner Code whose time-phased planned Revenue/Expenses you want to display.
- Pattern
Enter a Planner Code pattern to select a range of Planner Codes. Refine your search using Regular Expressions.
- Costs
Sort the information using one of the following costing parameters:
- Use Standard Cost
Select to display Standard Cost.
- Use Actual Cost
Select to display Actual Cost.
- All Sites
Select to display time-phased planned Revenue/Expenses by Planner Code for all Sites.
- Selected
Specify Site whose time-phased planned Revenue/Expenses by Planner Code you want to display.
- Sales Price
Sort the information using one of the following pricing parameters:
- Use List Price
Select to display the List Price.
- Use Average Price
Select to display Average Price. Average Price is based on the Item's average selling Price.
- Start Evaluation Date
Specify date to start evaluating average Price. This is a required field.
- End Evaluation Date
Specify date to stop evaluating average Price. This is a required field.
- Calendar
Select the Calendar you want to use for the report. Associated Calendar periods will be displayed.
- Name/Selected Periods
Select as many periods as you want to display. Selected periods correspond to Calendar specified in the "Calendar" field. Select individual periods or groups of periods together. To select an individual period, highlight the period using your mouse button. The period is now selected. To select a sequence of periods, highlight the first in the sequence using your mouse button. Then, holding down the SHIFT key on your keyboard, highlight the last period in the sequence. The entire sequence is now selected. To select periods that are out of sequence (e.g., January, April, July, October), highlight the first period in the group. Then, holding down the CTRL key on your keyboard, highlight the next period you want to select. Continue highlighting periods with the CTRL key depressed until all desired periods are selected. The entire group is now selected.
- Planned Revenue and Expenses
Display lists time-phased planned Revenue/Expenses by Planner Code, using the specified parameters.
To the far right of the screen, the following buttons are available:
- CLOSE
Closes the screen, returning you to the application desktop.
- QUERY
Select to generate the display, using the specified parameters. Start date and end date must be entered for calculation to proceed. Results will be displayed in the "Planned Orders" display.
Runs the report associated with this screen.