Work Order Transactions section.
Issue Material transactions section.
To issue Work Order Material Requirement Items simultaneously in a batch, select the "Issue W/O Material Batch" option. The following screen will appear:
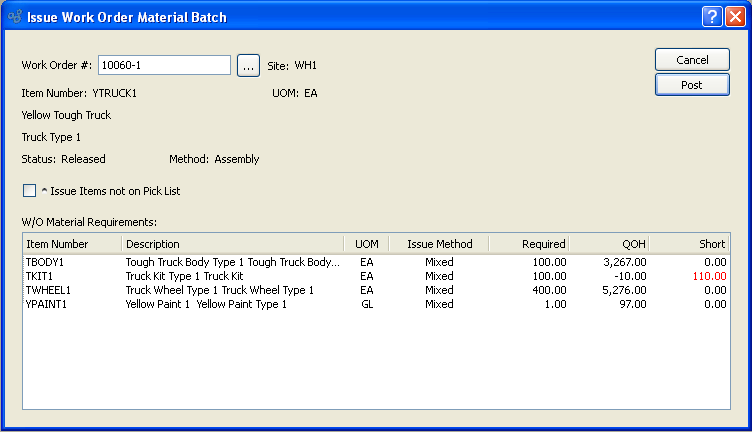
When issuing Work Order Material Requirement Items in a batch, you are presented with the following options:
- Work Order #
Enter the Work Order Number of the Work Order whose component Items you want to issue in a batch.
- Site
Displays Site code automatically when Work Order Number is entered into "Work Order #" field.
- Item Number
Displays Work Order Item Number automatically when Work Order Number is entered into "Work Order #" field.
- UOM
Inventory Unit of Measure.
- Status
Displays Work Order Status automatically when Work Order Number is entered into "Work Order #" field.
- Method
Indicates whether selected Work Order is an Assembly or Disassembly Work Order.
- Issue Items not on Pick List
Select to indicate that non-Pick List Items should be backflushed as well.
- W/O Material Requirements
Display lists Work Order Material Requirements. The display is color-coded for ease of use. If an Item's issue method is "Pull," then that Item—and the entire row it sits on—will appear in blue type. The blue type indicates that the batch issue utility will not affect these Items. By definition, pulled Items are backflushed, not issued. However, if an Item's issue method is "Push," then that Item—and the row it sits on—will appear in black type. Rows with black type are affected by the batch issue utility. One other color may also appear. If the quantity required by the Work Order exceeds the Quantity on Hand—meaning there is an Inventory shortage—the value in the "Short" column will display in red.
Note
If you are issuing Lot/Serial Items to a Work Order, these cannot be issued automatically from a default Location. You must individually select and then distribute the desired Lot/Serial quantity.
To the far right of the screen, the following buttons are available:
- CANCEL
Closes the screen without issuing any materials to the selected Work Order, returning you to the application desktop.
- POST
Issues all pushed Work Order Material Requirements for the selected Work Order.
To issue Work Order Material Items individually, select the "Issue W/O Material Item" option. The following screen will appear:
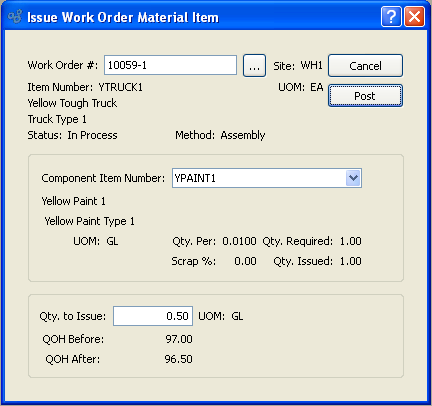
When issuing Work Order Material Items individually, you are presented with the following options:
- Work Order #
Enter the Work Order Number of the Work Order whose individual component Item you want to issue.
- Site
Displays Site code automatically when Work Order Number is entered into "Work Order #" field.
- Item Number
Displays Item Number automatically when Work Order Number is entered into "Work Order #" field.
- UOM
Inventory Unit of Measure.
- Status
Displays Work Order Status automatically when Work Order Number is entered into "Work Order #" field.
- Method
Indicates whether selected Work Order is an Assembly or Disassembly Work Order.
- Comp. Item Number
Select one of the specified Item's component Items whose issue method is "Push" or "Mixed."
Note
If the "Comp. Item Number" list contains no component Items, this means that the issue method for all the component Items is "Pull." Only Items with the issue method of "Push" or "Mixed" will appear in the menu.
- UOM
Issue Unit of Measure.
- Qty. Per
Displayed value represents the quantity of the component Item required per parent Item.
- Qty. Required
The total quantity of the component Item required by the Work Order will be displayed.
- Scrap %
Displayed value represents the allotted Scrap percentage for the component Item when manufacturing the parent Item.
- Qty. Issued
The total quantity of the component Item issued to the Work Order to date will be displayed.
- Qty. to Issue
to Issue: Enter the quantity of the component Item you want to issue to the Work Order.
- UOM
Issue Unit of Measure.
- QOH Before
Total Quantity on Hand prior to the issue will be displayed.
- QOH After
Total Quantity on Hand after the proposed issue will be displayed.
Note
If you are issuing Lot/Serial Items to a Work Order, these cannot be issued automatically from a default Location. You must individually select and then distribute the desired Lot/Serial quantity.
To the far right of the screen, the following buttons are available:
- CANCEL
Closes the screen without issuing any of the selected component material to the selected Work Order, returning you to the application desktop.
- POST
Issues the component Item in the quantity specified.
Return Material transaction section.
To return Work Order materials to Inventory simultaneously in a batch, select the "Return W/O Material Batch" option. The following screen will appear:
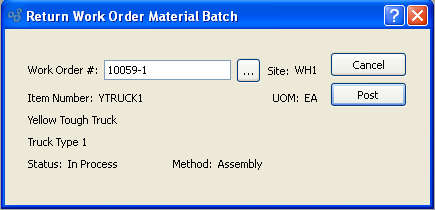
When returning Work Order materials to Inventory simultaneously in a batch, you are presented with the following options:
- Work Order #
Enter the Work Order Number of the Work Order whose materials you want to return to Inventory simultaneously in a batch.
- Site
Displays Site code automatically when Work Order Number is entered into "Work Order #" field.
- Item Number
Displays Item Number automatically when Work Order Number is entered into "Work Order #" field.
- UOM
Inventory Unit of Measure.
- Status
Displays Work Order Status automatically when Work Order Number is entered into "Work Order #" field.
- Method
Indicates whether selected Work Order is an Assembly or Disassembly Work Order.
To the far right of the screen, the following buttons are available:
- CANCEL
Closes the screen without returning Work Order materials to Inventory, bringing you back to the application desktop.
- POST
Returns the Work Order's materials to Inventory simultaneously in a batch.
To return Work Order materials to Inventory individually, select the "Return W/O Material Item" option. The following screen will appear:
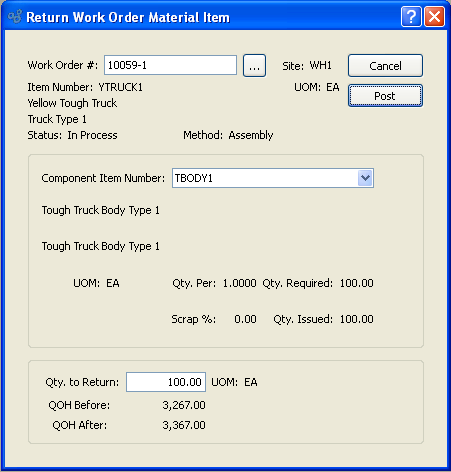
When returning Work Order materials to Inventory individually, you are presented with the following options:
- Work Order #
Enter the Work Order Number of the Work Order whose materials you want to return to Inventory individually.
- Site
Displays Site code automatically when Work Order Number is entered into "Work Order #" field.
- Item Number
Displays Item Number automatically when Work Order Number is entered into "Work Order #" field.
- UOM
Issue Unit of Measure.
- Status
Displays Work Order Status automatically when Work Order Number is entered into "Work Order #" field.
- Method
Indicates whether selected Work Order is an Assembly or Disassembly Work Order.
- Component Item Number
Select one of the individual component Items for the specified Item.
- UOM
Inventory Unit of Measure.
- Qty. Per
Displayed value represents the quantity of the component Item required per parent Item.
- Scrap %
Displayed value represents the allotted Scrap percentage for the component Item when manufacturing the parent Item.
- Qty. Required
Required: Displayed value represents the quantity required to fulfill the specified Work Order.
- Qty. Issued
Issued: Displayed value represents the quantity issued in fulfillment of the specified Work Order.
- Qty. to Return
to Return: Enter the amount of the component Item to be returned to Inventory.
- UOM
Issue Unit of Measure.
- QOH Before
Total Quantity on Hand prior to the issue will be displayed.
- QOH After
Total Quantity on Hand after the proposed issue will be displayed.
To the far right of the screen, the following buttons are available:
- CANCEL
Closes the screen without returning the Work Order component Item to Inventory, returning you to the application desktop.
- RETURN MATERIAL
Returns the material for the specified component Item to Inventory.
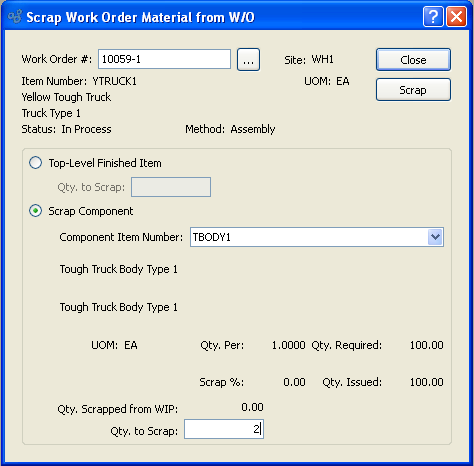
To scrap Work Order Materials which have been specifically issued to a Work Order using a Material Issue transaction, select the "Scrap Work Order Material from Work Order" option. The following screen will appear:
Tip
You may only scrap W/O Materials which have been specifically issued to a Work Order. In other words, Material Requirements having the Push issue method may be scrapped.
When scrapping Work Order Materials from a Work Order, you are presented with the following options:
- Work Order #
Enter the Work Order Number of the Work Order whose materials you want to scrap.
- Site
Displays Site code automatically when Work Order Number is entered into "Work Order #" field.
- Item Number
Displays Item Number automatically when Work Order Number is entered into "Work Order #" field.
- UOM
Inventory Unit of Measure.
- Status
Displays Work Order Status automatically when Work Order Number is entered into "Work Order #" field.
- Method
Indicates whether selected Work Order is an Assembly or Disassembly Work Order.
- Top-Level Finished Item
Select if you want to scrap parent-level Items.
- Qty. to Scrap
Enter the quantity of top-level finished Items you want to scrap. You may scrap top-level Items after they have been received into Inventory—or before. Keep in mind that if you scrap top-level Items prior to receiving them, material requirements for those Items may or may not have been issued to the Work Order yet. You should make any necessary adjustments to account for those requirements. For example, you may need to issue the components—either manually or through a material backflush—and then scrap them retroactively.
Tip
Shop Floor Workbench users should only scrap top-level Items after they have posted production sufficient to cover the scrap quantity. For example, if a user assembles 10 top-level Items successfully but significantly damages the 11th, the user should post a quantity of 11 produced and then scrap one (i.e., 11 - 1 = 10).
- Scrap Component
Select if you want to scrap component Items issued to the Work Order.
- Component Item Number
Select one of the component Items from the parent Item's Work Order Material Requirements will be listed.
Note
You may scrap component Items regardless of their issue method. However, components must first be issued to a Work Order before they can be scrapped from it. Components are issued to Work Orders either manually or through a material backflush.
- UOM
Inventory Unit of Measure.
- Qty. Per
Displays the component quantity per each specified on the parent Item's Work Order Material Requirements.
- Scrap %
Displays the component scrap percentage specified on the Item's Bill of Materials.
- Qty. Required
Displays the component quantity required to fulfill the Work Order Material Requirements.
- Qty. Issued
Displays the component quantity currently issued to the Work Order. You may only scrap components which have already been issued to a Work Order—either manually or through a material backflush.
- Qty. Scrapped from WIP
Displays a running total of the component quantity already scrapped—if any.
Tip
You may not scrap the full quantity of a Work Order Material Requirement from a Work Order.
- Qty. to Scrap
Enter the quantity of the component Item you want to scrap from the Work Order.
To the far right of the screen, the following buttons are available:
- CLOSE
Closes the screen without scrapping the material from the Work Order.
- SCRAP
Scraps the specified quantity of the component Item from the Work Order.
The Shop Floor Workbench offers enhanced labor tracking and streamlined Work Order processing for either Operations or Production posting environments. Its built-in Time Clock functionality ensures precise run-time reporting, as Workbench users are required to clock-in to and clock-out of Work Orders. While the Shop Floor Workbench is available in all xTuple ERP Editions, Operations posting is only supported in the Manufacturing Edition.
Tip
The clock-in requirement applies only to Shop Floor Workbench users. If you don"t use the Workbench, no clock-in is required.
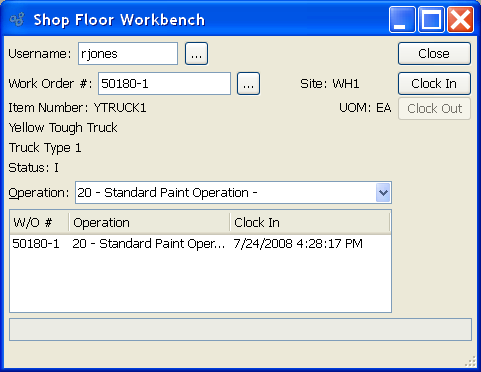
To access the Shop Floor Workbench, select the "Shop Floor Workbench" option. The following screen will appear:
Note
The Shop Floor Workbench must be configured for either Operations posting or Production posting. You may not use the Workbench for both methods simultaneously. To configure the method used by the Shop Floor Workbench, use the Configure W/O screen in the System module.
When accessing the Shop Floor Workbench, you are presented with the following options:
- Username
Enter the name of the user wanting to clock-in or clock-out of a Work Order. Once a username is entered, the display at the bottom of the screen will show all the Work Orders the user is currently clocked-in to.
Tip
At the system level, you can restrict a user's privileges so the Shop Floor Workbench is the only interface they see when they log in to the application.
- Work Order #
Enter the Work Order Number of the Work Order the user wants to clock-in to or clock-out of. Only released "R" and in-process "I" Work Orders may be processed using the Shop Floor Workbench.
Note
A Work Order must be released "R" before users may clock-in or clock out. The release of a Work Order occurs after the Work Order has been exploded.
- Site
Displays Site code automatically when Work Order Number is entered into "Work Order #" field.
- Item Number
Displays Item Number automatically when Work Order Number is entered into "Work Order #" field.
- UOM
Inventory Unit of Measure.
- Status
Displays Work Order Status automatically when Work Order Number is entered into "Work Order #" field. Only released "R" and in-process "I" Work Orders may be processed using the Shop Floor Workbench.
- Operation
If the Workbench is configured for Operations-posting, select an Operation from the list of Operations. Users are required to clock-in and clock-out of individual Operations. This allows run-time calculations to be performed on an Operation-by-Operation basis. A user may be clocked-in to multiple Operations simultaneously. Also, multiple users may be clocked-in to the same Operation. Whatever the case, the run-time clock starts when a user(s) clocks in to an Operation, and it stops when the user(s) clocks out.
To the far right of the screen, the following buttons are available:
- CLOSE
Closes the screen without clocking-in or clocking-out, returning you to the application desktop.
- CLOCK IN
Select to clock-in to the specified Work Order. When a user clocks-in to a Work Order, the run-time clock starts running from that point. The clock stops when a user clocks-out of the Work Order. The elapsed time—or "effort"—is used for labor reporting purposes. Users may only clock-in to Work Orders they are not already clocked-in to. However, users may clock-in to and clock-out of the same Work Order as many times as necessary. Each clock-in starts the run-time Time Clock; each clock-out stops it.
- CLOCK OUT
Select to clock-out of the specified Work Order. When selected, the run-time clock stops for the specified Work Order. The time elapsed since the user last clocked-in is added to the run time total for the Work Order. This run-time calculation is automatic and cannot be overridden—except by users who have override privileges. Users may only clock-out of Work Orders they are already clocked-in to. If the Workbench is configured for Operations-posting, the "Post Operations" screen will be presented immediately after the CLOCK OUT button is selected. By default, the "Scrap Work Order Material from W/O" screen will immediately follow the "Post Operations" screen.
Tip
Shop Floor Workbench users should only scrap top-level Items after they have posted production sufficient to cover the scrap quantity. For example, if a user assembles 10 top-level Items successfully but significantly damages the 11th, the user should post a quantity of 11 produced and then scrap one (i.e., 11 - 1 = 10).
- POST PRODUCTION
If the Workbench is configured for Production-posting, the Post Production screen will be presented immediately after this button is selected. The button will be hidden if the Workbench is configured for Operations-posting
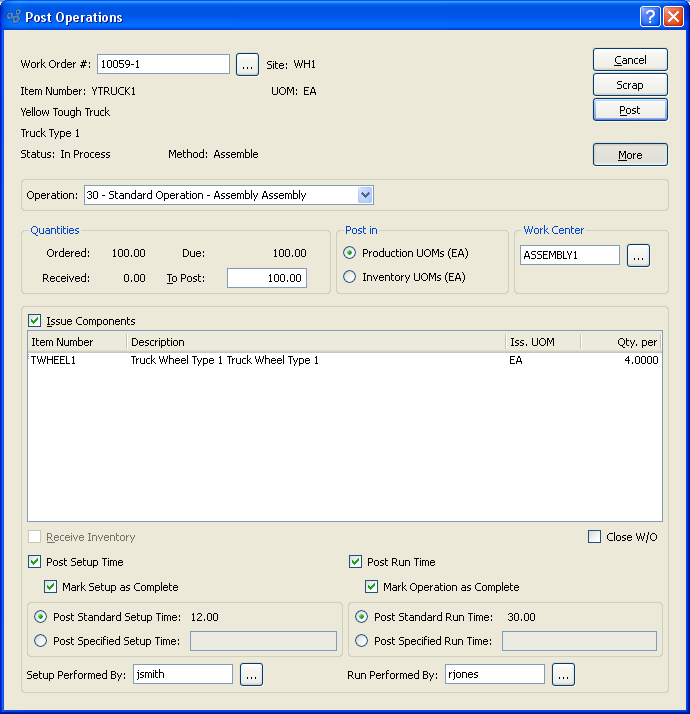
Work Order progress can be posted in terms of materials used or Operations completed. When you post Operations, you are using the Operations-driven process for reporting progress. To post Work Order Operations, select the "Post Operations" option. The following screen will appear:
When posting a Work Order's Operations, you are presented with the following options:
- Work Order #
Enter the Work Order Number of the Work Order whose Operations you want to post. You may also scan into this field a Work Order Operation barcode as defined for the Shop Floor Workbench screen.
- Site
Displays Site code automatically when Work Order Number is entered into "Work Order #" field.
- Item Number
Displays Item Number automatically when Work Order Number is entered into "Work Order #" field.
- UOM
Inventory Unit of Measure.
Note
If your site combines Operations posting with WIP Location tracking for Multiple Location Control (MLC) Items, then you may be prompted to relocate Inventory during the Operations posting process.
- Status
Displays Work Order Status automatically when Work Order Number is entered into "Work Order #" field.
- Method
Indicates whether selected Work Order is an Assembly or Disassembly Work Order.
- Operation
Select the individual Operation you want to post from the list of Work Order Operations for the specified Item. After selecting an Operation, specify details for that Operation. To post Operations for another Operation, simply select that Operation from the sequential list.
- Quantities
Displays quantity information related to the Operation posting.
- Ordered
Indicates the quantity of material, measures in the Item's Inventory UOM, that the selected Work Order is due to produce.
- Received
Indicates the quantity, measured in the Item's Inventory UOM, that has been completed by this Operation.
- Due
Indicates the quantity remaining to be produced by the specified Operation.
- To Post
Enter the quantity you want to post.
- Post in
Specify how you want the quantity to be posted
- Production UOMs
Select to post the Operations quantity in Production Units of Measure. Operations may be posted using either the Inventory or Production UOM. In addition, different Operations in a single Bill of Operations may use different Production UOMs. For example, if you are producing soup, you might mix the soup in one Operation using UOM = BATCH. But when canning the soup, the canning Operation might use UOM = CAN. If you post Operations using the Production UOM, the Inventory/Production UOM ratio defined at the Operation level normalizes the posting so that the Inventory impact is recorded using the Inventory UOM.
- Inventory UOMs
Select to post the Operations quantity in Inventory Units of Measure.
- Work Center
Enter the name of the Work Center where the Operations were performed.
- Issue Components
Indicates that linked component materials will be issued automatically (i.e., backflushed) when the specified Operation is posted. Option will be enabled only if component materials are linked to the specified Operation within the parent Item's Bill of Materials. If such linkages exist, only components with "Pull" or "Mixed" issue methods will be displayed. Components having the "Push" issue method will not appear in the list, as these must be issued manually to a Work Order. If this option is selected, the General Ledger will show the component materials being removed from Inventory when this Operation is posted.
- Receive Inventory
Indicates that finished goods will be received into Inventory when the specified Operation is posted. Enabled only when the selected Operation is the receiving Operation for the selected Work Order. Only one Work Order Operation may have this flag set. If this option is selected, the General Ledger will show the finished goods being received into Inventory when the Operation is posted.
- Close W/O
Select this option to close the Work Order. The option will be selected automatically at the point when you are posting all quantity complete.
- Post Setup Time
Select to post setup time.
- Mark Setup as Complete
Select to mark setup as complete.
- Post Standard Setup Time
Select to post standard setup time. Typically, standard times will not be used if Operations are being posted using the Shop Floor Workbench. Instead, labor times will be calculated based on clock-in and clock-out times. Only users with privileges to override the Production Time Clock will be able to post standard times.
- Post Specified Setup Time
Specify the non-standard amount of setup time required. The amount of time entered will be posted. If you are posting Operations from the Shop Floor Workbench, the setup time entered will be automatically deducted from the run-time total.
- Post Run Time
Select to post run time.
- Mark Operation as Complete
Select to mark Operation as complete. An Operation may not be marked as "Complete" until all users are clocked-out of the Operation. Users clock-in to and clock-out of Work Orders using the Shop Floor Workbench.
- Post Standard Run Time
Select to post the standard run time for specified Item. Typically, standard times will not be used if Operations are being posted using the Shop Floor Workbench. Instead, labor times will be calculated based on clock-in and clock-out times. Only users with privileges to override the Production Time Clock will be able to post standard times.
- Post Specified Run Time
Specify the non-standard amount of run time required. The amount of time entered will be posted. If you are posting Operations from the Shop Floor Workbench, run time will be automatically calculated based on the accumulated time elapsed between clock-ins and clock-outs.
- Setup Performed By
Enter the name of the user who performed the set up. Since this is a text field, user names may also be scanned into the field using a Bar Code scanner.
- Run Performed By
Enter the name of the user who performed the production run. Since this is a text field, user names may also be scanned into the field using a Bar Code scanner.
To the far right of the screen, the following buttons are available:
- CANCEL
Closes the screen without posting Operations, returning you to the application desktop.
- SCRAP
Select to open the "Scrap Work Order Material from W/O" screen.
- POST
Posts the specified Operation using the values entered in the screen.
- MORE
Select to display extra information related to the Operation posting. To hide the extra information, simply select the MORE button again.
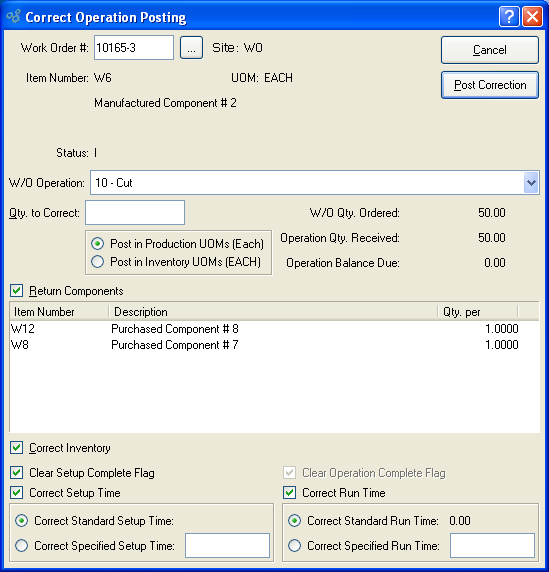
To correct a Work Order Operations posting, select the "Correct Operations Posting" option. The following screen will appear:
When correcting a Work Order Operations posting, you are presented with the following options:
- Work Order #
Enter the Work Order Number of the Work Order whose Operations posting you want to correct.
- Site
Displays Site code automatically when Work Order Number is entered into "Work Order #" field.
- Item Number
Displays Item Number automatically when Work Order Number is entered into "Work Order #" field.
- UOM
Inventory Unit of Measure.
- Status
Displays Work Order Status automatically when Work Order Number is entered into "Work Order #" field.
- Method
Indicates whether selected Work Order is an Assembly or Disassembly Work Order.
- W/O Operation
Select the individual Operation you want to post from the list of Work Order Operations for the specified Item. After selecting an Operation, specify details for that Operation. To correct Operations posting for another Operation, simply select that Operation from the sequential list.
- Qty. to Correct
Enter the quantity you want to correct.
- Post in Production UOMs
Select to post the corrected quantity in Production Units of Measure. Operations may be posted using either the Inventory or Production UOM. In addition, different Operations in a single Bill of Operations may use different Production UOMs. For example, if you are producing soup, you might mix the soup in one Operation using UOM = BATCH. But when canning the soup, the canning Operation might use UOM = CAN. If you post Operations using the Production UOM, the Inventory/Production UOM ratio defined at the Operation level normalizes the posting so that the Inventory impact is recorded using the Inventory UOM.
- Post in Inventory UOMs
Select to post the corrected quantity in Inventory Units of Measure.
- W/O Qty. Ordered
Ordered: Indicates the quantity of material, measures in the Item's Inventory UOM, that the selected Work Order is due to produce.
- Operation Qty. Received
Indicates the quantity, measured in the Item's Inventory UOM, that has been completed by this Operation.
- Operation Balance Due
Indicates the quantity remaining to be produced by the specified Operation.
- Return Components
Components: Select to return components to the Work Order Material Requirements. Option will only be enabled when Work Order Material Requirements are linked to a selected Operation. Only Items whose issue method is "Pull" or "Mixed" will be displayed.
- Correct Inventory
Select of you wish to remove any Inventory issued to stock by the selected Operation. Enabled if the selected Operation is tagged to receive Inventory.
- Clear Setup Complete Flag
Select to clear the setup complete flag.
- Correct Setup Time
Select to correct setup time.
- Correct Standard Setup Time
Select to correct standard setup time.
- Correct Specified Setup Time
Specify the non-standard amount of setup time used. The amount of time entered will be corrected.
- Clear Operation Complete Flag
Select to clear the Operation as complete flag.
- Correct Run Time
Select to correct run time.
- Correct Standard Run Time
Select to correct the standard run time for specified Item.
- Correct Specified Run Time
Specify the non-standard amount of run time used. The amount of time entered will be corrected. The amount of time entered will be posted.
To the far right of the screen, the following buttons are available:
- CANCEL
Closes the screen without posting Operations, returning you to the application desktop.
- POST CORRECTION
Posts the specified Operation using the values entered in the screen.
Work Order progress can be posted in terms of materials used or Operations completed. When you post production, you are using the materials-driven process for reporting progress. To post production for a Work Order, select the "Post Production" option. The following screen will appear:
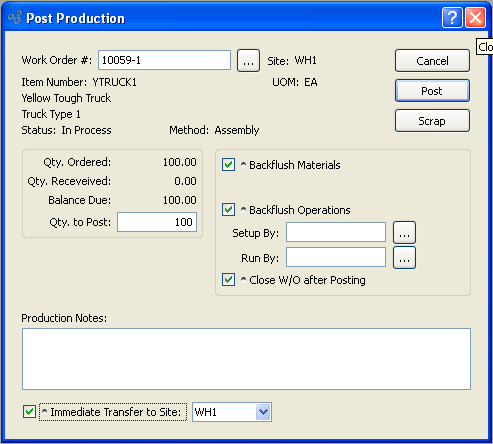
When posting production for a Work Order, you are presented with the following options:
- Work Order #
Enter the Work Order Number of the Work Order whose production you want to post.
- Site
Displays Site code automatically when Work Order Number is entered into "Work Order #" field.
- Item Number
Displays Item Number automatically when Work Order Number is entered into "Work Order #" field.
- UOM
Inventory Unit of Measure.
- Status
Displays Work Order Status automatically when Work Order Number is entered into "Work Order #" field.
- Method
Indicates whether selected Work Order is an Assembly or Disassembly Work Order.
- Qty. Ordered
Display the quantity of the component Item required per parent Item.
- Qty. Received
Received: Displays the quantity required to fulfill the specified Work Order.
- Balance Due
Displays the quantity issued in fulfillment of the specified Work Order.
- Qty. to Post
to Post: Enter the quantity of the component Items you want to post.
- Backflush Materials
Select to indicate that the amount of materials indicated by the associated Work Order Material Requirement record will be issued to the selected Work Order for all "Pull" or "Mixed" component Items.
- Backflush Operations
Select to indicate that the amount of time and labor indicated by the associated Work Order Operation record will be issued to the selected Work Order.
- Setup By
Enter the name of the user who performed the set up.
- Run By
Enter the name of the user who performed the production run.
Note
If the "Backflush Operations" option is not selected, the setup and run time options will be disabled.
- Close W/O after Posting
Select to close the Work Order after posting. If you are posting partial production and want to keep the Work Order open, you should not select this option.
- Production Notes
This is a scrolling text field with word-wrapping for entering production posting Notes related to the Work Order.
- Immediate Transfer to Site
Select to transfer Work Order production to specified Site. Specify the Site you want to transfer production to.
To the far right of the screen, the following buttons are available:
- CANCEL
Closes the screen without posting production for the Work Order, returning you to the application desktop.
- POST
Posts production for the Work Order in the amount specified.
- SCRAP
Select to open the "Scrap Work Order Material from W/O" screen.
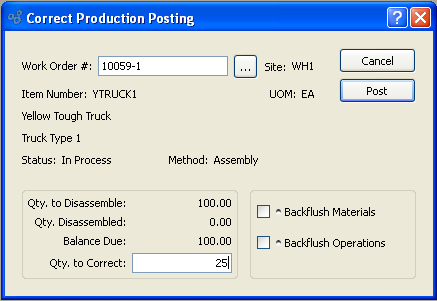
To correct production posting for a Work Order—in the event, for example, that production has been previously overstated—select the "Correct Production Posting" option. The following screen will appear:
Note
You may not post a correction to a Work Order that manufactures a Breeder Item. Instead, you must manually adjust the Quantity on Hand values for the Breeder materials, the Co-Products, and the By-Products.
When correcting production posting for a Work Order, you are presented with the following options:
- Work Order #
Enter the Work Order Number of the Work Order whose production posting you want to correct.
- Site
Displays Site code automatically when Work Order Number is entered into "Work Order #" field.
- Item Number
Displays Item Number automatically when Work Order Number is entered into "Work Order #" field.
- UOM
Inventory Unit of Measure.
- Status
Displays Work Order Status automatically when Work Order Number is entered into "Work Order #" field.
- Method
Indicates whether selected Work Order is an Assembly or Disassembly Work Order.
- Qty. Ordered
Displays the original Work Order quantity.
- Qty. Received
Displays the quantity received against the Work Order to date.
- Balance Due
Displays the quantity remaining to be received against the Work Order.
- Qty. to Correct
Enter the corrected amount of the production to be posted.
- Backflush Materials
Select to indicate that the amount of materials indicated by the associated Work Order Material Requirement record will be issued to the selected Work Order for all "Pull" or "Mixed" component Items.
- Backflush Operations
Select to indicate that the amount of time and labor indicated by the associated Work Order Operation record will be issued to the selected Work Order.
To the far right of the screen, the following buttons are available:
- CANCEL
Closes the screen without correcting production posting, returning you to the application desktop.
- POST
Posts the corrected production for the Work Order in the amount specified.
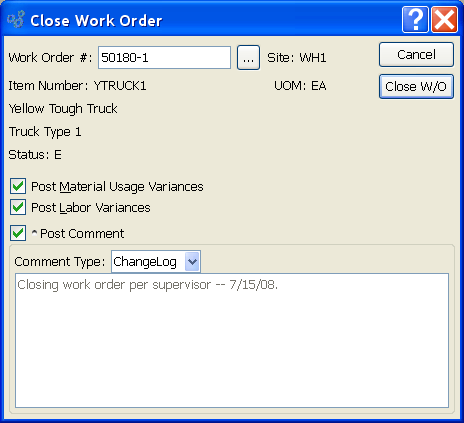
A Work Order can be closed at any point. To close a Work Order, select the "Close Work Order" option. The following screen will appear:
Note
Work Order Materials and Operations history is saved in the database after a Work Order is closed. Reports can be written to retrieve this information.
When closing a Work Order, you are presented with the following options:
- Work Order #
Enter the Work Order Number of the Work Order you want to close.
- Site
Displays Site code automatically when Work Order Number is entered into "Work Order #" field.
- Item Number
Displays Item Number automatically when Work Order Number is entered into "Work Order #" field.
- UOM
Inventory Unit of Measure.
- Status
Displays Work Order Status automatically when Work Order Number is entered into "Work Order #" field.
- Post Material Usage Variances
Material Usage Variances: Select to post material usage variances resulting from the Work Order. Variance information can be found in the Work Order reports.
- Post Labor Variances
Select to post labor variances resulting from the Work Order. Variance information can be found in the Work Order reports.
- Post Comment
Select to attach a Comment to the Work Order. This option must be selected if you want to add a Comment to the Work Order.
- Comment Type
Specify one of the following Comment Types from the drop-down list: ChangeLog or General. Comment Types are used to categorize Comments. Once you have specified a Comment Type, you may type your Comment in the main text area. The text area features word-wrapping and scroll-bar support for longer Comments.
To the far right of the screen, the following buttons are available:
- CANCEL
Closes the screen without closing the selected Work Order, returning you to the application desktop.
- CLOSE W/O
Closes the selected Work Order.
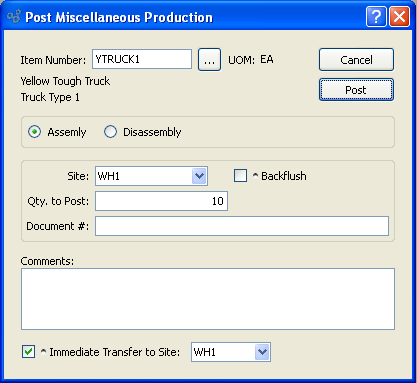
In repetitive manufacturing environments where production is continuous, the option to post miscellaneous production can be a useful feature. It can also be a useful feature for shops where disassembling manufactured Items is required. To post miscellaneous production, select the "Post Miscellaneous Production" option. The following screen will appear:
Tip
If you want to disassemble a manufactured Item and return the component Items to Inventory, simply enter a negative quantity for the manufactured Item. Posting negative miscellaneous Production effectively reverses the Production process.
When posting miscellaneous production, you are presented with the following options:
- Item Number
Enter the Item Number of the Item you want to post miscellaneous production for.
- UOM
Inventory Unit of Measure.
- Assembly
Select to identify Work Order as Assembly order.
- Disassembly
Select to identify Work Order as Disassembly order.
- Site
Specify Site Location for selected Item.
- Qty. to Post
to Post: Enter the quantity of production you want to post. This field will accept negative numbers for disassembly purposes.
- Document #
Creates a user-defined reference for the miscellaneous production. The document number will be posted with the General Ledger (G/L) transaction record when the miscellaneous production is generated. This field may be used for internal tracking and auditing purposes.
- Backflush
Select to indicate that the material requirements indicated by the associated Work Order Material Requirement record should be issued to the selected Work Order regardless of the issue method associated with these requirements.
- Issue Items not on Pick List
Select to indicate that non-Pick List Items should be backflushed as well.
- Comments
This is a scrolling text field with word-wrapping for entering Comments related to the miscellaneous production posting.
- Immediate Transfer to Site
Select to transfer miscellaneous production to specified Site. Specify the Site you want to transfer production to.
Note
Miscellaneous Production may not be posted for Breeder Items.
To the far right of the screen, the following buttons are available:
- CANCEL
Closes the screen without posting the miscellaneous production, returning you to the application desktop.
- POST
Posts the production for the selected Item in the specified quantity.