Manufacturing reports are contained in this section.
Manufacturing Schedule Reports section.
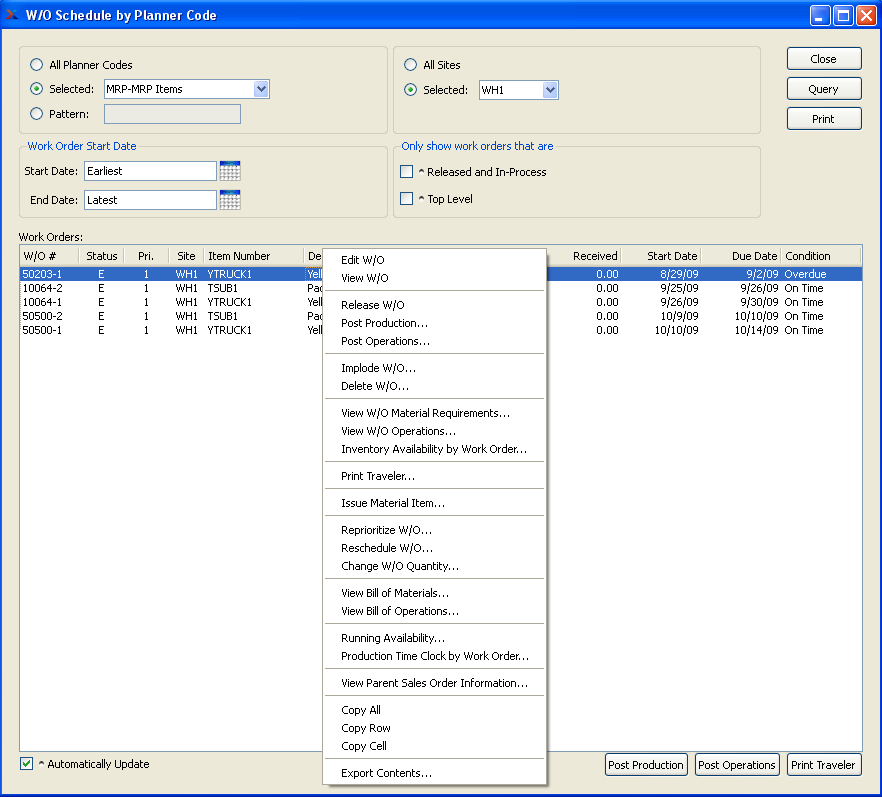
To view Work Order schedules by Planner Code, select the "Work Order Schedule by Planner Code" option. The following screen will appear:
Tip
To edit a Work Order after it has been created, use the right-click menu in any of the "Work Order Schedule by..." displays. There you will find an "Edit W/O" option.
When displaying Work Order schedules by Planner Code, you are presented with the following options:
- All Planner Codes
Select to display Work Order schedules for all Planner Codes.
- Selected
Specify Planner Code whose Work Order schedule you want to display.
- Pattern
Enter a Planner Code pattern to select a range of Planner Codes. Refine your search using Regular Expressions.
- Start W/O Start Date
Work Orders scheduled on and after this date will be displayed.
- End W/O Start Date
Work Orders scheduled on and before this date will be displayed.
- All Sites
Select to display Work Order schedules by Planner Code for all Sites.
- Selected
Specify Site whose Work Order schedules by Planner Code you want to display.
- Only Show Released and In-Process W/O"s
Select to display only released and in-process Work Order schedules. Selecting this option means only Work Orders whose Status is released ("R") or in-process ("I") will be displayed.
- Only Show Top Level Work Orders
Select to display only top level Work Orders. Top level Work Orders are Work Orders that have not been created to meet the component demands of a parent Work Order.
- Work Orders
Display lists Work Order schedules by Planner Code, using the specified parameters. The start dates and end dates are color-coded for ease of use. Both dates will display in red type if the Work Order is not yet in-process and is also past due. Once a Work Order's Status is changed to in-process ("I"), the start date will automatically revert to black type.
- Automatically Update
Select to automatically update the display every five minutes.
To the far right and at the bottom of the screen, the following buttons are available:
- CLOSE
Closes the screen, returning you to the application desktop.
- QUERY
Select to generate the display, using the specified parameters.
Runs the report associated with this screen.
Note
If the status of a highlighted Work Order is "O," then the buttons at the bottom of the screen will be disabled. Work Orders must be exploded ("E") before these options are available.
- POST PRODUCTION
Highlight a Work Order and then select this button to post Production for the Work Order.
- POST OPERATIONS
Highlight a Work Order and then select this button to post Production for the Work Order.
- PRINT TRAVELER
Highlight a Work Order and then select this button to print a Traveler for the Work Order.
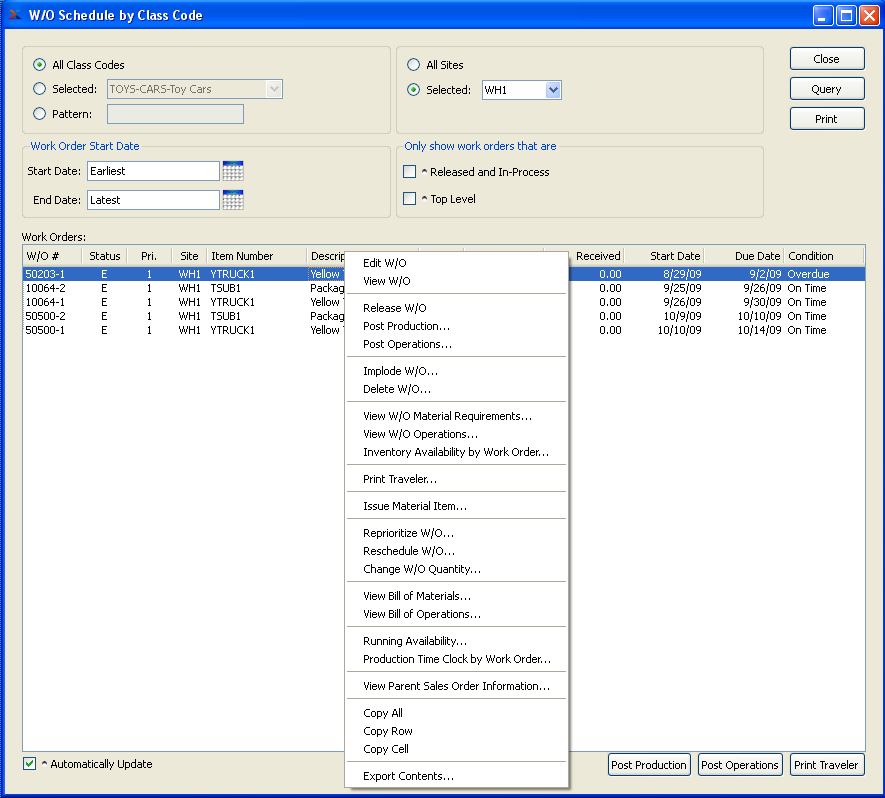
To view Work Order schedules by Class Code, select the "Work Order Schedule by Class Code" option. The following screen will appear:
Tip
To edit a Work Order after it has been created, use the right-click menu in any of the "Work Order Schedule by..." displays. There you will find an "Edit W/O" option.
When displaying Work Order schedules by Class Code, you are presented with the following options:
- All Class Codes
Select to display Work Order schedules for all Class Codes.
- Selected
Specify Class Code whose Work Order schedule you want to display.
- Pattern
Enter a Class Code pattern to select a range of Class Codes. Refine your search using Regular Expressions.
- Start W/O Start Date
Work Orders scheduled on and after this date will be displayed.
- End W/O Start Date
Work Orders scheduled on and before this date will be displayed.
- All Sites
Select to display the Work Order schedule by Class Code for all Sites.
- Selected
Specify Site whose Work Order schedule by Class Code you want to display.
- Only Show Released and In-Process W/O"s
Select to display only released and in-process Work Order schedules. Selecting this option means only Work Orders whose Status is released ("R") or in-process ("I") will be displayed.
- Only Show Top Level Work Orders
Select to display only top level Work Orders. Top level Work Orders are Work Orders that have not been created to meet the component demands of a parent Work Order.
- Work Orders
Display lists Work Order schedules by Class Code, using the specified parameters. The start dates and end dates are color-coded for ease of use. Both dates will display in red type if the Work Order is not yet in-process and is also past due. Once a Work Order's Status is changed to in-process ("I"), the start date will automatically revert to black type.
- Automatically Update
Select to automatically update the display every five minutes.
To the far right and at the bottom of the screen, the following buttons are available:
- CLOSE
Closes the screen, returning you to the application desktop.
- QUERY
Select to generate the display, using the specified parameters.
Runs the report associated with this screen.
Note
If the status of a highlighted Work Order is "O," then the buttons at the bottom of the screen will be disabled. Work Orders must be exploded ("E") before these options are available.
- POST PRODUCTION
Highlight a Work Order and then select this button to post Production for the Work Order.
- POST OPERATIONS
Highlight a Work Order and then select this button to post Production for the Work Order.
- PRINT TRAVELER
Highlight a Work Order and then select this button to post Production for the Work Order.
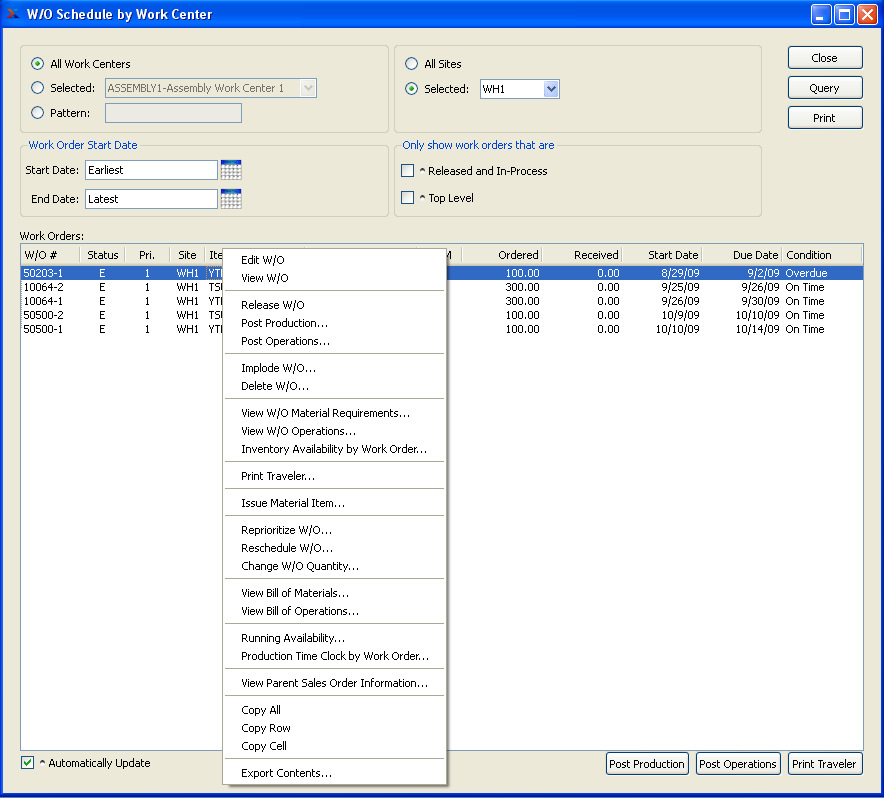
To view Work Order schedules by Work Center, select the "Work Order Schedule by Work Center" option. The following screen will appear:
Tip
To edit a Work Order after it has been created, use the right-click menu in any of the "Work Order Schedule by..." displays. There you will find an "Edit W/O" option.
When displaying Work Order schedules by Work Center, you are presented with the following options:
- All Work Centers
Select to display Work Order schedules for all Work Centers.
- Selected
Specify Work Center whose Work Order schedule you want to display.
- Pattern
Enter a Work Center pattern to select a range of Work Centers. Refine your search using Regular Expressions.
- Start W/O Start Date
Work Orders scheduled on and after this date will be displayed.
- End W/O Start Date
Work Orders scheduled on and before this date will be displayed.
- All Sites
Select to display Work Order schedules by Work Center for all Sites.
- Selected
Specify Site whose Work Order schedules by Work Center you want to display.
- Only Show Released and In-Process W/O"s
Select to display only released and in-process Work Order schedules. Selecting this option means only Work Orders whose Status is released ("R") or in-process ("I") will be displayed.
- Only Show Top Level Work Orders
Select to display only top level Work Orders. Top level Work Orders are Work Orders that have not been created to meet the component demands of a parent Work Order.
- Work Orders
Display lists Work Order schedules by Work Center, using the specified parameters. The start dates and end dates are color-coded for ease of use. Both dates will display in red type if the Work Order is not yet in-process and is also past due. Once a Work Order's Status is changed to in-process ("I"), the start date will automatically revert to black type.
- Automatically Update
Select to automatically update the display every five minutes.
To the far right and at the bottom of the screen, the following buttons are available:
- CLOSE
Closes the screen, returning you to the application desktop.
- QUERY
Select to generate the display, using the specified parameters.
Runs the report associated with this screen.
Note
If the status of a highlighted Work Order is "O," then the buttons at the bottom of the screen will be disabled. Work Orders must be exploded ("E") before these options are available.
- POST PRODUCTION
Highlight a Work Order and then select this button to post Production for the Work Order.
- POST OPERATIONS
Highlight a Work Order and then select this button to post Production for the Work Order.
- PRINT TRAVELER
Highlight a Work Order and then select this button to post Production for the Work Order.
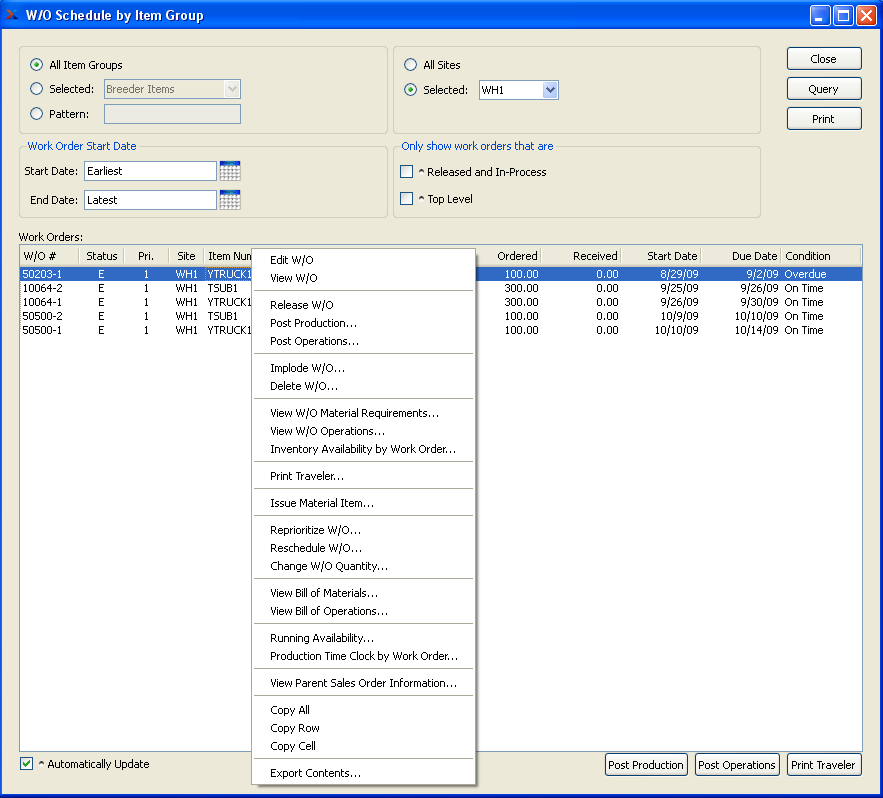
To view Work Order schedules by Item Group, select the "Work Order Schedule by Item Group" option. The following screen will appear:
Tip
To edit a Work Order after it has been created, use the right-click menu in any of the "Work Order Schedule by..." displays. There you will find an "Edit W/O" option.
When displaying Work Order schedules by Item Group, you are presented with the following options:
- All Item Groups
Select to display Work Order schedules for all Item Groups.
- Selected
Specify Item Group whose Work Order schedule you want to display.
- Pattern
Enter an Item Group pattern to select a range of Item Groups. Refine your search using Regular Expressions.
- Start W/O Start Date
Work Orders scheduled on and after this date will be displayed.
- End W/O Start Date
Work Orders scheduled on and before this date will be displayed.
- All Sites
Select to display the Work Order schedule by Item Group for all Sites.
- Selected
Specify Site whose Work Order schedule by Item Group you want to display.
- Only Show Released and In-Process W/O"s
Select to display only released and in-process Work Order schedules. Selecting this option means only Work Orders whose Status is released ("R") or in-process ("I") will be displayed.
- Only Show Top Level Work Orders
Select to display only top level Work Orders. Top level Work Orders are Work Orders that have not been created to meet the component demands of a parent Work Order.
- Work Orders
Display lists Work Order schedules by Item Group, using the specified parameters. The start dates and end dates are color-coded for ease of use. Both dates will display in red type if the Work Order is not yet in-process and is also past due. Once a Work Order's Status is changed to in-process ("I"), the start date will automatically revert to black type.
- Automatically Update
Select to automatically update the display every five minutes.
To the far right and at the bottom of the screen, the following buttons are available:
- CLOSE
Closes the screen, returning you to the application desktop.
- QUERY
Select to generate the display, using the specified parameters.
Runs the report associated with this screen.
Note
If the status of a highlighted Work Order is "O," then the buttons at the bottom of the screen will be disabled. Work Orders must be exploded ("E") before these options are available.
- POST PRODUCTION
Highlight a Work Order and then select this button to post Production for the Work Order.
- POST OPERATIONS
Highlight a Work Order and then select this button to post Production for the Work Order.
- PRINT TRAVELER
Highlight a Work Order and then select this button to post Production for the Work Order.
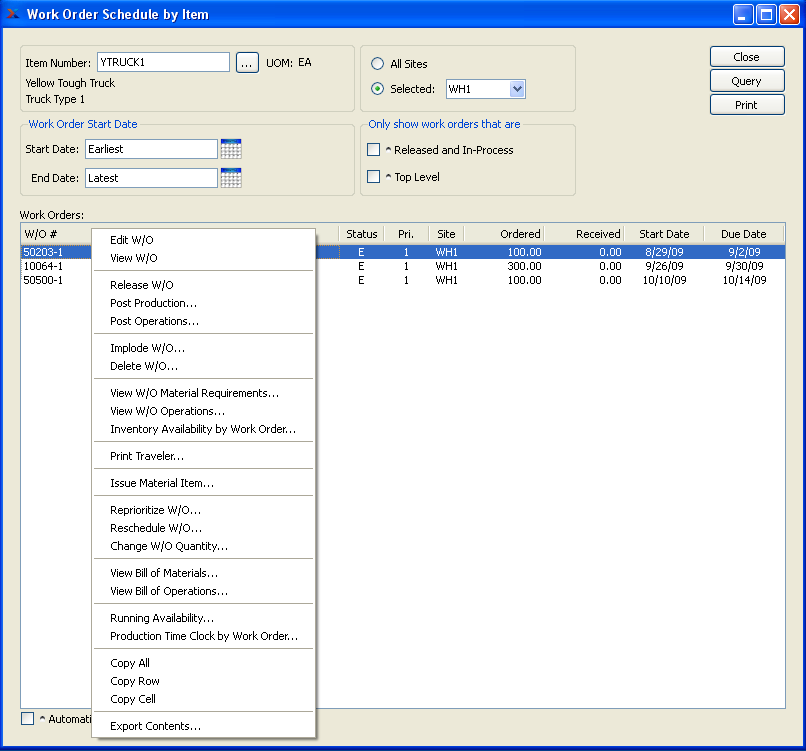
To view Work Order schedules by Item, select the "Work Order Schedule by Item" option. The following screen will appear:
Tip
To edit a Work Order after it has been created, use the right-click menu in any of the "Work Order Schedule by..." displays. There you will find an "Edit W/O" option.
When displaying Work Order schedules by Item, you are presented with the following options:
- Item Number
Enter the Item Number of the Item whose Work Order schedules you want to view. The browse button located to the right of the field leads to a searchable list of make and buy items.
- UOM
Inventory Unit of Measure.
- Start W/O Start Date
Work Orders scheduled on and after this date will be displayed.
- End W/O Start Date
Work Orders scheduled on and before this date will be displayed.
- All Sites
Select to display the Work Order schedule by Item for all Sites.
- Selected
Specify Site whose Work Order schedule by Item you want to display.
- Only Show Released and In-Process W/O"s
Select to display only released and in-process Work Order schedules. Selecting this option means only Work Orders whose Status is released ("R") or in-process ("I") will be displayed.
- Only Show Top Level Work Orders
Select to display only top level Work Orders. Top level Work Orders are Work Orders that have not been created to meet the component demands of a parent Work Order.
- Work Orders
Display lists Work Order schedules by Item, using the specified parameters. The start dates and end dates are color-coded for ease of use. Both dates will display in red type if the Work Order is not yet in-process and is also past due. Once a Work Order's Status is changed to in-process "I", the start date will automatically revert to black type.
- Automatically Update
Select to automatically update the display every five minutes.
To the far right of the screen, the following buttons are available:
- CLOSE
Closes the screen, returning you to the application desktop.
- QUERY
Select to generate the display, using the specified parameters.
Runs the report associated with this screen.
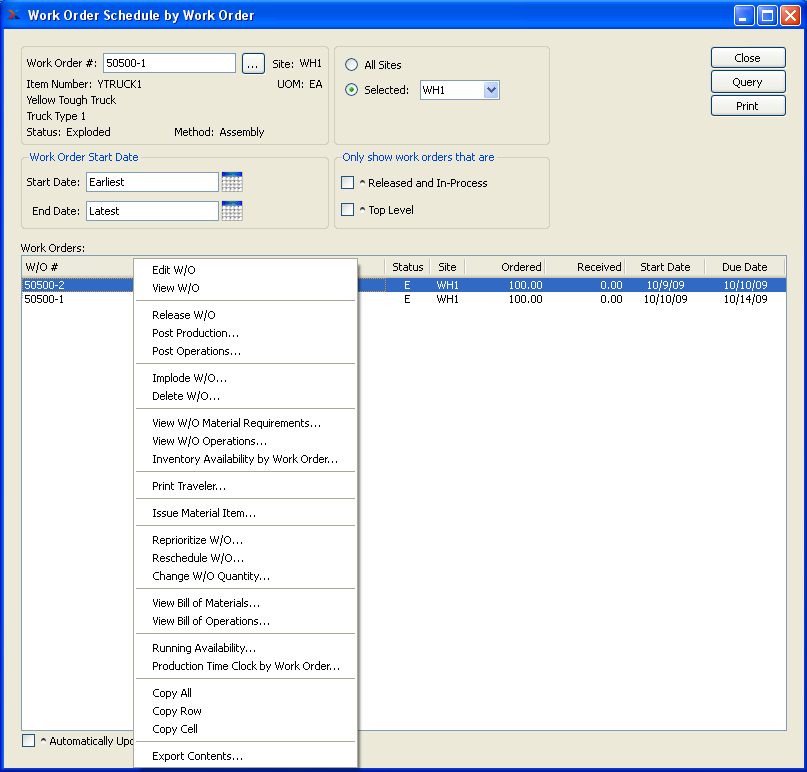
To view Work Order schedules by Work Order, select the "Work Order Schedule by Order" option. The following screen will appear:
Tip
To edit a Work Order after it has been created, use the right-click menu in any of the "Work Order Schedule by..." displays. There you will find an "Edit W/O" option.
When displaying Work Order schedules by Work Order, you are presented with the following options:
- Work Order #
Enter the Work Order Number of the Work Order whose schedule you want to display
- Start W/O Start Date
Work Orders scheduled on and after this date will be displayed.
- End W/O Start Date
Work Orders scheduled on and before this date will be displayed.
- All Sites
Select to display Work Order schedules by Work Order for all Sites.
- Selected
Specify Site whose Work Order schedules by Work Order you want to display.
- Only Show Released and In-Process W/O"s
Select to display only released and in-process Work Order schedules. Selecting this option means only Work Orders whose Status is released ("R") or in-process ("I") will be displayed.
- Only Show Top Level Work Orders
Select to display only top level Work Orders. Top level Work Orders are Work Orders that have not been created to meet the component demands of a parent Work Order.
- Work Orders
Display lists Work Order schedules by Work Order, using the specified parameters. The start dates and end dates are color-coded for ease of use. Both dates will display in red type if the Work Order is not yet in-process and is also past due. Once a Work Order's Status is changed to in-process ("I"), the start date will automatically revert to black type.
- Automatically Update
Select to automatically update the display every five minutes.
To the far right and at the bottom of the screen, the following buttons are available:
- CLOSE
Closes the screen, returning you to the application desktop.
- QUERY
Select to generate the display, using the specified parameters.
Runs the report associated with this screen.
Note
If the status of a highlighted Work Order is "O," then the buttons at the bottom of the screen will be disabled. Work Orders must be exploded ("E") before these options are available.
- POST PRODUCTION
Highlight a Work Order and then select this button to post Production for the Work Order.
- POST OPERATIONS
Highlight a Work Order and then select this button to post Production for the Work Order.
- PRINT TRAVELER
Highlight a Work Order and then select this button to print a Traveler for the Work Order.
Manufacturing Buffer Status Reports section.
The Work Order buffer status displays provide information on your current stock and time buffer levels for those Items having current Work Orders. Stock buffers apply to make-to-stock Items; whereas time buffers apply to Items which are make-to-order. Keep in mind that buffer status information will only be displayed on days when the Constraint Management system is run. If you find your displays show no information, this probably means Constraint Management has not been run.
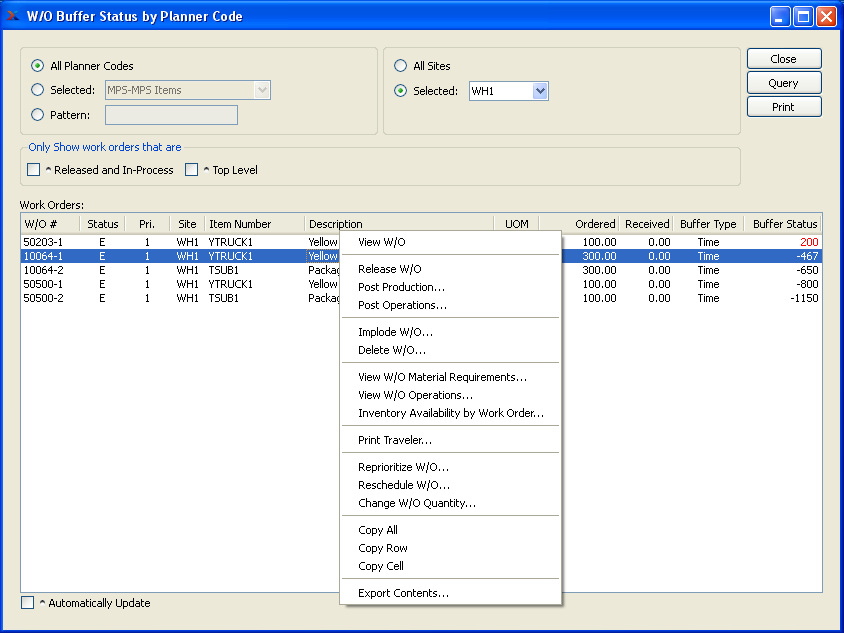
To view Work Order buffer status by Planner Code, select the "Work Order Buffer Status by Planner Code" option. The following screen will appear:
Note
When the buffer status for an Item hits 66 or higher, the status number will become red. By highlighting Items which are "red hot," the system is informing you which Items should be acted on immediately. The best remedy for red hot Item Sites is to expedite any associated Work Orders or Purchase Orders.
When displaying Work Order buffer status by Planner Code, you are presented with the following options:
- All Planner Codes
Select to display Work Order buffer statuses for all Planner Codes.
- Selected
Specify Planner Code whose Work Order buffer statuses you want to display.
- Planner Code Pattern
Enter a Planner Code pattern to select a range of Item Groups. Refine your search using Regular Expressions.
- All Sites
Select to display Work Order buffer statuses for all Sites.
- Selected
Specify Site whose Work Order buffer statuses you want to display.
Note
By default, the display will sort Work Orders by buffer status in descending order. In other words, Work Orders with the highest buffer status will appear at the top of the list; Work Orders with the lowest buffer status will appear at the bottom.
- Only Show Released and In-Process W/O"s
Select to display only released and in-process Work Order schedules. Selecting this option means only Work Orders whose Status is released ("R") or in-process ("I") will be displayed.
- Only Show Top Level Work Orders
Select to display only top level Work Orders. Top level Work Orders are Work Orders that have not been created to meet the component demands of a parent Work Order.
- Work Orders
Display lists Work Order buffer statuses by Planner Code, using the specified parameters.
- Automatically Update
Select to automatically update the display every five minutes.
To the far right and at the bottom of the screen, the following buttons are available:
- CLOSE
Closes the screen, returning you to the application desktop.
- QUERY
Select to generate the display, using the specified parameters.
Runs the report associated with this screen.
The Work Order buffer status displays provide information on your current stock and time buffer levels for those Items having current Work Orders. Stock buffers apply to make-to-stock Items; whereas time buffers apply to Items which are make-to-order. Keep in mind that buffer status information will only be displayed on days when the Constraint Management system is run. If you find your displays show no information, this probably means Constraint Management has not been run.
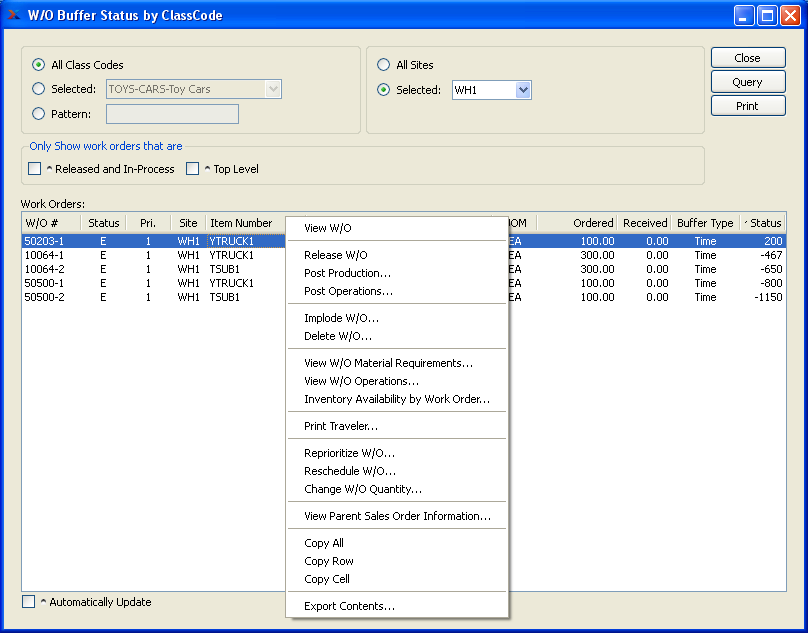
To view Work Order buffer status by Class Code, select the "Work Order Buffer Status by Class Code" option. The following screen will appear:
Note
When the buffer status for an Item hits 66 or higher, the status number will become red. By highlighting Items which are "red hot," the system is informing you which Items should be acted on immediately. The best remedy for red hot Item Sites is to expedite any associated Work Orders or Purchase Orders.
When displaying Work Order buffer status by Class Code, you are presented with the following options:
- All Class Codes
Select to display Work Order buffer statuses for all Class Codes.
- Selected
Specify Class Code whose Work Order buffer statuses you want to display.
- Class Code Pattern
Enter a Class Code pattern to select a range of Item Groups. Refine your search using Regular Expressions.
- All Sites
Select to display Work Order buffer statuses for all Sites.
- Selected
Specify Site whose Work Order buffer statuses you want to display.
Note
By default, the display will sort Work Orders by buffer status in descending order. In other words, Work Orders with the highest buffer status will appear at the top of the list; Work Orders with the lowest buffer status will appear at the bottom.
- Only Show Released and In-Process W/O"s
Select to display only released and in-process Work Order schedules. Selecting this option means only Work Orders whose Status is released ("R") or in-process ("I") will be displayed.
- Only Show Top Level Work Orders
Select to display only top level Work Orders. Top level Work Orders are Work Orders that have not been created to meet the component demands of a parent Work Order.
- Work Orders
Display lists Work Order buffer statuses by Class Code, using the specified parameters.
- Automatically Update
Select to automatically update the display every five minutes.
To the far right and at the bottom of the screen, the following buttons are available:
- CLOSE
Closes the screen, returning you to the application desktop.
- QUERY
Select to generate the display, using the specified parameters.
Runs the report associated with this screen.
The Work Order buffer status displays provide information on your current stock and time buffer levels for those Items having current Work Orders. Stock buffers apply to make-to-stock Items; whereas time buffers apply to Items which are make-to-order. Keep in mind that buffer status information will only be displayed on days when the Constraint Management system is run. If you find your displays show no information, this probably means Constraint Management has not been run.
To view Work Order buffer status by Item Group, select the "Work Order Buffer Status by Item Group" option. The following screen will appear:
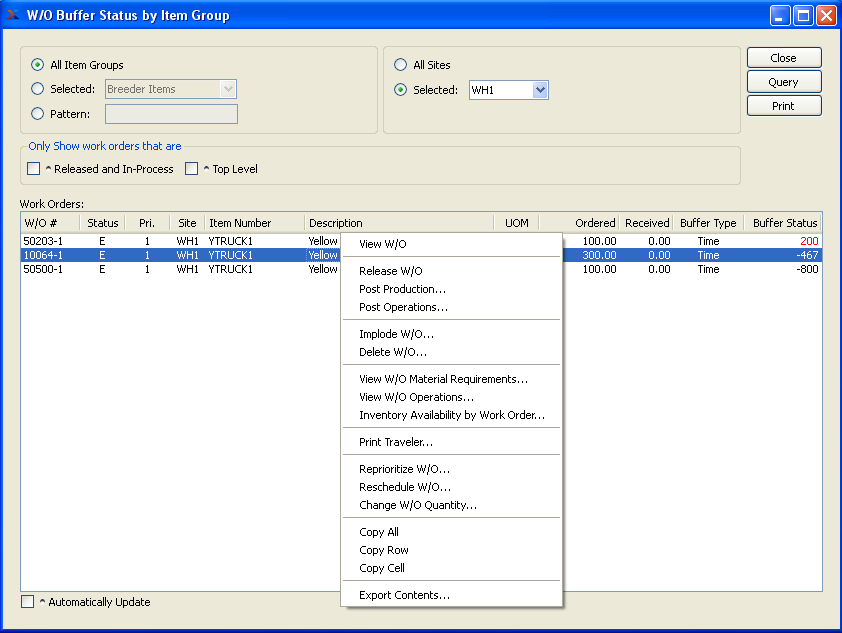
Note
When the buffer status for an Item hits 66 or higher, the status number will become red. By highlighting Items which are "red hot," the system is informing you which Items should be acted on immediately. The best remedy for red hot Item Sites is to expedite any associated Work Orders or Purchase Orders.
When displaying Work Order buffer status by Item Group, you are presented with the following options:
- All Item Groups
Select to display Work Order buffer statuses for all Item Groups.
- Selected
Specify Item Group whose Work Order buffer statuses you want to display.
- Item Group Pattern
Enter an Item Group pattern to select a range of Item Groups. Refine your search using Regular Expressions.
- All Sites
Select to display Work Order buffer statuses for all Sites.
- Selected
Specify Site whose Work Order buffer statuses you want to display.
Note
By default, the display will sort Work Orders by buffer status in descending order. In other words, Work Orders with the highest buffer status will appear at the top of the list; Work Orders with the lowest buffer status will appear at the bottom.
- Only Show Released and In-Process W/O"s
Select to display only released and in-process Work Order schedules. Selecting this option means only Work Orders whose Status is released ("R") or in-process ("I") will be displayed.
- Only Show Top Level Work Orders
Select to display only top level Work Orders. Top level Work Orders are Work Orders that have not been created to meet the component demands of a parent Work Order.
- Work Orders
Display lists Work Order buffer statuses by Item Group, using the specified parameters.
- Automatically Update
Select to automatically update the display every five minutes.
To the far right and at the bottom of the screen, the following buttons are available:
- CLOSE
Closes the screen, returning you to the application desktop.
- QUERY
Select to generate the display, using the specified parameters.
Runs the report associated with this screen.
Work Order Material Requirements Reports section.
To view Work Order Material Requirements by Work Order, select the "W/O Material Requirements by Work Order" option. The following screen will appear:
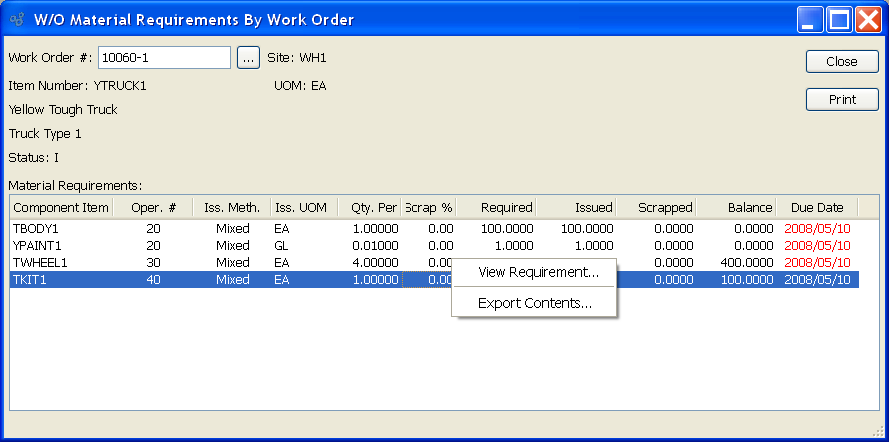
When displaying Work Order Material Requirements by Work Order, you are presented with the following options:
- Work Order #
Enter the Work Order Number of the Work Order whose Material Requirements you want to view.
- Site
Displays Site code automatically when Work Order Number is entered into "Work Order #" field.
- Item Number
Displays Item Number automatically when Work Order Number is entered into "Work Order #" field.
- UOM
Inventory Unit of Measure.
- Status
Displays Work Order Status automatically when Work Order Number is entered into "Work Order #" field.
- Material Requirements
Display lists Work Order Material Requirements by Work Order, using the specified parameters. The "Due Date" column is color-coded for ease of use. If the due date is past due, the date will display in red.
To the far right of the screen, the following buttons are available:
- CLOSE
Closes the screen, returning you to the application desktop.
Runs the report associated with this screen.
Note
The "Delete Requirement" option is only available if the component Item is not required by the Work Order.
To view Work Order Material Requirements by component Item, select the "W/O Material Requirements by Component Item" option. The following screen will appear:
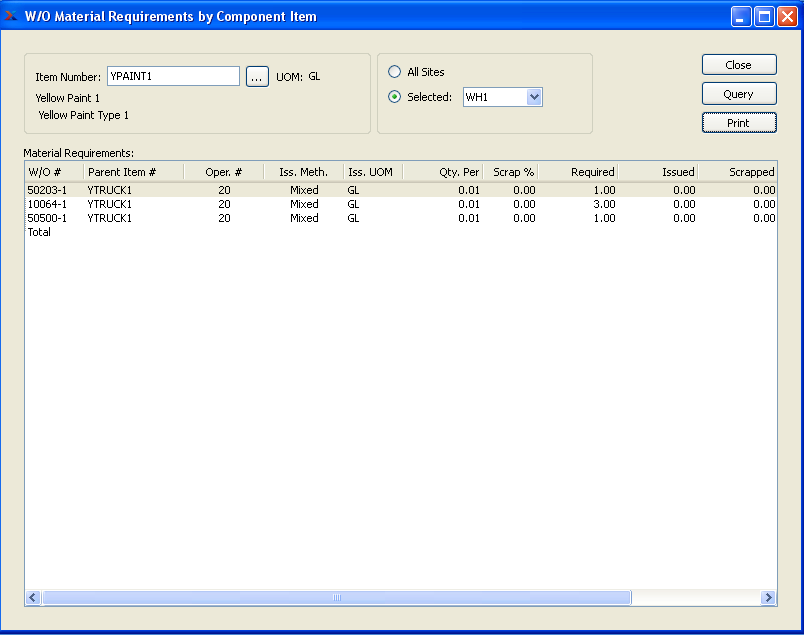
When displaying Work Order Material Requirements by component Item, you are presented with the following options:
- Item Number
Enter the Item Number of the Item whose Work Order Material Requirements you want to view. The browse button located to the right of the field leads to a searchable list of make and buy items.
- UOM
Inventory Unit of Measure.
- All Sites
Select to display Work Order Material Requirements by component Item for all Sites.
- Selected
Specify Site whose Work Order Material Requirements by component Item you want to display.
- Material Requirements
Display lists Work Order Material Requirements by component Item, using the specified parameters. Total balance required will also display. The "Due Date" column is color-coded for ease of use. If the due date is past due, the date will display in red.
To the far right of the screen, the following buttons are available:
- CLOSE
Closes the screen, returning you to the application desktop.
- QUERY
Select to generate the display, using the specified parameters.
Runs the report associated with this screen.
To view Inventory Availability by Work Order, select the "Inventory Availability by Work Order" option. The following screen will appear:
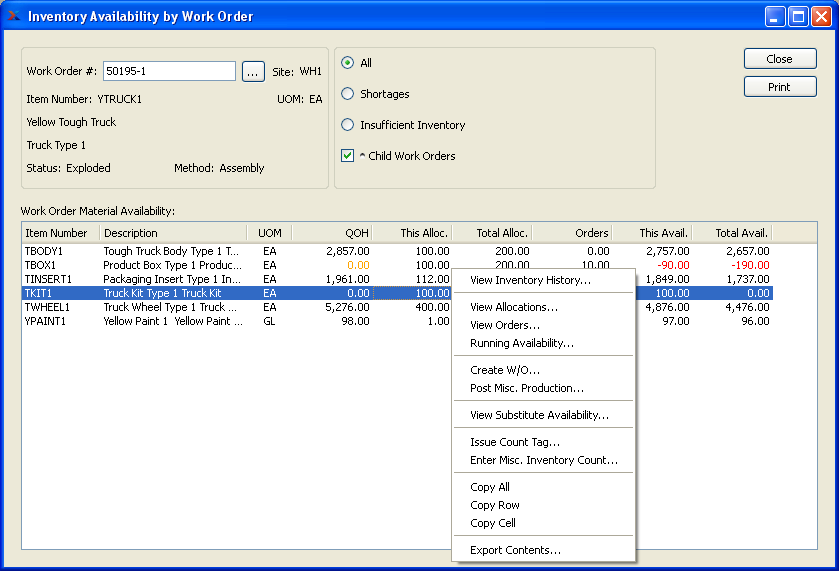
When displaying Inventory Availability by Work Order, you are presented with the following options:
- Work Order #
Enter the Work Order Number of the Work Order whose Inventory Availability you want to view.
- Site
Displays Site code automatically when Work Order Number is entered into "Work Order #" field.
- Item Number
Displays Item Number automatically when Work Order Number is entered into "Work Order #" field.
- UOM
Inventory Unit of Measure.
- Status
Displays Work Order Status automatically when Work Order Number is entered into "Work Order #" field.
- All
Select to include all availability, including Items showing shortages and insufficient Inventory
- Shortages
Select to only include Items having shortages in the display.
- Insufficient Inventory
Select to only include Items having insufficient Inventory in the display.
- Child Work Orders
Select to include child Work Orders for any subassemblies in the display.
- Work Order Material Availability
Display lists Inventory Availability by Work Order, using the specified parameters. The display is color-coded for ease of use. Orange text indicates the Item has fallen below its Reorder Level. Red text indicates the Quantity on Hand has fallen below 0.
To the far right of the screen, the following buttons are available:
- CLOSE
Closes the screen, returning you to the application desktop.
Runs the report associated with this screen.
To view the Pending Availability for Work Order Material Requirements associated with a Work Order, select the "Pending W/O Material Availability" option. The following screen will appear:
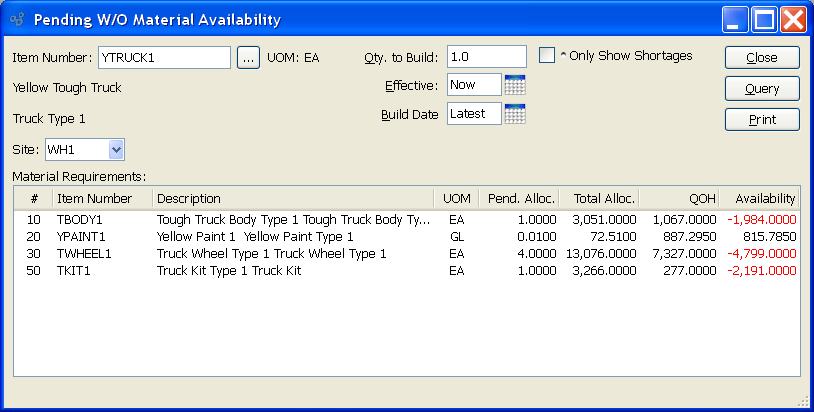
Note
This display shows Pending Availability for Work Order Material Requirements associated with the manufactured parent Item.
When displaying pending Work Order Material Availability, you are presented with the following options:
- Item Number
Enter the Item Number of the Item whose pending material Availability you want to view.
- UOM
Inventory Unit of Measure.
- Site
Specify Site whose pending Work Order Material Availability you want to display.
- Qty. to Build
Enter the quantity ordered for the hypothetical Work Order Item. The Pending Availability for Material Requirements will vary depending on the quantity entered.
- Effective
Pending Work Order Material Availability on or after this date will be displayed.
- Build Date
Enter the date you need to begin building the Item.
- Only Show Shortages
Select to only show shortages in the display.
- Material Requirements
Display lists pending Work Order Material Availability, using the specified parameters. The display is color-coded for ease of use. Orange text indicates the Item has fallen below its Reorder Level. Red text indicates the Quantity on Hand or Availability has fallen below 0.
To the far right of the screen, the following buttons are available:
- CLOSE
Closes the screen, returning you to the application desktop.
- QUERY
Select to generate the display, using the specified parameters.
Runs the report associated with this screen.
Work Order Operations Reports section.
To view Work Order Operations by Work Center, select the "W/O Operations by Work Center" option. The following screen will appear:
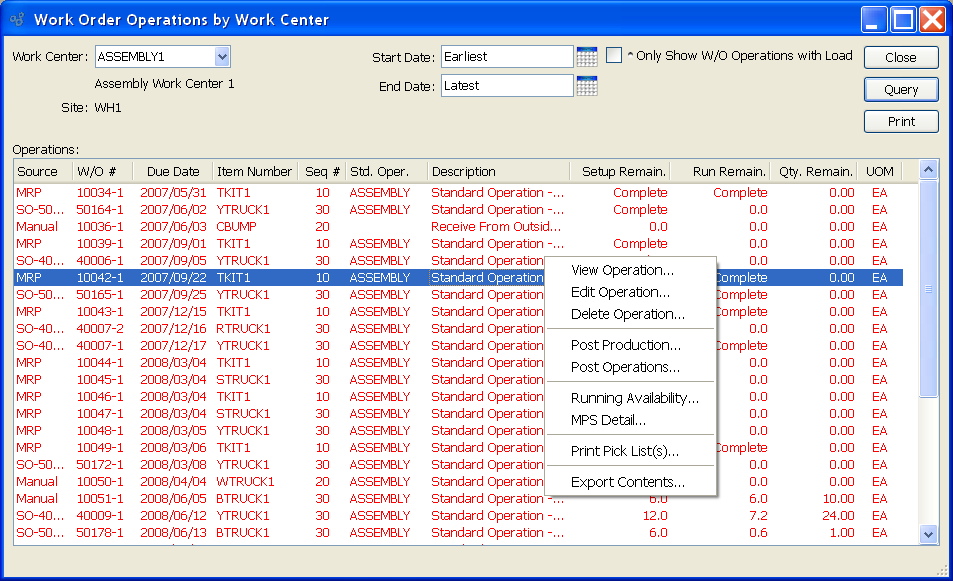
Tip
You can print Pick Lists for multiple Work Orders simultaneously from this screen. Simply use the SHIFT and/or CTRL keys to select multiple Orders. Then use the right-click menu to print Pick Lists for the selected Orders.
When displaying Work Order Operations by Work Center, you are presented with the following options:
- Work Center
Specify Work Center whose Work Order Operations you want to display.
- Site
Displays Site code for Site where Work Center is located.
- Start Date
Work Order Operations scheduled on and after this date will be displayed.
- End Date
Work Order Operations scheduled on and before this date will be displayed.
- Only Show W/O Operations with Load
Select to only show Work Order Operations with load in the display.
- Operations
Display lists Work Order Operations by Work Center, using the specified parameters. If a Work Order is past its due date, the line will display in red.
To the far right of the screen, the following buttons are available:
- CLOSE
Closes the screen, returning you to the application desktop.
- QUERY
Select to generate the display, using the specified parameters.
Runs the report associated with this screen.
To view Work Order Operations by Work Order, select the "W/O Operations by Work Order" option. The following screen will appear:
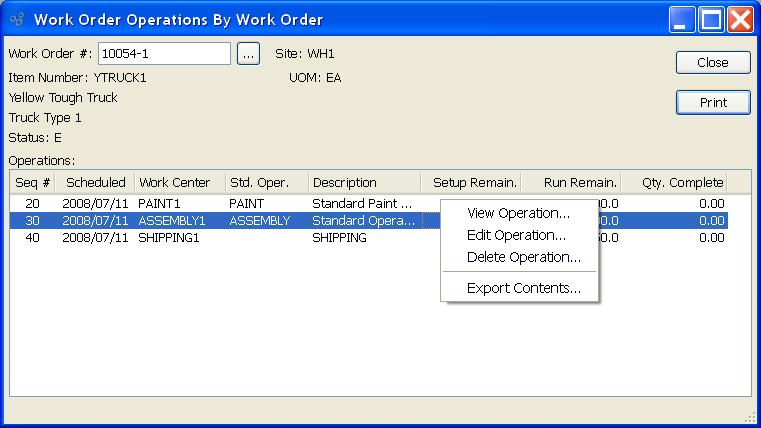
When displaying Work Order Operations by Work Order, you are presented with the following options:
- Work Order #
Enter the Work Order Number of the Work Order whose Operations you want to view.
- Site
Displays Site code automatically when Work Order Number is entered into "Work Order #" field.
- Item Number
Displays Item Number automatically when Work Order Number is entered into "Work Order #" field.
- UOM
Inventory Unit of Measure.
- Status
Displays the current status of the Work Order.
- Operations
Display lists Work Order Operations by Work Order, using the specified parameters.
To the far right of the screen, the following buttons are available:
- CLOSE
Closes the screen, returning you to the application desktop.
Runs the report associated with this screen.
The Work Order buffer status displays provide information on your current stock and time buffer levels for those Items having current Work Orders. Stock buffers apply to make-to-stock Items; whereas time buffers apply to Items which are make-to-order. Keep in mind that buffer status information will only be displayed on days when the Constraint Management system is run. If you find your displays show no information, this probably means Constraint Management has not been run.
To view Work Order Operation buffer statuses by Work Center, select the "W/O Buffer Status by Work Center" option. The following screen will appear:
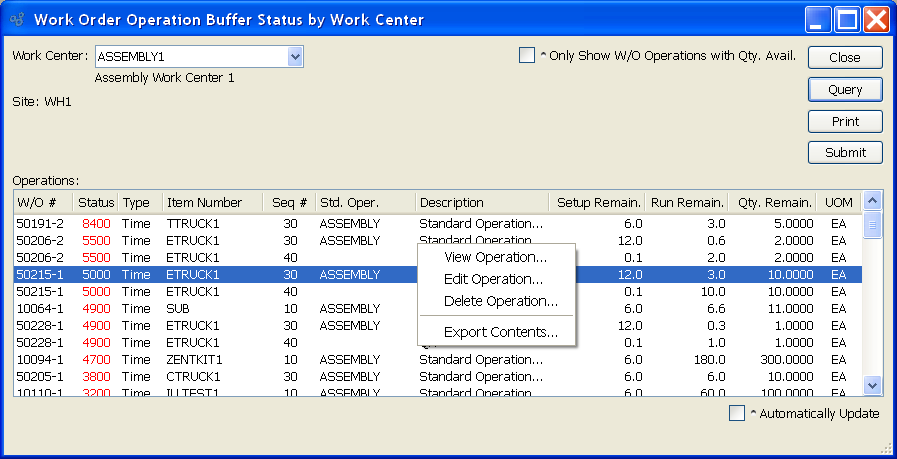
Note
When the buffer status for an Item hits 66 or higher, the status number will become red. By highlighting Items which are "red hot," the system is informing you which Items should be acted on immediately. The best remedy for red hot Item Sites is to expedite any associated Work Orders or Purchase Orders.
When displaying Work Order Operation buffer statuses by Work Center, you are presented with the following options:
- Work Center
Specify Work Center whose Work Order Operation buffer statuses you want to display.
- Site
Displays Site code for Site where Work Center is located.
Note
By default, the display will sort Work Orders by buffer status in descending order. In other words, Work Orders with the highest buffer status will appear at the top of the list; Work Orders with the lowest buffer status will appear at the bottom.
- Only Show W/O Operations with Qty. Available
Select to only show Work Order Operations with quantity available in the display.
- Operations
Display lists Work Order Operation buffer statuses by Work Center, using the specified parameters.
- Automatically Update
Select to automatically update the display every five minutes.
To the far right and at the bottom of the screen, the following buttons are available:
- CLOSE
Closes the screen, returning you to the application desktop.
- QUERY
Select to generate the display, using the specified parameters.
Runs the report associated with this screen.
- SUBMIT
Select to submit report to the Batch Manager.
Production Time Clock Reports section.
To view Time Clock information by user, select the "Production Time Clock by User" option. The following screen will appear:

When displaying Time Clock information by User, you are presented with the following options:
- Username
Enter the username of the user whose Time Clock information you want to view.
- Start W/O Start Date
Work Orders scheduled on and after this date will be displayed.
- End W/O Start Date
Work Orders scheduled on and before this date will be displayed.
- Work Orders
Display lists Work Orders the user has clocked-in to, using the specified parameters.
- Automatically Update
Select to automatically update the information displayed in the screen. The list will automatically update every 60 seconds if this option is selected.
To the far right of the screen, the following buttons are available:
- CLOSE
Closes the screen, returning you to the application desktop.
- QUERY
Select to generate the display, using the specified parameters.
Runs the report associated with this screen.
To view Time Clock information by Work Order, select the "Production Time Clock by Work Order" option. The following screen will appear:
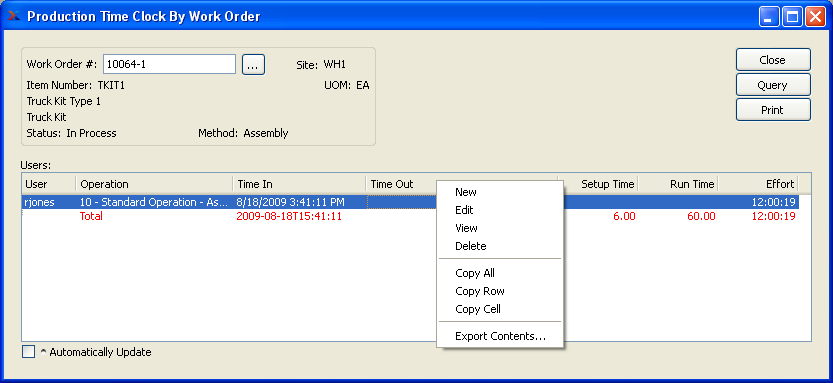
When displaying Time Clock information by Work Order, you are presented with the following options:
- Work Order #
Enter the Work Order Number of the Work Order whose Time Clock information you want to view.
- Site
Displays Site code automatically when Work Order Number is entered into "Work Order #" field.
- Item Number
Displays Item Number automatically when Work Order Number is entered into "Work Order #" field.
- UOM
Inventory Unit of Measure.
- Users
Display lists users who have clocked-in to the specified Work Order. If the totals row displays in red, this means the sum of total setup and run times does not equal the total effort.
- Automatically Update
Select to automatically update the information displayed in the screen. The list will automatically update every 60 seconds if this option is selected.
To the far right of the screen, the following buttons are available:
- CLOSE
Closes the screen, returning you to the application desktop.
Runs the report associated with this screen.
Manufacturing History Reports section.
To view Work Order history by Class Code, select the "Work Order History by Class Code" option. The following screen will appear:
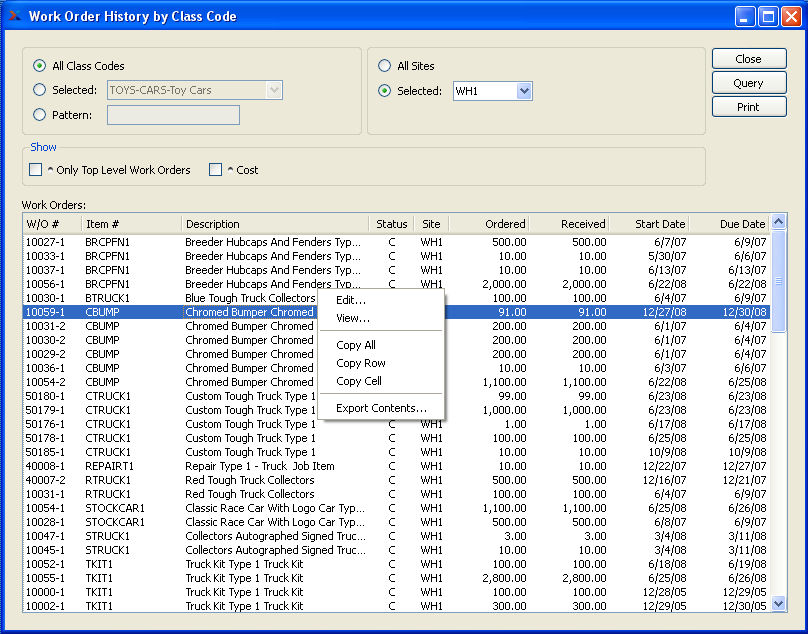
When displaying Work Order history by Class Code, you are presented with the following options:
- All Class Codes
Select to display Work Order history for all Class Codes.
- Selected
Specify Class Code whose Work Order history you want to display.
- Pattern
Enter a Class Code pattern to select a range of Class Codes. Refine your search using Regular Expressions.
- All Sites
Select to display Work Order history by Class Code for all Sites.
- Selected
Specify Site whose Work Order history by Class Code you want to display.
- Only Show Top Level Work Orders
Select to display only top level Work Orders. Top level Work Orders are Work Orders that have not been created to meet the component demands of a parent Work Order.
- Show W/O Cost
Select to include the current posted value of the Work Order in the display. The posted value is equal to the total cost accumulated on the Work Order, including both labor and materials. The posted value will be the same as the WIP value until the point when finished goods are received. Ultimately, once Production (or Operations) posting is completed, the posted value will be equal to the received value. If these two values are different, then a variance will result.
- Work Orders
Display lists Work Order history by Class Code, using the specified parameters.
To the far right of the screen, the following buttons are available:
- CLOSE
Closes the screen, returning you to the application desktop.
- QUERY
Select to generate the display, using the specified parameters.
Runs the report associated with this screen.
To view Work Order History by Item, select the "Work Order History by Item" option. The following screen will appear:
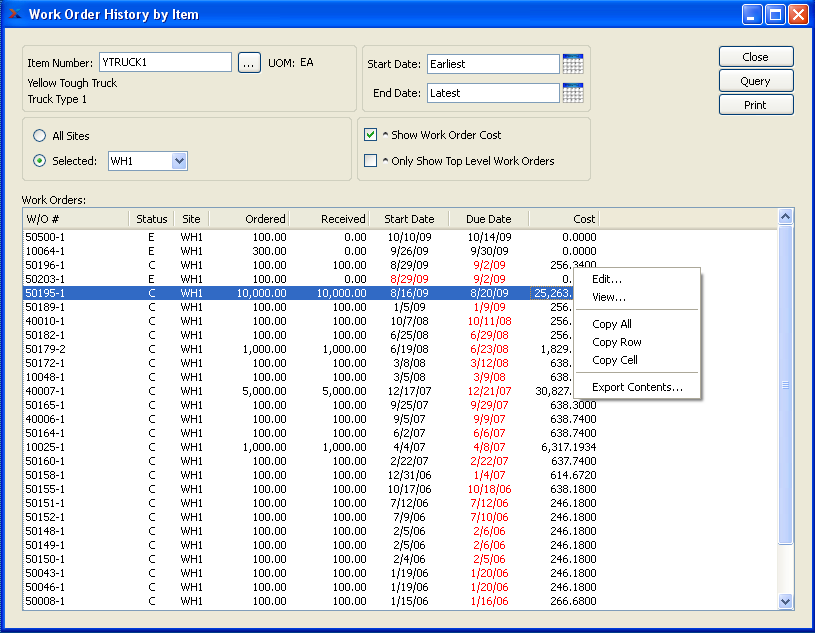
When displaying Work Order History by Item, you are presented with the following options:
- Item Number
Enter the Item Number of the Item whose Work Order History you want to view. The browse button located to the right of the field leads to a searchable list of make and buy items.
- UOM
Inventory Unit of Measure.
- All Sites
Select to display the Work Order History by Item for all Sites.
- Selected
Specify Site whose Work Order History by Item you want to display.
- Start Date
Work Orders scheduled on and after this date will be displayed.
- End Date
Work Orders scheduled on and before this date will be displayed.
- Only Show Top Level Work Orders
Select to display only top level Work Orders. Top level Work Orders are Work Orders that have not been created to meet the component demands of a parent Work Order.
- Show W/O Cost
Select to include the current posted value of the Work Order in the display. The posted value is equal to the total cost accumulated on the Work Order, including both labor and materials. The posted value will be the same as the WIP value until the point when finished goods are received. Ultimately, once Production (or Operations) posting is completed, the posted value will be equal to the received value. If these two values are different, then a variance will result.
- Work Orders
Display lists Work Order History by Item, using the specified parameters. The start dates and end dates are color-coded for ease of use. Both dates will display in red type if the Work Order is not yet in-process and is also past due. Once a Work Order's Status is changed to in-process ("I"), the start date will automatically revert to black type.
To the far right of the screen, the following buttons are available:
- CLOSE
Closes the screen, returning you to the application desktop.
- QUERY
Select to generate the display, using the specified parameters.
Runs the report associated with this screen.
To view Work Order History by Work Order Number, select the "Work Order History by W/O Number" option. The following screen will appear:
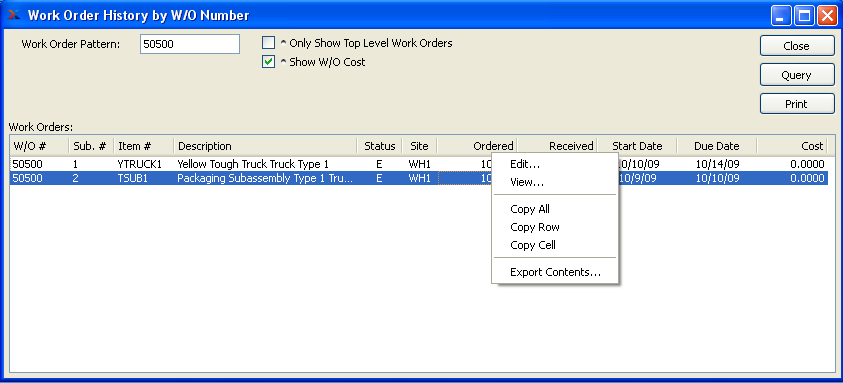
When displaying Work Order History by Work Order Number, you are presented with the following options:
- Work Order #
Enter the Work Order Number of the parent Work Order whose history you want to view. The field accepts only parent Work Order Numbers. Child Work Order Numbers—those containing a dash and a number following the Work Order Number—will not be recognized. This field supports pattern matching.
Tip
To search all work orders leave Work Order # blank and click Query. Can also limit search by entering partial Work Order number. For example, to search all Work Orders containing the number 50, enter 50 in Work Order # and click Query.
- Only Show Top Level Work Orders
Select to show only top level Work Orders in the "Work Orders" display.
- Show W/O Cost
Select to include the current posted value of the Work Order in the display. The posted value is equal to the total cost accumulated on the Work Order, including both labor and materials. The posted value will be the same as the WIP value until the point when finished goods are received. Ultimately, once Production (or Operations) posting is completed, the posted value will be equal to the received value. If these two values are different, then a variance will result.
- Work Orders
Display lists Work Order History by Work Order Number, using the specified parameters.
To the far right of the screen, the following buttons are available:
- CLOSE
Closes the screen, returning you to the application desktop.
- QUERY
Select to generate the display, using the specified parameters.
Runs the report associated with this screen.
To view Costing information for Job Item Work Orders, select the "Job Costing" option. The following screen will appear:
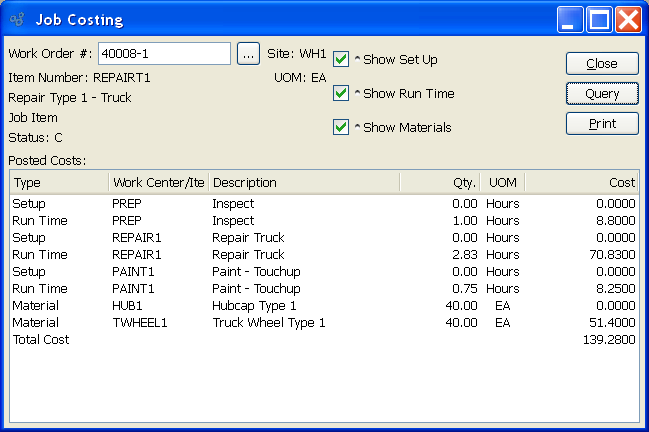
When displaying Costing information for Job Item Work Orders, you are presented with the following options:
- Work Order #
Enter the Work Order Number of the Work Order whose Job Costing information you want to view.
Note
This screen supports Work Orders created for Job Items only.
- Site
Displays Site code automatically when Work Order Number is entered into "Work Order #" field.
- Item Number
Displays Item Number automatically when Work Order Number is entered into "Work Order #" field.
- UOM
Inventory Unit of Measure.
- Status
Displays Work Order Status automatically when Work Order Number is entered into "Work Order #" field.
- Show Set Up
Select to include set up Costs in the display.
- Show Run Time
Select to include run time Costs in the display.
- Show Materials
Select to include material Costs in the display.
- Posted Costs
Display lists Job Costing by Work Order, using the specified parameters.
To the far right of the screen, the following buttons are available:
- CLOSE
Closes the screen, returning you to the application desktop.
- QUERY
Select to generate the display, using the specified parameters.
Runs the report associated with this screen.
Material Usage Variance Reports section.
To view material usage variances by Item, select the "Material Usage Variance by Item" option. The following screen will appear:
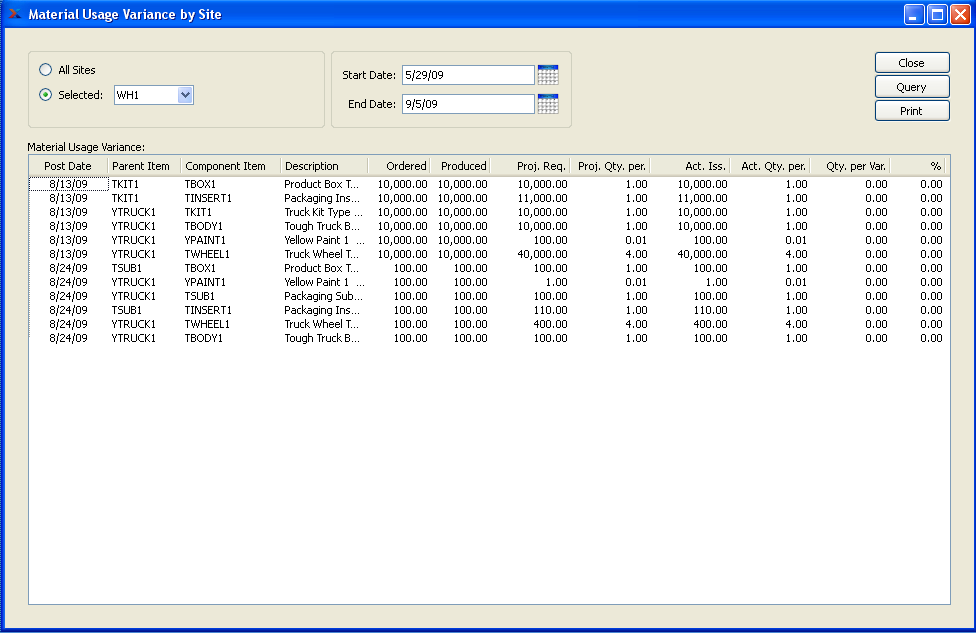
When viewing material usage variances by Site, you are presented with the following options:
- All Sites
Select to display material usage variances for all Sites.
- Selected
Specify Site whose material usage variances you want to display.
- Start Date
Material usage variances generated on or after this date will be displayed.
- End Date
Material usage variances generated on or before this date will be displayed.
- Material Usage Variance
Display lists material usage variances by Site, using the specified parameters.
To the far right of the screen, the following buttons are available:
- CLOSE
Closes the screen, returning you to the application desktop.
- QUERY
Select to generate the display, using the specified parameters.
Runs the report associated with this screen.
To view material usage variances by Item, select the "Material Usage Variance by Item" option. The following screen will appear:
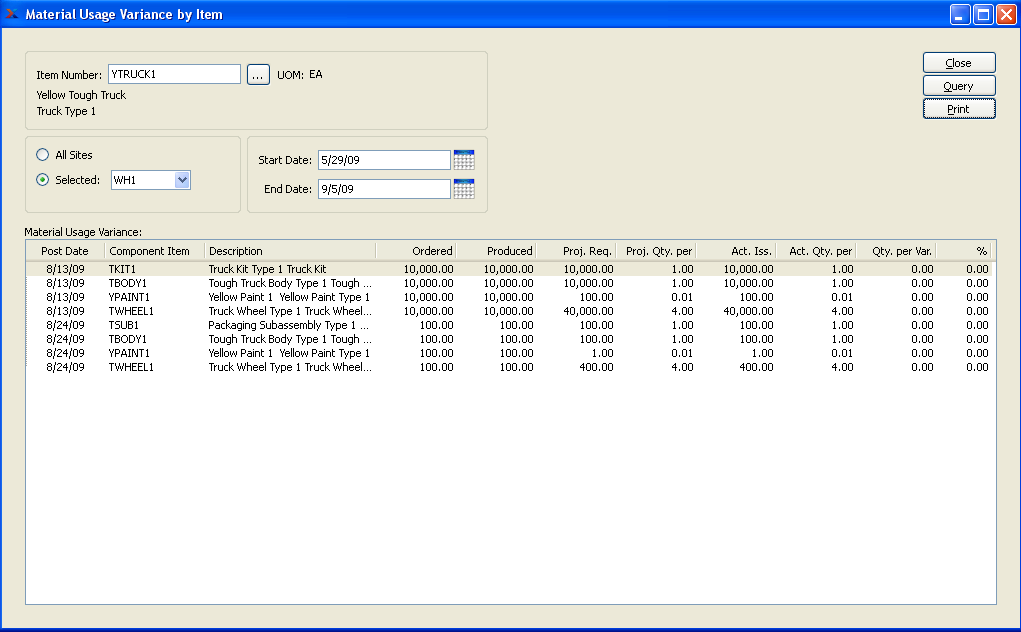
When viewing material usage variances by Item, you are presented with the following options:
- Item Number
Enter the Item Number of the Item whose material usage variances you want to view. The browse button located to the right of the field leads to a searchable list of make and buy items.
- UOM
Inventory Unit of Measure.
- All Sites
Select to display material usage variances by Item for all Sites.
- Selected
Specify Site whose material usage variances by Item you want to display.
- Start Date
Material usage variances by Item generated on or after this date will be displayed.
- End Date
Material usage variances by Item generated on or before this date will be displayed.
- Material Usage Variance
Display lists material usage variances by Item, using the specified parameters.
To the far right of the screen, the following buttons are available:
- CLOSE
Closes the screen, returning you to the application desktop.
- QUERY
Select to generate the display, using the specified parameters.
Runs the report associated with this screen.
To view material usage variances by Bill of Materials Item, select the "Material Usage Variance by BOM Item" option. The following screen will appear:
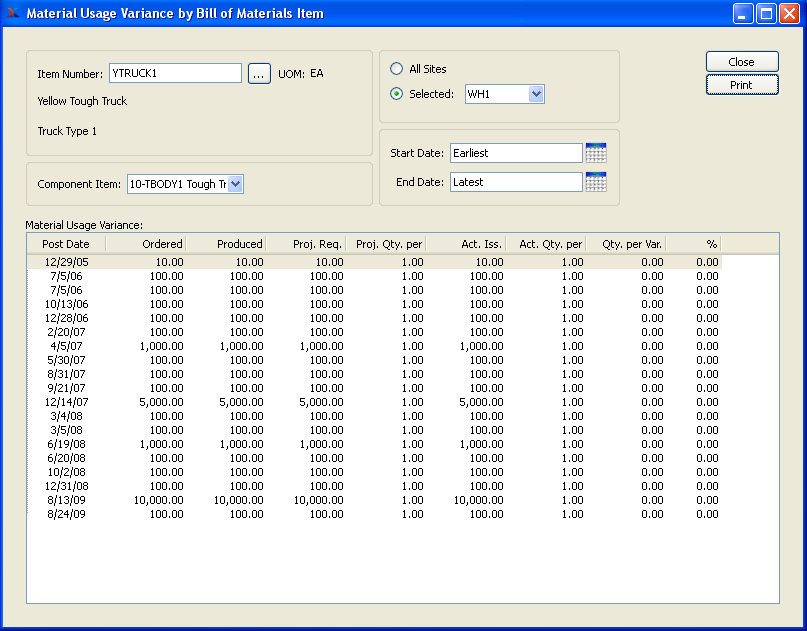
When viewing material usage variances by Bill of Materials Item, you are presented with the following options:
- Item Number
Enter the Item Number of the Item whose component Items will have their material usage variances displayed.
- UOM
Inventory Unit of Measure.
- Component Item
Select desired component Item listed on the parent Item's Bill of Materials.
- All Sites
Select to display material usage variances by Bill of Materials Item for all Sites.
- Selected
Specify Site whose material usage variances by Bill of Materials Item you want to display.
- Start Date
Material usage variances by Bill of Materials Item generated on or after this date will be displayed.
- End Date
Material usage variances by Bill of Materials Item generated on or before this date will be displayed.
- Material Usage Variance
Display lists material usage variances by Bill of Materials Item, using the specified parameters.
To the far right of the screen, the following buttons are available:
- CLOSE
Closes the screen, returning you to the application desktop.
Runs the report associated with this screen.
To view material usage variances by component Item, select the "Material Usage Variance by Component Item" option. The following screen will appear:
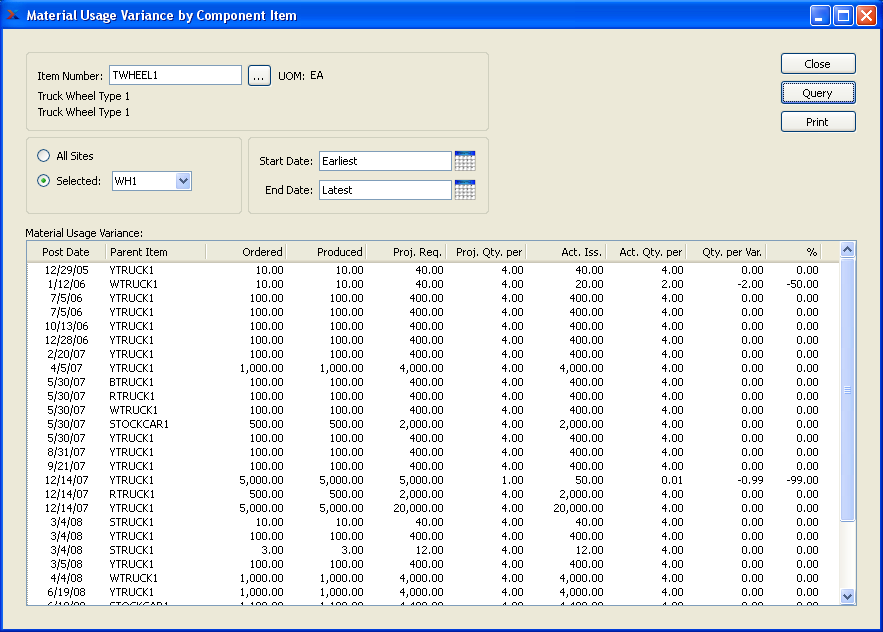
When viewing material usage variances by Item, you are presented with the following options:
- Item Number
Enter the Item Number of the component Item whose material usage variances you want to view.
- UOM
Inventory Unit of Measure.
- All Sites
Select to display material usage variances by component Item for all Sites.
- Selected
Specify Site whose material usage variances by component Item you want to display.
- Start Date
Material usage variances by component Item generated on or after this date will be displayed.
- End Date
Material usage variances by component Item generated on or before this date will be displayed.
- Material Usage Variance
Display lists material usage variances by component Item, using the specified parameters.
To the far right of the screen, the following buttons are available:
- CLOSE
Closes the screen, returning you to the application desktop.
- QUERY
Select to generate the display, using the specified parameters.
Runs the report associated with this screen.
To view material usage variances by Work Order, select the "Material Usage Variance by Work Order" option. The following screen will appear:
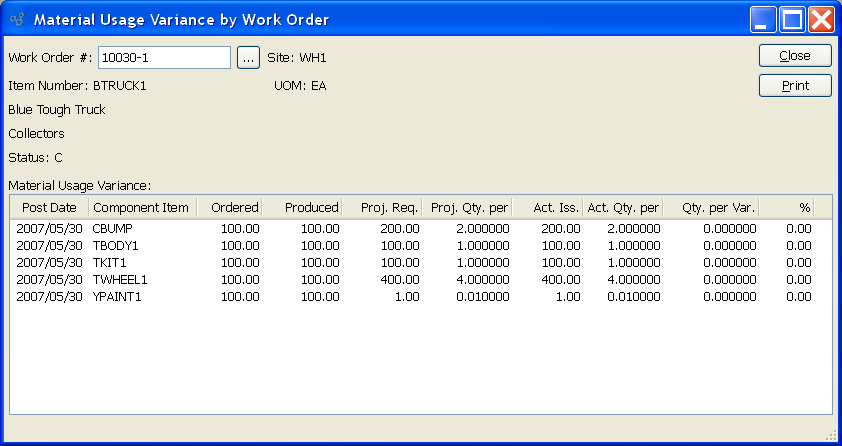
When displaying material usage variances by Work Order, you are presented with the following options:
- Work Order #
Enter the Work Order Number of the Work Order whose material usage variances you want to view.
- Site
Displays Site code automatically when Work Order Number is entered into "Work Order #" field.
- Item Number
Displays Item Number automatically when Work Order Number is entered into "Work Order #" field.
- UOM
Inventory Unit of Measure.
- Status
Displays Work Order Status automatically when Work Order Number is entered into "Work Order #" field.
- Material Usage Variance
Display lists material usage variances by Work Order, using the specified parameters.
To the far right of the screen, the following buttons are available:
- CLOSE
Closes the screen, returning you to the application desktop.
Runs the report associated with this screen.
Labor Variance Reports section.
To view labor variances by Work Center, select the "Labor Variance by Work Center" option. The following screen will appear:
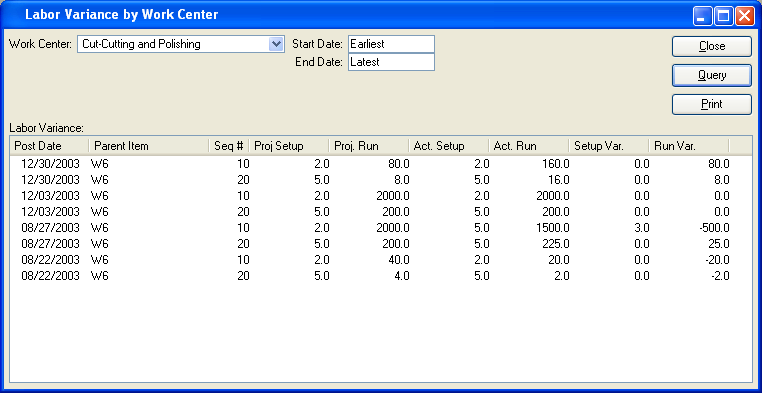
When viewing labor variances by Work Center, you are presented with the following options:
- Work Center
Specify Work Center whose labor variances you want to display.
- Start Date
Labor variances by Work Center generated on or after this date will be displayed.
- End Date
Labor variances by Work Center generated on or before this date will be displayed.
- Labor Variance
Display lists labor variances by Work Center, using the specified parameters.
To the far right of the screen, the following buttons are available:
- CLOSE
Closes the screen, returning you to the application desktop.
- QUERY
Select to generate the display, using the specified parameters.
Runs the report associated with this screen.
To view labor variances by Item, select the "Labor Variance by Item" option. The following screen will appear:
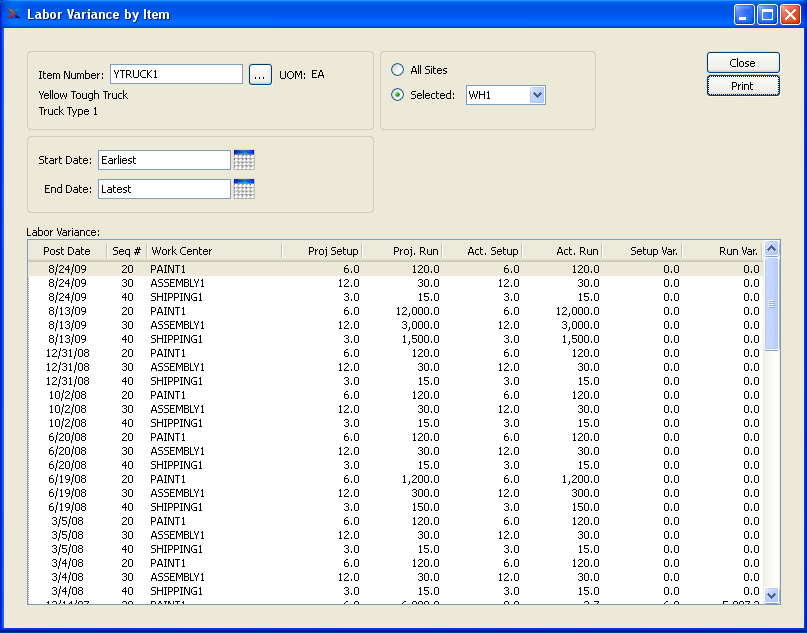
When viewing labor variances by Item, you are presented with the following options:
- Item Number
Enter the Item Number of the Item whose labor variances by Item you want to view. The browse button located to the right of the field leads to a searchable list of make and buy items.
- UOM
Inventory Unit of Measure.
- Start Date
Labor variances by Item generated on or after this date will be displayed.
- End Date
Labor variances by Item generated on or before this date will be displayed.
- All Sites
Select to display labor variances by Item for all Sites.
- Selected
Specify Site whose labor variances by Item you want to display.
- Labor Variance
Display lists labor variances by Item, using the specified parameters.
To the far right of the screen, the following buttons are available:
- CLOSE
Closes the screen, returning you to the application desktop.
Runs the report associated with this screen.
To view labor variances by Bill of Operations Item, select the "Labor Variance by BOO Item" option. The following screen will appear:
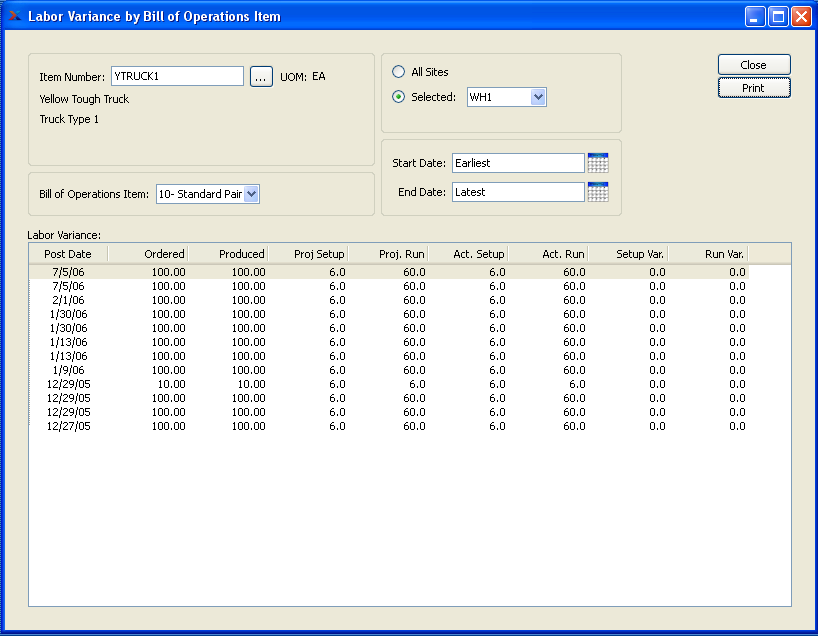
When viewing labor variances by Bill of Operations Item, you are presented with the following options:
- Item Number
Enter the Item Number of the Item whose labor variances by Bill of Operations Item you want to view.
- UOM
Inventory Unit of Measure.
- Bill of Operations Item
Select desired Bill of Operations Item listed on the parent Item's Bill of Operations.
- All Sites
Select to display labor variances by Bill of Operations Item for all Sites.
- Selected
Specify Site whose labor variances by Bill of Operations Item you want to display.
- Start Date
Labor variances by Bill of Operations Item generated on or after this date will be displayed.
- End Date
Labor variances by Bill of Operations Item generated on or before this date will be displayed.
- Labor Variance
Display lists labor variances by Bill of Operations Item, using the specified parameters.
To the far right of the screen, the following buttons are available:
- CLOSE
Closes the screen, returning you to the application desktop.
Runs the report associated with this screen.
To view labor variances by Work Order, select the "Labor Variance by Work Order" option. The following screen will appear:
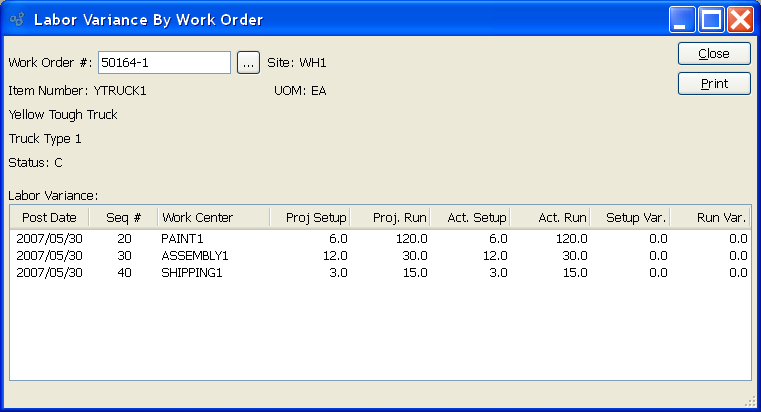
When displaying labor variances by Work Order, you are presented with the following options:
- Work Order #
Enter the Work Order Number of the Work Order whose labor variances you want to view.
- Site
Displays Site code automatically when Work Order Number is entered into "Work Order #" field.
- Item Number
Displays Item Number automatically when Work Order Number is entered into "Work Order #" field.
- UOM
Inventory Unit of Measure.
- Status
Displays Work Order Status automatically when Work Order Number is entered into "Work Order #" field.
- Labor Variance
Display lists labor variances by Work Order, using the specified parameters.
To the far right of the screen, the following buttons are available:
- CLOSE
Closes the screen, returning you to the application desktop.
Runs the report associated with this screen.
Breeder Distribution Variance Reports section.
A Breeder Item is an Item from which other Items—or by-products—are produced. To view breeder distribution variances by Site, select the "Breeder Distribution Variance by Site" option. The following screen will appear:
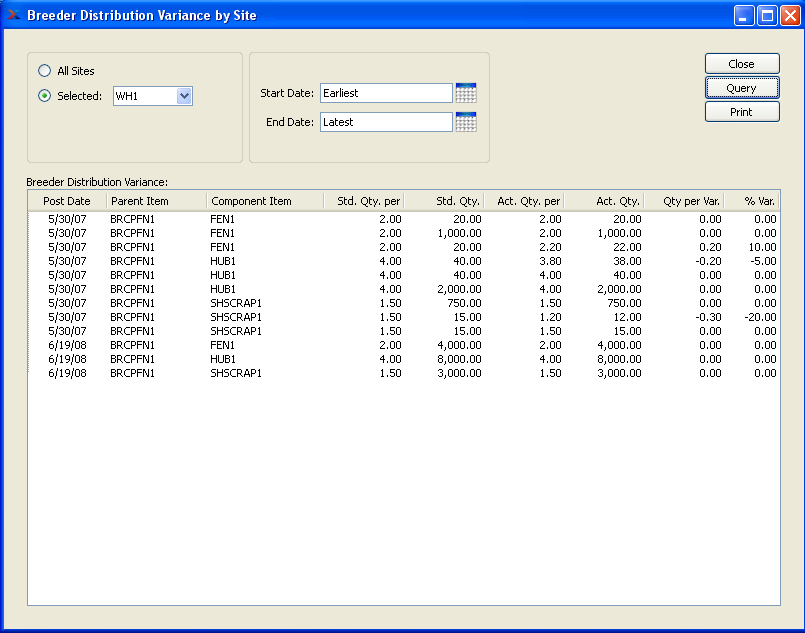
When viewing breeder distribution variances by Site, you are presented with the following options:
- All Sites
Select to display breeder distribution variances for all Sites.
- Selected
Specify Site whose breeder distribution variances you want to display.
- Start Date
Breeder distribution variances by Site generated on or after this date will be displayed.
- End Date
Breeder distribution variances by Site generated on or before this date will be displayed.
- Breeder Distribution Variance
Display lists breeder distribution variances by Site, using the specified parameters.
To the far right of the screen, the following buttons are available:
- CLOSE
Closes the screen, returning you to the application desktop.
- QUERY
Select to generate the display, using the specified parameters.
Runs the report associated with this screen.
A Breeder Item is an Item from which other Items—or by-products—are produced. To view breeder distribution variances by Item, select the "Breeder Distribution Variance by Item" option. The following screen will appear:

When viewing breeder distribution variances by Item, you are presented with the following options:
- Item Number
Enter the Item Number of the Item whose breeder distribution variances by Item you want to view.
- UOM
Inventory Unit of Measure.
- All Sites
Select to display breeder distribution variances by Item for all Sites.
- Selected
Specify Site whose breeder distribution variances by Item you want to display.
- Start Date
Breeder distribution variances by Item generated on or after this date will be displayed.
- End Date
Breeder distribution variances by Item generated on or before this date will be displayed. Runs the report associated with this screen.
- Breeder Distribution Variance
Display lists breeder distribution variances by Item, using the specified parameters.
To the far right of the screen, the following buttons are available:
- CLOSE
Closes the screen, returning you to the application desktop.
- QUERY
Select to generate the display, using the specified parameters.
Runs the report associated with this screen.
Open Work Orders Reports section.
To view open Work Orders whose parent Sales Orders are closed, select the "Open Work Orders with Closed Parent Sales Orders" option. The following screen will appear:
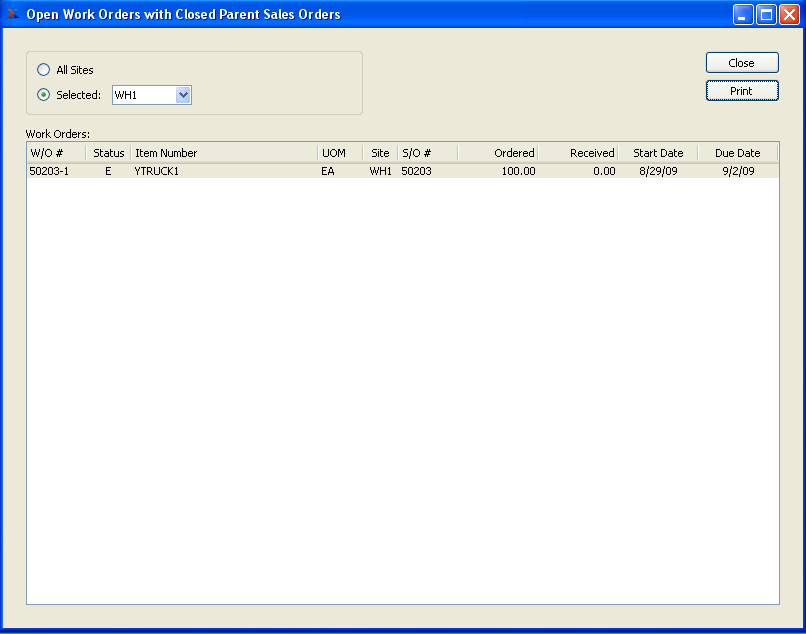
When displaying open Work Orders whose parent Sales Orders are closed, you are presented with the following options:
- All Sites
Select to display open Work Orders with closed parent Sales Orders for all Sites.
- Selected
Specify Site whose open Work Orders with closed parent Sales Orders you want to display.
- Work Orders
Display lists open Work Orders with closed parent Sales Orders, using the specified parameters.
To the far right of the screen, the following buttons are available:
- CLOSE
Closes the screen, returning you to the application desktop.
Runs the report associated with this screen.
To view the relationship between Sales Orders and the open Work Orders they are associated with, select the "Open Work Orders with Parent Sales Orders" option. The following screen will appear:

When displaying open Work Orders having parent Sales Orders, you are presented with the following options:
- All Sites
Select to display open Work Orders with parent Sales Orders for all Sites.
- Selected
Specify Site whose open Work Orders with parent Sales Orders you want to display.
- Work Orders
Display lists open Work Orders with parent Sales Orders, using the specified parameters.
To the far right of the screen, the following buttons are available:
- CLOSE
Closes the screen, returning you to the application desktop.
Runs the report associated with this screen.