Projects provide a mechanism for linking Orders which share a common thread. Through the use of Projects, you can create and then track the relationship between all related Sales Orders, Work Orders, and Purchase Orders generated to meet Sales Order demand. At the Project level, you also have the ability to enter descriptive information, as well as to-do items (i.e., Tasks) related to the Project.
Projects can be created manually or automatically, depending on your needs. To have Projects created automatically whenever a new Sales Order or Quote is entered, choose the appropriate setting in your system-level configuration. Otherwise, Projects will be created manually. Once created, Projects can be linked to Sales Orders, Work Orders, and Purchase Orders.
To create a new Project, select the "New Project" option. The following screen will appear:
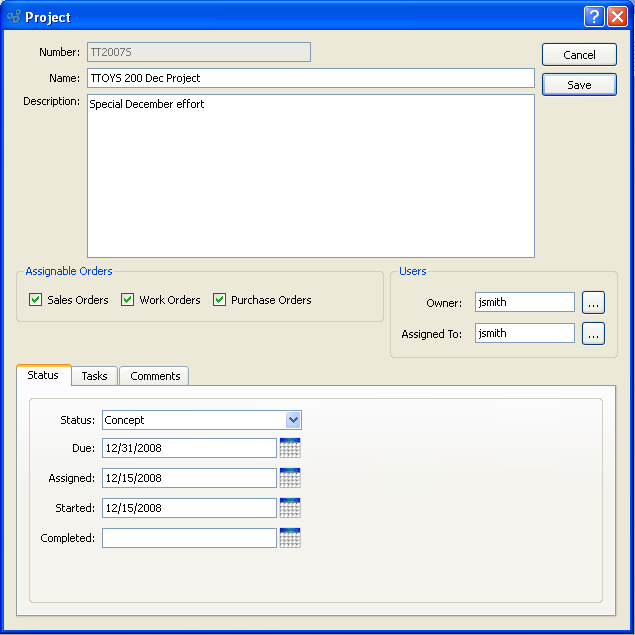
When creating a new Project, you are presented with the following options:
- Number
Enter a code to identify the Project.
- Name
Enter a brief name to identify the Project.
- Description
Enter a description to identify the Project.
- Assignable Orders
Specify which of the following Order types can be linked to the Project.
- Sales Orders
Select to indicate Sales Orders may be linked to the Project.
- Work Orders
Select to indicate Work Orders may be linked to the Project.
- Purchase Orders
Select to indicate Purchase Orders may be linked to the Project.
- Users
Identify which users are associated with this project.
- Owner
Select Project Owner.
- Assigned To
Identify who this Project has been Assigned to.
- Status
Specify status details regarding schedule.
- Status
Specify one of the following statuses to characterize the Project:
- Concept
Use this status to indicate the Project has not yet begun.
- In-Process
Use this status to indicate the Project is in-process.
- Complete
Use this status to indicate the Project is complete.
Note
Projects generated automatically when a new Sales Order or Quote is entered will be assigned the status "Undefined" at first. To remove this initial status, simply edit a Project and assign an appropriate status to it.
- Due
Date project is due.
- Assigned
Date project was assigned.
- Started
Date project was actually started.
- Completed
Date project was actually completed.
To the far right of the screen, the following buttons are available:
- CANCEL
Closes the screen, returning you to the application desktop.
- SAVE
Creates the new Project and adds it to the master list of Projects.
To add Tasks related to a Project, select the "Tasks" tab. The following screen will appear:
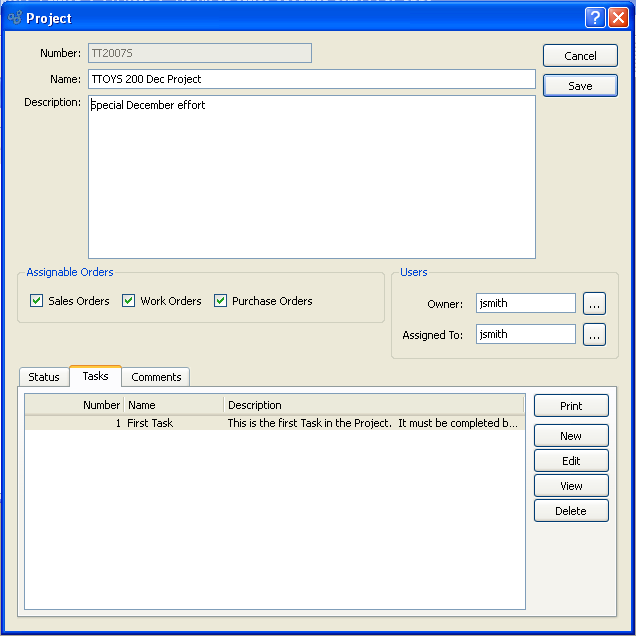
- Tasks
Displays any Tasks associated with the Project.
To the far right of the screen, the following buttons are available:
Prints a copy of the Task list.
- NEW
Opens screen for creating a new Task.
- EDIT
Enables you to edit highlighted Task. The edit screen is the same as that for creating a new Task—except that when editing, the fields will contain Task information. Double-clicking on a Task will also bring you to the editing screen.
- VIEW
Highlight a Task and then select this button to reach a read-only view of the "Edit" screen.
- DELETE
Highlight a Task and then select this button to remove the Task from the master list.
To add Comments related to a Project, select the "Comments" tab. The following screen will appear:

When adding or reviewing Comments, you are presented with the following options:
- Verbose Text
Select to display all Comments in the list in an expanded view which includes the entire text of each Comment. To edit a Comment, simply select the "Edit" link next to the Comment. That link will not be shown for Changelog Comments, which can't be edited. If the "Verbose Text" option is not selected, the Comment list will display only header level information for each Comment.
- Comments
Display lists Comments related to the record.
To the far right of the screen, the following buttons are available:
- NEW
Opens screen for creating a new Comment.
- VIEW
Highlight a Comment and then select this button to reach a read-only view of the "Edit" screen.
- EDIT
Enables you to edit highlighted Comments—as long as the Comments are not "ChangeLog" Comments. ChangeLog Comments are system-generated and may not be edited. The edit screen is the same as that for creating a new Comment—except that when editing, the fields will contain Comment information. Double-clicking on a Comment will also bring you to the editing screen.
To enter a new Comment, select the NEW button. The following screen will appear:
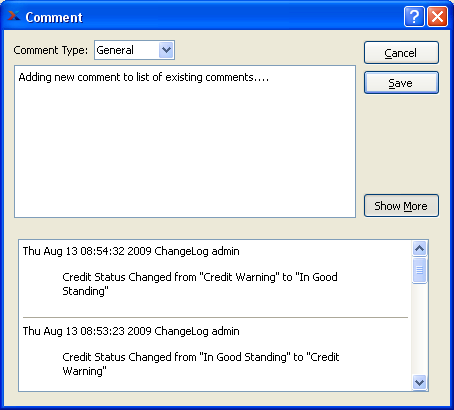
- Comment Type
Select a Comment Type from the drop-down list to classify the Comment. This is a required step. Comment Types may be system-defined (i.e., "ChangeLog" and "General") or user-defined, as described in Section 13.12, “Comment Types”. Once you have specified a Comment Type, begin typing your Comment in the main text area. The text area features word-wrapping and scroll-bar support for longer Comments.
To the far right of the screen, the following buttons are available:
- CANCEL
Closes the screen without creating the Comment, returning you to the previous screen.
- SAVE
Creates the Comment and adds it to the list of Comments.
- SHOW MORE
Select to show the complete list (i.e., "thread") of Comments associated with the record. To hide the list, simply select the SHOW MORE button again. The Comment thread will show the most recent Comment first.
To create a new Task, select the NEW button. The following screen will appear:

When creating a new Task, you are presented with the following options:
- Number
Enter a code to identify the Task.
- Status
Specify one of the following statuses to characterize the Task:
- Concept
Use this status to indicate the Task has not yet begun.
- In-Process
Use this status to indicate the Task is in-process.
- Complete
Use this status to indicate the Task is complete.
- Name
Enter a brief name to identify the Task.
- Description
Enter a description to identify the Task.
- Owner
Select Task Owner.
- Assigned to
Select who the Task was assigned to.
- Hours
Specify the number of hours associated with the Task using the following fields:
- Budgeted
Enter the number of hours budgeted for the Task. This information may be saved and updated later.
- Actual
Enter the actual number of hours consumed performing the Task. This information may be saved and updated later.
- Balance
Displays the difference between the budgeted and actual hours.
- Expenses
Specify the Expenses associated with the Task using the following fields:
- Budgeted
Enter the total Expenses budgeted for the Task. This information may be saved and updated later.
- Actual
Enter the actual Expenses incurred while performing the Task. This information may be saved and updated later.
- Balance
Displays the difference between the budgeted and actual Expenses.
- Due
Date Task is due.
- Assigned
Date task was assigned.
- Started
Date Task actually started.
- Completed
Date Task was actually completed.
To the far right of the screen, the following buttons are available:
- CANCEL
Closes the screen, returning you to the previous screen.
- SAVE
Creates the new Task and adds it to the Project's list of Tasks.
To add an Alarm related to a Task, select the "Alarms" tab. The following screen will appear:
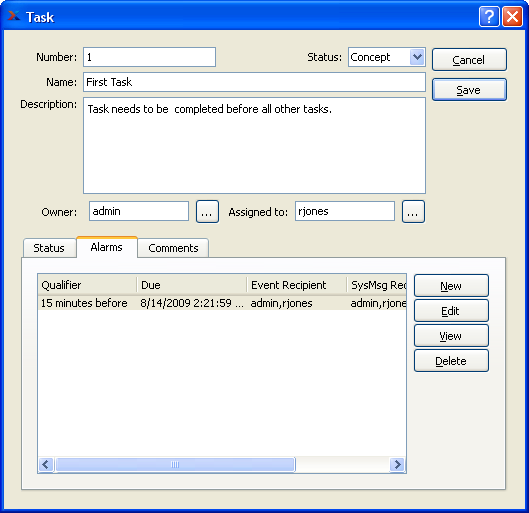
When adding an Alarm, you are presented with the following options:
- Alarms
Displays a list of Alarms you can create to send reminders to various users associated with an event or system message.
To the far right of the screen, the following buttons are available:
- NEW
Opens screen for entering new Alarm information.
- EDIT
Enables you to edit highlighted Alarm. The edit screen is the same as that for entering new Alarm information—except that when editing, the fields will contain Alarm information.
- VIEW
Highlight an Alarm and then select this button to reach a read-only view of the "Edit" screen. Double-clicking on an Alarm will also bring you to the view screen.
- DELETE
Highlight an Alarm Item and then select this button to remove the Alarm Item from the list.
To add Comments to a Task, select the "Comments" tab. The following screen will appear:
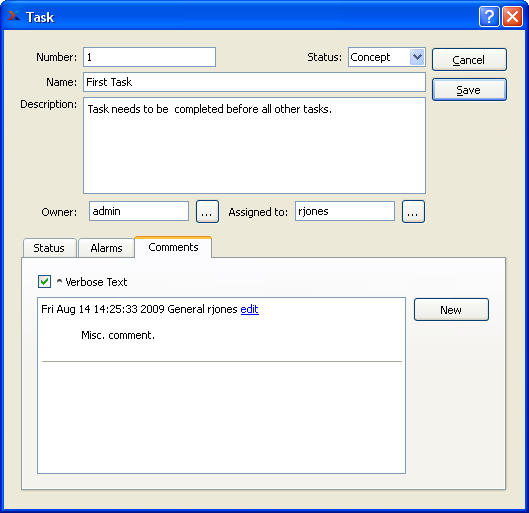
When adding or reviewing Comments, you are presented with the following options:
- Verbose Text
Select to display all Comments in the list in an expanded view which includes the entire text of each Comment. To edit a Comment, simply select the "Edit" link next to the Comment. That link will not be shown for Changelog Comments, which can't be edited. If the "Verbose Text" option is not selected, the Comment list will display only header level information for each Comment.
- Comments
Display lists Comments related to the record.
To the far right of the screen, the following buttons are available:
- NEW
Opens screen for creating a new Comment.
- VIEW
Highlight a Comment and then select this button to reach a read-only view of the "Edit" screen.
- EDIT
Enables you to edit highlighted Comments—as long as the Comments are not "ChangeLog" Comments. ChangeLog Comments are system-generated and may not be edited. The edit screen is the same as that for creating a new Comment—except that when editing, the fields will contain Comment information. Double-clicking on a Comment will also bring you to the editing screen.
To enter a new Comment, select the NEW button. The following screen will appear:
- Comment Type
Select a Comment Type from the drop-down list to classify the Comment. This is a required step. Comment Types may be system-defined (i.e., "ChangeLog" and "General") or user-defined, as described in Section 13.12, “Comment Types”. Once you have specified a Comment Type, begin typing your Comment in the main text area. The text area features word-wrapping and scroll-bar support for longer Comments.
To the far right of the screen, the following buttons are available:
- CANCEL
Closes the screen without creating the Comment, returning you to the previous screen.
- SAVE
Creates the Comment and adds it to the list of Comments.
- SHOW MORE
Select to show the complete list (i.e., "thread") of Comments associated with the record. To hide the list, simply select the SHOW MORE button again. The Comment thread will show the most recent Comment first.
To create a new Alarm, select the NEW button. The following screen will appear:
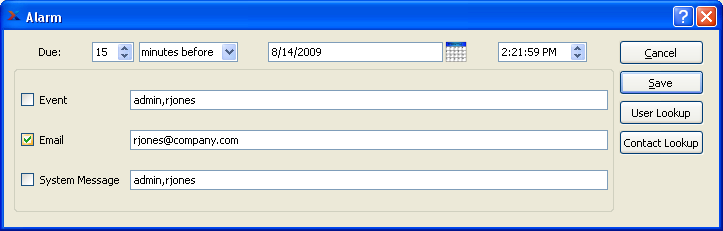
When creating a new Alarm you are presented with the following options:
- Due
Add the date and time for which you want the Alarm to alert specific users and contacts.
- Event
Select if you would like an event to trigger the Alarm. You may select from an unlimited list of users to be notified.
Select if you would like an Email notification to be sent as an alarm. You may select from an unlimited list of users to be notified.
- System Message
Select if you would like a system message to be issued as an alarm. You may select from an unlimited list of users to be notified.
To the far right of the screen, the following buttons are available:
- CANCEL
Closes the screen without creating an Alarm, returning you to the previous screen.
- SAVE
Creates the Alarm and adds it to the list of Alarms.
- USER LOOKUP
Allows you to choose unlimited number of users created in the system.
- CONTACT LOOKUP
Allows you to choose from unlimited number of contacts created in the system.
To access the master list of Projects, select the "Projects" option. The following screen will appear:
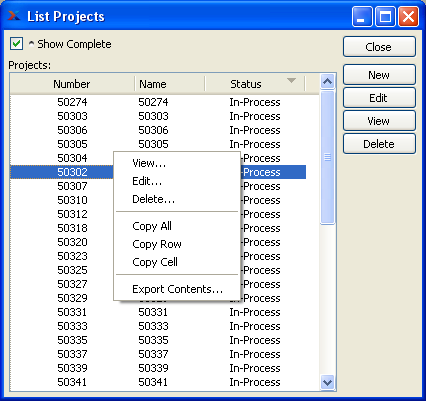
The "Projects" screen displays information on all existing Projects, including Project Number, Project name, and Project status. Select the "Show Complete" option to include completed Projects in the list.
To the far right of the screen, the following buttons are available:
- CLOSE
Closes the screen, returning you to the application desktop.
- NEW
Opens screen for creating a new Project.
- EDIT
Enables you to edit highlighted Projects. The edit screen is the same as that for creating a new Project—except that when editing, the fields will contain Project information. Double-clicking on a Project line will also bring you to the editing screen.
- VIEW
Highlight a Project and then select this button to reach a read-only view of the "Edit" screen.
- DELETE
Highlight a Project and then select this button to remove the Project from the master list