Billing section.
Invoice section.
An uninvoiced shipment is a shipment having one or more uninvoiced Sales Order Line Items. To invoice a Sales Order Line Item, select the Order for billing and specify an Invoice amount for the Item. Once the Invoice is printed and then posted, the selected Line Item will be considered invoiced. To view a list of Uninvoiced Shipments, select the "Uninvoiced Shipments" option. The following screen will appear:

When displaying Uninvoiced Shipments, you are presented with the following options:
- All Sites
Select to display Uninvoiced Shipments for all Sites.
- Selected
Specify Site whose Uninvoiced Shipments you want to display.
- Only Show Unselected Shipments
Select to show only shipments which have not yet been selected for billing.
- Uninvoiced Shipments
Display lists Uninvoiced Shipments.
To the far right of the screen, the following buttons are available:
- CLOSE
Closes the screen, returning you to the application desktop.
Runs the report associated with this screen.
This utility enables you to select groups of shipped Orders for billing in one operation. When used, the full Order quantity of shipped Orders will be selected for billing. You may later change the billing details for individual Line Items using the right-click menu on the Billing Edit List. All selected Orders will appear on the Billing Edit List after the Select All Shipped Orders for Billing utility is run. This approach differs from the approach used by the Select Order for Billing utility, which requires you to manually enter billing details for individual Orders. To select multiple shipped Orders for billing, select the "Select All Shipped Orders for Billing" option. The following screen will appear:

Note
When you select an Order for billing, you are indicating that you wish to create an Invoice for the Order.
When selecting multiple shipped Orders for billing, you are presented with the following options:
- All Customer Types
Choose to select all Customer Types for billing.
- Selected
Specify the Customer Type you want to select for billing.
- Pattern
Enter a Customer Type pattern to select a range of Customer Types. Refine your search using Regular Expressions.
- All Sites
Choose to select all Shipped Orders for billing for all Sites.
- Selected
Specify Site whose Shipped Orders you want to select for billing.
To the far right of the screen, the following buttons are available:
- CANCEL
Closes the screen without selecting Shipped Orders for billing, returning you to the application desktop.
- SELECT
Selects all shipped Orders for billing.
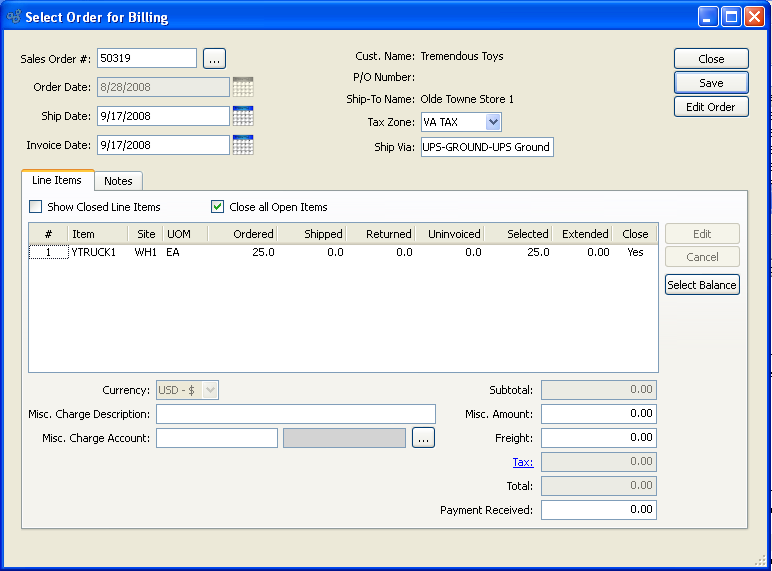
This utility enables you to manually enter billing details for individual Sales Order Line Items. Both shipped Orders and unshipped Line Items may be selected for billing in this manner. This individualized approach differs from the approach taken by the Select All Shipped Orders for Billing utility, which by default selects for billing the full Line Item quantities for all shipped Orders. To select an individual shipped Order for billing, select the "Select Order for Billing" option. The following screen will appear:
Note
When you select an Order for billing, you are indicating that you wish to create an Invoice for the Order. Invoice Numbers are assigned when an Invoice is printed.
When selecting an Order for billing, you are presented with the following options:
- Sales Order #
Enter the Sales Order Number of the Sales Order you want to select for billing.
- Order Date
Displays the original Sales Order date.
- Ship Date
By default, the most-recent ship date will appear in the field. You may override the default value by entering ship date information manually.
- Invoice Date
By default, the current (today"s) date will appear in the field. You may override the default value by entering Invoice date information manually.
- Cust. Name
Name: Displays Customer's name.
- P/O Number
Displays purchase for the specified Sales Order. Indicates the Customer Purchase Order Number assigned to the specified Sales Order.
- Ship-To Name
Displays Ship-To name.
- Tax Zone
Specify the Tax Zone associated with the Sales Order. The Tax Zone for the specified Ship-To Address will be entered here by default. Otherwise, the primary Tax Zone for the Customer will be entered.
- Ship Via
By default, the preferred Ship Via method for specified Customer will appear in the field. You may enter a free-form Ship Via simply by typing the name of the Ship Via into the field. Default Ship Vias may be defined at the system level.
Tip
The system supports up-to-date shipment tracking with links to the websites of many leading shipping companies (i.e., "Ship Vias").
- Show Closed Line Items
Select to show closed Line Items in the "Line Items" display.
- Close all Open Items
Select to close all open Sales Order Line Items.
- Line Items
Displays the Sales Order Line Items selected for billing. Double-clicking on a Line Item—or highlighting it and selecting the EDIT SELECTION button—enables you to select a billing quantity for that Item.
Note
In the Line Items display, the Uninvoiced column refers to quantity that has been shipped but not yet invoiced. Quantity must have been shipped to appear in the Uninvoiced column. If no quantity has been shipped, then no quantity will appear as uninvoiced.
- Subtotal
Displays the subtotal for the Sales Order Line Items.
- Sales Tax
Displays the amount of Tax that will be added to the Sales Order, as defined by the specified Tax Code. To get a detailed view of the Tax calculation, click on the Tax link using your mouse.
- Misc. Charge Amount
Enter the amount of the miscellaneous charge. Before entering a miscellaneous charge amount, you must first assign the charge to a Sales Account and also enter a description of the charge.
- Misc. Charge Description
Enter a description to identify the miscellaneous charge.
- Misc. Charge Sales Account
Enter a Sales Account to assign the miscellaneous charge to.
- Freight
Enter the amount of freight charge to be added to the specified Order. The freight charge may be entered during the creation or modification of a Sales Order—or at the time of shipment.
Note
The Payment Received field is an optional field which may be used to provide visibility into prepaid amounts. Because the field exists for visual purposes only, entering an amount in this field will not affect the amount due. The only way an Invoice may be offset is through the application of a Cash Receipt or a Credit Memo.
- Total
Displays the total amount of all uninvoiced Sales Orders.
- Payment Received
Enter the amount of payment received against the specified Sales Order, if any. This amount will appear on any resulting Invoice, but will not be posted as a credit against the Invoice.
To the far right of the screen, the following buttons are available:
- CLOSE
Closes the screen without selecting the Order for billing, returning you to the previous screen.
- SAVE
Saves the information you specified in the screen and selects the Order for billing, creating an Invoice in the process.
- EDIT ORDER
Brings you to the Sales Order screen, where you may edit the specified Sales Order. The Sales Order screen is described at length in Section 2.1, “New Sales Order”.
- EDIT
Enables you to specify or edit the billing quantity for the highlighted Line Item. Double-clicking on a Line Item will also bring you to the billing quantity edit screen.
- CANCEL
Removes previously entered billing quantity from a selected Line Item.
- SELECT BALANCE
Highlight a Line Item, then select this button to transfer the full balance to Billing.
When the Notes tab is clicked, the screen will appear as follows:
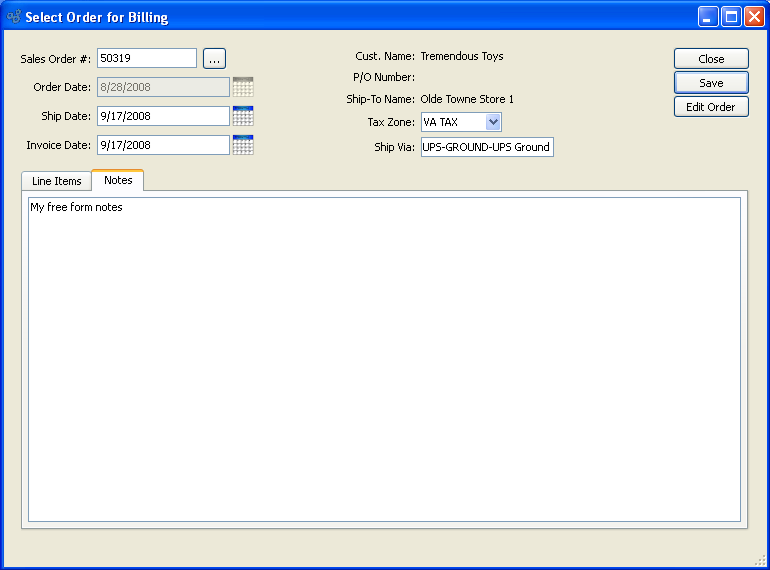
- Notes
This is a scrolling text field with word-wrapping for entering Notes related to the Sales Order selected for billing. Notes entered on this screen will follow the Order through the billing process. For example, you may view notes associated with a posted Invoice within the Invoice Information report.
To specify billing quantities for Line Items in the "Select Order for Billing" screen, double-click on a Line Item in the "Line Items" display—or highlight the Line Item and select the EDIT SELECTION button. The following screen will appear:
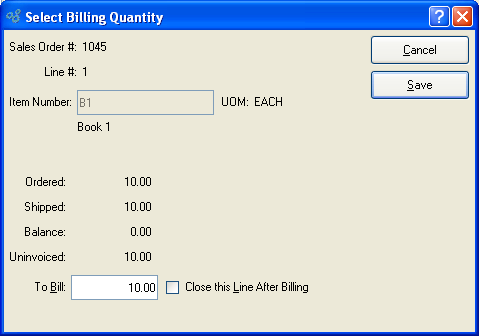
When selecting the billing quantity for a Line Item, you are presented with the following options:
- Sales Order #
Displays Sales Order Number.
- Line #
Displays Sales Order Line Item Number.
- Item Number
Displays Item Number of Line Item.
- UOM
Inventory Unit of Measure.
- Ordered
Displays quantity ordered.
- Shipped
Displays quantity shipped.
- Balance
Displays remaining quantity to be shipped.
- Uninvoiced
Displays uninvoiced quantity.
- To Bill
Enter the quantity you want to select for billing.
- Close this Line After Billing
Select to close the specified Line Item after billing.
Tip
If you are shipping a partial quantity to a Customer, be sure to leave the "Close this Line After Billing" option unchecked. This will ensure the Sales Order Item remains open until the full quantity has been shipped.
To the far right of the screen, the following buttons are available:
- CANCEL
Closes the screen without selecting a billing quantity, returning you to the previous screen.
- SAVE
Selects the specified quantity for billing, returning you to the previous screen.
To edit an Order selected for billing, or to view detailed information about selected Orders, choose the "Billing Edit List" option. The following screen will appear:
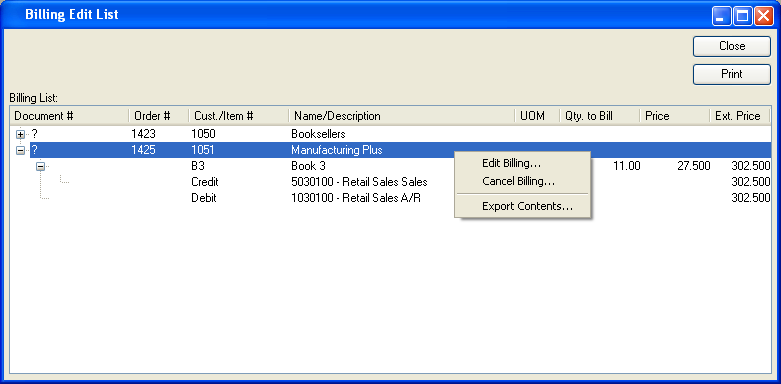
Tip
In cases where a large number of Orders have been selected for billing, data may be slow to display on the Billing Edit List—given the quantity of detail provided. For a faster-loading view of the same Orders, use the Billing Selections list, which provides only higher level details and so loads more quickly.
The Billing Edit List displays details on all Orders selected for billing. The display is a nested list, with a plus ("+") sign located to the far left of the screen next to each line that may be expanded to lower levels. By clicking your mouse on a plus sign, you reveal lower levels of information related to the Order.
Tip
If a Billing record displays in red type, this means an Account Assignment is missing for the Customer Type in question. To correct the problem, check your Sales Account and Accounts Receivable Assignments. Once the Assignments are in place, the record will display in black type.
To the far right of the screen, the following buttons are available:
- CLOSE
Closes the screen, returning you to the application desktop.
Runs the report associated with this screen.
To edit Orders selected for billing and to create Invoices for these Orders, select the "Billing Selections" option. The following screen will appear:
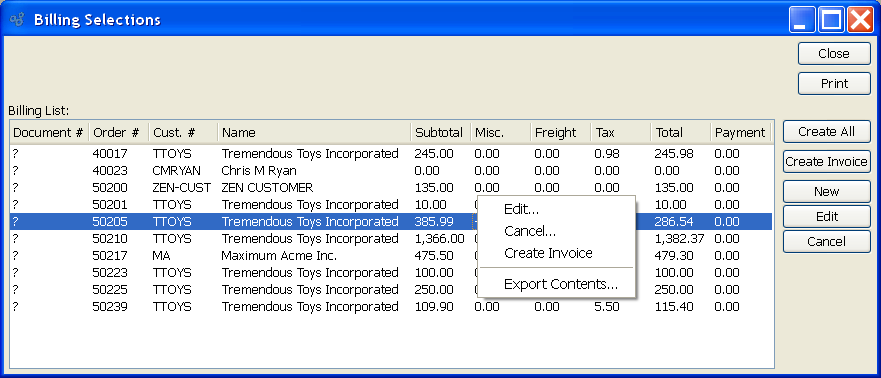
Tip
Because less detailed information is shown, the Billing Selections list will load more quickly than the Billing Edit List. The amount of detail is the only difference between the two lists. Both show the same Orders selected for billing.
The Billing Selections list displays Orders selected for billing.
To the far right of the screen, the following buttons are available:
- CLOSE
Closes the screen, returning you to the application desktop.
Runs the report associated with this screen.
- CREATE ALL
Select to create Invoices for all Orders on the list.
Note
When you convert an Order selected for billing to an Invoice, you create an unposted Invoice. Unposted Invoices must in turn be posted to generate associated General Ledger (G/L) transaction records. You can reverse the process of Invoice creation by deleting the unposted Invoice.
- CREATE INVOICE
Highlight an individual Order, then select this button to create an Invoice for the selected Order.
- NEW
Opens screen for selecting a new Order for billing.
- EDIT
Enables you to edit highlighted billing selections. The edit screen is the same as that for selecting a new Order for billing—except that when editing, the fields will contain billing information. Double-clicking on a billing selection will also bring you to the editing screen.
Note
Users may be restricted from editing billing selections if they are granted the privilege "RestrictSelectOrderEditing."
To create an Invoice, an Order selected for billing must first be posted. Once the Order selected for billing is posted, an Invoice for that selected Order is created. To post Orders selected for billing in batch mode, select the "Post Billing Selections" option. The following screen will appear:
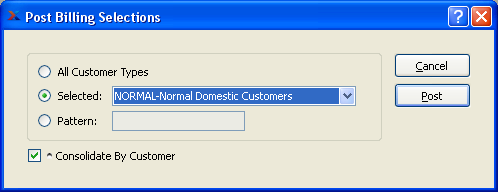
When posting billing selections, you are presented with the following options:
- All Customer Types
Select to post billing selections for all Customer Types.
- Selected
Specify Customer Type whose billing selections you want to post.
- Pattern
Enter a Customer Type pattern to select a range of Customer Types. Refine your search using Regular Expressions.
- Consolidate by Customer
Select to cause all Sales Orders selected for billing to be consolidated on one Invoice by Customer. Keep in mind, though, that to be consolidated the Orders must have matching criteria (e.g., Billing, Tax, Sales Rep information). If the criteria do not match, then non-conforming Orders will not be consolidated. (Separate Invoices will be created for them instead.) If only a single Order exists, at all or in a group, then it will be posted as a single Invoice. Consolidated Orders are given a combined header, and the Line Items are attached to the Invoice in no particular order. Line Items themselves are never consolidated (i.e., you can have two lines for the same Item). In addition, Invoice Line Items have a reference back to their original Sales Order Item.
To the far right of the screen, the following buttons are available:
- CANCEL
Closes the screen without posting billing selections, returning you to the application desktop.
- POST
Select this button to post all Orders selected for billing.
When Orders selected for billing are posted, Invoices are created for the billing selections.
To edit or post Orders selected for billing, select the "Unposted Invoices" option. The following screen will appear:

Tip
You may select multiple Invoices for printing or posting by highlighting them using your mouse—or a combination of your mouse and either the SHIFT or CTRL keys.
The Unposted Invoices list displays information on all Invoices available for posting. Users with the appropriate privilege will also see the G/L distribution date column.
To the far right of the screen, the following buttons are available:
- CLOSE
Closes the screen, returning you to the application desktop.
- QUERY
Refreshes the screen with latest Invoices.
- NEW
Opens screen for creating a new Invoice.
- EDIT
Enables you to edit highlighted Invoices. The edit screen is the same as that for selecting a new Invoice—except that when editing, the fields will contain Invoice information. Double-clicking on an Invoice will also bring you to the editing screen.
- VIEW
Highlight an Invoice and then select this button to reach a read-only view of the "Edit" screen.
- DELETE
Highlight an Invoice and then select this button to remove the Invoice from the list. Deleting an Invoice causes the source Sales Order to be returned to the Billing Selections list.
Tip
Deleting an Invoice effectively reverses the transaction which created it. In other words, when you delete an Invoice the source Sales Order will be returned to the Billing Selections list. From there, you have the ability to either A) cancel the Billing Selection or B) re-create the Invoice.
Note
If the Customer specified on the Invoice has an EDI Profile attached, you may encounter an EDI processing interface when printing Invoices.
- POST
Highlight one—or multiple—Invoices, then select this button to post the selected Invoice(s). By default, Invoices post to the General Ledger (G/L) on the Invoice date. However, users with the appropriate privilege may change the default G/L distribution date to an alternate date during the Invoice posting process. If used, Invoices will post on the alternate date. The ability privileged users have to change the distribution date applies to the posting of both individual and also batches of Invoices from this screen.
- Print Sales Journal
Select to print the Sales Journal when selected Invoices are posted.
To post Invoices in batch mode, select the "Post Invoices" option. The following screen will appear:
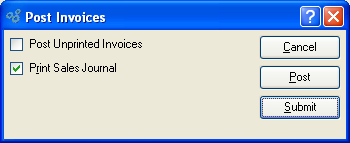
When posting Invoices, you are presented with the following options:
- Post Unprinted Invoices
Select to include unprinted Invoices in the list of Invoices to be posted. If not selected—and if there are unprinted Invoices waiting to be posted—you will be prompted to print the unprinted Invoices before posting may occur.
- Print Sales Journal
Select to print the Sales Journal in addition to posting the Invoices. Sales Journals are assigned a unique identification number, which corresponds to the Invoice batch and the date the batch was posted.
Note
A Sales Journal will also be created for Invoices that are posted individually—that is, not in batch mode, but one at a time. As with batch postings, the Sales Journals for individually-posted Invoices are assigned a unique identification number.
To the far right of the screen, the following buttons are available:
- CANCEL
Closes the screen without posting any Invoices, returning you to the application desktop.
- POST
Posts the Invoices, using the specified parameters.
- SUBMIT
Select to submit the requested action to the Batch Manager.
Sales Order Credit Memos are used to issue credit for sold Inventory. They differ from Accounts Receivable (A/R) Credit Memos, which are issued for non-Inventory purposes. In this section we describe the features of sales Credit Memos.
To create a Credit Memo, select the "New Credit Memo" option. The following screen will appear:

- Memo #
Next available Credit Memo Number will automatically display, unless your system requires you to enter Credit Memo Numbers manually.
Default values and input parameters for Credit Memo Numbers are configurable at the system level.
- Apply To
Specify the Invoice Number of the Invoice you want to apply the Credit Memo to, using the browse button located to the right of the field. The list will include Invoices for the specified Customer. If a Credit Memo is applied to a specific Invoice, the Credit Memo may only credit Items which appeared on the chosen Invoice. If for some reason the Credit Memo is applied to a closed Invoice, the Credit Memo will be listed as an unapplied Credit Memo.
- Memo Date
Enter a date representing the date when you want the Credit Memo to be distributed. When a Credit Memo is posted, it is posted effective as of the Memo date.
Note
You are not required to apply a Credit Memo to a specific Invoice. If a Credit Memo is applied to an Invoice, any Credit Memo Items will be returned to Inventory when the Credit Memo is posted.
- Status
Indicates whether Credit Memo is posted or unposted.
Tip
The quickest way to fill in the Credit Memo screen may be to select the Invoice you intend to credit using the "Apply To" feature. If you use this feature, most of the fields in the Credit Memo screen will automatically populate with the needed Customer information.
- Sales Rep.
Specify the Sales Representative associated with the Order. By default, the Customer's designated Sales Representative will appear in the field—except if you have selected an Invoice to apply the Credit Memo to. In that case, the Sales Representative credited with the Invoice will be selected.
- Tax Zone
Specify the Tax Zone associated with the Credit Memo. The Tax Zone for the specified Ship-To Address will be entered here by default. Otherwise, the primary Tax Zone for the Customer will be entered.
- Commission
By default, the commission percentage recorded on the Customer master will be automatically entered in this field. If for some reason you select a non-default Sales Representative at Credit Memo entry, the commission rate will not change. To adjust the commission rate, you must make the change manually.
- Reason Code
Specify the reason why an adjustment is being made to a Customer's account.
- Place on Hold
Select to place Credit Memo on hold. If a Credit Memo is placed on hold, it cannot be posted. You would place a Credit Memo on hold, for example, to allow time for producing and processing a Return Material Authorization (RMA) document. To remove a hold and allow posting of a Credit Memo, de-select this option.
- Customer #
Enter the Customer Number of the Customer you want to issue the Credit Memo to. The browse button located to the right of the field leads to a searchable Customers list. You may also access this list using the keyboard shortcut "CTRL + L". Once a Customer Number is entered, the Customer name and billing address will display. Select the "?" or "$" symbol next to the browse button to view Customer information for the specified Customer. If a Customer's credit is "In Good Standing," the button will feature a black question mark ("?") icon. If the icon turns to an orange dollar sign ("$"), the Customer's credit Status is "On Credit Warning." A red dollar sign ("$") indicates the Customer's credit Status is "On Credit Hold."
Note
Credit Memos may be entered for inactive Customers. The same does not hold true for Sales Orders.
- Bill-To Name
Displays the Customer's Bill-To name.
- Address
Displays the Customer's Bill-To Address. You may manually override the displayed Address information in the fields below—or use the browse button to select another Address. If a new Address is manually entered here, that Address will be added automatically to the master list of Addresses. For additional documentation related to creating Addresses, see Section 8.1, “ New Address”.
- Copy to Ship-to -\>
Select to copy contents of billing address into Ship-To address field. This option is enabled if the Customer master for the specified Customer indicates that free-form Ship-To's are allowed.
- Ship-To #
Enter the number of the preferred Ship-To Address. Customers may maintain multiple Ship-To Addresses. If the Customer master for the specified Customer indicates that free-form Ship-To's are allowed, then any address may be entered. If free-form Ship-To's are not allowed, then the Ship-To Address must be entered using the browse button located to the right of the field. The browse button leads to a searchable Ship-To Addresses list.
- Ship-To Name
Displays the name for the specified Ship-To.
- Address
Displays the specified Ship-To Address. You may manually override the displayed Address information in the fields below—or use the browse button to select another Address. If a new Address is manually entered here, that Address will be added automatically to the master list of Addresses. For additional documentation related to creating Addresses, see Section 8.1, “ New Address”.
- Ship-To #
Enter the number of the preferred Ship-To Address.
Customers may maintain multiple Ship-To Addresses. If Pricing Schedules by Ship-To are maintained for the Customer, the Ship-To Address must match the Pricing Schedule to successfully issue credit for Items linked exclusively to the Pricing Schedule. The browse button located to the right of the field leads to a searchable Ship-To Addresses list.
Tip
Make sure the Ship-To Address on the Credit Memo matches the Ship-To Address on the Customer's Pricing Schedule. If they don"t match, you won"t be able to issue credit for exclusively sold Items.
- Cust. PO #
By default, the Customer Purchase Order Number associated with the Invoice being credited will display here. If no Customer Purchase Order Number was entered at the time of the original Sales Order—or if the Credit Memo is not being applied to a specific Invoice—the field will remain blank. Enter or edit a Customer Purchase Order Number as necessary.
To the far right of the screen, the following buttons are available:
- SAVE
Creates the new Credit Memo and saves the Credit Memo information.
- CANCEL
Closes the screen without creating a new Credit Memo, returning you to the application desktop.
To create or modify Credit Memo Line Items, select the "Line Items" tab at the top of the "Credit Memo" screen. The following screen will appear:
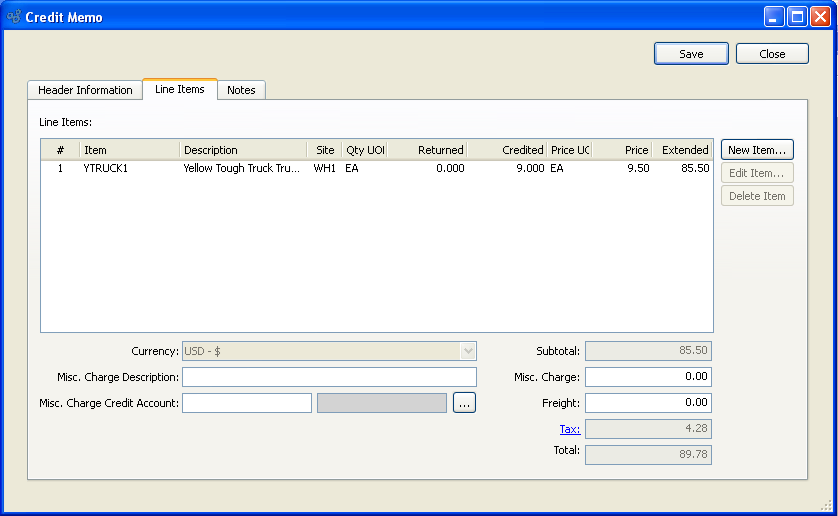
When creating or modifying Credit Memo Line Items, you are presented with the following options:
- Line Items
Display lists Sales Order Line Item quantities that have been returned and selected for credit. Line Items are added to a Credit Memo using the NEW ITEM button.
Tip
Before creating a new Credit Memo Line Item, be sure to specify an Invoice to apply the Credit Memo to. The "Apply To" feature is found on the Credit Memo header screen.
- Subtotal
Displays the subtotal for the Credit Memo Line Items.
- Misc. Charge Amount
Enter the amount of the miscellaneous charge. Before entering a miscellaneous charge amount, you must first assign the charge to a Sales Account and also enter a description of the charge.
- Misc. Charge Description
Enter a description to identify the miscellaneous charge.
- Misc. Charge Credit Account
Enter a Credit Account to assign the miscellaneous charge to.
- Freight
Enter the amount of freight charge to be added to the specified Order. The freight charge may be entered during the creation or modification of a Credit Memo—or at the time of shipment.
- Tax
Displays the total amount of Tax to be charged on the Credit Memo. Sales Tax is calculated at the Credit Memo Line Item level. The Tax amount displayed here represents the total for all Line Item Tax amounts. To get a detailed view of the Tax calculation, click on the Tax link using your mouse.
- Total
Displays the total amount of the Credit Memo.
To the far right of the screen, the following buttons are available:
- SAVE
Saves new Credit Memo Line Items and updates any changes made to existing Line Items.
- CANCEL
Closes the screen without creating a new Credit Memo Line Item or saving any changes, returning you to the application desktop.
- NEW ITEM
Opens screen for creating a new Credit Memo Line Item.
- EDIT ITEM
Enables you to edit highlighted Credit Memo Line Item. The edit screen is the same as that for creating a new Credit Memo Line Item—except that when editing, the fields will contain Line Item information. Double-clicking on a Line Item will also bring you to the editing screen.
- DELETE ITEM
Highlight a Credit Memo Line Item and then select this button to remove the Line Item from the Credit Memo list.
To add Notes to a Credit Memo, select the "Notes" tab at the top of the "Credit Memo" screen. The following screen will appear:
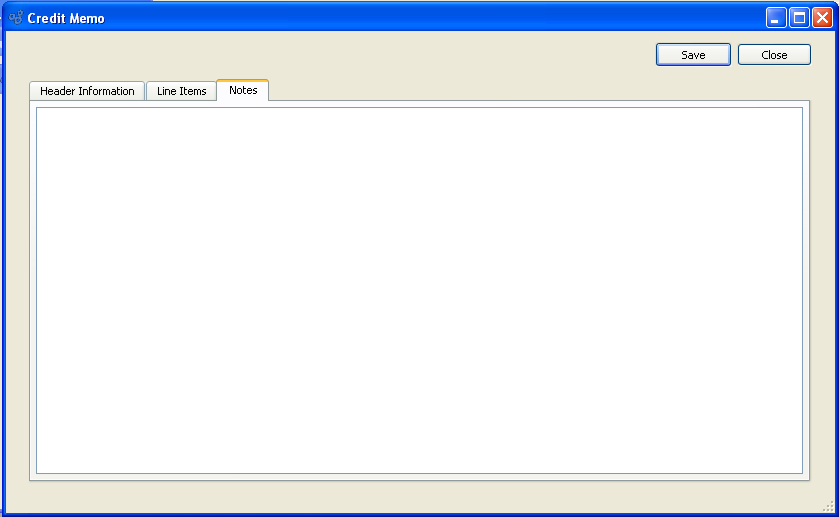
When adding Notes to a Credit Memo, you are presented with the following options:
- Notes
This is a scrolling text field with word-wrapping for entering Notes related to the Credit Memo. Notes entered on this screen will follow the Credit Memo through the billing process. For example, you may view notes associated with a posted Credit Memo within the Customer History report.
To the far right of the screen, the following buttons are available:
- SAVE
Saves the Credit Memo Notes.
- CANCEL
Closes the screen without creating a Credit Memo Notes, returning you to the application desktop.
To create a new Credit Memo Line Item, select the NEW button. The following screen will appear:
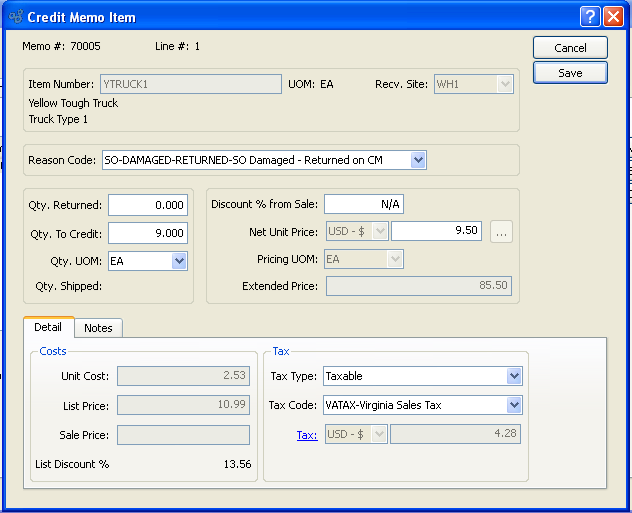
When creating a new Credit Memo Line Item, you are presented with the following options:
- Order #
Displays the Credit Memo number for the current Credit Memo.
- Line #
Displays the line number assigned to the Credit Memo Item.
- Item Number
Enter the Item Number of the Item you want to add to the Credit Memo. If the Credit Memo is being applied to an Invoice, only those Line Items which appeared on the Invoice will be available for selection—that is, if the appropriate setting is selected at the system level. Invoices are selected for application by a Credit Memo using the "Apply To" feature on the Credit Memo header screen.
Tip
The system-level configuration which determines whether Credit Memo Items will be restricted to relevant Invoice Items is the setting "Restrict Credit Memos to Items that appear on their Apply-To Document." Selecting this option narrows the Credit Memo Item selection process to only those Items which appeared on the Invoice the Credit Memo is being applied to. If not selected, a sold Item master list will appear instead when selecting Credit Memo Items for Credit Memos applied to a specific Invoice. This setting has no bearing on unapplied Credit Memos.
- UOM
Inventory Unit of Measure.
- Receiving Site
Specify the Site returned Inventory will be received into. Items designated as Multiple Location Control Items may be received into multiple Sites. If this is the case, be sure to specify the correct receiving Site when entering a Credit Memo Line Item. The receiving Site will not necessarily be the same Site as the Site the Item was shipped from.
- Reason Code
Specify the reason why an adjustment is being made to a Customer's account.
Note
By default, the Reason Code on the Credit Memo header will be used at the Line Item level. However, you may change the Reason Code for individual Line Items.
- Qty. Returned
Enter the quantity of the Item returned for credit.
Note
If the Credit Memo is created from a Return Authorization, the quantity returned will be zero on the Credit Memo Item screen. Return Authorization returns are handled separately, outside of the normal sales Credit Memo Inventory handling process.
- Qty. To Credit
Enter the quantity of the Item you plan to give the Customer credit for. The quantity entered here may equal the quantity returned. However, you have the flexibility to credit the Customer for a quantity different from the returned quantity. The quantity credited is multiplied by the Net Unit Price to determine the amount of the credit.
- Qty UOM
The unit of measure being returned and credited in.
- Qty. Shipped
Displays the quantity of the Item shipped to date.
- Discount % from Sale
Specify a percentage to reduce the credited amount by. The discount will be deducted from the sale Price, thereby reducing the amount of the credit by the specified percentage.
- Net Unit Price
Specify the Net Unit Price to assign the quantity being credited. If the Credit Memo is being applied to a specific Invoice, then the system will automatically enter the Item's Net Unit Price as it appeared on the referring Invoice. If no Invoice is being applied-to, then the system will choose the lower of the following two Prices: A) The most-specific Pricing Schedule Assignment or B) any Sale in effect at the time of Order entry. The specificity of Pricing Schedule Assignments is determined in the following descending order: By Customer Ship-To Address (most specific), by Customer, by Customer Type, by Customer Type pattern, by all Customers. The browse button located to the right of the field leads to a Price List screen.
If your Pricing Schedule has multiple Units of Measure (UOM) on it―or if several Pricing Schedules share the same level of Price specificity, but they have different UOMs―then the UOM which matches the selected UOM will be chosen―that is, as long as the quantity break does not exceed the quantity being priced. If no entry matches the UOM with a quantity break less than the quantity being priced, then the lowest value Price for any UOM will be chosen. To make sure a specific UOM is always chosen at the desired level of Price specificity, then your Pricing Schedules should include at least one UOM with a quantity break of 0.
Tip
The system can be configured to prevent users from editing the Net Unit Price. If your system is configured that way, the Net Unit Price field will not be editable.
- Pricing UOM
Displays the Item's Price UOM.
- Extended Price
Displays the Extended Price. The Extended Price for a Credit Memo Item is based on the quantity credited multiplied by the Price.
- Unit Cost
Displays the Standard Cost per unit.
- List Price
Displays the Item's List Price per unit displays.
- Sale Price
Displays the sold Price for the Item at the time of sale.
- Tax Type
Specify the Tax Type for the Credit Memo Item.
- Tax
Displays the amount of Tax to be charged for the Credit Memo Line Item quantity. To get a detailed view of the Tax calculation, click on the Tax link using your mouse.
To the far right of the screen, the following buttons are available:
- CANCEL
Closes the screen without creating a new Credit Memo Item, returning you to the previous screen.
- SAVE
Creates the new Credit Memo Item and adds it to the list of Credit Memo Line Items.
Click on the notes tab to enter notes and you will be presented with the following screen:

- Notes
This is a scrolling text field with word-wrapping for entering Notes related to the Credit Memo Item.
To view a list of unposted Credit Memos, select the "List Unposted Credit Memos" option. The following screen will appear:
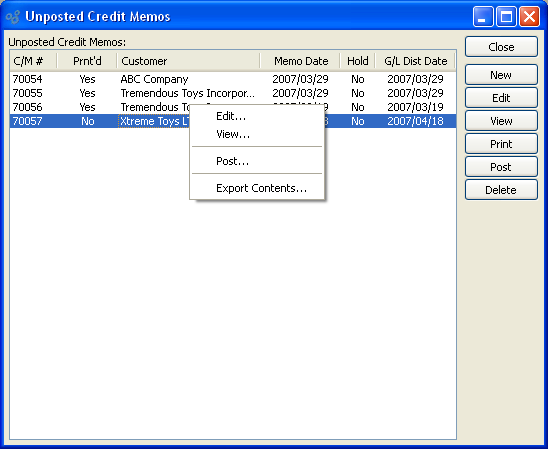
Tip
You may select multiple Credit Memos for posting by highlighting them using your mouse—or a combination of your mouse and either the SHIFT or CTRL keys.
The unposted Credit Memos master list displays all existing Credit Memo numbers, associated Customer names, accounting date of Credit Memo, and hold status. Users with the appropriate privilege will also see the G/L distribution date column.
To the far right of the screen, the following buttons are available:
- CLOSE
Closes the screen, returning you to the application desktop.
- NEW
Opens screen for creating a new Credit Memo.
- EDIT
Enables you to edit highlighted Credit Memo. The edit screen is the same as that for creating a new Credit Memo—except that when editing, the fields will contain Credit Memo information. Double-clicking on a Credit Memo will also bring you to the editing screen.
- VIEW
Highlight a Credit Memo and then select this button to reach a read-only view of the "Edit" screen.
Highlight one—or multiple—Credit Memos, then select this button to print the selected Credit Memo(s).
If the Customer specified on the Credit Memo has an EDI Profile attached, you may encounter an EDI processing interface when printing it.
- POST
Highlight one—or multiple—Credit Memos, then select this button to post the selected Credit Memo(s). By default, Credit Memos post to the General Ledger (G/L) on their memo date. However, users with the appropriate privilege may change the G/L distribution date to an alternate date during the Credit Memo posting process. If used, Credit Memos will post on the alternate date. The ability privileged users have to change the distribution date applies to the posting of both individual and also batches of Credit Memos from this screen.
Note
If the Credit Memo has been applied to an Invoice, any Credit Memo Items will be returned to Inventory when the Credit Memo is posted.
- DELETE
Highlight a Credit Memo and then select this button to remove the Credit Memo from the master list.
To edit an unposted Credit Memo, or to view detailed information about unposted Credit Memos, choose the "Credit Memo Edit List" option. The following screen will appear:

The Credit Memo Edit List displays details on all unposted Credit Memos. The display is a nested list, with a plus ("+") sign located to the far left of the screen next to each line that may be expanded to lower levels. By clicking your mouse on a plus sign, you reveal lower levels of information related to the Order.
Tip
If a Billing record displays in red type, this means an Account Assignment is missing for the Customer Type in question. To correct the problem, check your Sales Account and Accounts Receivable Assignments. Once the Assignments are in place, the record will display in black type.
To the far right of the screen, the following buttons are available:
- CLOSE
Closes the screen, returning you to the application desktop.
Runs the report associated with this screen.
To post Credit Memos in batch mode, select the "Post Credit Memos" option. The following screen will appear:
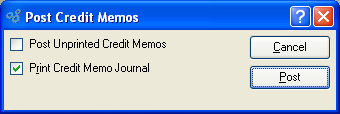
Note
Credit Memos are posted effective on the date they are distributed, not on the date they are posted—as might be assumed.
When posting Credit Memos, you are presented with the following options:
- Post Unprinted Credit Memos
Select to include unprinted Credit Memos in the list of Credit Memos to be posted. If not selected—and if there are unprinted Credit Memos waiting to be posted—you will be prompted to print the unprinted Credit Memos before posting may occur.
- Print Credit Memo Journal
Select to print the Credit Memo Journal in addition to posting the Credit Memos. Credit Memo Journals are assigned a unique identification number, which corresponds to the Credit Memo batch and the date the batch was posted.
Note
A Credit Memo Journal will also be created for Credit Memos that are posted individually—that is, not in batch mode, but one at a time. As with batch postings, the Credit Memo Journals for individually-posted Credit Memos are assigned a unique identification number.
To the far right of the screen, the following buttons are available:
- CANCEL
Closes the screen without posting any Credit Memos, returning you to the application desktop.
- POST
Posts the Credit Memos, using the specified parameters.
Billing Forms section.
Although the system does not require you to print Invoices before posting them individually (i.e., one-at-a-time), you are required to print Invoices before posting them in batch mode. To print unposted Invoices, select the "Print Invoices" option. The following screen will appear:
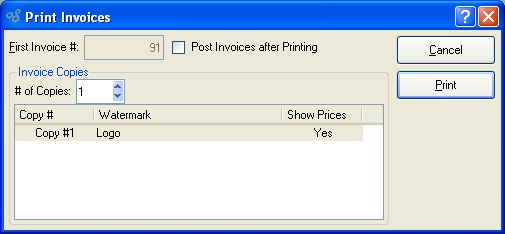
When printing Invoices, you are presented with the following options:
- First Invoice #
The next Invoice Number in the automatic sequence of Invoice Numbers will display here. Once this Invoice Number has been printed, the next Invoice Number will appear. Default values for Invoice Numbers are configurable at the system level.
- Post Invoices after Printing
Select to automatically post Invoices after they have been printed.
Note
Invoices are posted effective on the date they are distributed, not on the date they are posted—as might be assumed.
- Invoice Copies
Specify details for the Invoice copies you want to print:
- # of Copies
Indicate the number of copies you want to print. Information about the specified copies will display below. To add a Watermark, double-click on a copy line.
To the far right of the screen, the following buttons are available:
- CANCEL
Closes the screen without printing Invoices, returning you to the application desktop.
Runs the report associated with this screen.
Note
If the Customer specified on the Invoice has an EDI Profile defined, you may encounter an EDI processing interface when printing individual Invoices.
To add a Watermark to an Invoice, double-click on a copy line. The following screen will appear:
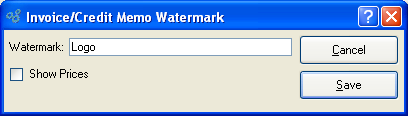
When adding a Watermark to an Invoice copy, you are presented with the following options:
- Watermark
Specify the name of the Watermark to be used for the selected copy.
- Show Prices
Select to show Prices in the selected copy.
To the far right of the screen, the following buttons are available:
- CANCEL
Closes the screen without adding a Watermark, returning you to the previous screen.
- SAVE
Saves the Watermark definition to the selected copy.
To print Invoices by Ship Via, select the "Print Invoices by Ship Via" option. The following screen will appear:
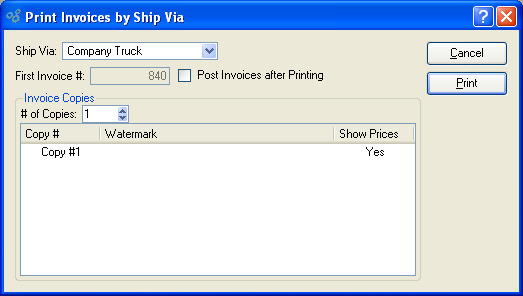
Tip
If you don"t see any Ship Vias appearing in the Ship Via list, this probably means you don"t have any unprinted Invoices on the list of unposted Invoices. To verify, open the list of unposted Invoices and check the printed status of the Invoices listed there.
When printing Invoices by Ship Via, you are presented with the following options:
- Ship Via
Specify the Ship Via whose Invoices you want to print.
Tip
The system supports up-to-date shipment tracking with links to the websites of many leading shipping companies (i.e., "Ship Vias").
- First Invoice #
The next Invoice Number in the automatic sequence of Invoice Numbers will display here. Once this Invoice Number has been printed, the next Invoice Number will appear. Default values for Invoice Numbers are configurable at the system level.
- Post Invoices after Printing
Select to automatically post Invoices after they have been printed.
Note
Invoices are posted effective on the date they are distributed, not on the date they are posted—as might be assumed.
- Invoice Copies
Specify details for the Invoice copies you want to print.
- # of Copies
Indicate the number of copies you want to print using the arrow buttons. Information about the specified copies will display below. To add a Watermark, double-click on a copy line.
To the far right of the screen, the following buttons are available:
- CANCEL
Closes the screen without printing Invoices, returning you to the application desktop.
Prints all Invoices available for printing, using the specified parameters.
Note
If the Customer specified on the Invoice has an EDI Profile defined, you may encounter an EDI processing interface when printing individual Invoices.
To add a Watermark to an Invoice, double-click on a copy line. The following screen will appear:
When adding a Watermark to an Invoice copy, you are presented with the following options:
- Watermark
Specify the name of the Watermark to be used for the selected copy.
- Show Prices
Select to show Prices in the selected copy.
To the far right of the screen, the following buttons are available:
- CANCEL
Closes the screen without adding a Watermark, returning you to the previous screen.
- SAVE
Saves the Watermark definition to the selected copy.
To print an Invoice that was previously printed, select the "Re-Print Invoices" option. The following screen will appear:

When re-printing an Invoice, you are presented with the following options:
- Search for Invoice Number
Enter an Invoice Number or Regular Expression. This field may be used independently or in conjunction with the date fields.
Tip
The "Invoice Number" field supports pattern matching with Regular Expressions.
- Only include Invoices with Balance
Select to include only those invoices having an open balance due in the display. If not selected, all invoices in the specified date range will be shown.
- Start Date
Invoices posted on and after this date will be displayed, unless the list is intentionally limited by information entered in the "Search for Invoice Number" field.
- End Date
Invoices posted on and before this date will be displayed, unless the list is intentionally limited by information entered in the "Search for Invoice Number" field.
- Invoices
Display lists previously printed Invoices. Highlight the individual Invoice or group of Invoices you want to re-print using your mouse button. To select a sequence of Invoices, highlight the first in the sequence using your mouse button. Then, holding down the SHIFT key on your keyboard, highlight the last Invoice in the sequence. The entire sequence is now selected. To select Invoices that are out of sequence, highlight the first Invoice in the group. Then, holding down the CTRL key on your keyboard, highlight the next Invoice you want to select. Continue highlighting Invoices with the CTRL key depressed until all desired Invoices are selected. The entire group is now ready for re-printing.
- Invoice Copies
Specify details for the Invoice copies you want to print:
- # of Copies
Indicate the number of copies you want to re-print. Information about the specified copies will display below. To add a Watermark, double-click on a copy line.
To the far right of the screen, the following buttons are available:
- CLOSE
Closes the screen without re-printing Invoices, returning you to the application desktop.
- QUERY
Select to generate a list of Invoices for re-printing, using the specified parameters.
Runs the report associated with this screen.
Tip
If the Customer specified on the Invoice has an EDI Profile defined, you may encounter an EDI processing interface when printing individual Invoices.
To send a copy of a Customer Invoice electronically, select the "Send Electronic Invoice" option. The following screen will appear:

E-mail Invoice Form
This window shows either a list or search window for Invoices for those Customers configured to receive EDI. You are presented with the following options:
- Search for
Optionally enter an Invoice number here to find it in the list.
- Invoices
List of Invoices that can be sent by EDI.
Note
Customers are set up to receive electronic deliveries of information using the "Transmission" tab on the Customer master.
To the far right of the screen, the following buttons are available:
- CANCEL
Closes the screen without scheduling an Invoice for delivery, returning you to the application desktop.
- SELECT
Select the Invoice for delivery. This closes the window and proceeds to sending the EDI.
You may be presented with one of two screens, depending on whether the document will be sent by email or by FTP. If you do not see either screen, the EDI Profile has been set to disable review before sending and will automatically be sent to the Batch Manager.
If the document will be sent by email, you will see the following screen:
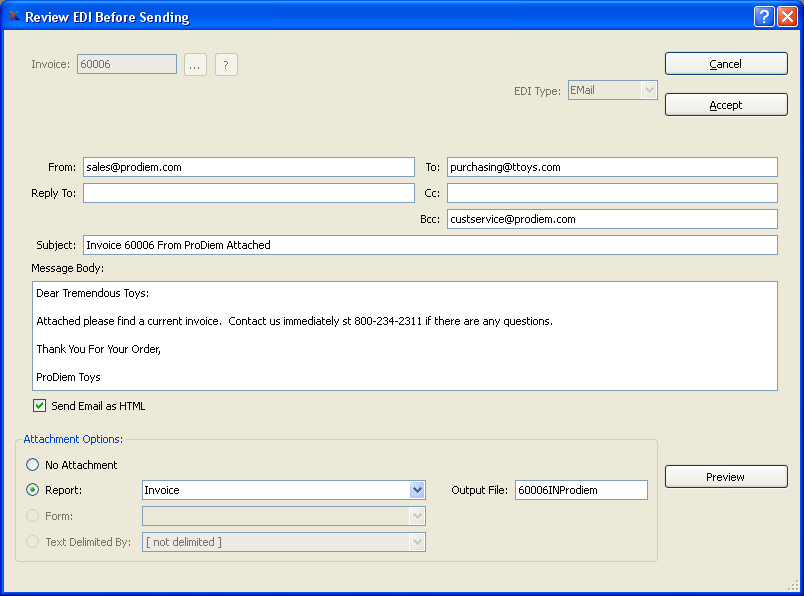
Review EDI Before Sending a document by email
The fields at the top of the window show basic information about the EDI that will be sent:
- A/R Open Item, Credit Memo, Customer #, Invoice, Order #, Quote
This shows the document number of the document you want to schedule for delivery. Which label appears depends on the document being sent. The "Customer #" is shown when sending A/R Statements.
- EDI Type
This shows whether the EDI will be sent by email or FTP.
The information in the following fields will be populated from the EDI Profile. If you have the "EditEDIBeforeSending" privilege, you will be allowed to edit the contents of these fields. You are presented with the following email-specific options:
- From
This is the email address of the person sending the email. It can be set to the address of the user running the application or a generic address (e.g. "[email protected]"). If it is left blank on this screen, the Batch Manager will fill in the email address of the user running the application at the time the EDI was prepared.
- Reply To
This is the reply-to address that will be set on the outgoing email message. This controls the email address used when someone replies to the email sent by xTuple ERP.
- To
This is the email address of the primary intended recipient of the email.
- Cc
This is the carbon copy (i.e., Cc:) email address—a copy of the email will be sent to this address.
- Bcc
This is the blind carbon copy (i.e., Bcc:) email address—a copy of the email will be sent to this address but none of the recipients will see this address.
- Subject
This is the subject line that will be used for this email.
- Message Body
This is the body of the email message that will be sent. This is a scrolling text field with word-wrapping.
- Send Email as HTML
Select if you want the body of the Email to be sent as HTML. If not selected, the Email will be sent as plain text.
- Attachment Options
Use the Attachment Options to control the contents and format of the file attached to this email. The following options are available, depending on the settings in the EDI Profile:
- No Attachment
No file will be attached to the email.
- Report
The named report will be run by the Batch Manager and attached to the email as a .PDF file.
- Form
If the document is a Sales Order or an Invoice, the Customer Form Assignment will be used. That report will be run by the Batch manager and attached to the email as a .PDF file.
- Text Delimited By
The queries defined in the EDI Form Details for the EDI Profile will be run. The results will be used to build a file with the fields delimited by the given character. Pre-defined characters include the comma (",") and tab. If you need to change the delimiter, select "[ not delimited ]" from the drop-down menu, then replace that text with your own single character. Normally, however, this should be left to the value specified in the EDI Profile.
- Output File
This is the name that will be given to the email attachment. For Forms and Reports it should end with a ".pdf" suffix. For comma-delimited files the output file should end with ".csv". Tab-delimited files should have a ".tsv" suffix.
- PREVIEW
This brings up a preview window to show what the attachment will look like when generated by the Batch Manager. It can show either reports or delimited text files.
To the far right of the screen, the following buttons are available:
- CANCEL
Closes the screen without scheduling a document for email delivery, returning you to the application desktop.
- ACCEPT
Select to submit the requested action to the Batch Manager for processing. If the EDI will be sent by email, there must be at least one email address in either the To, Cc, or Bcc fields.
If the document will be sent by FTP, you will see the following screen.
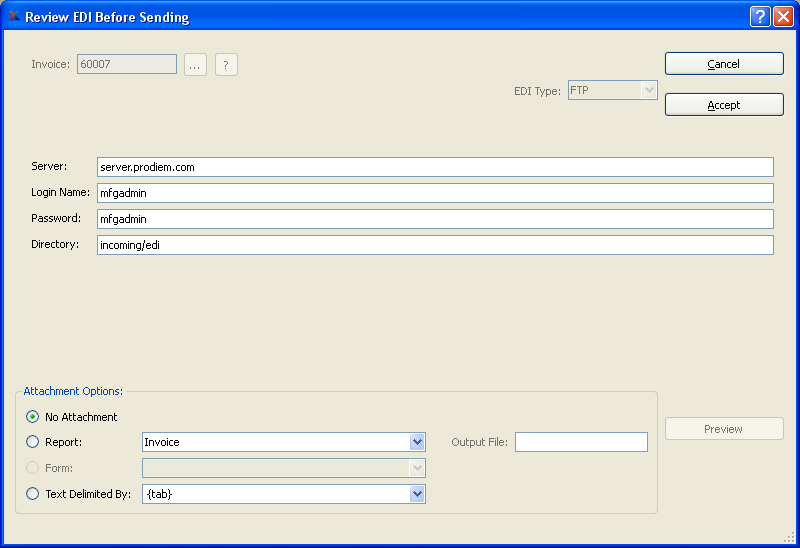
Review EDI Before Sending a document by FTP
The Attachment Options will be the same as for sending email but the transmission options will be different. Get the values for these from the EDI recipient (either your Vendor or Customer, depending on the document type). See the xTuple Batch Manager Product Guide for one suggestion on how to store these data. You are presented with the following FTP-specific options:
- Server
This is the host name or Internet address of the FTP server to send the document to.
- Login Name
This is the user name required to log in to the FTP server.
- Password
This is the password required to log in to the FTP server.
- Directory
This is the directory in which the recipient wants you to put the EDI message on the FTP server.
If both the "Login Name" and "Password" fields are empty, the Batch Manager will attempt an anonymous FTP, using the name "anonymous" for the "Login Name" and the email address of the user submitting the EDI for the "Password".
Printing a Credit Memo is a required step in the process of posting a Credit Memo. To print a Credit Memo, select the "Print Credit Memos" option. The following screen will appear:
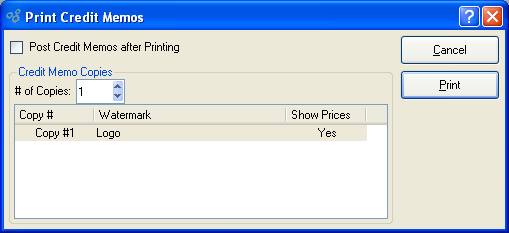
When printing Credit Memos, you are presented with the following options:
- Post Credit Memos after Printing
Select to automatically post Credit Memos after they have been printed.
Note
Credit Memos are posted effective on the date they are distributed, not on the date they are posted—as might be assumed.
- Credit Memo Copies
Specify details for the Credit Memo copies you want to print.
- # of Copies
Indicate the number of copies you want to print using the arrow buttons. Information about the specified copies will display below. To add a Watermark, double-click on a copy line.
To the far right of the screen, the following buttons are available:
- CANCEL
Closes the screen without printing Credit Memos, returning you to the application desktop.
Prints all Credit Memos available for printing, using the specified parameters.
If the Customer specified on a Credit Memo has an EDI Profile attached, you may encounter an EDI processing interface when printing it.
To add a Watermark to a Credit Memo, double-click on a copy line. The following screen will appear:
When adding a Watermark to a Credit Memo copy, you are presented with the following options:
- Watermark
Specify the name of the Watermark to be used for the selected copy.
- Show Prices
Select to show Prices in the selected copy.
To the far right of the screen, the following buttons are available:
- CANCEL
Closes the screen without adding a Watermark, returning you to the previous screen.
- SAVE
Saves the Watermark definition to the selected copy.
To print a Credit Memo that was previously printed, select the "Re-Print Credit Memos" option. The following screen will appear:
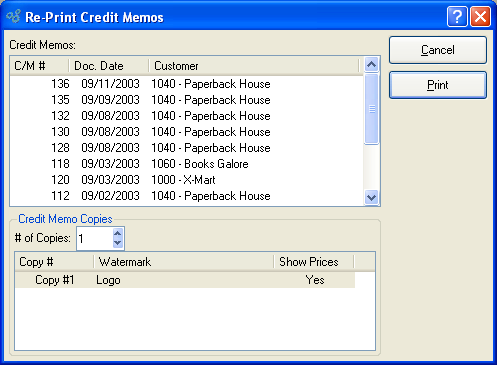
When re-printing a Credit Memo, you are presented with the following options:
- Invoices
Display lists previously printed Credit Memos. To select a sequence of Credit Memos, highlight the first in the sequence using your mouse button. Then, holding down the SHIFT key on your keyboard, highlight the last Credit Memo in the sequence. The entire sequence is now selected. To select Credit Memos that are out of sequence, highlight the first Credit Memo in the group. Then, holding down the CTRL key on your keyboard, highlight the next Credit Memo you want to select. Continue highlighting Credit Memos with the CTRL key depressed until all desired Credit Memos are selected. The entire group is now ready for re-printing.
- Invoice Copies
Specify details for the Credit Memo copies you want to print.
- # of Copies
Indicate the number of copies you want to re-print using the arrow buttons. Information about the specified copies will display below. To add a Watermark, double-click on a copy line.
To the far right of the screen, the following buttons are available:
- CLOSE
Closes the screen without re-printing Credit Memos, returning you to the application desktop.
Prints the highlighted Credit Memos, using the specified parameters.
If the Customer specified on a Credit Memo has an EDI Profile attached, you may encounter an EDI processing interface when printing it.