Sales Reports section.
To view summarized Backlog by Site, select the "Summarized Backlog by Site" option. The following screen will appear:
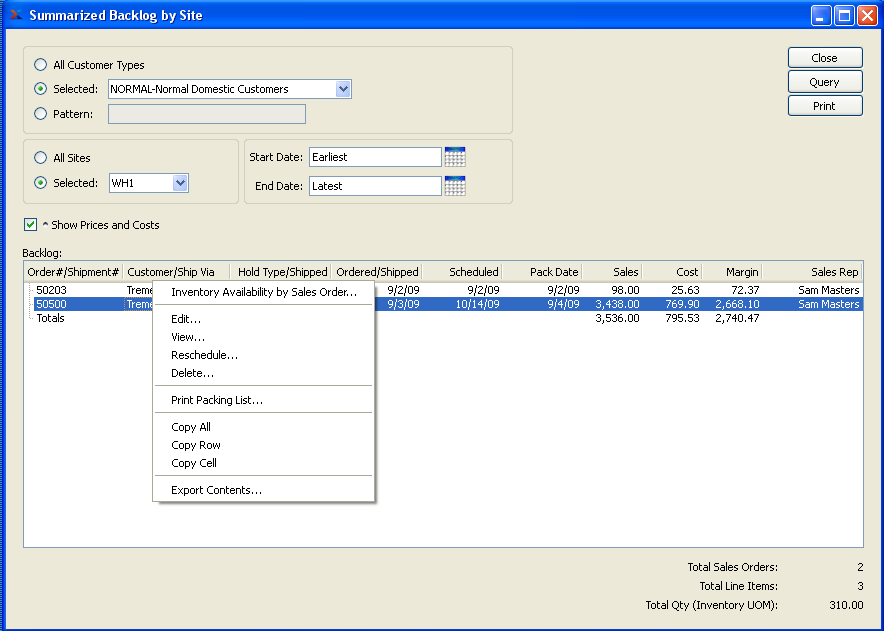
When displaying summarized Backlog by Site, you are presented with the following options:
- All Customer Types
Select to display summarized Backlog by Site for all Customer Types.
- Selected
Specify Customer Type whose Backlog by Site you want to display.
- Pattern
Enter a Customer Type pattern to select a range of Customer Types. Refine your search using Regular Expressions.
- All Sites
Select to display summarized Backlog for all Sites.
- Selected
Specify Site whose summarized Backlog you want to display.
- Start Date
Summarized Backlog by Site entered on and after this date will be displayed.
- End Date
Summarized Backlog by Site entered on and before this date will be displayed.
- Show Prices and Costs
Select to include pricing and Cost information in the display.
- Order By
Select one of the following options to indicate how you want the results to be organized:
- Ship Date
Select to order the display by Ship Date.
- Pack Date
Select to order the display by Pack Date.
- S/O Number
Select to order the display by Sales Order Number.
- Backlog
Display lists summarized Backlog by Site, using the specified parameters. The display is a nested list, with a plus ("+") sign located to the far left of the screen next to each line that may be expanded to lower levels. By clicking your mouse on a plus sign, you reveal lower levels of information related to the Order. If the "Show Prices and Costs" option is selected, additional columns showing sales Price, Cost, and margin will display.
Note
The Summarized Backlog by Site display is color-coded for ease of use. The following colors are used to describe the backlog status of Sales Order Line Items:
- Blue
Order is at Shipping but is not yet shipped.
- Green
Order has been shipped complete, but has not yet been selected for Billing.
- Red
Part of the Order has been shipped and selected for Billing, but Backorder Items still need to be shipped and billed.
- Black
None of the above conditions is true.
- Total Sales Orders
Displays the total number of Sales Orders on Backlog.
- Total Line Items
Displays the total number of Sales Order Line Items on Backlog.
- Total Qty (Shipping UOM)
Displays the total number of unshipped Sales Order Line Items on Backlog.
To the far right of the screen, the following buttons are available:
- CLOSE
Closes the screen, returning you to the application desktop.
- QUERY
Select to generate the display, using the specified parameters.
Runs the report associated with this screen.
Backlog Reports section.
To view Backlog by Customer Type, select the "Backlog by Customer Type" option. The following screen will appear:
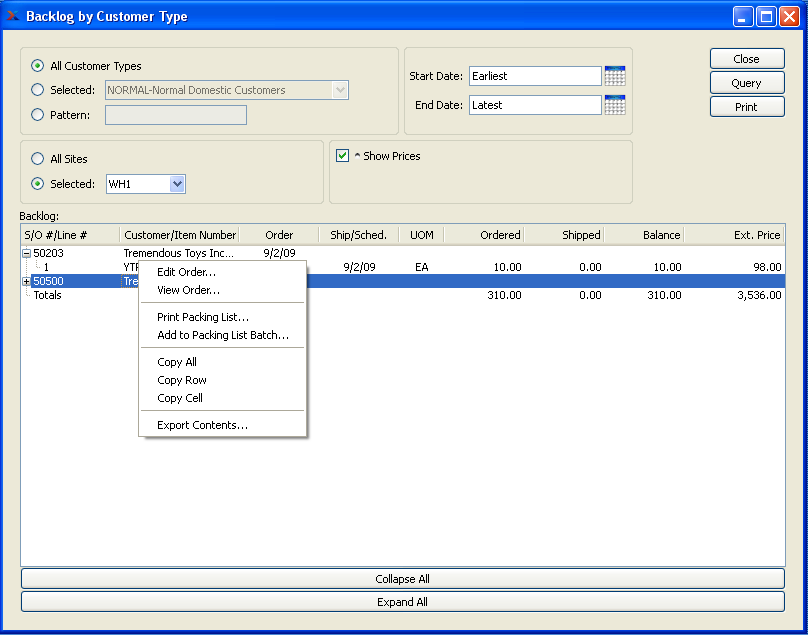
When displaying Backlog by Customer Type, you are presented with the following options:
- All Customer Types
Select to display Backlog for all Customer Types.
- Selected
Specify Customer Type whose Backlog you want to display.
- Pattern
Enter a Customer Type pattern to select a range of Customer Types. Refine your search using Regular Expressions.
- All Sites
Select to display Backlog by Customer Type for all Sites.
- Selected
Specify Site whose Backlog by Customer Type you want to display.
- Start Date
Backlog by Customer Type entered on and after this date will be displayed.
- End Date
Backlog by Customer Type entered on and before this date will be displayed.
- Show Prices
Select to include pricing information in the display.
- Backlog
Display lists Backlog by Customer Type, using the specified parameters. If the "Show Prices" option is selected, an additional column showing the amount of the backlog, with Prices normalized to the Base Currency using the Currency Exchange Rate effective on the Order Date, will display. The total backlog will also be shown.
To the far right of the screen, the following buttons are available:
- CLOSE
Closes the screen, returning you to the application desktop.
- QUERY
Select to generate the display, using the specified parameters.
Runs the report associated with this screen.
To view Backlog by Customer Group, select the "Backlog by Customer Group" option. The following screen will appear:
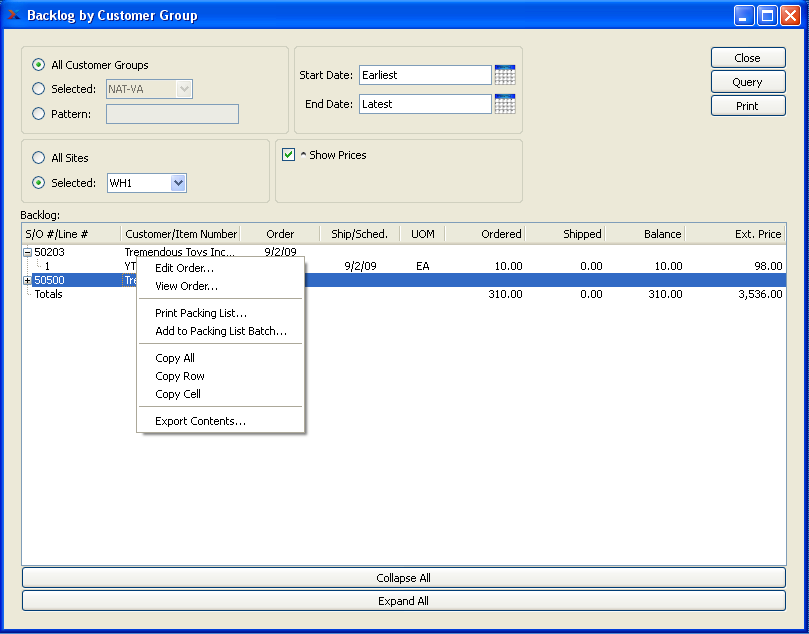
When displaying Backlog by Customer Group, you are presented with the following options:
- All Customer Groups
Select to display Backlog for all Customer Groups.
- Selected
Specify Customer Group whose Backlog you want to display.
- Pattern
Enter a Customer Group pattern to select a range of Customer Groups. Refine your search using Regular Expressions.
- All Sites
Select to display Backlog by Customer Group for all Sites.
- Selected
Specify Site whose Backlog by Customer Group you want to display.
- Start Date
Backlog by Customer Group entered on and after this date will be displayed.
- End Date
Backlog by Customer Group entered on and before this date will be displayed.
- Show Prices
Select to include pricing information in the display.
- Backlog
Display lists Backlog by Customer Group, using the specified parameters. This display is a nested list, with a plus ("+") sign located to the far left of the display next to each line that may be expanded to lower levels. By clicking your mouse on a plus sign, you reveal lower levels of information related to the Documents. If the "Show Prices" option is selected, an additional column showing the amount of the backlog, with Prices normalized to the Base Currency using the Currency Exchange Rate effective on the Order Date, will display. The total backlog will also be shown.
To the far right of the screen, the following buttons are available:
- CLOSE
Closes the screen, returning you to the application desktop.
- QUERY
Select to generate the display, using the specified parameters.
Runs the report associated with this screen.
To view Backlog by Customer, select the "Backlog by Customer" option. The following screen will appear:

When displaying Backlog by Customer, you are presented with the following options:
- Customer #
Enter the Customer Number of the Customer whose Backlog you want to display. The browse button located to the right of the field leads to a searchable Customers list. You may also access this list using the keyboard shortcut "CTRL + L". Once a Customer Number is entered, the Customer name and billing address will display. Select the "?" or "$" symbol next to the browse button to view Customer information for the specified Customer. If a Customer's credit is "In Good Standing," the button will feature a black question mark ("?") icon. If the icon turns to an orange dollar sign ("$"), the Customer's credit Status is "On Credit Warning." A red dollar sign ("$") indicates the Customer's credit Status is "On Credit Hold."
- All Sites
Select to display Backlog by Customer for all Sites.
- Selected
Specify Site whose Backlog by Customer you want to display.
- Start Date
Backlog by Customer entered on and after this date will be displayed.
- End Date
Backlog by Customer entered on and before this date will be displayed.
- Show Prices
Select to include pricing information in the display.
- Backlog
Display lists Backlog by Customer, using the specified parameters. If the "Show Prices" option is selected, an additional column showing the amount of the backlog, with Prices normalized to the Base Currency using the Currency Exchange Rate effective on the Order Date, will display. The total backlog will also be shown.
To the far right of the screen, the following buttons are available:
- CLOSE
Closes the screen, returning you to the application desktop.
- QUERY
Select to generate the display, using the specified parameters.
Runs the report associated with this screen.
To view Backlog by Sales Order, select the "Backlog by Sales Order" option. The following screen will appear:
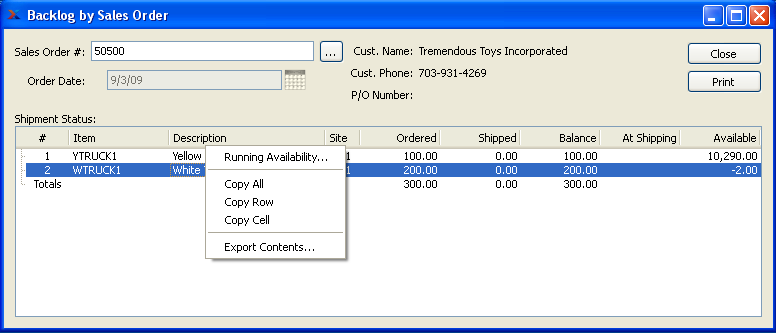
When displaying Backlog by Sales Order, you are presented with the following options:
- Sales Order #
Enter the Sales Order Number of the Sales Order whose backlog you want to view.
- Order Date
Displays the date the Sales Order was placed.
- Cust. Name
Displays the Customer name associated with specified Sales Order.
- Cust. Phone
Displays the Customer phone number associated with specified Sales Order.
- P/O Number
Displays the Customer Purchase Order number associated with specified Sales Order.
- Shipment Status
Display lists Backlog by Sales Order, using the specified parameters. If the available quantity falls below zero, the value will display in red type.
To the far right of the screen, the following buttons are available:
- CLOSE
Closes the screen, returning you to the application desktop.
Runs the report associated with this screen. Right-clicking on a Sales Order Line Item in the Shipment Status list enables you to select from the following menu options:
To view Backlog by Product Category, select the "Backlog by Product Category" option. The following screen will appear:
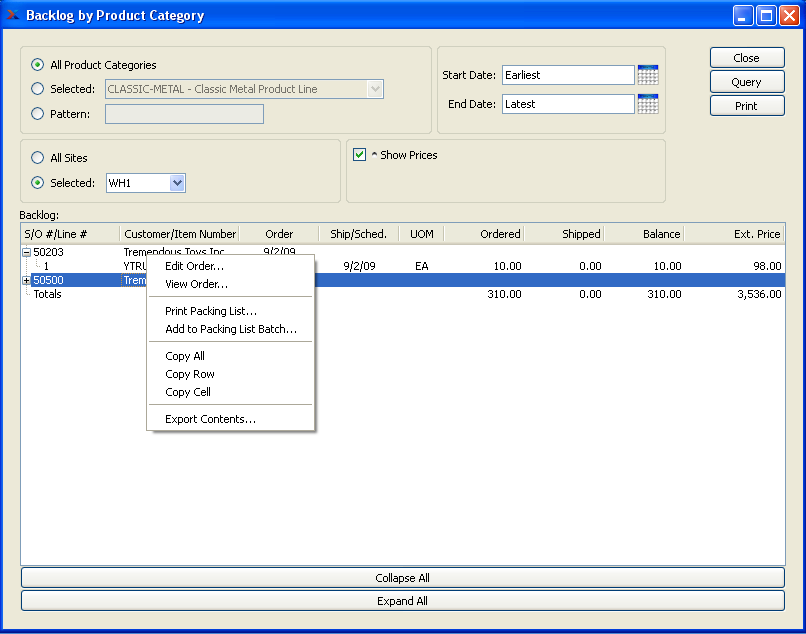
When displaying Backlog by Product Category, you are presented with the following options:
- All Product Categories
Select to display Backlog for all Product Categories.
- Selected
Specify Product Category whose Backlog you want to display.
- Pattern
Enter a Product Category pattern to select a range of Product Categories. Refine your search using Regular Expressions.
- All Sites
Select to display Backlog by Product Category for all Sites.
- Selected
Specify Site whose Backlog by Product Category you want to display.
- Start Date
Backlog by Product Category entered on and after this date will be displayed.
- End Date
Backlog by Product Category entered on and before this date will be displayed.
- Show Prices
Select to include pricing information in the display.
- Backlog
Display lists Backlog by Product Category, using the specified parameters. If the "Show Prices" option is selected, an additional column showing the amount of the backlog, with Prices normalized to the Base Currency using the Currency Exchange Rate effective on the Order Date, will display. The total backlog will also be shown.
To the far right of the screen, the following buttons are available:
- CLOSE
Closes the screen, returning you to the application desktop.
- QUERY
Select to generate the display, using the specified parameters.
Runs the report associated with this screen.
To view Backlog by Item, select the "Backlog by Item" option. The following screen will appear:

When displaying Backlog by Item, you are presented with the following options:
- Item Number
Enter the Item Number of the Item whose Backlog you want to view. The browse button located to the right of the field leads to a searchable list of make and buy items.
- UOM
Inventory Unit of Measure.
- All Sites
Select to display Backlog by Item for all Sites.
- Selected
Specify Site whose Backlog by Item you want to display.
- Start Date
Backlog by Item entered on and after this date will be displayed.
- End Date
Backlog by Item entered on and before this date will be displayed.
- Show Prices
Select to include pricing information in the display.
- Backlog
Display lists Backlog by Item, using the specified parameters. If the "Show Prices" option is selected, an additional column showing the amount of the backlog, with Prices normalized to the Base Currency using the Currency Exchange Rate effective on the Order Date, will display. The total backlog will also be shown.
To the far right of the screen, the following buttons are available:
- CLOSE
Closes the screen, returning you to the application desktop.
Runs the report associated with this screen.
If a shipped Order does not contain all the Line Items ordered by the Customer, the Order is considered to be partially shipped. To view a list of partially-shipped Orders, select the "Partially Shipped Orders" option. The following screen will appear:
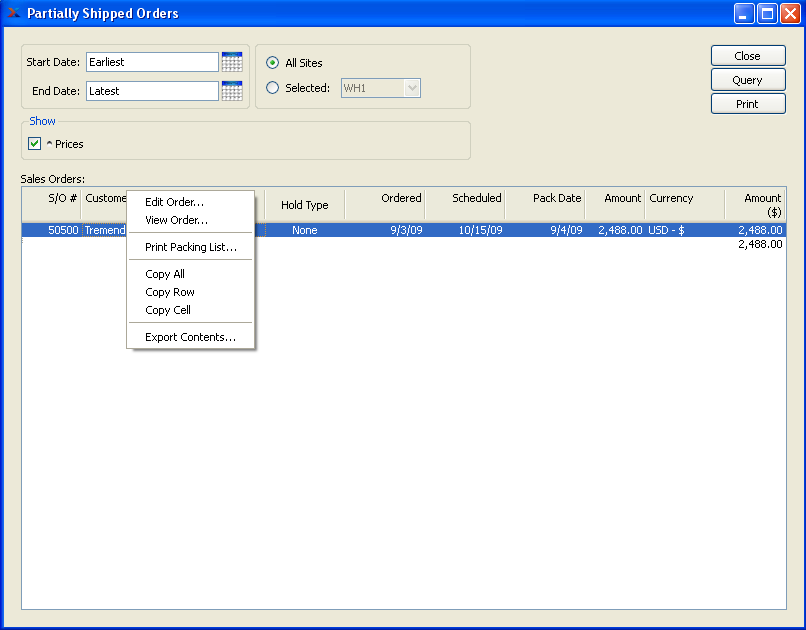
When displaying partially shipped Orders, you are presented with the following options:
- Start Date
Partially shipped Orders entered on and after this date will be displayed.
- End Date
Partially shipped Orders entered on and before this date will be displayed.
- Show Prices
Select to include pricing information in the display.
- All Sites
Select to display partially shipped Orders for all Sites.
- Selected
Specify Site whose partially shipped Orders you want to display.
- Sales Orders
Display lists partially shipped Orders, using the specified parameters. If the "Show Prices" option is selected, an additional column showing Order total will display.
To the far right of the screen, the following buttons are available:
- CLOSE
Closes the screen, returning you to the application desktop.
Runs the report associated with this screen.
Inventory Availability Reports section.
To view Inventory Availability by Sales Order, select the "Inventory Availability by Sales Order" option. The following screen will appear:
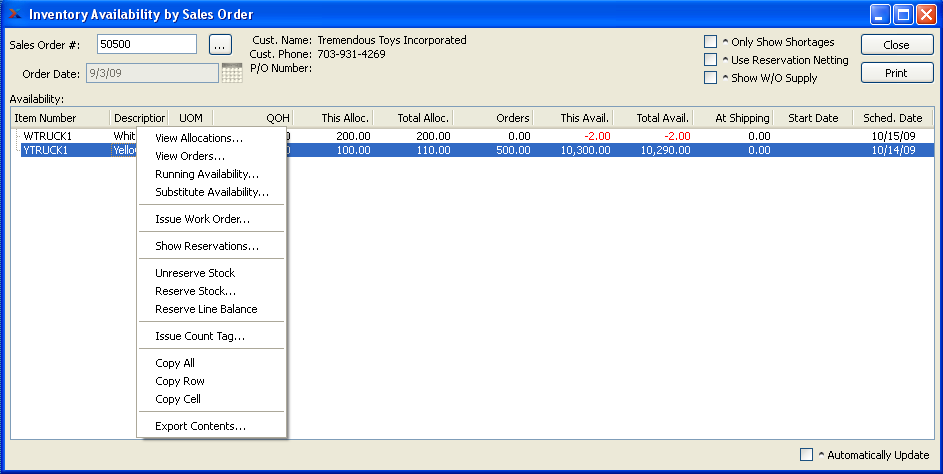
When displaying Inventory Availability by Sales Order, you are presented with the following options:
- Sales Order #
Enter the Sales Order Number of the Sales Order whose Availability you want to view.
- Order Date
Displays the date the Sales Order was placed.
- Cust. Name
Displays Customer name.
- Cust. Phone
Phone: Displays Customer phone number.
- P/O Number
Displays Purchase Order Number.
- Only Show Shortages
Select to only show Inventory shortages in display. A shortage describes Inventory quantity whose Availability is negative.
- Use Reservation Netting
Select to show Sales Order Reservations (if any) for the Sales Order Items included in the display. When selected, the "This Availability" column will dynamically change to "This Reservation" and the quantity reserved for each Sales Order Item (if any) will be shown. This option will not be visible if Sales Order reservations are not enabled at your site.
Tip
To manipulate Sales Order Reservations by Line Item, see the options available in the right-click menu. These options will not be visible if Sales Order Reservations are not enabled at your site.
- Show W/O Supply
Select to include current Work Orders for the Sales Order Items shown in the display. If current Work Orders exist, they will appear nested below each relevant Sales Order Item.
- Availability
Display lists Inventory Availability by Sales Order, using the specified parameters. If an available quantity value displays in the color orange, this means the actual or projected Quantity on Hand is at or below the Reorder Level. If the color is red, the current or projected Quantity on Hand is below 0.
Note
The display features additional color-coding to help easily identify the Sales Order Reservation status of individual Orders and also Line Items. The following color conventions are used:
Green (Line Item level): Line Item quantity is fully-reserved.
Green (Header level): Sales Order has been added to the Packing List Batch
Blue: Line Item quantity is partially-reserved.
Black: Line Item has no Sales Order reservations.
To the far right of the screen, the following buttons are available:
- CLOSE
Closes the screen, returning you to the application desktop.
Runs the report associated with this screen.
- Automatically Update
Select to automatically update the information displayed in the screen. The list will automatically update every 60 seconds if this option is selected.
To view Inventory Availability by Item, select the "Inventory Availability by Item" option. The following screen will appear:
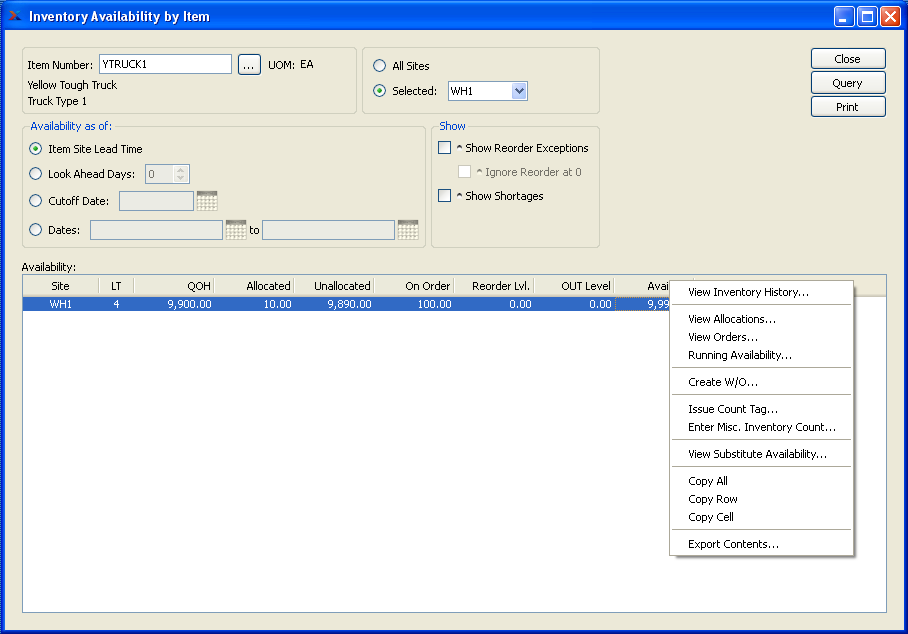
When displaying Inventory Availability by Item, you are presented with the following options:
- Item Number
Enter the Item Number of the Item whose Inventory Availability you want to display. The browse button located to the right of the field leads to a searchable list of make and buy items.
- UOM
Inventory Unit of Measure.
- Show Availability as of
Show Availability using one of the following criteria:
- Item Site Lead Time
Select to show projected Availability based on the Lead Time specified in the Item Site master.
- Look Ahead Days
Select a number using the arrow buttons, or manually enter a value up to a maximum of 1000. Future Availability for the specified Item will be displayed based on the value entered here.
- Cutoff Date
Display will show projected Inventory Availability as of date entered up to a maximum of 1000 days.
- Dates
Display will show projected Inventory Availability for the date range entered.
- All Sites
Select to display Inventory Availability for all Sites.
- Selected
Specify Site whose Inventory Availability you want to display.
- Show Reorder Exceptions
Select to show Reorder Exceptions in display. Reorder Exceptions are an indication that an Item Site's projected Availability will drop below the Reorder Level for the Item Site.
- Ignore Reorder at 0
Select to ignore Reorder Exceptions in cases where both the Item Site Reorder Level and Planned Availability are equal to zero ("0"). If selected, Item Sites matching these criteria will not be displayed.
- Show Shortages
Select to only show Inventory shortages in display. Shortages are always shown in the report, if they exist. However, using this option simply separates shortages out so you can see only them. A shortage exists if Availability is less than zero, as in
QOH - Allocated + Ordered < 0
- Availability
Display lists Inventory Availability by Item, using the specified parameters. If Planned Availability displays in the color orange, this means the actual or projected Quantity on Hand is at or below the Reorder Level. If the color is red, the current or projected Quantity on Hand is below 0.
Note
When quantity appears in the "On Order" column, this refers to quantity that is on order through either a Work Order or Purchase Order. In the case of Purchase Orders, the quantity will always be represented in the Inventory Unit of Measure (UOM)—regardless of the Vendor UOM used on the Purchase Order.
To the far right of the screen, the following buttons are available:
- CLOSE
Closes the screen, returning you to the application desktop.
- QUERY
Select to generate the display, using the specified parameters.
Runs the report associated with this screen.
If Sales Order Reservations are enabled at your site, this screen may be considered a useful workbench for processing Sales Order Reservations. While other screens support this functionality, the Inventory Availability by Customer Type report consolidates several useful functions in one location.
To view Inventory Availability by Customer Type, select the "Inventory Availability by Customer Type" option. The following screen will appear:
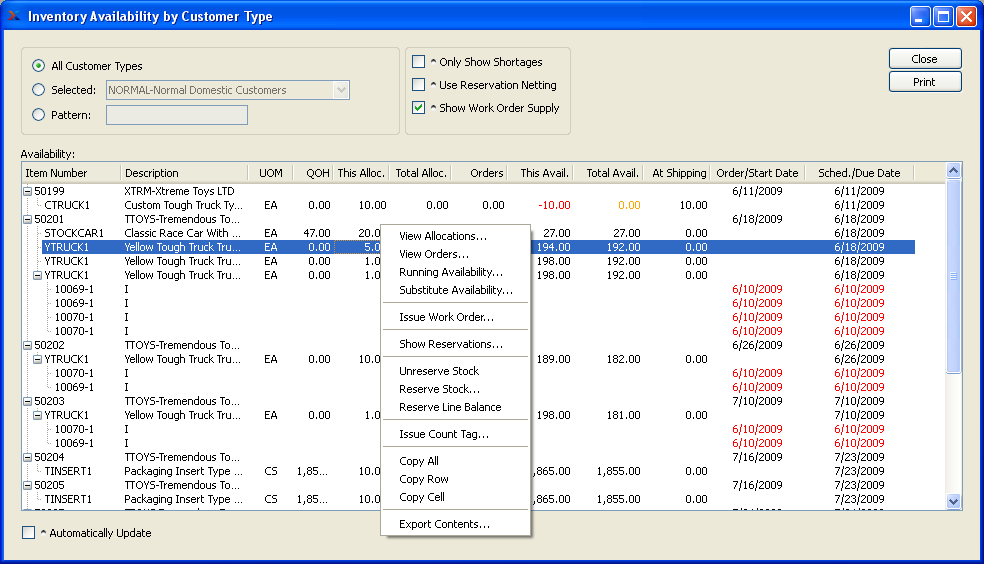
When displaying Inventory Availability by Customer Type, you are presented with the following options:
- All Customer Types
Select to display Inventory Availability for all Customer Types.
- Selected
Specify Customer Type whose Inventory Availability you want to display.
- Pattern
Enter a Customer Type pattern to select a range of Customer Types. Refine your search using Regular Expressions.
- Only Show Shortages
Select to only show Inventory shortages in display. A shortage describes Inventory quantity whose Availability is negative.
- Use Reservation Netting
Select to show Sales Order Reservations (if any) for the Sales Order Items included in the display. When selected, the "This Availability" column will dynamically change to "This Reservation" and the quantity reserved for each Sales Order Item (if any) will be shown. This option will not be visible if Sales Order reservations are not enabled at your site.
Tip
To manipulate Sales Order Reservations by Line Item, see the options available in the right-click menu. These options will not be visible if Sales Order Reservations are not enabled at your site.
- Show W/O Supply
Select to include current Work Orders for the Sales Order Items shown in the display. If current Work Orders exist, they will appear nested below each relevant Sales Order Item.
- Availability
Display lists Inventory Availability by Customer Type, using the specified parameters. If an available quantity value displays in the color orange, this means the actual or projected Quantity on Hand is at or below the Reorder Level. If the color is red, the current or projected Quantity on Hand is below 0.
Note
The display features additional color-coding to help easily identify the Sales Order Reservation status of individual Orders and also Line Items. The following color conventions are used:
Green (Line Item level): Line Item quantity is fully-reserved.
Green (Header level): Sales Order has been added to the Packing List Batch
Blue: Line Item quantity is partially-reserved.
Black: Line Item has no Sales Order reservations.
To the far right of the screen, the following buttons are available:
- CLOSE
Closes the screen, returning you to the application desktop.
Runs the report associated with this screen.
- Automatically Update
Select to automatically update the information displayed in the screen. The list will automatically update every 60 seconds if this option is selected.
The system gives you the ability to reserve Inventory quantity to particular Sales Order Line Items. You can reserve Inventory to Sales Orders using the following screen:
When reserving Inventory quantity to a Sales Order Line Item, you are presented with the following options:
- Sales Order #
Parent Sales Order the Line Item belongs to.
- Line #
Line Item Number for the Sales Order Item.
- Item Number
Item Number for the Sales Order Item.
- UOM
Sales Order Item Unit of Measure.
- Site
Site the Sales Order Item is sold from.
- Balance Due
Remaining Line Item quantity which has not yet been shipped.
- Qty. at Shipping
Line Item quantity currently at Shipping.
- Unreserved Qty
Total Line Item quantity currently not reserved.
- Qty. Reserved
Total Line Item quantity currently reserved for this Sales Order Item.
- Qty. to Reserve
Enter the quantity of Inventory you would like to reserve to the specified Line Item.
Tip
You may only reserve quantity to the Line Item if there is currently Quantity on Hand (QOH) for the Item. Also, you may not reserve more than the balance due.
- UOM
Sales Order Item Unit of Measure.
- Availability
The following Availability information for the sold-from Site will be displayed:
- On Hand
Current Quantity on Hand (QOH) for the specified Item in sold-from Site.
- Reserved
Total quantity of reservations for the specified Item in sold-from Site.
- Unreserved
Total quantity available to be reserved for the specified Item in sold-from Site.
To the far right of the screen, the following buttons are available:
- CANCEL
Closes the screen, returning you to the previous screen.
- RESERVE
Reserves the indicated quantity to the specified Sales Order Item.
The system gives you the ability to view all the Sales Order reservations for an Item, if any. You can view these system-wide reservations using the following screen:
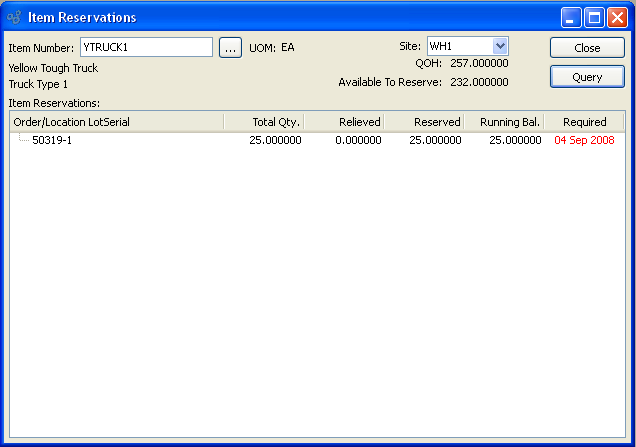
When viewing system-wide Item Reservations, you are presented with the following information:
- Item Number
Item Number for the specified Sales Order Item.
- UOM
Inventory Unit of Measure.
- Site
Sold-from Site containing Sales Order Reservations.
- QOH
Current Quantity on Hand in sold-from Site.
- Available To Reserve
Total quantity available to be reserved in sold-from Site.
- Item Reservations
Display lists Item Reservations, using the specified parameters. If S/O Reservations by Locations is enabled, then reservation quantity by location is displayed for each S/O.
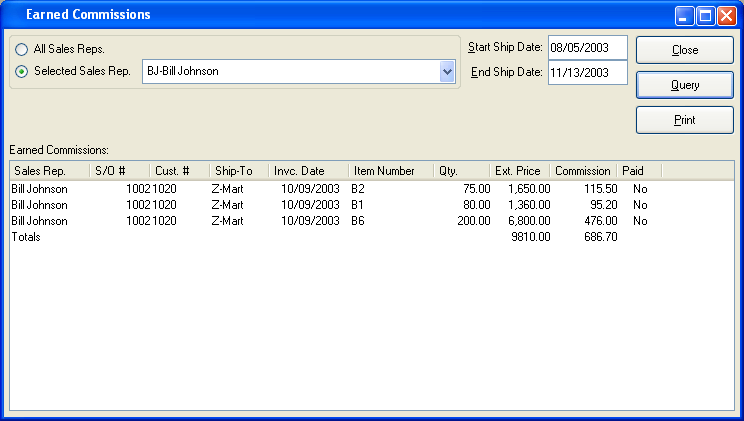
To view Earned Commissions, select the "Earned Commissions" option from the "Displays" menu. The following screen will appear:
Tip
To mark a commission as having been paid, use the "Edit" option on any of the following screens:
Sales History By Customer
Sales History By Bill-To Name
Sales History By Ship-To
Sales History By Item
Sales History By Sales Rep.
Sales History By Product Category
Sales History By Customer Group
Sales History By Customer Type
Bookings By Customer Group
Brief Sales History By Sales Rep.
When displaying Earned Commissions, you are presented with the following options:
- All Sales Reps
Select to display Earned Commissions for all Sales Representatives.
- Selected
Specify Sales Representative whose Earned Commissions you want to display.
- Start Ship Date
Earned Commissions occurring on or after this date will display.
- End Ship Date
Earned Commissions occurring on or before this date will display.
- Earned Commissions
Display lists Earned Commissions for the specified Sales Representative(s) using the specified parameters.
To the far right of the screen, the following buttons are available:
- CLOSE
Closes the screen, returning you to the application desktop.
- QUERY
Select to generate the display, using the specified parameters.
Runs the report associated with this screen.
To view brief Earned Commissions, select the "Brief Earned Commissions" option from the "Displays" menu. The following screen will appear:

When displaying brief Earned Commissions, you are presented with the following options:
- All Sales Reps
Select to display brief Earned Commissions for all Sales Representatives.
- Selected
Specify Sales Representative whose brief Earned Commissions you want to display.
- Start Date
Brief Earned Commissions occurring on or after this date will display.
- End Date
Brief Earned Commissions occurring on or before this date will display.
- Earned Commissions
Display lists brief Earned Commissions for the specified Sales Representative(s) using the specified parameters. Prices are normalized to the Base Currency using the Currency Exchange Rate effective on the Invoice Date.
To the far right of the screen, the following buttons are available:
- CLOSE
Closes the screen, returning you to the application desktop.
- QUERY
Select to generate the display, using the specified parameters.
Runs the report associated with this screen.
The Tax history report offers you the ability to view summarized or detailed information about both sales and purchase Tax history. This report will be especially useful for those who both collect and pay VAT taxes―and must report on and pay net VAT taxes collected. The netting column will only be visible when both the "Sales" and "Purchases" options are selected. To view Tax history, select the "Tax History" option. The following screen will appear:
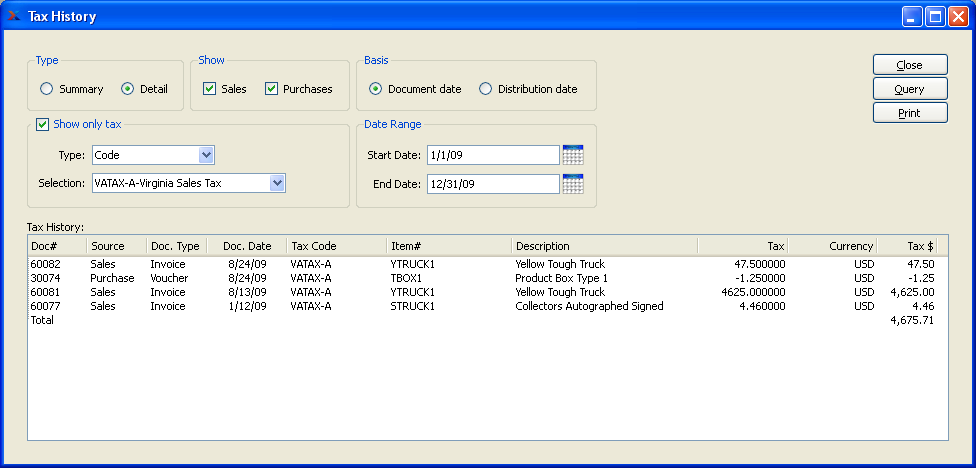
When displaying Tax history, you are presented with the following options:
- Type
Specify one of the following options for viewing your Tax history:
- Summary
Select to display a summarized view of your Tax history.
- Summarize by
In summary mode, you may select from the following filter options:
- Type
Select to show summarized Tax information based on one of the following types of information: Tax Code, Tax Type, Tax Class, Tax Authority, or Tax Zone.
- Selection
Specify a selection option to further refine your results. The selection options will vary depending on the type chosen. For example, if you choose "Zone," then you will be able to choose from a list of all your defined Tax Zones.
- Detail
Select to display a detailed view of your Tax history.
- Show only tax
In detail mode, you may select from the following filter options:
- Type
Select to show detailed Tax information based on one of the following types of information: Tax Code, Tax Type, Tax Class, Tax Authority, or Tax Zone.
- Selection
Specify a selection option to further refine your results. The selection options will vary depending on the type chosen. For example, if you choose "Zone," then you will be able to choose from a list of all your defined Tax Zones.
- Show
Specify the kind(s) of Tax you want to display. If both options are selected, the report will automatically include the net balance between sales Tax paid and purchase Tax collected.
- Sales
Select to include sales Tax in the report. When this option is selected, the columns in the report will include sales information. If not selected, those column headers will be hidden.
- Purchases
Select to include Tax on purchases in the report. When this option is selected, the columns in the report will include purchase information. If not selected, those column headers will be hidden.
- Basis
Specify a date basis to use for the report:
- Document date
Select to use the document date as the basis for the report.
- Distribution date
Select to use the G/L distribution date as the basis for the report.
- Date Range
Specify the date range, based on the chosen date basis:
- Start Date
Taxes posted on and after this date will be included in the report.
- End Date
Taxes posted on and before this date will be included in the report.
- Tax History
Display lists Tax history, using the specified parameters.
To the far right of the screen, the following buttons are available:
- CLOSE
Closes the screen, returning you to the application desktop.
- QUERY
Select to generate the display, using the specified parameters.
Runs the report associated with this screen.
Customer Reports section.
To view Customers by Customer Type, select the "Customers by Customer Type" option from the "Displays" menu. The following screen will appear:
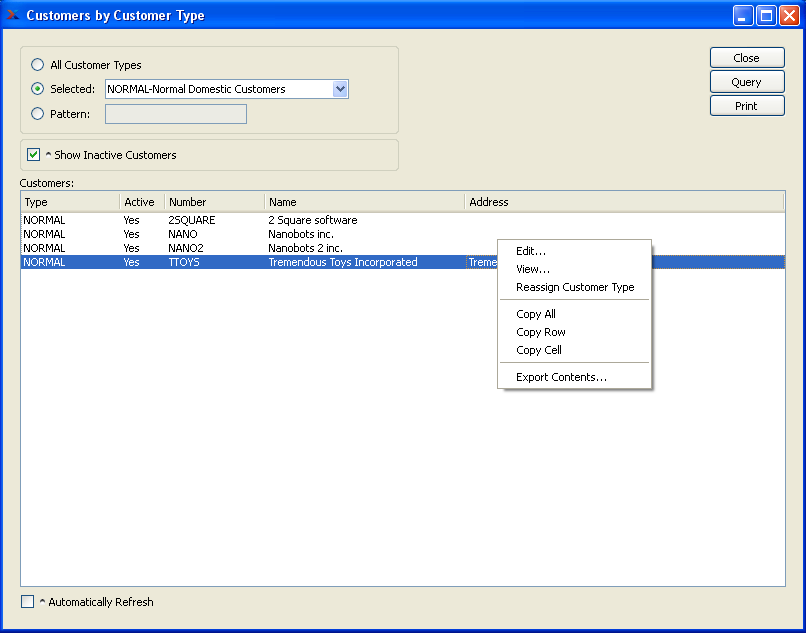
When displaying Customers by Customer Type, you are presented with the following options:
- All Customer Types
Select to display Customers for all Customer Types.
- Selected
Specify Customer Type whose Customers you want to display.
- Pattern
Enter a Customer Type pattern to select a range of Customer Types. Refine your search using Regular Expressions.
- Show Inactive Customers
Select to show inactive Customers in the display.
- Customers
Display lists Customers for specified Customer Type(s).
To the far right of the screen, the following buttons are available:
- CLOSE
Closes the screen, returning you to the application desktop.
- QUERY
Select to generate the display, using the specified parameters.
Runs the report associated with this screen.
To view Customers by Characteristic, select the "Customers by Characteristic" option from the "Displays" menu. The following screen will appear:
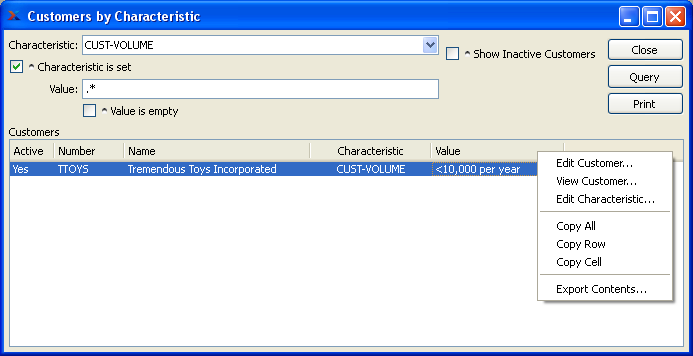
When displaying Customers by Characteristic, you are presented with the following options:
- Characteristic
Select a Characteristic from the list of Characteristics designated as being available for use as Customer Characteristics. If you query with only this field set, you will see a list of all Customers who are either using or are eligible to use this Characteristic (i.e., because their Customer Type supports a Characteristic Profile).
- Characteristic is set
Select to include only those Customers with a specific value assigned to the specified Characteristic. If selected, the report will include only those Customers who are using the Characteristic with a defined value.
- Value
Enter a Characteristic value to view Customers who have been assigned the Characteristic and value combination.
- Value is empty
Select this option to include Customers who are using the specified Characteristic, but with an empty value.
- Show Inactive Customers
Select to include inactive Customers in the display.
- Customers
Display lists Customers who have been assigned the Characteristic and value combination.
To the far right of the screen, the following buttons are available:
- CLOSE
Closes the screen, returning you to the application desktop.
- QUERY
Select to generate the display, using the specified parameters.
Runs the report associated with this screen.