Prospect section.
Prospects are potential Customer Accounts. The system allows you to maintain information on Prospects—and then, when the time is right, it enables you to convert Prospect Accounts to Customer Accounts.
Tip
To convert a Prospect to a Customer, simply select the "Customer" button on the Prospect's CRM Account. This will prompt you to convert the Prospect information—and also give you the chance to convert any existing Prospect Quotes to Customer Quotes.
To create a new Prospect, select the "Enter New Prospect" option. The following screen will appear:
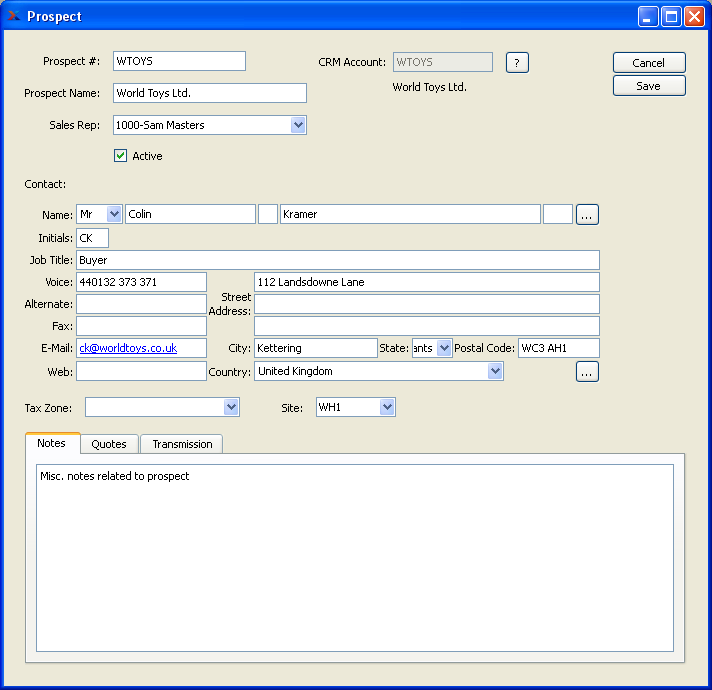
Create New Prospect Account
Tip
Prospects can also be created from the CRM Account screen. Simply enter a new CRM Account, selecting the "Prospect" Relationship option.
When creating a new Prospect, you are presented with the following options:
- Prospect #
Enter a code to identify the Prospect.
- Prospect Name
Enter a name to describe the Prospect.
- Sales Rep
Specify the Sales Representative associated with the Prospect.
- Active
Select to indicate the Prospect is Active. Not selecting this option means the Prospect is inactive.
- CRM Account
Displays the CRM Account Number associated with the Prospect. Prospects are a form of CRM Account. If a Prospect is created from the Sales module, a linked CRM Account will automatically be created. To view the CRM Account information for the Prospect, select the "?" symbol next to the field.
- Contact
Manually enter Contact information in the fields below—or use the browse button to select pre-existing Contact information. If a new Contact is manually entered here, that Contact will be added automatically to the master list of Contacts. For additional documentation related to creating Contacts, see Section 7.1, “ New Contact”.
Note
If a new Address is manually entered here, that Address will be added automatically to the master list of Addresses.
- Address
Manually enter the Prospect's Address information in the fields below—or use the browse button to select pre-existing Address information. If a new Address is manually entered here, that Address will be added automatically to the master list of Addresses. For additional documentation related to creating Addresses, see Section 8.1, “ New Address”.
- Tax Zone
Specify the Tax Zone you want to associate with the Prospect.
- Site
Specify the Site (i.e., Site or Store) the Prospect is associated with.
The system allows you to enter Quotes for Prospects. To view the list of existing Prospect Quotes—or to enter a new Quote for a Prospect—select the "Quotes" tab at the bottom of the Prospect screen. The following screen will appear:
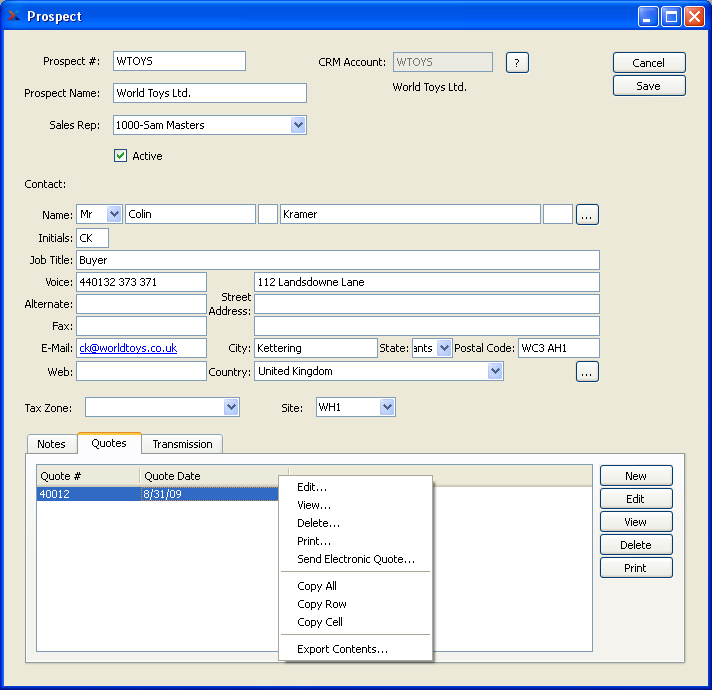
The "Quotes" screen displays information on all existing Prospect Quotes, including Quote Number and Quote date.
To the far right of the screen, the following buttons are available:
- CANCEL
Closes the screen without creating a Prospect, returning you to the previous screen.
- SAVE
Creates the Prospect and adds it to the master list of Prospects.
- NEW
Opens screen for creating a new Prospect Quote.
- EDIT
Enables you to edit highlighted Prospect Quotes. The edit screen is the same as that for creating new Prospect Quotes—except that when editing, the fields will contain Prospect Quote information. Double-clicking on a Prospect Quote line will also bring you to the editing screen.
- VIEW
Highlight a Prospect Quote and then select this button to reach a read-only view of the "Edit" screen.
- DELETE
Highlight a Prospect Quote line and then select this button to remove the Prospect Quote from the list
Runs the report associated with this screen.
If the Prospect specified on the Quote has an EDI Profile attached or has an email address for the Contact, you may encounter an EDI processing interface when printing the Quote.
The Electronic Data Interchange (EDI) system enables you to send Quotes electronically to your Prospects. To establish a Prospect's EDI preferences, select the "Transmission" tab. The following screen will appear:
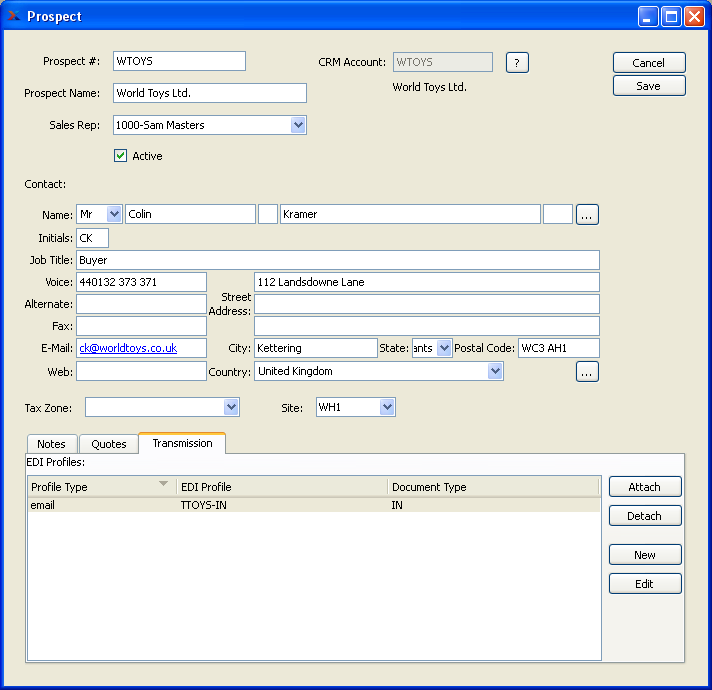
Transmission Information for EDI
Note
If you do not set EDI preferences for a Prospect but do enter an email address for the Contact, you may see an EDI processing interface when you print Quotes for the Prospect.
When associating EDI Profiles with EDI recipients, such as Customers, Ship-To Addresses, and Vendors, you are presented with the following options:
- EDI Profiles
Display lists EDI Profiles associated with this recipient (e.g. current Customer) for a particular document type. It also shows whether EDI will be sent via email or FTP.
To the far right of the screen, the following buttons are available:
- ATTACH
Connect an existing EDI Profile to this EDI recipient for a particular document type.
- DETACH
Detach the selected EDI Profile from the recipient for the selected document type.
- NEW
Create a new EDI Profile and have the opportunity to attach it to the current recipient.
- EDIT
Edit the selected EDI Profile.
To attach an existing EDI Profile to the current recipient, select the ATTACH button. The following screen will appear:
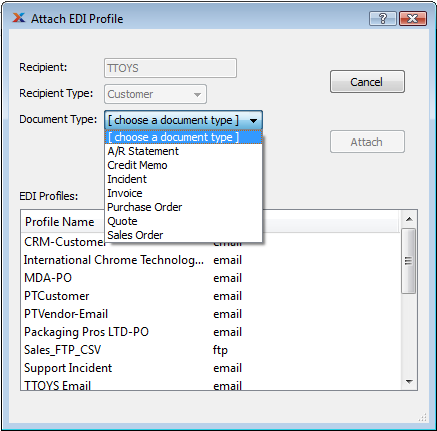
- Recipient
This shows the number of the Customer, Vendor, etc. which will receive EDI using the selected EDI Profile.
- Recipient Type
This shows whether the Recipient is a Customer, Vendor, etc. This reduces confusion in cases where a Customer and Vendor have the same number (i.e., the same CRM Account is both a Customer and Vendor).
- Document Type
Choose from this list the type of document you want to use the EDI Profile for.
- EDI Profiles
Choose from this list the EDI Profile you want to attach for the selected document type.
To the far right of the screen, the following buttons are available:
- CANCEL
Closes the screen without attaching the EDI Profile, returning you to the previous screen.
- ATTACH
Attaches the EDI Profile to the recipient and closes the screen, returning you to the previous screen.
If there is no existing EDI Profile that suits your needs, you can create a new one by selecting the NEW button. This does the same thing as clicking the NEW button on the EDI Profiles window (see Section 13.16, “EDI Profiles”). After you have created the new EDI Profile and saved it, the Attach EDI Profile window will appear with the new EDI Profile selected. Now you can select the Document Type and click ATTACH. If you click CANCEL, the new EDI Profile will still be saved but will not be attached to the recipient.
Prospects are potential Customer Accounts. The system allows you to maintain information on Prospects—and then, when the time is right, it enables you to convert Prospect Accounts to Customer Accounts.
Tip
To convert a Prospect to a Customer, simply select the "Customer" button on the Prospect's CRM Account. This will prompt you to convert the Prospect information—and also give you the chance to convert any existing Prospect Quotes to Customer Quotes.
To access the master list of Prospects, select the "Prospects" option. The following screen will appear:
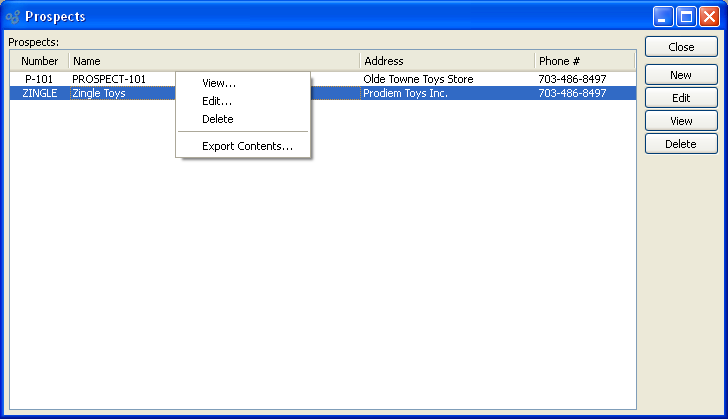
The Prospects master list displays information on all existing Prospects, including Prospect Number, Name, address, and phone number.
To the far right of the screen, the following buttons are available:
- CLOSE
Closes the screen, returning you to the application desktop.
- NEW
Opens screen for creating a new Prospect.
- EDIT
Enables you to edit highlighted Prospect. The edit screen is the same as that for creating a new Prospect—except that when editing, the fields will contain Prospect information. Double-clicking on a Prospect will also bring you to the editing screen.
- VIEW
Highlight a Prospect and then select this button to reach a read-only view of the "Edit" screen.
- DELETE
Highlight a Prospect and then select this button to remove the Prospect from the master list.
To search for a Prospect, select the "Search for Prospect" option. The following screen will appear:
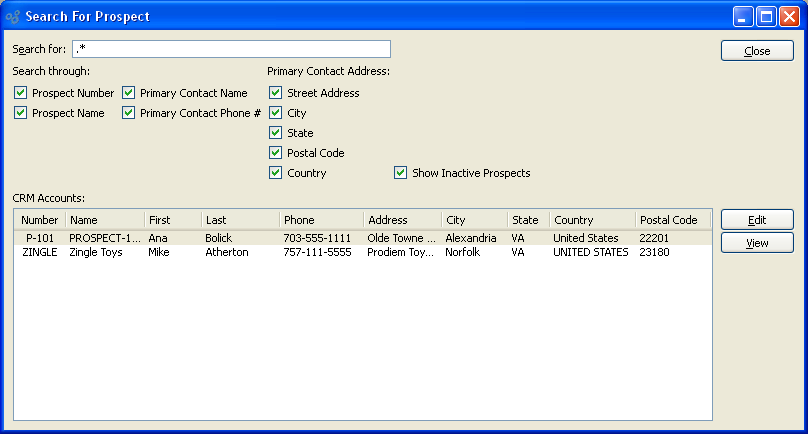
When searching to retrieve Prospect information from the database, you are presented with the following options:
- Search for
Enter any character or combination of characters you want to match, followed by the TAB key. The "Search for" field supports pattern matching with Regular Expressions.
Tip
Hitting the TAB key activates the search operation.
- Search through
Specify which of the following criteria you want to include in the search:
- Prospect Number
Select to search by Prospect Number.
- Prospect Name
Select to search by Prospect Name.
- Primary Contact Name
Select to search by Primary Contact Name.
- Primary Contact Phone #
Select to search by Primary Contact Phone Number.
- Street Address
Select to search by Primary Contact Street Address.
- City
Select to search by Primary Contact City.
- State
Select to search by Primary Contact State.
- Postal Code
Select to search by Primary Contact Postal Code.
- Country
Select to search by Primary Contact Country.
- Show Inactive Prospects
Select to show inactive Prospects as well as active Prospects. By default, inactive Prospects are not displayed.
- CRM Accounts
Display will show search results for Prospect Accounts, using specified parameters.
To the far right of the screen, the following buttons are available:
- CLOSE
Closes the screen, returning you to the application desktop.
- EDIT
Enables you to edit highlighted Prospect. The edit screen is the same as that for creating a new Prospect—except that when editing, the fields will contain Prospect information. Double-clicking on a Prospect will also bring you to the editing screen.
- VIEW
Highlight a Prospect and then select this button to reach a read-only view of the "Edit" screen.