Item Pricing section.
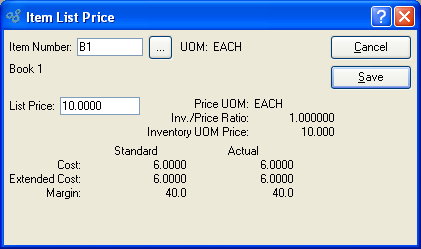
To create or modify the List Price for an Item, select the "Item List Price" option. The following screen will appear:
Note
List Prices may also be created or modified in the Item master for an Item. Changes made to an Item's List Price in either location will be reflected application-wide.
When creating an Item List Price, you are presented with the following options:
- Item Number
Enter the Item Number of the Item you want to create or modify a List Price for.
- UOM
Inventory Unit of Measure.
- List Price
Enter the List Price for the specified Item.
- Price UOM
Displays the Price UOM for the specified Item.
- Inv./Price Ratio
Displays the ratio between the Price and Inventory Units of Measure for the specified Item.
- Inventory UOM Price
Displays the Inventory Unit of Measure Price for the Item.
- Cost
Displays Standard Cost and Actual Cost for the specified Item.
- Extended Cost
Displays the extended Standard Cost and extended Actual Cost for the Item. The extended Cost is equal to the List Price multiplied by the Price/Inventory UOM ratio. If the Price/Inv. Ratio = 1, then the Cost and Extended Cost will be the same.
- Margin
Displays the profit margin. The margin is determined by the following formula: Price - Cost / Price.
To the far right of the screen, the following buttons are available:
- CANCEL
Closes the screen, returning you to the previous screen.
- SAVE
Creates the Item List Price.
To update List Prices by Product Category, select the "Update List Prices by Product Category" option. The following screen will appear:
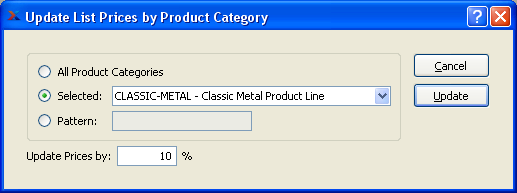
When updating List Prices by Product Category, you are presented with the following options:
- All Product Categories
Select to update List Prices for all Product Categories.
- Selected
Specify Product Category whose List Prices you want to update.
- Pattern
Enter a Product Category pattern to select a range of Product Categories. Refine your search using Regular Expressions.
- Update Prices by
Specify the percentage you want to update your List Prices by. The percentage can be either positive or negative.
To the far right of the screen, the following buttons are available:
- CANCEL
Closes the screen without updating List Prices by Product Category, returning you to the application desktop.
- UPDATE
Updates List Prices by Product Category, using the specified parameters.
A Pricing Schedule is a grouping of sold Items indicating special Prices for specified Quantity Breaks. Pricing Schedules may be assigned to individual Customers or to groups of Customers by Customer Type. To access the master list of Pricing Schedules, select the "Pricing Schedules" option. The following screen will appear:
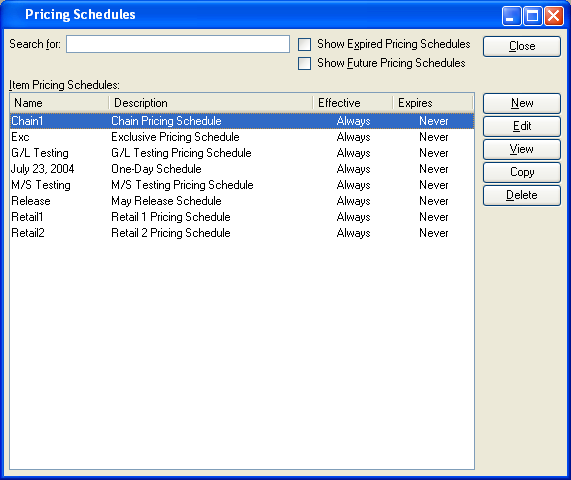
At the top of the screen is a "Search for" field. To search for a Pricing Schedule, begin typing in the search field. As you type, the list will automatically scroll toward the Pricing Schedule you are typing. You can also search for Pricing Schedules manually by scrolling through the list. The following filters can also be applied to your search:
- Show Expired Pricing Schedules
Select to display expired Pricing Schedules.
Note
The effectivity and expiration dates for Pricing Schedules correspond to the created date for Sales Orders. Changes to Line Item quantities or scheduled dates for already-created Sales Orders can also cause Pricing Schedule effectivity to be recalculated as of the date the changes occur.
- Show Future Pricing Schedules
Select to display future Pricing Schedules.
- Item Pricing Schedules
Display lists Item Pricing Schedules.
To the far right of the screen, the following buttons are available:
- CLOSE
Closes the screen, returning you to the application desktop.
- NEW
Opens screen for creating a new Pricing Schedule.
- EDIT
Enables you to edit highlighted Pricing Schedule. The edit screen is the same as that for creating a new Pricing Schedule—except that when editing, the fields will contain Pricing Schedule information. Double-clicking on a Pricing Schedule will also bring you to the editing screen.
- VIEW
Highlight a Pricing Schedule and then select this button to reach a read-only view of the "Edit" screen.
- COPY
Highlight a Pricing Schedule and then select this button to create a new Pricing Schedule which duplicates the source Pricing Schedule.
- DELETE
Highlight a Pricing Schedule and then select this button to remove the Pricing Schedule from the list.
A single Pricing Schedule may contain multiple Items or Product Categories—and multiple Quantity Breaks. To create a new Pricing Schedule, select the NEW button. The following screen will appear:
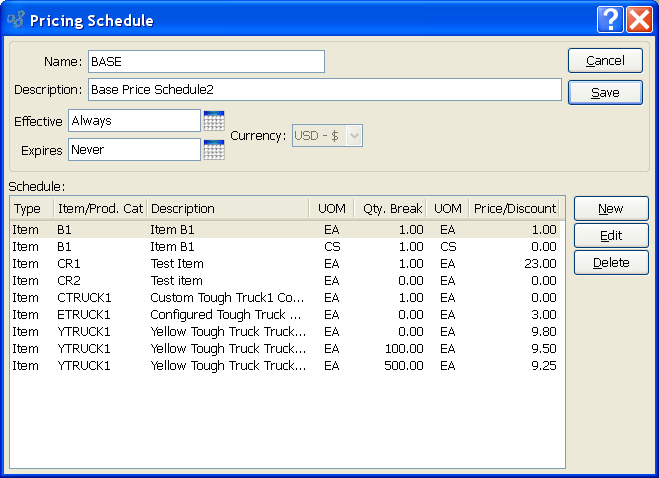
Tip
When Sales Orders are entered, the system will search for Quantity Break matches between the Sales Order Item and the relevant Pricing Schedule. If duplicate Quantity Breaks are found, the lowest Price for the given quantity will be used.
When creating a new Pricing Schedule, you are presented with the following options:
- Name
Enter the name of the Pricing Schedule.
- Description
Enter a description to identify the Pricing Schedule.
- Effective
Enter the date when the Pricing Schedule becomes effective.
Note
The effectivity and expiration dates for Pricing Schedules correspond to the created date for Sales Orders. Changes to Line Item quantities or scheduled dates for already-created Sales Orders can also cause Pricing Schedule effectivity to be recalculated as of the date the changes occur.
- Expires
Enter the date when the Pricing Schedule expires.
- Schedule
Display lists all sold Items or Product Categories assigned to this Pricing Schedule.
To the far right of the screen, the following buttons are available:
- CANCEL
Closes the screen, returning you to the previous screen.
- SAVE
Creates the Pricing Schedule, adding it to the master list of Pricing Schedules.
- NEW
Opens screen for creating a new Pricing Schedule Item.
- EDIT
Enables you to edit highlighted Pricing Schedule Item. The edit screen is the same as that for creating a new Pricing Schedule Item—except that when editing, the fields will contain Pricing Schedule Item information. Double-clicking on a Pricing Schedule Item will also bring you to the editing screen.
- DELETE
Highlight a Pricing Schedule Item and then select this button to remove the Pricing Schedule Item from the list.
To create a new Pricing Schedule Item, select the NEW button. The following screen will appear:
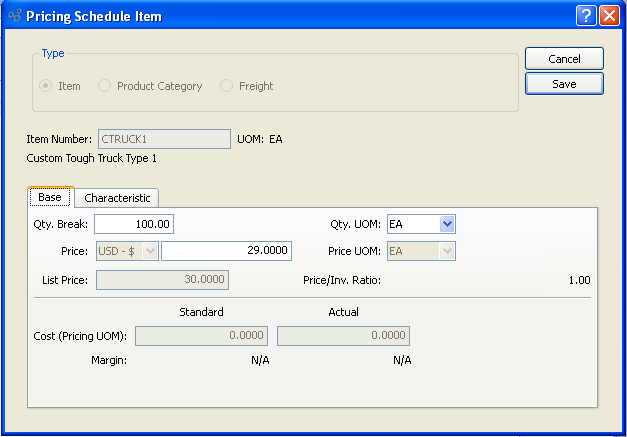
When creating a new Pricing Schedule Item, you are presented with the following options:
- Type
Specify which type of Pricing Schedule Item you want to create:
- Item
Select if the Pricing Schedule is for an individual Item.
- Product Category
Select if the Pricing Schedule is for a Product Category.
Tip
The screen options will differ depending on whether the Pricing Schedule is for an Item or a Product Category.
- Freight
Select if the Pricing Schedule is for Freight.
- Item Number
Enter the Item Number of the Item you want to add to the Pricing Schedule. The browse button located to the right of the field leads to a searchable sold Items list. Multiple sold Items may be assigned to a single Pricing Schedule.
- UOM
Inventory Unit of Measure.
To define the base Pricing Schedule details for non-configured Items, select the "Base" tab. The "Characteristics" tab is only available for configured Items (i.e., Job and Reference Items).
- Qty. Break
Enter the lowest quantity of the specified Item that must be purchased to receive the specified Price. The Quantity Break is measured in the Inventory Unit of Measure. Multiple Quantity Breaks may be assigned to a single Item.
- Price
Enter the Price the specified Item may be purchased for if the specified Quantity Break is met. The Price is measured in the Price Unit of Measure.
- Qty. UOM
Specify the Unit of Measure you want to use for the Quantity Break. By default, the Inventory UOM will appear here. However, if you have Selling UOMs defined for the specified Item, you may also select one of these. Selling UOMs are defined on the Item master.
Tip
When using a Selling UOM for the Quantity Break, you may not select an alternate Price UOM. The reason for this is that selling UOMs use the same UOM for both quantity and pricing.
- Price UOM
Specify the Price Unit of Measure to be used with the specified Quantity Break UOM. If you select a Selling UOM for the Qty. UOM, you will not be able to select a Price UOM. For Selling UOMs, the Selling UOM and the Price UOM are the same.
- List Price
Displays the List Price for the specified Item.
- Price/Inv. Ratio
Displays the ratio between the Price and Inventory Units of Measure for the specified Item.
- Cost (Pricing UOM)
Displays Standard Cost and Actual Cost for the specified Item.
- Margin
The margin is determined by the following formula: Price - Cost / Price.
If the specified Item is a configured Item (i.e., Job and Reference Items), then the "Characteristics" tab will be available. Characteristics for configured Items can carry their own List Prices. These Characteristic Prices may be added to the Base Price when configured Items are sold. To define Characteristic pricing for configured Items, select the "Characteristics" tab. The following screen will appear:
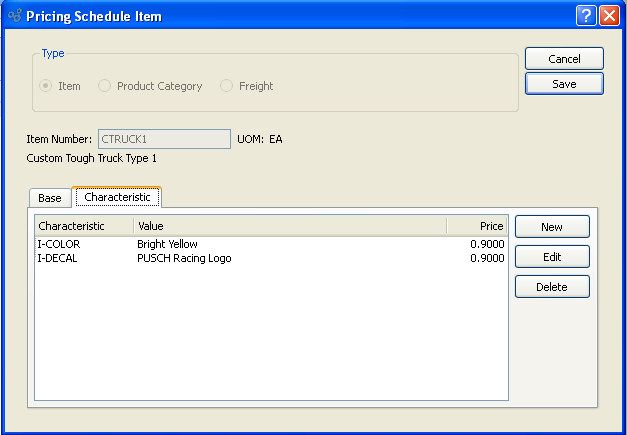
When defining Characteristic pricing for configured Items, you are presented with the following options:
- Characteristic
List displays all the Characteristic Prices which have been associated with the Pricing Schedule Item.
To the far right of the screen, the following buttons are available:
- NEW
Opens screen for creating a new Characteristic pricing Item.
- EDIT
Enables you to edit highlighted Characteristic pricing Item. The edit screen is the same as that for creating a new Characteristic pricing Item—except that when editing, the fields will contain Characteristic pricing Item information. Double-clicking on a Characteristic pricing Item will also bring you to the editing screen.
- DELETE
Highlight a Characteristic pricing Item and then select this button to remove the Characteristic pricing Item from the list.
To add a new Characteristic pricing Item, select the NEW button. The following screen will appear:
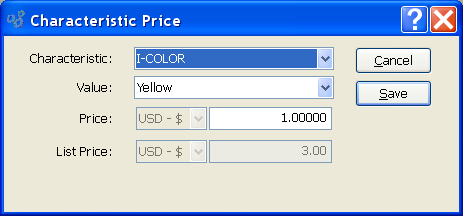
When adding a new Characteristic pricing Item, you are presented with the following options:
- Characteristic
Select a Characteristic from the list of Item Characteristics defined for the specified Item.
- Value
Select a Value from the list of Values defined for the specified Item Characteristic.
- Price
Enter a new Price for the Characteristic and Value combination. This alternate Price will be used in place of the standard Characteristic List Price when the Pricing Schedule is used.
- List Price
Displays the default List Price for the Item Characteristic. The List Price for Characteristics is added to the Base Price of Sales Order Items when the Characteristic is specified at Sales Order entry time. Pricing Schedules are designed to override standard List Prices.
To the far right of the screen, the following buttons are available:
- CANCEL
Closes the screen without creating the Pricing Schedule Item, returning you to the previous screen.
- SAVE
Creates the Pricing Schedule Item and adds it to the Pricing Schedule.
If you are creating a new Pricing Schedule for a Product Category, the following screen will appear:
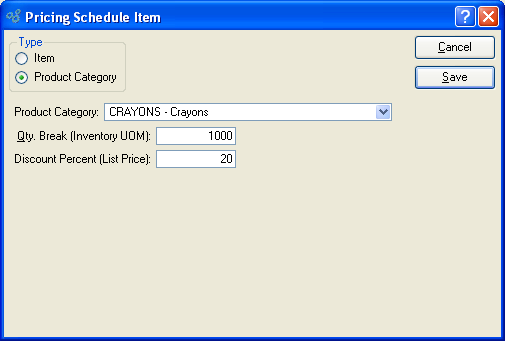
When creating a new Pricing Schedule for a Product Category, you are presented with the following options:
- Product Category
Specify the Product Category you want to add to the Pricing Schedule. All Items in the Product Category will be subject to the specified Quantity Break and Discount. Multiple Product Categories may be assigned to a single Pricing Schedule.
- Qty. Break (Inventory UOM)
Enter the lowest quantity that must be purchased to receive the specified Discount. The Quantity Break applies to all Items in the specified Product Category. Multiple Quantity Breaks may be assigned to a single Product Category.
- Discount Percent (List Price)
Enter the Discount percentage off List Price to be used when the specified Quantity Break is reached. The List Prices for all Items in the Product Category will be reduced by the specified percentage.
In order for Pricing Schedules to take effect at Sales Order entry, the Pricing Schedules must be linked—or assigned—to specific Customers or Customer Types. To assign Pricing Schedules to Customers, select the "Pricing Schedule Assignments" option. The following screen will appear:
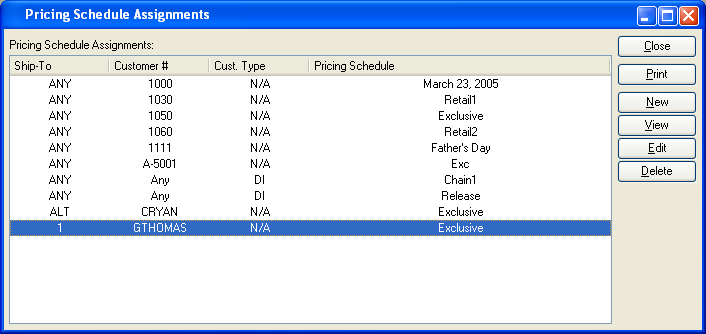
When assigning Pricing Schedules to Customers, you are presented with the following options:
- Pricing Schedule Assignments
Display lists any and all Pricing Schedule Assignments.
To the far right of the screen, the following buttons are available:
- CLOSE
Closes the screen, returning you to the application desktop.
Runs the report associated with this screen.
- NEW
Opens screen for creating a new Pricing Schedule assignment.
- EDIT
Enables you to edit highlighted Pricing Schedule assignment. The edit screen is the same as that for creating a new Pricing Schedule assignment—except that when editing, the fields will contain Pricing Schedule assignment information. Double-clicking on a Pricing Schedule assignment will also bring you to the editing screen.
- DELETE
Highlight a Pricing Schedule assignment and then select this button to remove the Pricing Schedule assignment from the list of Pricing Schedule assignments.
To create a Pricing Schedule assignment, select the NEW button. The following screen will appear:
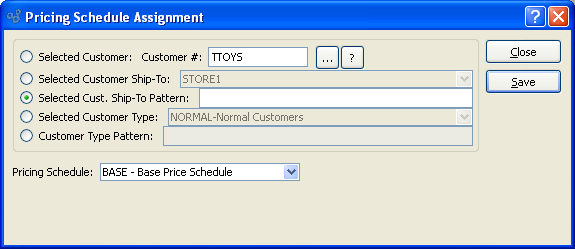
When creating a new Pricing Schedule assignment, you are presented with the following options:
- Selected Customer
Select to assign a Pricing Schedule to an individual Customer.
- Customer #
Specify the Customer Number of the Customer you want to assign a Pricing Schedule to. The browse button located to the right of the field leads to a searchable Customers list. You may also access this list using the keyboard shortcut "CTRL + L". Once a Customer Number is entered, the Customer name and billing address will display. Select the "?" or "$" symbol next to the browse button to view Customer information for the specified Customer. If a Customer's credit is "In Good Standing," the button will feature a black question mark ("?") icon. If the icon turns to an orange dollar sign ("$"), the Customer's credit Status is "On Credit Warning." A red dollar sign ("$") indicates the Customer's credit Status is "On Credit Hold."
- Selected Customer Ship-To
Specify the Customer Ship-To Address you want to assign a Pricing Schedule to. This is an optional setting which may be used in conjunction with the "Selected Customer" setting. The Ship-To option gives you the added flexibility of being able to assign multiple Pricing Schedules to a single Customer based on separate Ship-To Addresses.
Tip
When entering Credit Memos, make sure the Ship-To Address on the Credit Memo matches the Ship-To Address on the Customer's Pricing Schedule. If they don"t match, you won"t be able to issue credit for exclusively sold Items.
- Selected Cust. Ship-To Pattern
Enter a Ship-To Address pattern to select a range of Ship-To Addresses for the selected Customer.
- Selected Customer Type
Specify the Customer Type you want to assign a Pricing Schedule to.
- Customer Type Pattern
Enter a Customer Type pattern to select a range of Customer Types. Refine your search using Regular Expressions.
- Pricing Schedule
Specify the Pricing Schedule to be used when entering Sales Orders for the specified Customers.
Sales offer the opportunity for discounting Items and Product Categories across all Customer Types. Unlike Pricing Schedule Assignments, Sales cannot be limited to certain Customers or Customer Types. Instead, all Customers benefit from Sales during the period of time when a Sale is in effect. To create a Sale tied to a Pricing Schedule, select the "Sales" option. The following screen will appear:
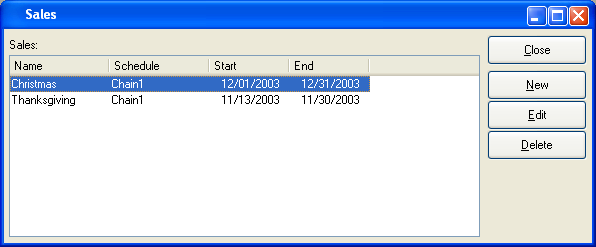
Note
If a Sale is in effect and the Sale Price is lower than the most specific Customer Price, then the Customer will be given the Sale Price.
When defining and maintaining Sale information, you are presented with the following options:
- Sales
Display lists any and all Sales.
To the far right of the screen, the following buttons are available:
- CLOSE
Closes the screen, returning you to the application desktop.
- NEW
Opens screen for creating a new Sale.
- EDIT
Enables you to edit highlighted Sale. The edit screen is the same as that for creating a new Sale—except that when editing, the fields will contain Sale information. Double-clicking on a Sale will also bring you to the editing screen.
- DELETE
Highlight a Sale and then select this button to remove the Sale from the list of Sales.
To create a new Sale, select the NEW button. The following screen will appear:
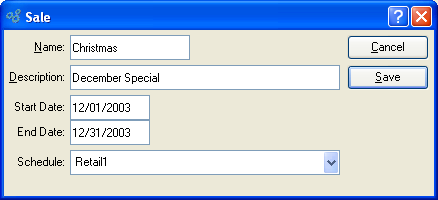
Note
Sales make Pricing Schedules available to all Customers for the period of time defined by the Sale.
When creating a new Sale, you are presented with the following options:
- Name
Enter the name of the Sale.
- Description
Enter a description to identify the Sale.
- Start Date
Enter the date when the Sale begins.
- End Date
Enter the date when the Sale ends.
- Schedule
Specify a Pricing Schedule to assign to the Sale. By assigning a Pricing Schedule to a Sale, you make the Prices on the Pricing Schedule available to all Customers for the period defined by the Sale.
To the far right of the screen, the following buttons are available:
- CANCEL
Closes the screen, returning you to the previous screen.
- SAVE
Creates the Sale, adding it to the master list of Sales.
Update Prices section.
To update Prices by Product Category, select the "Update Prices by Product Category" option. The following screen will appear:
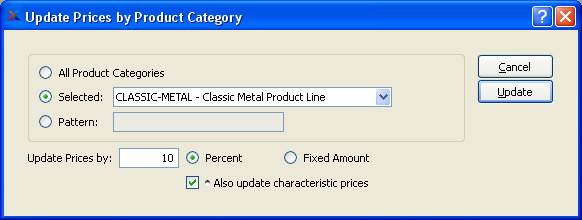
When updating Prices by Product Category, you are presented with the following options:
- All Product Categories
Select to update Prices for all Product Categories.
- Selected
Specify Product Category whose Prices you want to update.
- Pattern
Enter a Product Category pattern to select a range of Product Categories. Refine your search using Regular Expressions.
- Update Prices by
Enter an amount based on the Price update option you specify:
- Percent
Select to update Prices by a percentage amount.
- Fixed Amount
Select to update Prices by a fixed amount.
- Also Update Characteristic Prices
Select to also update Prices associated with Item Characteristics for Items in the specified Product Category range.
To the far right of the screen, the following buttons are available:
- CANCEL
Closes the screen without updating Prices by Product Category, returning you to the application desktop.
- UPDATE
Updates Prices by Product Category, using the specified parameters.
To update Item Prices by Pricing Schedule, select the "Update Prices by Pricing Schedule" option. The following screen will appear:
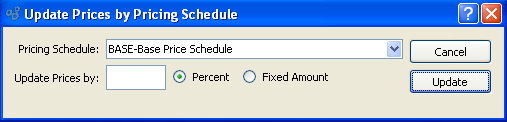
Note
This utility updates Item Prices found on Pricing Schedules only. It will not update discount percentages, nor List Prices.
When updating Prices by Pricing Schedule, you are presented with the following options:
- Pricing Schedule
Specify the Pricing Schedule whose Prices you want to update.
- Update Prices by
Update Prices for the selected Pricing Schedule. Select Percent or Fixed Amount to specify how you want to update pricing.
To the far right of the screen, the following buttons are available:
- CANCEL
Closes the screen without updating Item Prices by Pricing Schedule, returning you to the application desktop.
- UPDATE
Updates Item Prices by Pricing Schedule, using the specified parameters.
Item Pricing Reports section.
To display a list of Prices by Customer Type, select the "Prices by Customer Type" option. The following screen will appear:
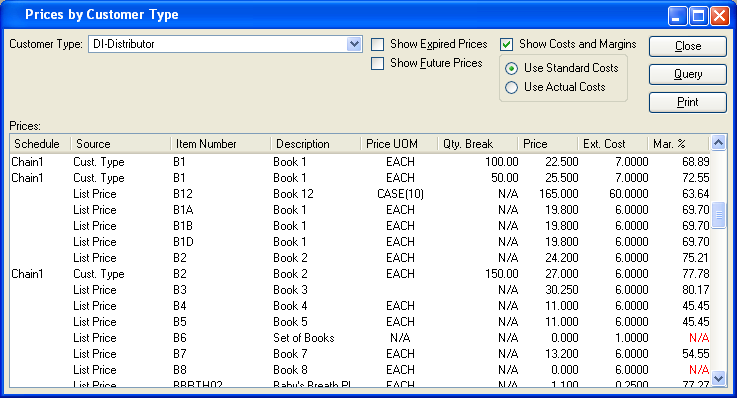
When displaying Prices by Customer Type, you are presented with the following options:
- Customer Type
Specify the Customer Type whose Prices you want to display.
- Show Expired Prices
Select to display expired Prices.
- Show Future Prices
Select to display future Prices.
- Show Costs and Margins
Select to show Costs and margins using one of the following costing parameters:
- Use Standard Costs
Select to show Costs and margins using Standard Costs.
- Use Actual Costs
Select to show Costs and margins using Actual Costs.
- Prices
Display lists Prices for the specified Customer Type. Cost and margin columns will also appear if the "Show Costs and Margins" parameter is selected. If the margin is negative, the value will display in red type.
To the far right of the screen, the following buttons are available:
- CLOSE
Closes the screen, returning you to the application desktop.
- QUERY
Select to generate the display, using the specified parameters.
Runs the report associated with this screen.
To display a list of Prices by Customer, select the "Prices by Customer" option. The following screen will appear:
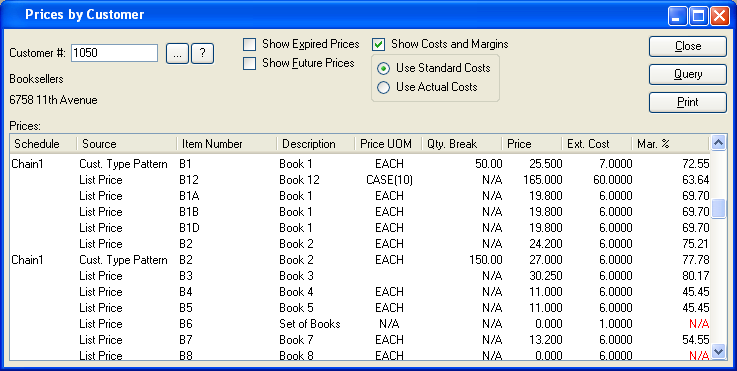
When displaying Prices by Customer, you are presented with the following options:
- Customer #
Enter the Customer Number of the Customer whose Item Prices you want to view. The browse button located to the right of the field leads to a searchable Customers list. You may also access this list using the keyboard shortcut "CTRL + L". Once a Customer Number is entered, the Customer name and billing address will display. Select the "?" or "$" symbol next to the browse button to view Customer information for the specified Customer. If a Customer's credit is "In Good Standing," the button will feature a black question mark ("?") icon. If the icon turns to an orange dollar sign ("$"), the Customer's credit Status is "On Credit Warning." A red dollar sign ("$") indicates the Customer's credit Status is "On Credit Hold."
- Show Expired Prices
Select to display expired Prices.
- Show Future Prices
Select to display future Prices.
- Show Costs and Margins
Select to show Costs and margins using one of the following costing parameters:
- Use Standard Costs
Select to show Costs and margins using Standard Costs.
- Use Actual Costs
Select to show Costs and margins using Actual Costs.
- Prices
Display lists Prices for the specified Customer. Cost and margin columns will also appear if the "Show Costs and Margins" parameter is selected. If the margin is negative, the value will display in red type.
To the far right of the screen, the following buttons are available:
- CLOSE
Closes the screen, returning you to the application desktop.
- QUERY
Select to generate the display, using the specified parameters.
Runs the report associated with this screen.
To display a list of Prices by Item, select the "Prices by Item" option under "Item Pricing." The following screen will appear:
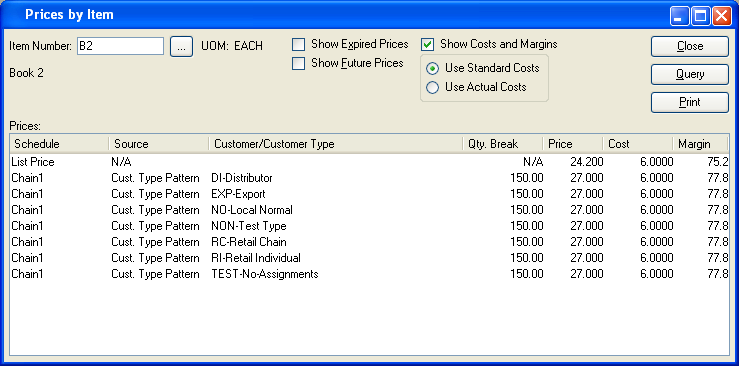
When displaying Prices by Item, you are presented with the following options:
- Item Number
Enter the Item Number of the Item whose Prices you want to view. The browse button located to the right of the field leads to a searchable list of make and buy items.
- UOM
Inventory Unit of Measure.
- Show Expired Prices
Select to display expired Prices.
- Show Future Prices
Select to display future Prices.
- Show Costs and Margins
Select to show Costs and margins using one of the following costing parameters:
- Use Standard Costs
Select to show Costs and margins using Standard Costs.
- Use Actual Costs
Select to show Costs and margins using Actual Costs.
- Prices
Display lists Prices for the specified Item. Cost and margin columns will also appear if the "Show Costs and Margins" parameter is selected. If the margin is negative, the value will display in red type.
To the far right of the screen, the following buttons are available:
- CLOSE
Closes the screen, returning you to the application desktop.
- QUERY
Select to generate the display, using the specified parameters.
Runs the report associated with this screen.
To display a list of Freight Prices by Customer Type, select the "Freight Prices by Customer Type" option. The following screen will appear:
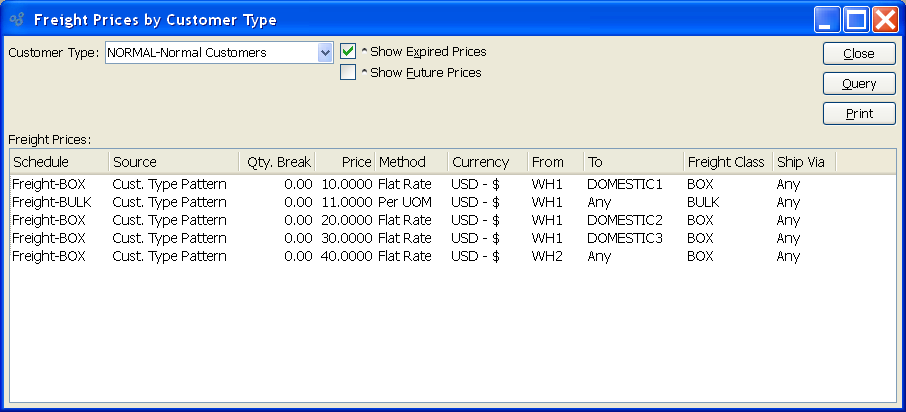
When displaying Freight Prices by Customer Type, you are presented with the following options:
- Customer Type
Specify the Customer Type whose Freight Prices you want to display.
- Show Expired Prices
Select to display expired Freight Prices.
- Show Future Prices
Select to display future Freight Prices.
- Freight Prices
Display lists Freight Prices for the specified Customer Type.
To the far right of the screen, the following buttons are available:
- CLOSE
Closes the screen, returning you to the application desktop.
- QUERY
Select to generate the display, using the specified parameters.
Runs the report associated with this screen.
To display a list of Freight Prices by Customer, select the "Freight Prices by Customer" option. The following screen will appear:
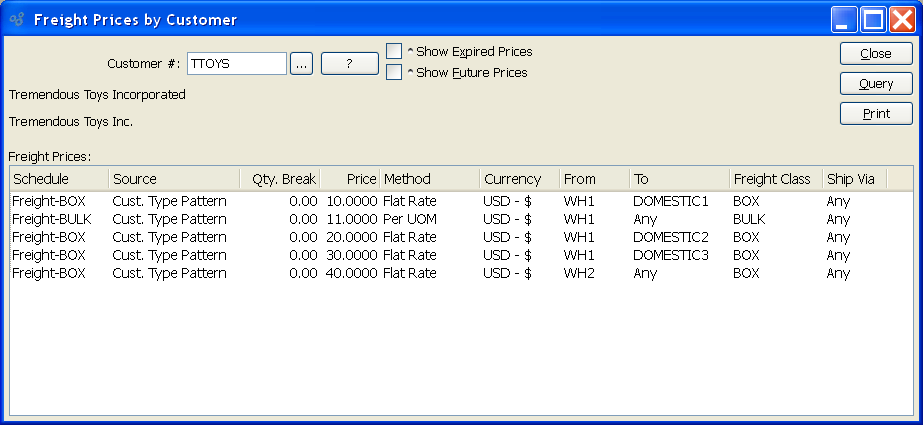
When displaying Freight Prices by Customer, you are presented with the following options:
- Customer #
Enter the Customer Number of the Customer whose Freight Prices you want to view. The browse button located to the right of the field leads to a searchable Customers list. You may also access this list using the keyboard shortcut "CTRL + L". Once a Customer Number is entered, the Customer name and billing address will display. Select the "?" or "$" symbol next to the browse button to view Customer information for the specified Customer. If a Customer's credit is "In Good Standing," the button will feature a black question mark ("?") icon. If the icon turns to an orange dollar sign ("$"), the Customer's credit Status is "On Credit Warning." A red dollar sign ("$") indicates the Customer's credit Status is "On Credit Hold."
- Show Expired Prices
Select to display expired Freight Prices.
- Show Future Prices
Select to display future Freight Prices.
- Freight Prices
Display lists Freight Prices for the specified Customer.
To the far right of the screen, the following buttons are available:
- CLOSE
Closes the screen, returning you to the application desktop.
- QUERY
Select to generate the display, using the specified parameters.
Runs the report associated with this screen.