Constraints
In the object hierarchy under any table, you will find Constraints. Constraints can be added by selecting ADD TABLE CONSTRAINT from the Constraints context menu. Once a constraint has been created, it can also be commented on and dropped. This section describes how to create, comment on, and drop a constraint with RHDB Administrator.
Constraints are not actual entities themselves (except for check constraints). Constraints are mostly a collection of indexes and triggers that restrict certain actions on a table. There are four types of constraints:
| Primary Key Constraints |
| Unique Constraints |
| Check Constraints |
| Foreign Key (FK) Constraints. |
The following sections describe each of these constraints in brief and provide an example of how to create them. Note that all of these examples are based on the table invoices as described in the schema in the introduction to Chapter 4.
Primary Key Constraints
A primary key is a type of index that will most likely be used as the primary index when a query is made on the table (assuming of course, that one of the conditional fields in the query pertains to the column on which the index exists).
A primary key constraint is an object under a table, so to create a primary key constraint, first expand the database then the table you wish to create the primary key constraint under (click the + beside the database and table names).
Right-click on Constraints and select ADD TABLE CONSTRAINT -> PRIMARY KEY.
The first field is the name for the constraint. For this example, type the name: customer_id_pkey
In the Available Columns list, select customer_id and click Add to move that column to the PRIMARY KEY Columns.
Click OK to create the primary key constraint.

 | In order to create a primary key constraint on a table, the column selected must be NOT NULL. |
Unique Constraints
Unique constraints may be placed on multiple columns. They constrain the UPDATE/INSERTS on the table so that the values being updated or inserted do not match any other row in the table for the corresponding values.
A unique constraint is an object under a table, so to create a unique constraint, first expand the database then the table you wish to create the unique constraint under (click the + beside the database and table names).
Right-click on Constraints and select ADD TABLE CONSTRAINT -> UNIQUE.
The first field is the name for the constraint. For this example, type the name: invoice_number_ukey
In the Available Columns list, select invoice_number and click Add to move that column to the UNIQUE Columns listbox.
Click OK to create the unique constraint.

Check Constraints
A check constraint prevents updates/inserts on the table by placing a check condition on the selected column. The UPDATE/INSERT is allowed only if the check condition qualifies.
A check constraint is an object under a table, so to create a check constraint, first expand the database then the table you wish to create the check constraint under (click the + beside the database and table names).
Right-click on Constraints and select ADD TABLE CONSTRAINT -> CHECK.
The first field is the name for the constraint. For this example, type the name: invoice_number_check
Specify the CHECK Condition that is checked each time an UPDATE/INSERT is made into the table. For this example, set the check condition to be: invoice_number >= 0
Click OK to create the check constraint.

Foreign Key (FK) Constraints
A foreign key constraint allows certain fields in one table to refer to fields in another table. This type of constraint is useful if you have two tables, one of which has partial information, details on which can be sought from another table with a matching entry. A foreign key constraint in this case will prevent the deletion of an entry from the table with detailed information if there is an entry in the table with partial information that matches it.
A foreign key constraint is an object under a table, so to create a foreign key constraint, first expand the database then the table you wish to create the foreign key constraint under (click the + beside the database and table names).
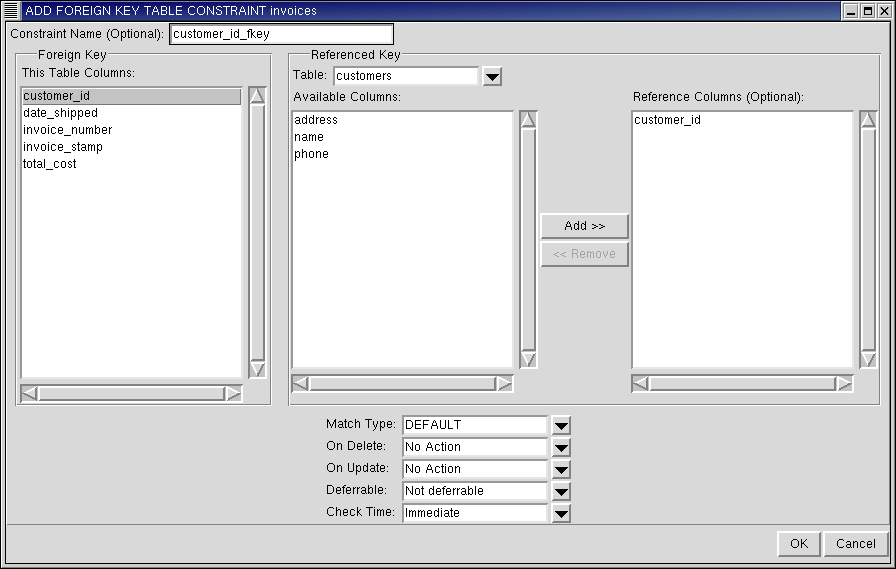
Right-click on Constraints and select ADD TABLE CONSTRAINT -> FOREIGN KEY.
The first field is the name for the constraint. For this example, type the name: invoice_customer_fkey
The dependent column exists in the table customers. Select that table name from the Table drop-down list.
Select the dependent columns (from the left) then select the reference columns (from the right), and click Add.
For this example, the dependent column is customer_id in table invoices, and the column it refers to is customer_id in the customers table.
If dependent and reference columns have been selected, the number of columns being selected as dependent must be equal to the number of reference columns.
Selection of columns on the right can be optional, but only if the dependent columns have the same name as that of the columns they will be referring to on the right, and if the columns on the right make up the primary key for the parent table.
Optionally, you can select other foreign key constraint characteristics from the drop down boxes at the bottom of the window.
Click OK to create the foreign key constraint.

Note that the constraints have been added under the Constraints node in the Tree View.
RHDB Administrator also enables you to perform the following operations:
- Dropping
To drop a constraint, right-click on it and select DROP CONSTRAINT. If View -> Ask For Confirmations is enabled, you are asked to confirm that you want the constraint dropped; if it is disabled, the constraint is dropped immediately. This action cannot be undone.

As primary, unique, and foreign key constraints are not individual entities, dropping them will result in dropping of the indexes/triggers that they represent. If you are unsure of which indexes/triggers these are, click on the constraint and check its properties. (The pane on the right lists the indexes or triggers, whichever is applicable.)
- Commenting
PostgreSQL allows commenting on constraints, which makes them easier to identify. To comment on a constraint, right-click on it and select COMMENT. A dialog asks for the comment. If there is already a comment on the constraint, this comment is displayed. Type the new comment in the edit box and click OK (or press
[Enter] ) to save the new comment.Commenting on check constraints is not supported.
Refer to the Red Hat Database SQL Guide and Reference for more information on constraints.