Tables
In the object hierarchy under any database, you will find Tables. Tables can be added by selecting CREATE TABLE or CREATE TABLE AS from the Tables context menu. Once a table has been created, it can also be altered, renamed, commented on, analyzed, vacuumed, and dropped. This section describes how to create, manage, and drop a table with RHDB Administrator.
Creating Tables Using CREATE TABLE
A table is an object under a database, so to create a table, first expand the database under which you wish to create the table (click the + beside the database name).
To create a table, right-click on Tables and choose CREATE TABLE. The CREATE TABLE dialog box appears.
In the Name For The New Table field, type the name for the new table. Once this is done, you must enter the table definition.
There are four tabs in the create table dialog. The first tab, Columns, allows the definition of table columns, which optionally may have column constraints. The second tab, Table Constraints, permits you to define table constraints. Options such as inheritance can be specified using the Options tab. Finally, you can use the Privileges tab to define which users should have privileges to use the newly created table. This is similar to what could have been done with a SQL92 CREATE SCHEMA command.
Once the table definition has been entered, options chosen, and privileges selected, click OK to create the table and close the dialog window. If the backend cannot create the table due to some error (such as the table name already exists), an error message appears. After you dismiss the error message window, the CREATE TABLE dialog will still be available so that you can make corrections and retry the operation.
Defining Columns
The first tab allows for column definitions. Your table must have at least one column defined unless it inherits from some other table (it should probably still have some columns defined, but that is up to you to decide). The minimum column definition requires a column name and a data type (with perhaps a precision/scale specification). After entering these specifications, click the Add Column button to add that column definition to the columns that will be part of the table once it is created.

The column definition will then show up in the Current Column Definitions list. Once created, the column definition cannot be altered, but it can be removed with the Remove button and recreated. Column definitions are added to the end of the list, but definitions can be moved up or down the list with the Move Up and Move Down buttons (select the column definition and click the appropriate button).
Column Constraints
Column constraints are (logically) mutually exclusive, so radio buttons allow you to choose which constraint to use, if any. The exception is that UNIQUE and NOT NULL can both be specified. A special Unique Not Null radio button is provided for this case.
Some constraints, namely DEFAULT, CHECK, and REFERENCES, require further specification. Once selected, the appropriate entry boxes and widgets will become active. You must select the appropriate options as you would with plain SQL commands. There is also a box for specifying an optional name for the column constraint. In the case of the Unique Not Null option, the constraint name will apply to the NOT NULL constraint, as that can only be defined as a column constraint while UNIQUE can also be defined as a table constraint and thus have a name associated with it.
Once the constraint has been selected (and additional data entered), you can use the Add Column button. The column, with the defined constraint, will be added to the Current Column Definitions list.
The current version does not allow for the specification of column (or table) comments while creating the table, so they will have to be added afterward with the COMMENT menu option.
 | Keyboard Focus |
|---|---|
The focus will cycle through the column name, data type (and related)
fields, and the Add Column button. If the focus is on this
button and you press |
Table Constraints
The second tab permits the definition of table constraints. As with the creation of columns described above, you specify a table constraint, one at a time, and then add the definition to the Current Table Constraint Definitions list box by selecting the Add Table Constraint button. Once created, constraint definitions cannot be changed, but they can be removed with the Remove button and recreated. Remember that the table has not yet been created—an attempt to create the table will happen only after the OK button in the dialog is pressed. At this point we are only compiling a list of definitions to be used in the creation of the table.
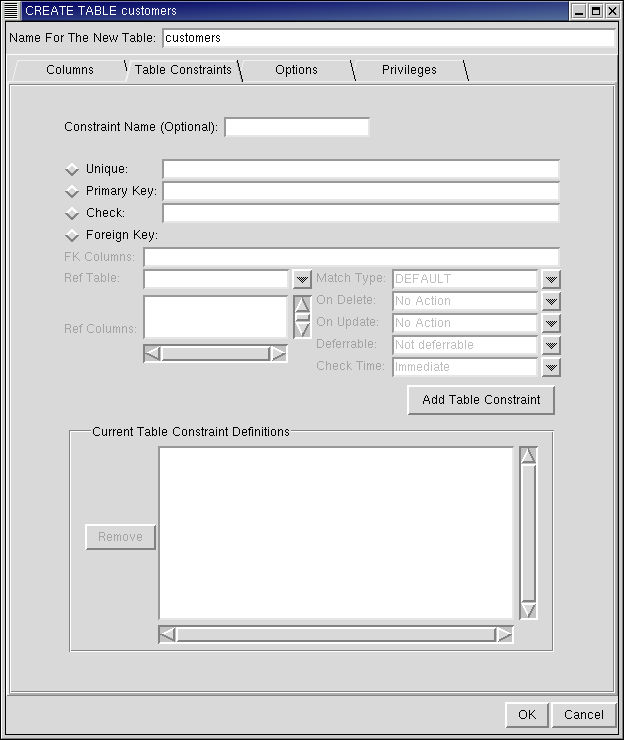
A table constraint is defined by selecting its type with the radio buttons and then filling the required information for that type of constraint. For UNIQUE and PRIMARY KEY constraints, this information consists on a comma-separated list of columns (which should have been defined in the Columns tab). The CHECK constraint requires a valid SQL expression. The FOREIGN KEY constraint requires the specification of the foreign key columns (comma-separated list) and the Referenced table, at least. Optionally you can specify the name of the columns in the referenced table and referential integrity constraint options (refer to the Red Hat Database SQL Guide and Reference for more details on table constraints).
Table constraints can optionally have names. To name a constraint you should fill the Constraint Name text entry field before pressing the Add Table Constraint button.
 | As in the Columns tab, the focus circulates through the table constraint options, their associated argument specification widgets, and the Add Table Constraint button. |
Options
The third tab allows for the specification of table creation options. You can select whether the table should have OIDs associated with each of its rows and select parent tables for inheritance. (Refer to the Red Hat Database SQL Guide and Reference for details about OIDs and the PostgreSQL inheritance concept.)
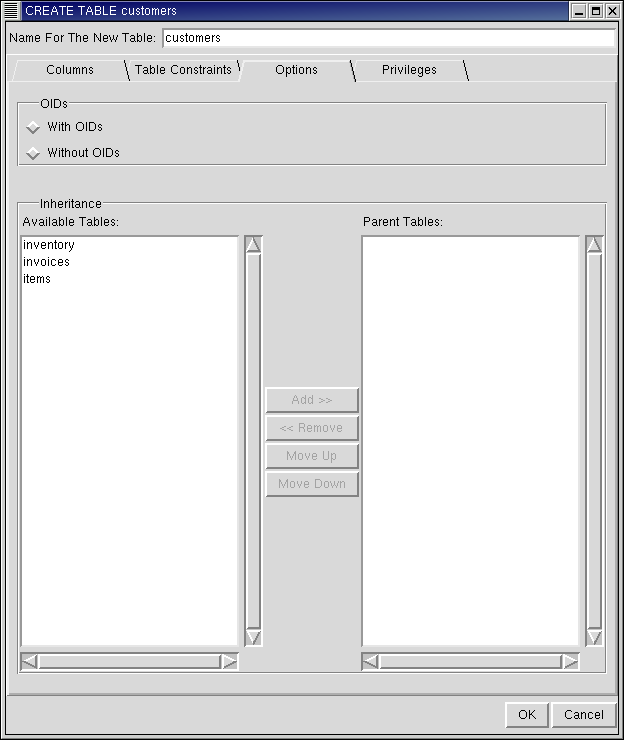
The use of OIDs can be specified by selecting the desired radio button option. To specify a table as a parent table, select the table (or tables) in the Available Tables list and use the Add button to move it (or them) to the Parent Tables list. Tables can be removed from the Parent Tables list with the Remove button and reordered with the Move Up and Move Down buttons (select a table and press the appropriate button).
Privileges
The fourth and last tab allows you to specify who can use the newly created table and how they can use it.
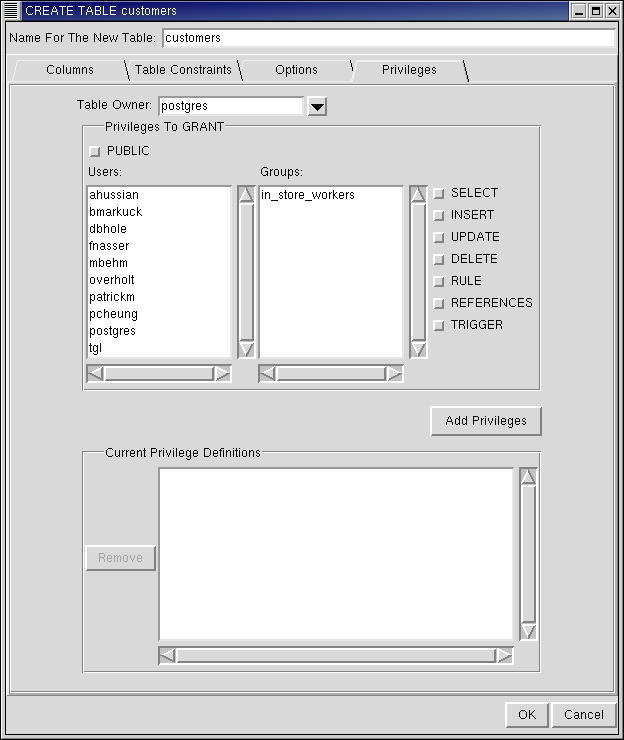
It also allows specifying who will own the newly created table, assuming the tool user has the right to create tables on behalf of others (that is, this user is a superuser). This selection can be done in the Table Owner combo box, which is initially filled with the PostgreSQL default owner, the current tool user.
The association between users or groups and privileges is done by:
Selecting all the users and/or groups that will receive the same set of privileges on the Users and Groups list (a special check button is provided for the special grantee PUBLIC).
Specifying the set of privileges with the check buttons located at the right.
Clicking the Add Privileges button.
The process must be repeated for each different set of privilege definitions, or at least to grant some users or groups the additional privileges that were not granted initially.
As with the other tabs, the privileges defined are added to the Current Privilege Definitions list. As before, they cannot be edited but can be removed and recreated.
RHDB Administrator also enables you to perform the following operations on an existing table:
- Dropping
To drop a table, right-click on it and select DROP TABLE. If View -> Ask For Confirmations is enabled, you are asked to confirm that you want the table dropped; if it is disabled, the table is dropped immediately. This action cannot be undone.
- Renaming
A table can be renamed once it has been created. To rename a table, right-click on it and select RENAME TABLE. Type the new name in the dialog that appears and click OK.
- Altering Owner
By default, the user creating the table is the owner. However, the owner can later be modified by a superuser. To modify the owner of a table, right-click on the table and select ALTER TABLE OWNER. A dialog pops up asking for the new ownername. Because the owner name can be only one of the users in the cluster, the dialog has a drop down box from which the user can be selected. Once the username is selected, click OK to change the table owner.
- Commenting
PostgreSQL allows commenting on tables, which makes them easier to identify. To comment on a table, right click on it, and select COMMENT. A dialog pops up asking for the comment. If there is already a comment on the table, this comment is displayed. Type the new comment in the edit box and click OK (or press
[Enter] ) to save the new comment.
Creating Tables Using CREATE TABLE AS
In addition to creating a table using the CREATE TABLE dialog, you can also create a table by using the CREATE TABLE AS option. The latter allows you to create a table comprised of columns selected from other tables.
In this example you will create a table named "item_availability" using CREATE TABLE AS.
Expand the database under which you wish to create the table (click the + beside the database name).
To create a table using columns from another table, right-click on Tables and choose CREATE TABLE AS. The CREATE TABLE AS dialog box appears.
In the Name For The New Table field, type: item_availability
Next is the Column Names field. This optional field may be used to specify new column names in the table you are creating (in case you do not want to use the same column names as those used in the source tables. For this example, change the name of the second column to quantity_available. Because PostgreSQL has no way of knowing which column will take the new name (when more columns than given new names exist), it assigns the new names starting from the first column in the table. To avoid this, you need to specify the name item_id again to achieve the desired result—in the Column Names field, type: item_id, quantity_available
The next field is the Imported From File. Note that this field is not editable; it displays the path to the selected file, if you have imported the SQL Select Statement from another file (see below for instructions on how to do that). For this example you will not be importing a file, so this field will remain blank.
The next field is the SQL Select Statement. This is the field where you type in the query to select specific columns from different tables to make the new table you are creating. For this example, type:
SELECT items.item_id, inventory.quantity FROM items, inventory WHERE items.item_id=inventory.item_id;Click OK to create the table.

The table now contains up to date information on items and how many of each is available. Note that the information is up to date as of the time of creation. However, if the table needs to be kept up to date after creation, it has to be manually updated as required.
Other Features of CREATE TABLE AS
Below the SQL SELECT Statement edit box, are the Clear, Import From File, and Export To File buttons:
- Clear
Clear clears any statements in the SQL SELECT Statement edit box. Once cleared, the statement cannot be retrieved unless it was imported from a file or was exported to a file before clearing.
- Import From File
Import From File allows you to import a previously saved SQL SELECT Statement from a file.
- Export To File
Export To File allows you to export the text in the SQL SELECT Statement edit box to a file.