This section describes how to use
the bundle project creation wizard to create a new Bundle Project. The project’s Spring bean
definition files will also be created using the Spring bean configuration file creation wizard.
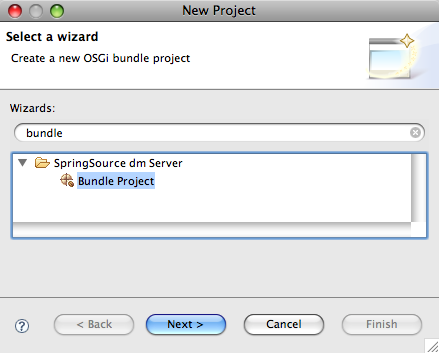
Create a new project by right-clicking in the Package Explorer view and selecting → . In the resulting dialog select → and press Next:
 |
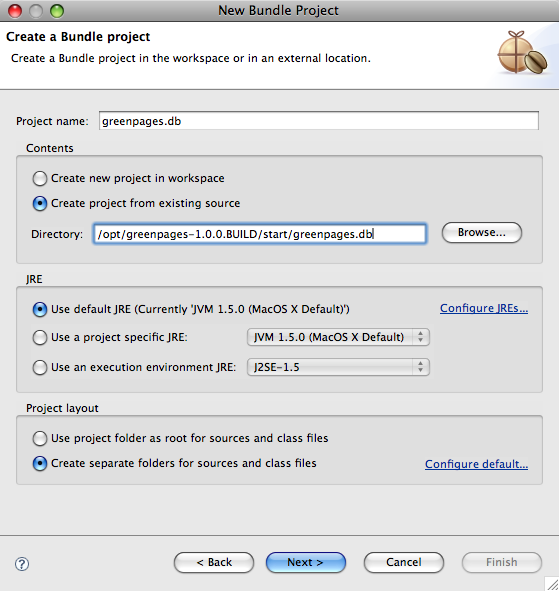
In the New Bundle Project dialog, name the project greenpages.db.
Choose the create the project from an existing source location and specify a location that will place the new
greenpages.db alongside the project skeletons that were imported into the workspace
earlier. If the start directory of the GreenPages sample is being used this will
be $GREENPAGES_HOME/start/greenpages.db. Click Next.
 |
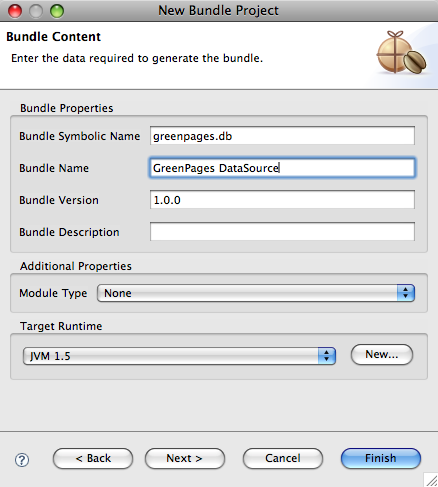
In this page of the wizard, many of the Bundle Properties are already populated. The
Bundle-SymbolicName is the name of the project. The Bundle-Name is
derived from the Bundle-SymbolicName. The Bundle-Version is
set to 1.0.0, and there is no Bundle-Description.
Change the Bundle-Name to “GreenPages DataSource” to more accurately
describe the bundle’s purpose. Lastly, check the target runtime JVM version is appropriately configured; it
should specify a JVM version of 1.5 or later. Click Finish.
 |
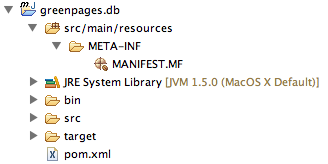
The greenpages.db project appears in the Package Explorer view.
By default, a bundle project is configured with a Bundle Classpath Container. This classpath container derives its contents from the bundle’s manifest. Rather than using each bundle’s manifest to control the classpath, the GreenPages application uses Maven POM files. To this end the Bundle Classpath Container must be replaced by a Maven Classpath Container that is populated from the Maven POM.
Right-click the greenpages.db project in the Package Explorer view and then select
Properties. Select Java Build Path on the left-hand side and
then switch to the Libraries tab on the right-hand side. Select the entry
named Bundle Dependencies and click on Remove. Click
OK to remove the Properties dialog.
 |
Before a Maven Classpath Container can be added to the project, a pom.xml file must
be created. Create a new file in the root of the greenpages.db project named
pom.xml and add the following contents to it:
<?xml version="1.0" encoding="UTF-8"?>
<project
	xmlns="http://maven.apache.org/POM/4.0.0"
	xmlns:xsi="http://www.w3.org/2001/XMLSchema-instance"
	xsi:schemaLocation="http://maven.apache.org/POM/4.0.0 http://maven.apache.org/maven-v4_0_0.xsd">

	<parent>
		<groupId>com.springsource.dmserver</groupId>
		<artifactId>greenpages.parent</artifactId>
		<version>1.0.0.SNAPSHOT</version>
		<relativePath>../parent</relativePath>
	</parent>

	<modelVersion>4.0.0</modelVersion>
	<groupId>com.springsource.dmserver</groupId>
	<artifactId>greenpages.db</artifactId>
	<name>greenpages.db</name>
	<packaging>jar</packaging>

	<dependencies>
	</dependencies>

</project>
Save the file.
A Maven Classpath Container can now be added to the project. Right-click the
greenpages.db project in the Package Explorer and select
→ .
Eclipse will perform some workspace building, and the greenpages.db project will now be marked as a Maven project.
The last part of the setup of the project is to configure its source folders. Return to the Properties dialog of
the greenpages.db project (from the Package Explorer view).
Select Java Build Path on the left-hand side and the Source tab
on the right-hand side. Remove both of the pre-configured source folders by selecting them and
clicking Remove.
Now click Add folder and then
Create new folder…. Specify src/main/resources as the folder
name and click Finish, then OK and OK again.
The final change to be made is to drag the META-INF folder from src
to src/main/resources. Once these changes have been made the project will appear
similar to the following in the Package Explorer view:
 |
The DataSource bundle’s main rôle is to configure and create a DataSource object and to
publish this to the OSGi service registry. This will be done by creating
a handful of Spring beans.
By default, Spring DM looks for application context files in a bundle’s META-INF/spring
directory. Create a new folder named spring in the greenpages.db
project’s META-INF folder. Having created the new folder, right-click it in the
Package Explorer and select
→ .
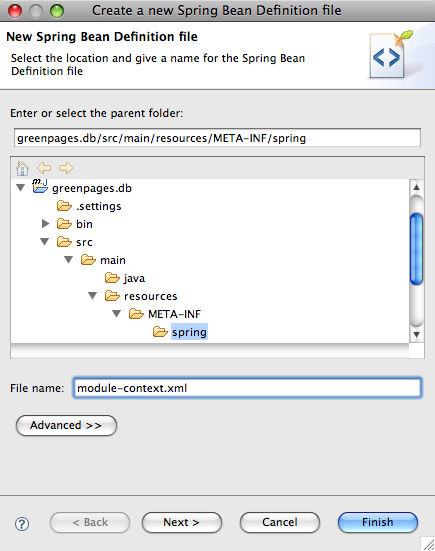
This will open the wizard for creating Spring bean configuration files.
In the wizard enter a File name of module-context.xml and click
Next:
 |
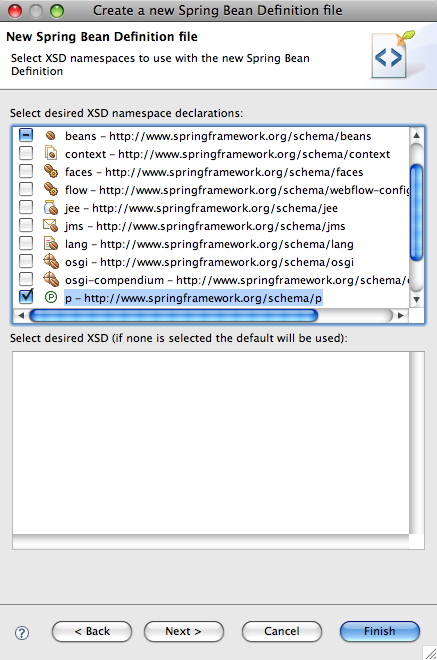
Add the p - http://ww.springframework.org/schema/p namespace declaration to the pre-selected beans declaration and then click Finish.
 |
Update the newly-created file (which is opened by Eclipse) to declare a bean that defines the DataSource
object that will be used to access the GreenPages database.
Do this by adding the following bean declaration:
    <bean id="dataSource" class="org.apache.commons.dbcp.BasicDataSource"
        p:driverClassName="org.h2.Driver"
        p:url="jdbc:h2:~/greenpages-db/greenpages"
        p:username="greenpages"
        p:password="pass"
        init-method="createDataSource"
        destroy-method="close" />
The new bean has introduced a dependency on Commons DBCP, which will cause an error to be reported by Eclipse.
This dependency must be recorded in the project’s pom file. Open the pom file for greenpages.db and add
the following dependency between the <dependencies> tags:
        <dependency>
            <groupId>org.apache.commons</groupId>
            <artifactId>com.springsource.org.apache.commons.dbcp</artifactId>
        </dependency>
Save the updated pom and then switch back to the editor for module-context.xml. Save the updated file and
observe that the previously reported problem has now been resolved as Commons DBCP is available on the classpath.
(If this is not resolved automatically, it may be necessary to close and open the greenpages.db project
in the Package Explorer view.)
Now that the DataSource bean is available, it can be published into the OSGi service registry.
Right-click the spring folder and select
→ . This time specify
a name of osgi-context.xml, click Next, and add the osgi
namespace declaration. Click Finish and then add the following to the new file to publish the
DataSource as a service:
    <!--
        export the dataSource bean to the OSGi service registry under the
        DataSource interface
    -->
    <osgi:service ref="dataSource" interface="javax.sql.DataSource" />
Bundlor uses a manifest template to control the contents of the generated manifest.
Create a new file named
template.mf in the root of the greenpages.db project.
Open the existing
MANIFEST.MF and switch to the MANIFEST.MF tab to view its source. Copy
the contents. Switch to the editor for template.mf, switch to the
template.mf tab and paste the contents from MANIFEST.MF. These entries
will tell Bundlor what the resulting manifest’s bundle symbolic name, bundle version, etc. should be. Save the
updated template.
Still in the template.mf editor switch to the Overview tab
and click Update MANIFEST.MF which is under the “Bundle Actions” section.
At this point Bundlor will scan the project to determine its
dependencies. It will scan both module-context.xml and osgi-context.xml
looking for references to classes. For each class to which it finds a reference, an import for the class’s
package will be added to the resulting manifest.
In this case, Bundlor will generate imports for
both javax.sql and org.apache.commons.dbcp. The import for
org.apache.commons.dbcp will result in an error as the package cannot be resolved.
(javax.sql may also be unresolved.)
The greenpages.db project needs to be associated with a dm Server instance which has the
Commons DBCP bundle in its repository. This is achieved in the next step by adding the greenpages.db
project to the GreenPages PAR, this will result in it inheriting the PAR project’s targetted runtime
configuration.
Double-click the MANIFEST.MF file in the greenpages project in the
Package Explorer view.
Switch to the Dependencies tab and click Add….
Select greenpages.db and click OK. Save the updated file. The
problem concerning the org.apache.commons.dbcp dependency should now be resolved
(along with any other resolution errors) and (if the server is
running) the
GreenPages application will be redeployed due to the addition of the greenpages.db
module. Start the server if it is not already running and observe that this deployment fails.
The deployment will fail because the org.h2.Driver class that is referenced in the
DataSource bean’s definition in module-context.xml is not available to
the bundle. (Check for the exception org.springframework.beans.factory.BeanCreationException with
text: “Error creating bean with name 'dataSource' defined in URL [bundleentry://84/META-INF/spring/module-context.xml]:
Invocation of init method failed; nested exception is org.apache.commons.dbcp.SQLNestedException:
Cannot load JDBC driver class 'org.h2.Driver'”.)
There are a few cases where Bundlor will not identify a dependency on a class and, at the moment, this is one of them, although this is an area of Bundlor that is being improved all the time. Thankfully it’s easy to add the required import by making a simple update to the template.
Open the editor for the
template.mf file in the greenpages.db project and add the following
Import-Package header and save the updated manifest:
Import-Package: org.h2;version="[1.0.71,1.0.71]"
Saving the manifest will trigger a redeployment (or click on Update MANIFEST.MF as before) which will fail if the H2 database is not available. (Refer to the section the section called “Starting and configuring the database” in Chapter 3, Installing and exploring GreenPages to run and configure the database.)
If the database is running the GreenPages application should correctly deploy. Although the application web front-end will run, the database contents is
not visible, of course, because we are still running with the stub version of the search method on the controller.
The implementation of the Directory service needs to be changed to exploit the database.