SpeedView Guide
This document introduces you to SpeedView.
Purpose
SpeedView is a Scalado proprietary concept to view images faster on a mobile device. It is only available when using Image Processor Plugin with CAPS adaptation.
Introduction
The SpeedView technology is used mainly in a photo album or image gallery application.
Mega pixel resolution is standard in high-end mobile camera phones, and the development continues towards more pixels. At the same time, the screen resolution is also increasing and many phones now have a QVGA (Quarter Video Graphics Array) display.
The aim of SpeedView is to view mega pixel images faster. The decoding process of a mega pixel image is a time consuming operation on a mobile phone. The JPEG thumbnail, in the EXIF metadata, solves this time consuming problem, but the thumbnail is too small to produce a sharp picture in full screen mode. So, you either suffer from delays or bad image quality.
The idea behind SpeedView is to associate a small data object with an image to enable very fast access.
SpeedView is compatible with the basic Image Processor library and switching between the data object and source image is done automatically.
Note: SpeedView is applicable only to JPEG images.
Spmo (SpeedView meta object)
The Spmo format is the object enabler of SpeedView. The Spmo format has the following features:
It contains data for rapid decoding of the JPEG images
It resides inside the JPEG image or is associated with a specific JPEG file in a separate database. For a JPEG image, the Spmo object is stored at APP4. (Application marker segment). For more information see APP4.
Note: If the images are transferred to another viewing device that does not have SpeedView capabilities, Spmo is ignored. The output is the image is decoded and treated as any ordinary JPEG image.
Creating Spmo
Spmo is created directly in the camera application, but can also be created when transferring images to an photo album application or after modifying an image in a photo editor.
There are two ways to capture images:
From the camera chip, which produces a raw image data buffer or a JPEG image.
From the mega pixel resolution camera.
The best way to create and insert an Spmo object into a JPEG file is using the camera application.
Note: If it is not possible or desirable to store Spmo in the JPEG files directly, you have the option to store them in a separate database.
The file size of Spmo is dependant on the screen size, it is optimized for : the expected file size for a 320 x 240 screen resolution is generally in the range of 20-25 kB. In some rare cases, the Spmo file size is as large as 60 kB.
The high-level steps to create an Spmo object are shown below:
Create an Spmo object by calling CCapsSpmoUtility::NewSpmoL(const TSize&)
The size parameter should reflect the most probable viewing mode. This is often the size of the screen on the device.
Set the image as input in a buffer, file or as a file handle using the below function:
Ignore if client reads existing Spmo.
Either read an existing Spmo embedded in the image using CapsSpmoUtility::CCapsSpmo::ReadFromInput().
Or generate an Spmo from the image using CapsSpmoUtility::CCapsSpmo::GenerateFromInput().
The Spmo object can then be add to an image in a buffer or on disk using CapsSpmoUtility::CCapsSpmo::AddToBuffer() or CapsSpmoUtility::CCapsSpmo::AddToFile() or can be inserted into the input image by calling CapsSpmoUtility::CCapsSpmo::InsertIntoInputL().
Note: Asynchronous versions of the above steps also exist.
The example below shows how to take an existing JPEG, generate an Spmo based on that file and create a new file which is the original image with the embedded Spmo object
// Start new spmo optimized for QVGA screen size.
   CCapsSpmo* spmo = CapsSpmoUtility::CCapsSpmoUtility::NewSpmoL(TSize(320, 240));
   CleanupStack::PushL(spmo);

// Generate spmo data from the input file
   spmo->SetInputL(KInputFileName);
   spmo->GenerateFromInputL();

// Add the generated Spmo data to the output file.
   spmo->AddToFileL(KInputWithSpmoFileName);
   CleanupStack::PopAndDestroy(spmo);
Use of Spmo in external file or database
If you do not have permission to modify the original images by embedding an SPMO it is possible to store the SPMO separately and supply it when processing an image.
Generating iterative Spmo
CAPS Spmo Utility can be used to generation an Spmo object from an input asynchronously or iteratively.
Note: Other tasks can be performed in-between the iterations and sometimes the whole JPEG image is not available at once, but is delivered in chunks as it is encoded to the user.
The high level steps for iterative Spmo generation are shown below:
Signal the start of the iterative process by calling CCapsSpmo:: BeginInputStreamL().
Add chunk data sequentially from a buffer by calling CCapsSpmo::ContinueInputStreamL(TDesC8&).
Finish the operation by calling CCapsSpmo::EndInputStreamL().
The Spmo object can now be embedded in an image or save externally.
The code snippets below illustrate the process of creating an Spmo iteratively from a camera that delivers JPEGs in chunks of 8 kB.
    // Start new spmo optimized for QVGA screen size.
    CCapsSpmo* spmo = CapsSpmoUtility::CCapsSpmoUtility::NewSpmoL(TSize(320, 240));
    CleanupStack::PushL(spmo);

    RFile file;
    TInt fileSize = 0;

    // Open the file for reading.
    User::LeaveIfError(file.Open(iFs, KInputFileName, EFileRead));
    CleanupClosePushL(file);

    User::LeaveIfError(file.Size(fileSize));

    // Prepare memory buffer for 8K chunk
    HBufC8* chunk = HBufC8::NewMaxL(CHUNK_SIZE);
    TPtr8 chunkPtr = chunk->Des();

    // We must reorder the cleanupstack.
    CleanupStack::Pop(); // file
    CleanupStack::PushL(chunk);
    CleanupClosePushL(file);

    if (file.SubSessionHandle())
        {
        // Begin spmo streaming
        spmo->BeginInputStreamL();

        TInt leftToRead = fileSize;
        while (leftToRead >= CHUNK_SIZE)
            {
            leftToRead -= CHUNK_SIZE;
            User::LeaveIfError(file.Read(chunkPtr, CHUNK_SIZE));
            spmo->ContinueInputStreamL(chunkPtr);
            }

        if (leftToRead != 0)
            {
            User::LeaveIfError(file.Read(chunkPtr, leftToRead));
            spmo->ContinueInputStreamL(chunkPtr);
            }

        spmo->EndInputStreamL();
        }

    // Generate spmo data from the processed input stream.
    spmo->GenerateFromInputL();

    CleanupStack::PopAndDestroy(2); // file chunk

    // Get just generated spmo data and save it to a binary file.
    TPtr8 spmoData = spmo->BufferL();

    // Open the file for writing.
    User::LeaveIfError(file.Replace(iFs, KSpmoFileName, EFileWrite));
    CleanupClosePushL(file);

    User::LeaveIfError(file.Write(spmoData));

    CleanupStack::PopAndDestroy(2,spmo); // file spmo
SpeedView in Image Processor Plug-in
When you specify an input to Image Processor as a JPEG file or a JPEG buffer, ImageProcessor will check if an Spmo object exists in the image and use it for rendering the preview in order to increase the speed of the rendering.
Note: The SpeedView functionality is supported by the Caps Image Processor plug-in and its extensions.
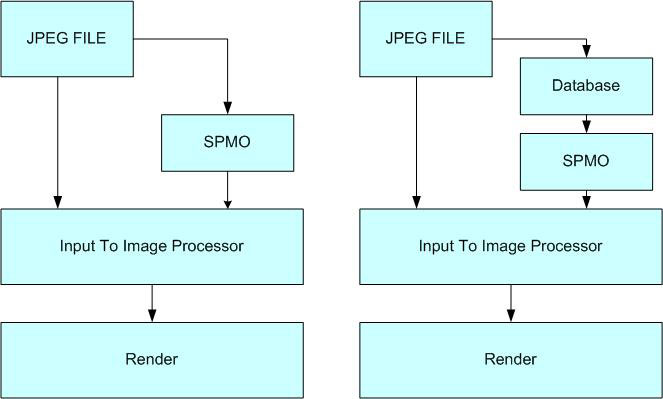
The figure above shows the two ways how the Caps Image Procesor plug-in deals with Spmo: either Spmo comes from a JPEG image, or Spmo is stored in a database. It is important that you associate an Spmo correctly with the image.
The Image Processor must get the Spmo from the JPEG file or from a separate buffer. If Spmo is located in a separate buffer, you must call TCapsImageProcessorExtension::SetSpmoL(TDesC8&,TCapsImageProcessorExtension::TSpmoVerificationMode) from the Caps Image Processor plug-in extension.
TCapsImageProcessorExtension::TSpmoVerificationMode checks whether Spmo is coherent with the image. If the TCapsImageProcessorExtension::ESpmoVerificationModeDisabled passed, the client must make sure that the Spmo belongs to the JPEG image.
You can decide to include or remove the regenerated Spmo object by calling the TCapsImageProcessorExtension::AddSpmoToOutputL(TBool, const TSize&) function.
You get the Spmo buffer from the Image Processor input by calling the TCapsImageProcessorExtension::SpmoL(const TSize&) function.
The code snippets below illustrate the scenario that adds the QVGA size Spmo to the output:
 ImageProcessor::CImgProcessor* imageProcessor = ImageProcessor::CImgProcessor::NewL(iFs, observer);
    CleanupStack::PushL(imageProcessor);

 // Initialize the Image Processor instance. By default the initialization is asynchronous.
 // (It might take some time to load Image Processor plugin and initialize it).
       imageProcessor->InitializeL();

    // Wait for asynchronous callback
       CActiveScheduler::Start();

    // Set input image. This one does not have Spmo, but it could have.
       imageProcessor->SetInputL(KInputFileName, KImageTypeJPGUid);
       imageProcessor->SetOutputL(KOutputWithSpmoFileName, KImageTypeJPGUid);

    // transfer exif from the input (this is not mandatory)
       imageProcessor->SetOptionsL(ImageProcessor::CImgProcessor::EOptionExifMetadataProcessing);

    // To access Spmo functionality it is necessary to get Caps image processor extension interface @publishedpartner.
       TCapsImageProcessorExtension* extension = static_cast<TCapsImageProcessorExtension*>(imageProcessor->Extension(KCapsImageProcessorExtensionUid));

    // Set add Spmo to the output. The Spmo will be optimized for preview at QVGA screen size.
    // The code below will be commented in when DTW-MM00213 is fixed
    extension->SetAddSpmoToOutputL(ETrue, TSize(320, 240));

    // it is not possible to apply effects AND set Speedview object to the output

    // Process the input image to the output image.
       imageProcessor->ProcessL();

    // Wait for asynchronous callback
       CActiveScheduler::Start();

 CleanupStack::PopAndDestroy(imageProcessor);