Lighting Window
The Lighting Window (menu: ) is the main control point for Unity’s Global Illumination (GI) features. Although GI in Unity gives good results with default settings, the window’s properties allow you to adjust many aspects of the GI process to customise your scene or optimise for quality, speed and storage space as you need. This window also contains lighting-related settings that were available under the Render Settings in Unity versions prior to 5.0. These include ambient light, halos, cookies and fog.
Overview
The controls of the Lighting window are divided among three tabs:
The Object tab lets you choose subsets of the objects in your scene and change settings for them. This is very useful for selecting which objects should participate in the GI computations and also for applying settings consistently to groups of objects.
The Scene tab has settings that apply to the scene overall rather than individual objects. These settings control lighting effects and also optimisation options.
The Lightmaps tab shows the lightmap asset files generated by the GI process.
The tabs are described in full detail below.
Regardless of which tab is selected, the window also has an Auto checkbox near the bottom. If enabled, this allows the lightmap data to be updated while you edit the scene (although you should note that the update usually take a few seconds rather than happening instantaneously). If Auto is disabled then the Build button to the right of the checkbox becomes active; use the button to trigger lightmap updates as you need them. The Build button also has a dropdown menu with an option to clear the baked data from the scene (without clearing the GI Cache).
Below the Auto checkbox is a small panel showing lightmap statistics.
Object Tab
The Object tab lets you select groups of objects and apply settings to them.
At the top of the tab is a set of Scene Filter buttons that let you limit the hierarchy view to specific types of objects: Lights, Renderers, Terrains. Selecting All will show the hierarchy view as normal.
If you select any of the other buttons then the hierarchy view will be limited to showing just those object types. This is essentially just a quick way to access the standard hierarchy view filter for the most common cases.
Note that the filter does not affect which object is currently selected, so it is possible to have, say, a terrain object selected even when the hierarchy is filtered to show only lights.
The relevance of the filter buttons is that each of the three object types has its own set of properties, each described in detail below.
Lights
For a light object, the Object tab essentially shows the same information as the light component’s standard inspector panel. The properties that specifically affect GI are Baking and Bounce Intensity.
Baking allows you to choose if the light should be baked if Baked GI is selected. Mixed will also bake it, but it will still be present at runtime to give direct lighting to non-static objects. Realtime works both for Precomputed Realtime GI and when not using global illumination.
Bounce Intensity allows you to vary the intensity of indirect light (ie, light that is bounced from one object to another. The value is a multiple of the default brightness calculated by the GI system; if you set Bounce Intensity to a value greater than one then bounced light will be made brighter, while a value less than one will make it dimmer. This is useful, for example, when a dark surface in shadow (such as the interior of a cave) needs to be rendered brighter in order to make detail visible. Or alternatively, if you want to use Precomputed Realtime GI in general, but want to limit a single light to give direct light only, you can set its Bounce Intensity to 0.
Renderers
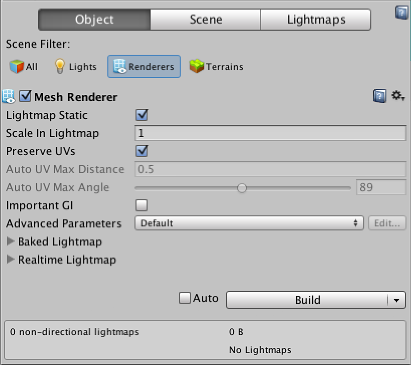
For Renderers, the following properties are available:

| Property: | Function: |
|---|---|
| Lightmap Static | This indicates to Unity that the object’s location is fixed and so it should participate in the GI. If an object is not marked as Lightmap Static then it can still be lit using Light Probes. |
| Scale in Lightmap | This value affects the number of pixels in the lightmap texture that are used for this object. With the default value of 1.0, the number of lightmap pixels used for the object is only dependent on its surface area (ie, same number of pixels per unit area for all objects). A value greater than 1.0 increases the number of pixels (ie, the lightmap resolution) used for this object while a value less than 1.0 decreases it. You can use this property to optimise lightmaps so that important and detailed areas are more accurately lit. For example, an isolated building with flat, dark walls might look fine with a low lightmap scale (less than 1.0) while a collection of colourful motorcycles displayed close together might warrant a high scale value. |
| Preserve UVs | Unity can recalculate the UV coordinates used for the realtime lightmap texture so as to improve its storage and performance characteristics. Please note that the recalculation process will sometimes make misjudgements about discontinuities in the original UV mapping. For example, an intentionally sharp edge may be misinterpreted as a continuous surface, resulting in artifacts where the seam should be. If Preserve UVs is enabled then the lightmapping UVs from the object will be translated to the lightmap to retain the effect intended by the artist. If Preserve UVs is switched off then Unity will calculate the realtime lightmap UVs based on the baked UVs so as to join adjacent “charts” and compact the lightmap as much as possible. This calculation is based on the two settings below (max distance and max angle). The realtime charts are packed with a half pixel border around them. This ensures that we get no leaking when rendering from them. |
| Auto UV Max Distance | Enlighten automatically generates simplified UVs by merging UV charts. Charts will only be simplified if the worldspace distance between the charts is smaller than this value. |
| Auto UV Max Angle | Enlighten automatically generates simplified UVs by merging UV charts. Charts will only be merged if the angle between the charts is smaller than this value. |
| Important GI | This tells Unity that light reflected or emitted from the object is likely to affect other objects in a noticeable way. This ensures that subtle illumination effects created by this object are not optimised away. |
| Advanced Parameters | Allows you to choose or create a set of Lightmap Parameters for the current object selection. |
Terrains
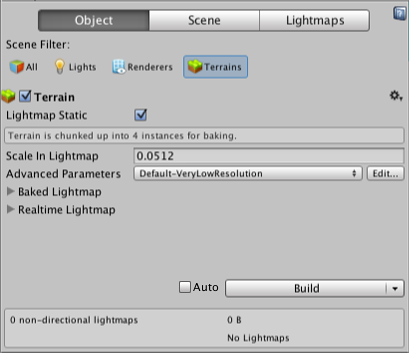
For Terrains, the properties are a subset of those available for renderers.

| Property: | Function: |
|---|---|
| Lightmap Static | This indicates to Unity that the object’s location is fixed and so it should participate in the GI. If an object is not marked as Lightmap Static then it can still be lit using Light Probes. |
| Scale in Lightmap | This value affects the number of pixels in the lightmap texture that are used for this object. With the default value of 1.0, the number of lightmap pixels used for the object is only dependent on its surface area (ie, same number of pixels per unit area for all objects). A value greater than 1.0 increases the number of pixels (ie, the lightmap resolution) used for this object while a value less than 1.0 decreases it. You can use this property to optimise lightmaps so that important and detailed areas are more accurately lit. |
| Advanced Parameters | Allows you to choose or create a set of Lightmap Parameters for the current object selection. The default parameter set for Terrains is the Very Low Resolution built-in set. |
Scene Tab
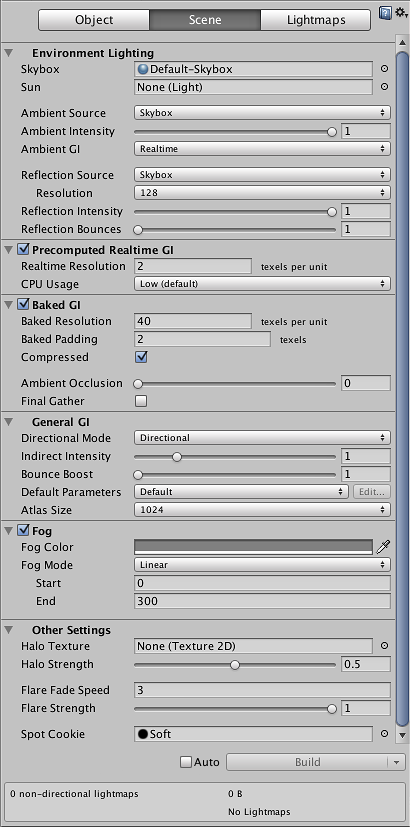
The Scene tab contains settings that apply to the scene overall as opposed to individual objects. Note that Precomputed Realtime GI and Baked GI features can be enabled or disabled by clicking the checkboxes next to their names in the Scene tab.

| Property: | Function: |
|---|---|
| Environment Lighting | |
| Skybox | A skybox is an image that appears behind everything else in the scene so as to simulate the sky or other distant background. This property lets you choose the skybox asset you want to use for the scene. |
| Sun | When a procedural skybox is used, you can use this to specify a directional light object to indicate the direction of the “sun” (or whatever large, distant light source is illuminating your scene). If this is set to None then the brightest directional light in the scene will be assumed to represent the sun. |
| Ambient Source | Ambient light is light that is present all around the scene and doesn’t come from any specific source object. There are three options for the source of the ambient light. Color simply uses a flat color for all ambient light in the scene. Gradient lets you choose the color separately for ambient light from the sky, horizon and ground and blends smoothly between them. Skybox uses the colors of the skybox (if specified by the property described above) to determine the ambient light coming from different angles; this allows for more precise effects than the simpler Gradient option. |
| Ambient Intensity | The brightness of the ambient light in the scene. |
| Ambient GI | Specifies the GI mode (Precomputed Realtime or Baked) that should be used for handling the ambient light. This property has no effect unless both modes are enabled for the scene. |
| Reflection Source | Allows you to specify whether to use the skybox for reflection effects (the default) or alternatively choose a cubemap to use instead. If the skybox is selected as the source then an additional option is provided to set the resolution of the skybox for reflection purposes. |
| Reflection Intensity | The degree to which the reflection source (skybox or cubemap) will be visible in reflective objects. |
| Reflection Bounces | A reflection “bounce” occurs where a reflection from one object is then reflected by another object. The reflections are captured in the scene through the use of Reflection Probes. This property lets you set how many times the bounces back and forth between objects are evaluated by the probes; if set to 1 then only the initial reflection (from the skybox or cubemap specified in the Reflection Source property) will be taken into account. |
| Precomputed Realtime GI | |
| Realtime Resolution | This sets the number of texels (ie, “texture pixels”) that will be used per unit of length for objects being lit by realtime GI. A resolution of 1 per unit is usually a good value (depending on the size of the objects in the scene) but for terrains and huge objects you will usually want to scale the resolution down. You can use the Lightmap Parameters or the Mesh Renderer’s Scale In Lightmap property to reduce the resolution. Note that this property also sets the Indirect Resolution if both Realtime and Baked GI are enabled - see the Baked GI properties below. |
| CPU Usage | This lets you set the approximate amount of CPU time that should be spent evaluating realtime GI at runtime. Higher CPU usage results in faster reactions from the lighting but may affect framerate, etc. This does not affect the CPU usage for the precomputation process performed in the editor. Note that higher CPU usage is achieved by increasing the number of threads assigned to the GI; processors with many cores may therefore suffer less of a performance hit. |
| Baked GI | |
| Baked Resolution | This sets the number of texels (ie, “texture pixels”) that will be used per unit of length for objects being lit by baked GI. This is typically set about ten times higher than the Realtime Resolution (see Precomputed Realtime GI above). |
| Baked Padding | The separation (in texel units) between separate shapes in the baked lightmap. |
| Compressed | Should the baked lightmap texture be compressed? A compressed lightmap requires less storage space but the compression process can introduce unwanted artifacts into the texture. |
| Indirect Resolution | (Only available when Precomputed Realtime GI is disabled) Resolution of the indirect lighting calculations. Equivalent to Realtime Resolution when using Precomputed Realtime GI. |
| Ambient Occlusion | The relative brightness of surfaces in ambient occlusion (ie, partial blockage of ambient light in interior corners). Higher values indicate greater contrast between the occluded and fully lit areas. This is only applied to the indirect lighting calculated by the GI system. |
| Final Gather | When the final gather option is enabled, the final light bounce in the GI calculation will be calculated at the same resolution as the baked lightmap. This improves the visual quality of the lightmap but at the cost of additional baking time in the editor. |
| General GI | |
| Directional Mode | The lightmap can be set up to store information about the dominant incoming light at each point on the objects’ surfaces. In Directional mode, a second lightmap is generated to store the dominant direction of incoming light. This allows diffuse normal mapped materials to work with the GI. In Directional Specular mode, further data is stored to allow full shading incorporating specular reflection and normal maps. Non-directional mode switches both these options off. Directional mode requires about twice as much storage space for the additional lightmap data; Directional Specular requires four times as much storage and also about twice as much texture memory. See the page on Directional Lightmapping for further details. |
| Indirect Intensity | A value that scales the brightness of indirect light as seen in the final lightmap (ie, ambient light or light bounced and emitted from objects). Setting this to 1.0 uses the default scaling; values less than 1.0 reduce the intensity while values greater than 1.0 increase it. |
| Bounce Boost | A scaling value to increase the amount of light bounced from surfaces onto other surfaces. The default value is 1.0 which indicates no increase. |
| Default Parameters | Unity uses a set of general parameters for the lightmapping in addition to properties of the Lighting window. A few defaults are available from the menu for this property but you can also create your own lightmap parameter file using the option. See the Lightmap Parameters page for further details. |
| Atlas Size | The size in pixels of the full lightmap texture which incorporates separate regions for the individual object textures. |
| Fog | |
| Fog Color | The color used to draw fog in the scene. Note that fog is not available with the Deferred rendering path. |
| Fog Mode | The way in which the fogging accumulates with distance from the camera. The options are Linear, Exponential and Exponential Squared (these are in increasing order of fog accumulation with distance). |
| Start | (Only available for Linear fog mode) The distance from camera at which the fog starts. |
| End | (Only available for Linear fog mode) The distance from camera at which the fog completely obscures scene objects. |
| Other Settings | |
| Halo Texture | The texture used for drawing a Halos around lights. |
| Halo Strength | The visibility of halos around lights. |
| Flare Fade Speed | The time over which lens flares will fade from view after initially appearing. |
| Flare Strength | The visibility of lens flares from lights. |
| Spot Cookie | The Cookie texture used for spot lights. |
The Build button will start the lighting build process. The button can expand into a dropdown where you can clear the baked data. This isn’t the same as clearing the GICache.
Lightmaps Tab
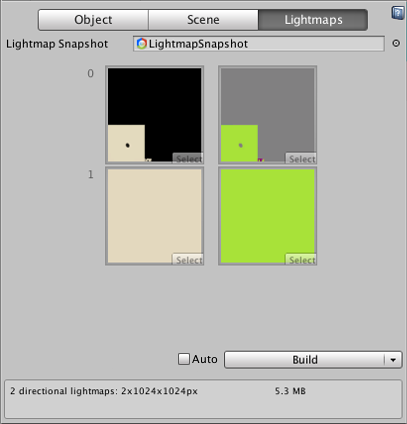
The final tab provides an easy way to set and locate the lightmap asset file used for the scene.

If you click the filename in the Lightmap Snapshot box, the Project view will show you the asset file. If you click the small pip next to the box, an object selection window will appear to let you select a different lightmap. If you rename the folder where the current lightmap asset is located and then set the Lightmap Snapshot property to None, a new file will be created the next time you build the lightmap. Using multiple files like this is a good way to test out GI settings and compare different sets of parameters.
The image below the Lightmap Snapshot box shows a preview of the lightmap. This is only available when Baked lights are used; the preview will be blank for Realtime lights.