Avatar Mask
Masking allows you to discard some of the animation data within a clip, allowing the clip to animate only parts of the object or character rather than the entire thing. For example, you may have a standard walking animation that includes both arm and leg motion, but if a character is carrying a large object with both hands then you wouldn’t want their arms to swing to the side side as they walk. However, you could still use the standard walking animation while carrying the objecht by using a mask to only play the upper body portion of the carrying animation over the top of the walking animation.
Masking can be applied to animation clips either during import time, or at runtime. Masking during import time is preferable, because it allows the discarded animation data to be omitted from your build, making filesize and memory footprint smaller. It also makes for faster processing speed because there is less animation data to be blended at runtime. In some cases, import masking may not be suitable for your purposes, in which case you can apply a mask at runtime by creating an Avatar Mask asset, and using it in the layer settings of your Animator Controller. This page relates to creating an Avatar Mask asset.
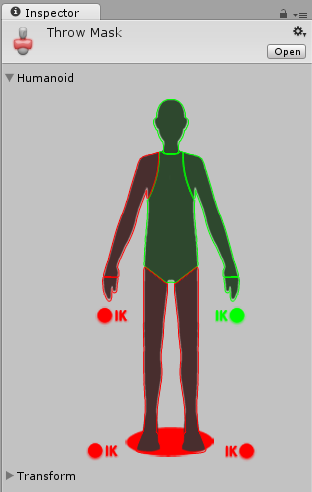
There are two ways to define which parts of your animation should be masked. If your animation uses a Humanoid avatar, you have the option of using the humanoid body selection method which allows you to click on a simplified diagram of a humanoid body to select or deselect certain parts to mask.
The body parts included are: Head, Left Arm, Right Arm, Left Hand, Right Hand, Left Leg, Right Leg and Root (which is denoted by the “shadow” under the feet). In the body mask, you can also toggle inverse kinematics (IK) for hands and feet, which will determine whether or not IK curves will be included in animation blending.
- Click the avatar section to toggle inclusion or exclusion (green/red)
- Double click in empty space surrounding the avatar to toggle all

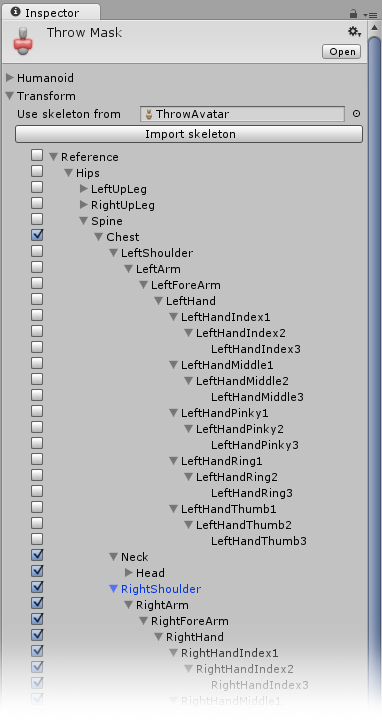
Alternatively, if your animation does not use a Humanoid avatar, or if you want more detailed control over which individual bones are masked off, you can use the Transform method to select or deselect portions of the model’s hierarchy to mask. To do this, you must assign a reference to the avatar whose transform you would like to mask off, then click the “Import Skeleton” button. You will then see the hierarchy of the avatar listed in the inspector. Each bone has a checkbox allowing you to select or deselect parts of the hierarchy to use as your mask.

Mask assets can be used in Animator Controllers, when specifying Animation Layers to apply masking at runtime, or in the import settings of of your animation files to apply masking during to the import animation.
A benefit of using Masks is that they tend to reduce memory overheads since body parts that are not active do not need their associated animation curves. Also, the unused curves need not be calculated during playback which will tend to reduce the CPU overhead of the animation.