iOS Player Settings
This page details the Player Settings specific to iOS. A description of the general Player Settings can be found here.
Note that Unity iOS requires 7.0 or higher. iOS 6.0 and earlier are not supported.
Resolution and presentation
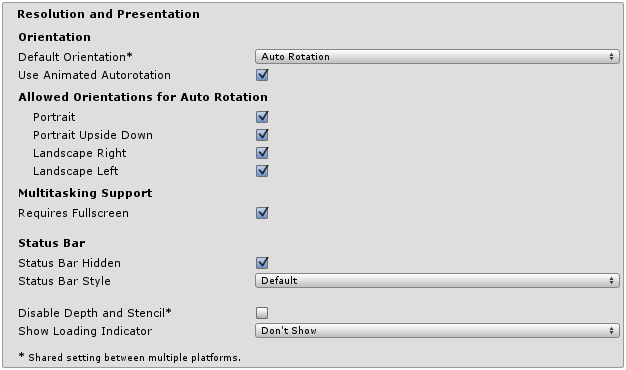
| Property: | Function: |
|---|---|
| Orientation | |
|
Default Orientation This setting is shared between iOS and Android devices |
The game’s screen orientation. The options are: Portrait (home button at the bottom), Portrait Upside Down (home button at the top), Landscape Left (home button on the right side), Landscape Right (home button on the left side), and Auto Rotation (screen orientation changes with device orientation) |
| Use Animated Autorotation | Check this box if you want orientation changes to animate the screen rotation rather than just switch. This is only visible when Default Orientation is set to Auto Rotation. |
| Allowed Orientations for Auto Rotation (only visible when Default Orientation is set to Auto Rotation.) | |
| Portrait | Allow portrait orientation. |
| Portrait Upside Down | Allow portrait upside-down orientation. |
| Landscape Right | Allow landscape right orientation (home button on the left side). |
| Landscape Left | Allow landscape left orientation (home button is on the right side). |
| Multitaking Support | |
| Requires Fullscreen | Check this box if your game requires fullscreen. |
| Status Bar | |
| Status Bar Hidden | Check this box to hide the the status bar when the application launches. |
| Status Bar Style | Define the style of the status bar when the application launches. The options are Default, Black Translucent and Black Opaque. |
| Disable Depth and Stencil | Check this box to disable the depth and stencil buffers. |
| Show Loading Indicator | Select how the loading indicator be displayed. The options are Don’t Show, White Large, White, and Gray. |
Icon
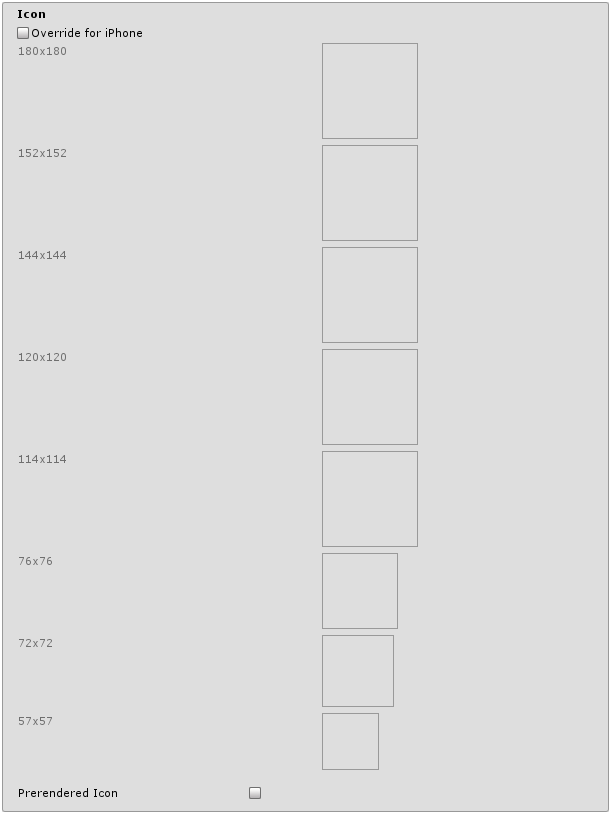
| Property: | Function: |
|---|---|
| Override for iPhone | Check this box if you want to assign a custom icon you would like to be used for your iPhone/iPad game. Different sizes of the icon fill in the squares below. If any icon textures are omitted, the icon texture with the nearest size (preferring larger resolution textures) is scaled accordingly. |
| Prerendered icon | If unchecked, iOS applies its standard styling effects to the application icon. |
Splash Image
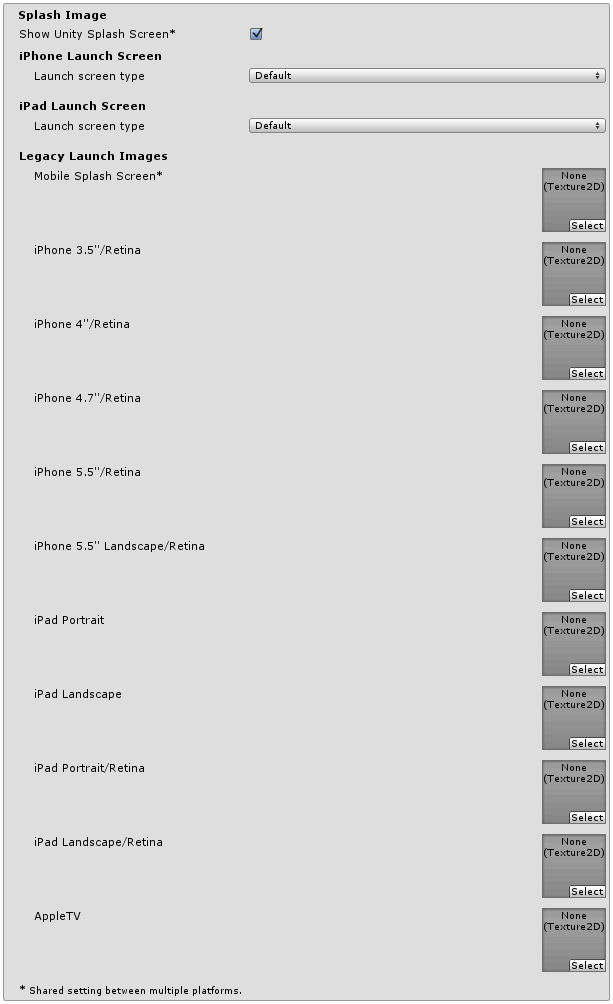
There are two ways to implement splash images on iOS: Launch Images and Launch Screens.
Launch Images
Launch Images are static splash screen images that occupy the entire screen.
For devices that use iOS 7, Launch Images are the only launch screen option. There is no support for versions prior to iOS 7.0. For devices that use iOS 8 or newer, you can use either Launch Images or Launch Screens.
Launch Images are defined in an Asset catalog (Images.xcassets/LaunchImage). Always add a Launch Screen for each supported size and orientation combination.
Only iPhone 6+ supports landscape orientation; other iPhones can only use portrait. Launch Images are selected in the following order:
- The specific Launch Image override, if the texture is set
- Default Unity splash screen launch image, which is a solid blue-black color
You need to set all Launch Images for your build.
Launch Screens
A Launch Screen is an XIB file from which iOS creates a splash screen dynamically on the device.
Launch Screens have a limitation, in that it is not possible to display different contents depending on orientation on iPad devices. Therefore, Launch Screens are only supported on iPhone devices. All iPhones support landscape Launch Screens; however, due to a bug in iOS, Landscape Left is shown instead of Landscape Right on certain iOS versions.
| Property: | Function: |
|---|---|
| Mobile Splash Screen | Specifies texture which should be used for iOS Splash Screen. Standard Splash Screen size is 320x480.(This is shared between Android and iOS) |
| iPhone 3.5"/Retina | Specifies texture which should be used for iOS 3.5" Retina Splash Screen. Splash Screen size is 640x960. |
| iPhone 4"/Retina | Specifies texture which should be used for iOS 4" Retina Splash Screen. Splash Screen size is 640x1136. |
| iPhone 4.7"/Retina | Specifies texture which should be used for iOS 4.7" Retina Splash Screen. Splash Screen size is 750x1334. |
| iPhone 5.5"/Retina | Specifies texture which should be used for iOS 5.5" Retina Splash Screen. Splash Screen size is 1242x2208. |
| iPhone 5.5" Landscape/Retina | Specifies texture which should be used for iOS 5.5" Landscape/Retina Splash Screen. Splash Screen size is 2208x1242. |
| iPad Portrait | Specifies texture which should be used as iPad Portrait orientation Splash Screen. Standard Splash Screen size is 768x1024. |
| iPad Landscape | Specifies texture which should be used as iPad Landscape orientation Splash Screen. Standard Splash Screen size is 1024x768. |
| iPad Portrait/Retina | Specifies texture which should be used as the iPad Retina Portrait orientation Splash Screen. Standard Splash Screen size is 1536x2048. |
| iPad Landscape/Retina | Specifies texture which should be used as the iPad Retina Landscape orientation Splash Screen. Standard Splash Screen size is 2048x1536. |
| Launch Screen type | Allows you to select between the launch screen types |
| - None | The behavior is as if only launch images are used. |
| - Default | A launch screen that is very much like a launch image. One image is selected for portrait and landscape. The selection order: iPhone 6+ launch images, shared mobile launch image, default unity launch image for iPhone 6+. The images are displayed using aspect-fill mode. |
| - Image with background, relative size | A center-aligned image is shown, with the rest of area filled with solid color. The image size is user-specified percentage of the screen size, computed in the smaller dimension (vertical on landscape, horizontal in portrait orientations). User also specifies background color and images for portrait and landscape orientations. Image selection order: the user-specified image, shared mobile launch image, default unity launch image for iPhone 6+. The images are displayed using aspect-fill mode. |
| - Image with background, constant size | Same as relative size option except that the size of the image is defined by user-specified number of points. |
| - Custom Xib | An user-specified XIB file from any location. |
In Unity Personal Edition the Unity Splash Screen displays as soon as engine initialises, in addition to your chosen splash screen.
Debugging and Crash Reporting
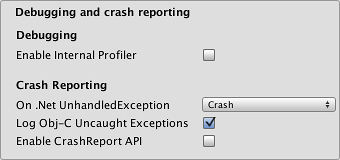
| Property: | Function: |
|---|---|
| Enable Internal Profiler | Enables an internal profiler which collects performance data of the application and prints a report to the console. The report contains the number of milliseconds that it took for each Unity subsystem to execute on each frame. The data is averaged across 30 frames. |
| On .Net UnhandledException | The action taken on .NET unhandled exception. The options are Crash (the application crashes hardly and forces iOS to generate a crash report that can be submitted to iTunes by app users and inspected by developers), Silent Exit (the application exits gracefully). |
| Log ObjC uncaught exceptions | Enables a custom Objective-C Uncaught Exception handler, which will print exception information to console. |
| Enable Crash Report API | Enables a custom crash reporter to capture crashes. Crash logs will be available to scripts via CrashReport API. |
Other Settings
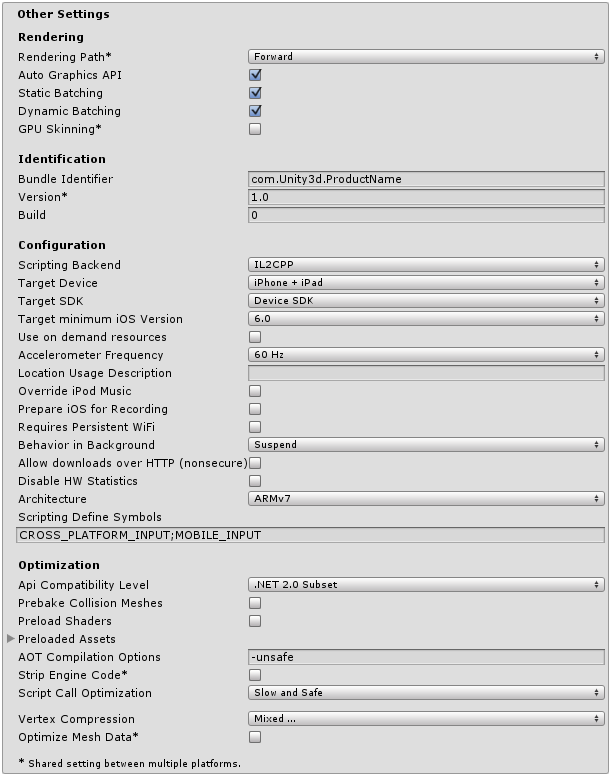
| Property: | Function: |
|---|---|
| Rendering | |
| Rendering Path | The rendering path enabled for the game. |
| Automatic Graphics API | Allows you to select which graphics API is used. When checked, Unity will include Metal, and GLES2 as a fallback for devices where Metal is not supported. When unchecked, you can manually pick and reorder the graphics APIs. Manually picking just one API will adjust your app’s info.plist which will result in appropriate app store restrictions. |
| Static Batching | Set this to use Static batching on your build (enabled by default). |
| Dynamic Batching | Set this to use Dynamic Batching on your build (enabled by default). |
| GPU Skinning | Should DX11/ES3 GPU skinning be enabled? |
| Identification | |
| Bundle Identifier | The string used in your provisioning certificate from your Apple Developer Network account(This is shared between iOS and Android) |
| Bundle Version | Specifies the build version number of the bundle, which identifies an iteration (released or unreleased) of the bundle. The version is specified in the common format of a string containing numbers separated by dots (eg, 4.3.2). |
| Build | The build number can be entered here to allow you to keep track of the number of builds that have been made |
| Apple Developer Team ID | Set this property with your Apple Developer Team ID. You can find this on the Apple Developer website under Account > Membership. This sets the Team ID for the generated Xcode project, allowing developers to use the Build and Run functionality. An Apple Developer Team ID must be set here for automatic signing of your app. |
| Configuration | |
| Scripting Backend | Allows you to select between IL2CPP and Mono2x scripting backends. The default is IL2CPP, and in most normal situations there should be no reason to switch to the older Mono2x backend. Unless you are running into bugs specifically relating to IL2CPP, you should not select Mono2x. Mono2x builds are no longer accepted in the App store. |
| Target Device | Which devices are targeted by the game? The options are iPhone Only, iPad Only and iPhone + iPad. |
| Target SDK | Which SDK is targeted by the game? The options are iPhone Only, Device SDK and Simulator SDK. |
| Target minimum iOS Version | Defines the minimum version of iOS that the game will work on. |
| Use on Demand Resource | When enabled allows you to use one demand resources. |
| Accelerometer Frequency | How often is the accelerometer sampled? The options are Disabled (ie, no samples are taken), 15Hz, 30Hz, 60Hz and 100Hz. |
| Location Usage Description | This field allows you to enter the reason for accessing the users location. |
| Override iPod Music | If selected, the application will silence user’s iPod music. Otherwise user’s iPod music will continue playing in the background. |
| Prepare iOS for Recording | When selected, the microphone recording APIs are initialised. This makes recording latency lower, though on iPhones it re-routes audio output via earphones only. |
| Requires Persistent WiFi | Specifies whether the application requires a Wi-Fi connection. iOS maintains the active Wi-Fi connection while the application is running. |
| Behaviour in Background | Specifies what the application should do when the user presses the home button. |
| - Suspend | This is the standard behaviour, the app is suspended, but not quit. |
| - Exit | Instead of suspending, the app will quit when the home button is pressed. |
| - Custom | You can implement your own behaviour with background processing. See an example here. |
| Allow downloads over HTTP (nonsecure) | When this option is enabled it will allow you to download content over HTTP. Default and reccomended is HTTPS. |
| Supported URL schemes | A list of supported URL schemes. |
| Disable HW Statistics | By default, Unity iOS apps send anonymous HW statistics to Unity so we can provide you with aggregated information to help you make decisions as a developer. These stats can be found at http://stats.unity3d.com/. Checking this option disables the sending of these statistics for your app. |
| Architecture | Allows you to select which architecture to target. Universal is recommended default. Some apps that are shipping on high-end devices only might consider selecting the Arm64-only option. Armv7 is for consistency purposes. |
| - Universal | The recommended option. Supports both architectures. |
| - Armv7 | Support only the older Armv7 architecture. |
| - Arm64 | Support only the newer Arm64 architecture. |
| Scripting Define Symbols | Custom compilation flags (see the platform dependent compilation page for details). |
| Optimization | |
| Api Compatibility Level | Specifies active .NET API profile. See below |
| - .Net 2.0 | .Net 2.0 libraries. Maximum .net compatibility, biggest file sizes |
| - .Net 2.0 Subset | Subset of full .net compatibility, smaller file sizes |
| Prebake Collision Meshes | Should collision data be added to meshes at build time? |
| Preload Shaders | Should shaders be loaded when the player starts up? |
| Preloaded Assets | An array of assets to be loaded when the player starts up. |
| AOT compilation options | Additional AOT compiler options. |
| SDK Version | Specifies iPhone OS SDK version to use for building in Xcode |
| - Device SDK | SDK to run on actual hardware. |
| - Simulator SDK | SDK to run only on the simulator. |
| Target iOS Version | Specifies lowest iOS version where final application will able to run. Selecting a lower version will mean more devices will be able to run your app. Selecting a higher version means you gain access to features introduced in those higher versions, but users who have not upgraded their device will not be able to use the app. Selecing the ‘Unknown’ option allows you to pick one in your xcode project instead (in case there are newer/beta versions of iOS which have not yet been added to our list in the editor). |
| Strip Engine Code | Enable code stripping. (This setting is only available with the IL2CPP scripting backend.) |
| Script Call Optimization | Optionally disable exception handling for a speed boost at runtime |
| - Slow and Safe | Full exception handling will occur (with some performance impact on the device when using the Mono scripting backend) |
| - Fast but no Exceptions | No data provided for exceptions on the device (the game will run faster when using the Mono scripting backend) |
| Vertex Compression | Select which vertex channels should be compressed. Compression can save memory and bandwidth but precision will be lower. |
| Optimize Mesh Data | Remove any data from meshes that is not required by the material applied to them (tangents, normals, colors, UV). |
Note: Be sure to select the correct SDK - if you select Device, say, but then target the Simulator in Xcode then the build will fail with a lot of error messages.
API Compatibility Level
You can choose your mono api compatibility level for all targets. Sometimes a 3rd party .net dll will use things that are outside of the .net compatibility level that you would like to use. In order to understand what is going on in such cases, and how to best fix it, get “Reflector” on windows.
- Drag the .net assemblies for the api compatilibity level in question into reflector. You can find these in Frameworks/Mono/lib/mono/YOURSUBSET/
- Also drag in your 3rd party assembly.
- Right click your 3rd party assembly, and select “Analyze”.
- In the analysis report, inspect the “Depends on” section. Anything that the 3rd party assembly depends on, but is not available in the .net compatibility level of your choice will be highlighted in red there.
Details
Bundle Identifier
The Bundle Identifier string must match the provisioning profile of the game you are building. The basic structure of the identifier is com.CompanyName.GameName. This structure may vary internationally based on where you live, so always default to the string provided to you by Apple for your Developer Account. Your GameName is set up in your provisioning certificates, that are manageable from the Apple iPhone Developer Center website. Please refer to the Apple iPhone Developer Center website for more information on how this is performed.
Stripping Level
Most games don’t use all necessary dlls. With this option, you can strip out unused parts to reduce the size of the built player on iOS devices. If your game is using classes that would normally be stripped out by the option you currently have selected, you’ll be presented with a Debug message when you make a build.
Script Call Optimization
A good development practice on iOS is to never rely on exception handling (either internally or through the use of try/catch blocks). When using the default Slow and Safe option, any exceptions that occur on the device will be caught and a stack trace will be provided. When using the Fast but no Exceptions option, any exceptions that occur will crash the game, and no stack trace will be provided. In addition, the AppDomain.UnhandledException event will be raised to allow project-specific code access to the exception information. With the Mono scripting backend the game will run faster since the processor is not diverting power to handle exceptions. There is no performance benefit with the Fast but no Exceptions option when using the IL2CPP scripting backend. When releasing your game to the world, it’s best to publish with the Fast but no Exceptions option.
Incremental Builds
The C++ code generated by the IL2CPP scripting backend can be updated incrementally, allowing incremental C++ build systems to compile only the changes source files. This can significantly lower iteration times with the IL2CPP scripting backend.
To use incremental builds, choose the “Append” option after selecting “Build” from the “Build Settings” dialog. The “Replace” option will perform a clean build.