Administration Guide
Follow these steps to use the advanced add facility to add a single device to Zenoss.
From the Navigation menu, select Add Device.
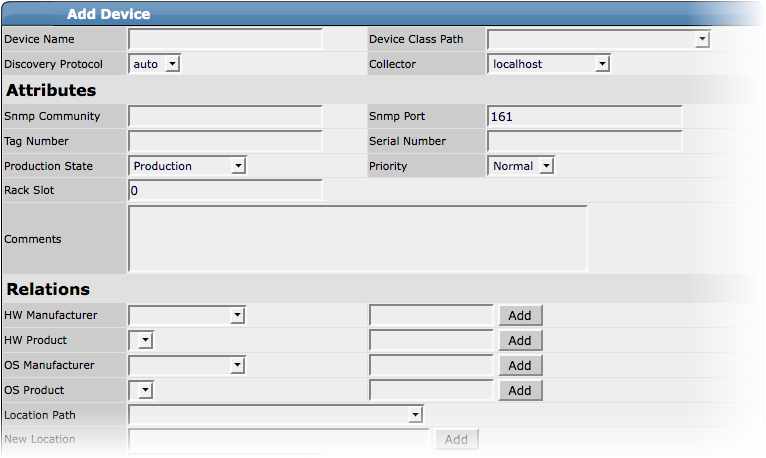
The Add Device page appears.
Enter information or make selections to add the device:
Device Name - Enter the network (DNS) name or IP address of the device.
Device Class Path - Select a device class to which this device will belong. For example, if the new device is a Windows server, then choose /Server/Windows/WMI.
Discovery Protocol - Select a discovery protocol (auto or none).
Note
Device Name, Device Class Path, and Discovery Protocol are the only required fields to add the device. Zenoss recommends that you continue without adding more information or making selections, as information you enter or select may conflict with information Zenoss discovers about the device.
An exception to this is if you are adding a Cisco router in a device class other than /Network. In this case you should set the zProperty for zlfDescription to True. This will give you additional information about Cisco routers. By default, this option is set to True for the /Network class.
Scroll to the bottom of the page, and then click Add Device.
A status page appears, showing a log of the operations Zenoss is using to gather information about the device.
Scroll to the bottom of the status page, and then click the link that appears, similar to:
Navigate to device
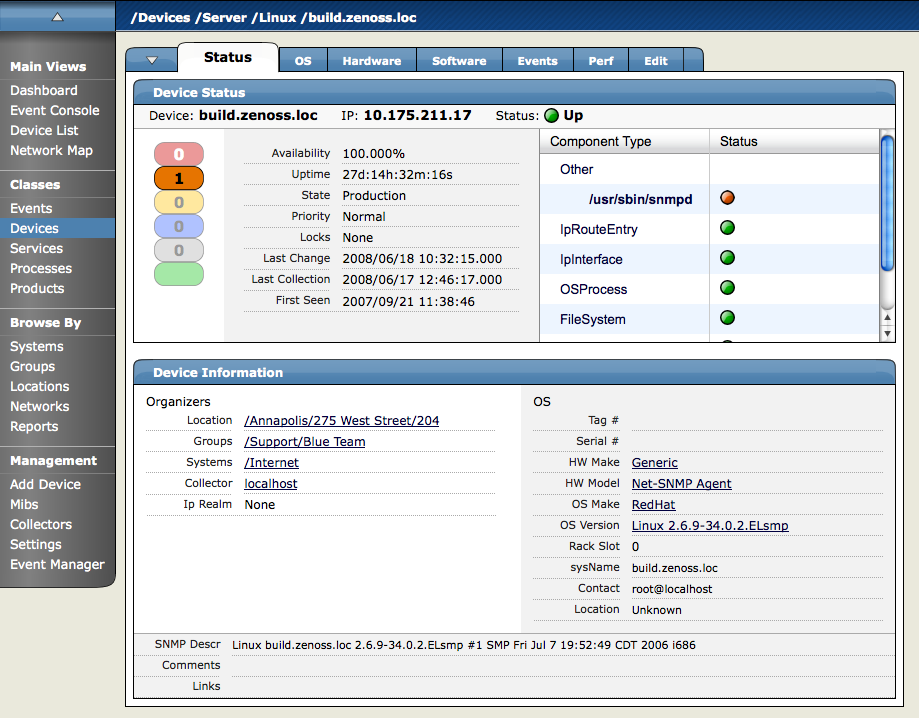
DeviceNameThe Main Device page appears, showing the Status tab.
By default, when you add a device, Zenoss places it in the /Discovered class. You can choose instead to add a device directly to a specific device class in the hierarchy.
To add a device within a specific device class:
Navigate to the location in the devices hierarchy where you want to add the device.
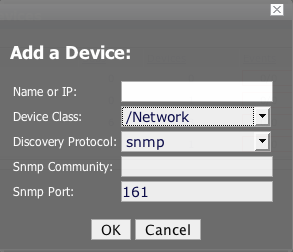
Open the page menu, and then select Manage > Add Device.
The Add Device dialog appears.
Complete the Name and Discovery Protocol fields. (For descriptions of valid values for these fields, refer to the section titled "Add a Single Device.") the Device Class value is the class you selected in the devices hierarchy.
Click OK.
The Device is added into the selected device class. The main Device page appears, showing the Status tab.
You also can use the "easy add" facility to add a device to Zenoss. From the Add Device page, click "Easy Add" (located at the top right of the page). For information and instructions to help you add devices this way, refer to the section titled "Add Devices" in Zenoss Getting Started.