Extended Monitoring Guide
Monitoring Windows devices normally requires an account with Administrator level privileges. For the Zenoss user that wishes to use a non-administrative account several additional configuration steps must be performed on each Windows device, or by using a Group Policy.
Zenoss uses the Windows Management Instrumentation (WMI) feature to collect Event Log and Service information in the Core edition and modeling information when using the Enterprise edition. In the Enterprise edition, the remote Windows registry API is also used to collect low-level performance monitor ("PerfMon") statistics. Both of these Windows subsystems use the Microsoft Remote Procedure Call (MS-RPC) interface to connect to the Windows device and gather the appropriate information. MS-RPC handles the authentication on a per packet or per session basis, but ultimately the access granted is determined by the subsystems involved with serving the remote procedure calls.
If the Windows Firewall is in use, modify it to allow Remote Administration access. This will open the MS-RPC port and others as needed. The following command entered in a Command Prompt can be used:
netsh firewall set service RemoteAdmin enable
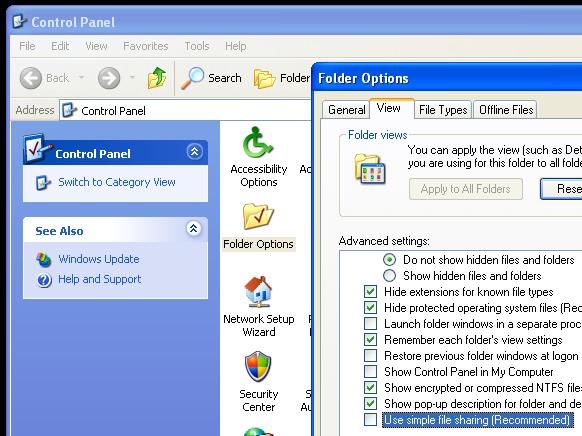
On Windows XP, Simple File Sharing must be disabled for machines that are not located within a Domain. When this feature is enabled it causes all incoming MS-RPC connections to use the built-in Guest account, rather than the account credentials specified in the incoming call. This option may be found by going to Control Panel, opening the Folder Options applet and then choosing the View tab. In the Advanced Settings list, navigate to the bottom until you see the Use simple file sharing (Recommended) option and then disable it.
Create a new local account on the Windows device for monitoring. We assume in the remainder of these steps that this account was named
zenossmonbut any valid account name can be used. Place the account only in the Users group and not in the Power Users or Administrators groups. Optionally, create a new user group for monitoring and use that group instead of the account in the remaining steps.Give the
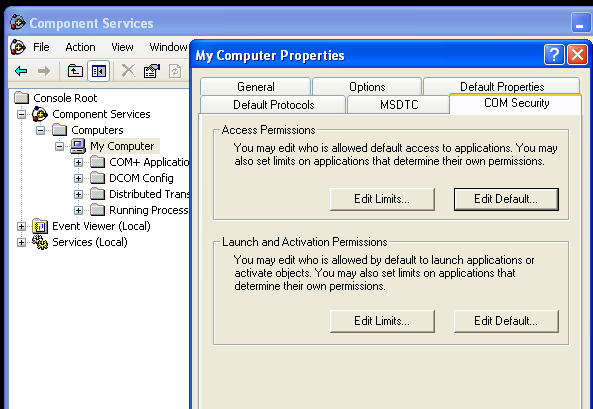
zenossmonaccount DCOM access by running the dcomcnfg utility.In the Component Services dialog box, expand Component Services, expand Computers, and then right-click My Computer and click Properties .
In the My Computer Properties dialog box, click the COM Security tab.
Under Access Permissions, click Edit Limits. In the Access Permission dialog box, add the
zenossmonaccount to the list and ensure that the Remote Access checkbox is enabled, then click to close the dialog.Under Launch and Activation Permissions, click Edit Limits. In the Access Permission dialog box, add the
zenossmonaccount to the list and ensure that the Remote Launch and Remote Activation checkboxes are enabled, then click to close the dialog.Click on the My Computer Properties dialog to save all changes.
Give the
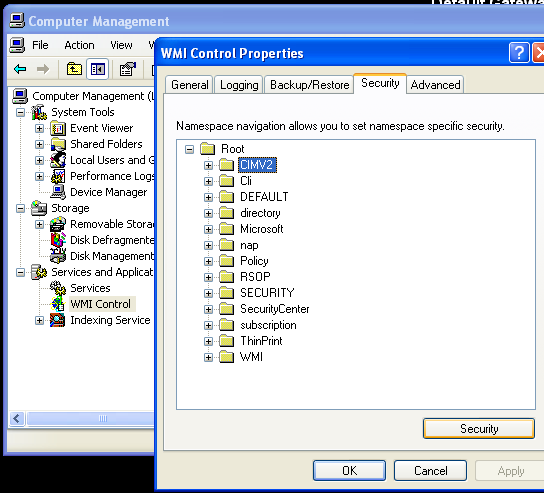
zenossmonaccount permissions to read the WMI namespace by using WMI Control.Open the menu and right-click on My Computer. Select from the menu.
In the Computer Management dialog, expand the Services and Applications item and then right-click on WMI Control.
In the WMI Control Properties dialog, click the Security tab.
Expand the Root namespace, select the CIMV2 namespace folder and then click Security.
In the Security for ROOT\CIMV2 dialog, add the
zenossmonuser to the list and ensure the Enable Account and Remote Enable checkboxes are enabled, then click to close the dialog.In the WMI Control Properties dialog click to close the dialog and save all changes.
At this point in the process remote access to WMI should be enabled and functioning. Test it by running the following command from the Zenoss server:
wmic -U '.\zenossmon' //
myhostname'SELECT Name FROM Win32_ComputerSystem'If all is well this command should return the remote system name as the response. If there is any error, carefully recheck the above steps to ensure all access has been properly granted.
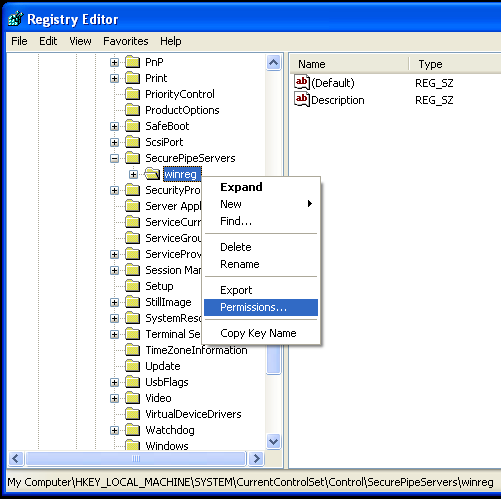
To gather Windows performance data from PerfMon permissions on the
winregregistry key must be granted to our monitoring user by using regedit.Run regedit.
Browse to the
HKEY_LOCAL_MACHINE\SYSTEM\CurrentControlSet\Control\SecurePipeServers\winregkey.Right-click on the
winregkey and choose Permissions.Add the monitoring user to the permissions list and grant only
Readpermissions
Give the
zenossmonaccount access to read the Windows Event Log.Once the appropriate changes are made, test that Event Log access works with your
zenossmonuser by running the following from your Zenoss system:wmic -U '.\zenossmon' //
myhostname\ 'SELECT Message FROM Win32_NTLogEvent WHERE LogFile="Application"'If you are using SP1 or newer with Windows Server 2003, then you will need to allow non-administrative users to access the service control manager in order to monitor services.
At a command prompt, run the following:
sc sdset SCMANAGER
D:(A;;CCLCRPRC;;;AU)(A;;CCLCRPWPRC;;;SY)(A;;KA;;;BA)S:(AU;FA;KA;;;WD)
(AU;OIIOFA;GA;;;WD)
Warning
The above command should be one line.
At this point you should be able to query Windows service status remotely using the non-administrative account. This can be tested by running the following from your Zenoss system:
wmic -U '.\zenossmon' //
myhostname'SELECT Name FROM Win32_Service'