Product SiteDocumentation Site

8.3. VMware vSphere Installation and Configuration

If you want to use the VMware vSphere hypervisor to run guest virtual machines, install vSphere on the host(s) in your cloud.

8.3.1. System Requirements for vSphere Hosts

8.3.1.1. Software requirements:

  • vSphere and vCenter, both version 4.1 or 5.0.
    vSphere Standard is recommended. Note however that customers need to consider the CPU constraints in place with vSphere licensing. See http://www.vmware.com/files/pdf/vsphere_pricing.pdf and discuss with your VMware sales representative.
    vCenter Server Standard is recommended.
  • Be sure all the hotfixes provided by the hypervisor vendor are applied. Track the release of hypervisor patches through your hypervisor vendor's support channel, and apply patches as soon as possible after they are released. CloudStack will not track or notify you of required hypervisor patches. It is essential that your hosts are completely up to date with the provided hypervisor patches. The hypervisor vendor is likely to refuse to support any system that is not up to date with patches.

Apply All Necessary Hotfixes

The lack of up-do-date hotfixes can lead to data corruption and lost VMs.

8.3.1.2. Hardware requirements:

  • The host must be certified as compatible with vSphere. See the VMware Hardware Compatibility Guide at http://www.vmware.com/resources/compatibility/search.php.
  • All hosts must be 64-bit and must support HVM (Intel-VT or AMD-V enabled).
  • All hosts within a cluster must be homogenous. That means the CPUs must be of the same type, count, and feature flags.
  • 64-bit x86 CPU (more cores results in better performance)
  • Hardware virtualization support required
  • 4 GB of memory
  • 36 GB of local disk
  • At least 1 NIC
  • Statically allocated IP Address

8.3.1.3. vCenter Server requirements:

  • Processor - 2 CPUs 2.0GHz or higher Intel or AMD x86 processors. Processor requirements may be higher if the database runs on the same machine.
  • Memory - 3GB RAM. RAM requirements may be higher if your database runs on the same machine.
  • Disk storage - 2GB. Disk requirements may be higher if your database runs on the same machine.
  • Microsoft SQL Server 2005 Express disk requirements. The bundled database requires up to 2GB free disk space to decompress the installation archive.
  • Networking - 1Gbit or 10Gbit.
For more information, see "vCenter Server and the vSphere Client Hardware Requirements" at http://pubs.vmware.com/vsp40/wwhelp/wwhimpl/js/html/wwhelp.htm#href=install/c_vc_hw.html.

8.3.1.4. Other requirements:

  • VMware vCenter Standard Edition 4.1 or 5.0 must be installed and available to manage the vSphere hosts.
  • vCenter must be configured to use the standard port 443 so that it can communicate with the CloudStack Management Server.
  • You must re-install VMware ESXi if you are going to re-use a host from a previous install.
  • CloudStack requires VMware vSphere 4.1 or 5.0. VMware vSphere 4.0 is not supported.
  • All hosts must be 64-bit and must support HVM (Intel-VT or AMD-V enabled). All hosts within a cluster must be homogeneous. That means the CPUs must be of the same type, count, and feature flags.
  • The CloudStack management network must not be configured as a separate virtual network. The CloudStack management network is the same as the vCenter management network, and will inherit its configuration. See Section 8.3.5.2, “Configure vCenter Management Network”.
  • CloudStack requires ESXi. ESX is not supported.
  • All resources used for CloudStack must be used for CloudStack only. CloudStack cannot share instance of ESXi or storage with other management consoles. Do not share the same storage volumes that will be used by CloudStack with a different set of ESXi servers that are not managed by CloudStack.
  • Put all target ESXi hypervisors in a cluster in a separate Datacenter in vCenter.
  • The cluster that will be managed by CloudStack should not contain any VMs. Do not run the management server, vCenter or any other VMs on the cluster that is designated for CloudStack use. Create a separate cluster for use of CloudStack and make sure that they are no VMs in this cluster.
  • All the required VLANS must be trunked into all network switches that are connected to the ESXi hypervisor hosts. These would include the VLANS for Management, Storage, vMotion, and guest VLANs. The guest VLAN (used in Advanced Networking; see Network Setup) is a contiguous range of VLANs that will be managed by CloudStack.

8.3.2. Preparation Checklist for VMware

For a smoother installation, gather the following information before you start:

8.3.2.1. vCenter Checklist

You will need the following information about vCenter.
vCenter Requirement
Value
Notes
vCenter User
This user must have admin privileges.
vCenter User Password
Password for the above user.
vCenter Datacenter Name
Name of the datacenter.
vCenter Cluster Name
Name of the cluster.

8.3.2.2. Networking Checklist for VMware

You will need the following information about VLAN.
VLAN Information
Value
Notes
ESXi VLAN
VLAN on which all your ESXi hypervisors reside.
ESXI VLAN IP Address
IP Address Range in the ESXi VLAN. One address per Virtual Router is used from this range.
ESXi VLAN IP Gateway
ESXi VLAN Netmask
Management Server VLAN
VLAN on which the CloudStack Management server is installed.
Public VLAN
VLAN for the Public Network.
Public VLAN Gateway
Public VLAN Netmask
Public VLAN IP Address Range
Range of Public IP Addresses available for CloudStack use. These addresses will be used for virtual router on CloudStack to route private traffic to external networks.
VLAN Range for Customer use
A contiguous range of non-routable VLANs. One VLAN will be assigned for each customer.

8.3.3. vSphere Installation Steps

  1. If you haven't already, you'll need to download and purchase vSphere from the VMware Website (https://www.vmware.com/tryvmware/index.php?p=vmware-vsphere&lp=1) and install it by following the VMware vSphere Installation Guide.
  2. Following installation, perform the following configuration, which are described in the next few sections:
    Required
    Optional
    ESXi host setup
    NIC bonding
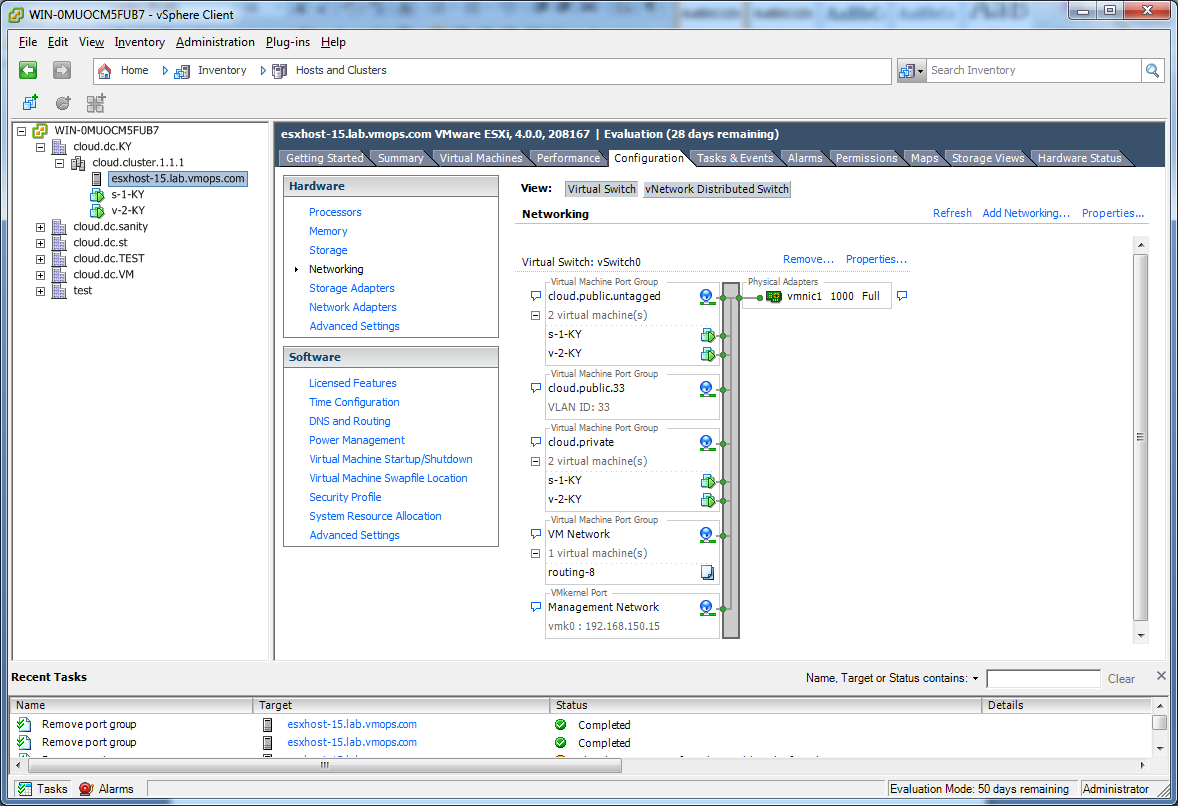
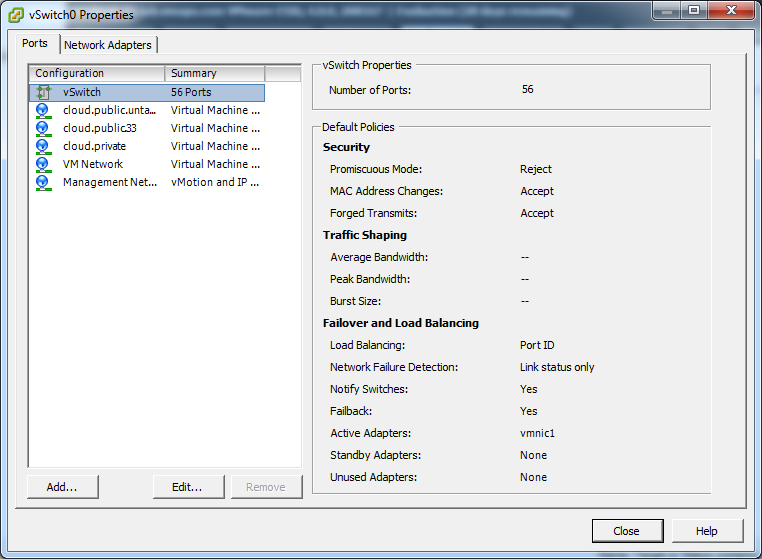
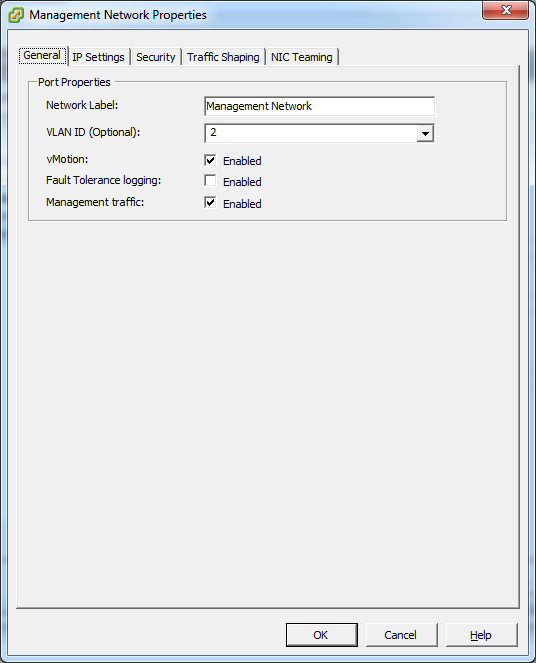
    Configure host physical networking, virtual switch, vCenter Management Network, and extended port range
    Multipath storage
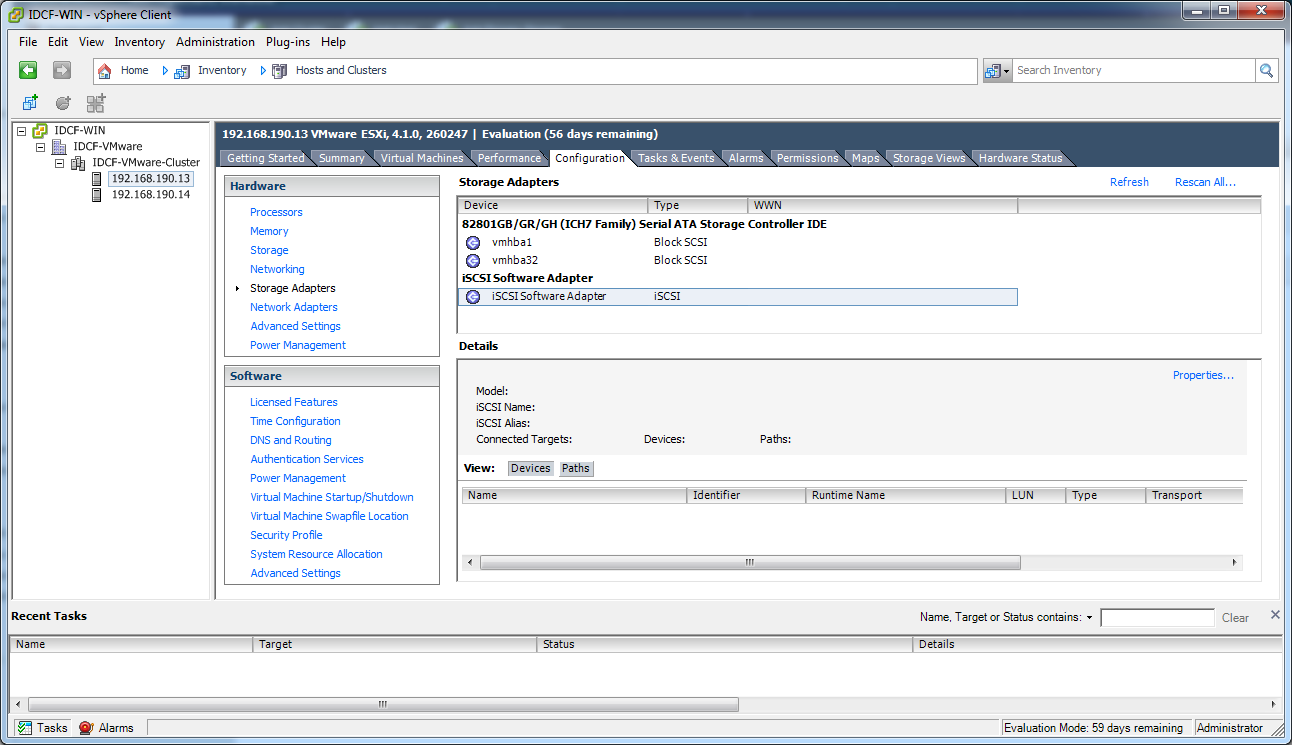
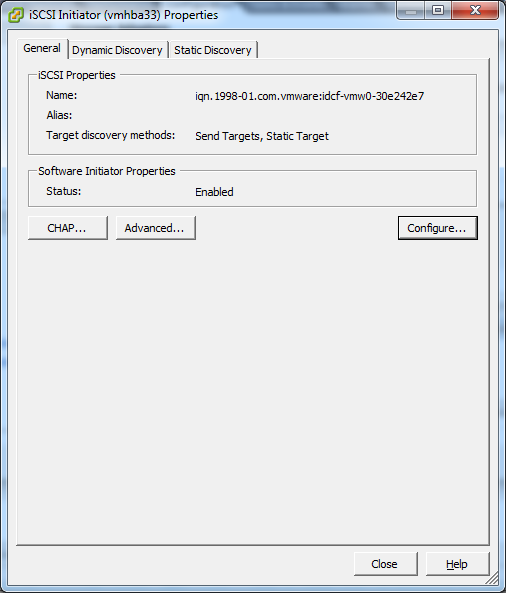
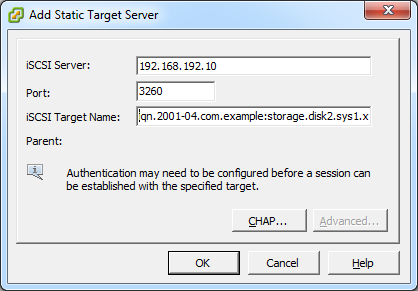
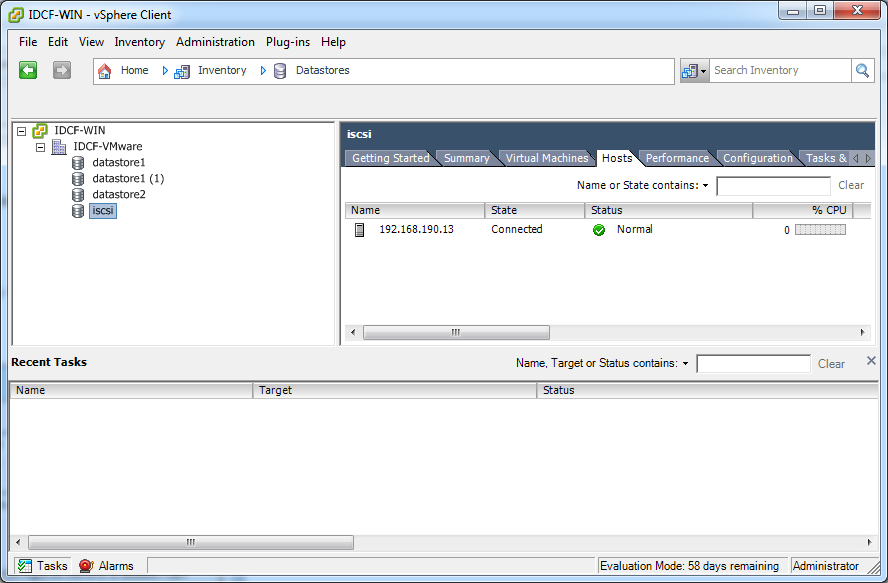
    Prepare storage for iSCSI
    Configure clusters in vCenter and add hosts to them, or add hosts without clusters to vCenter

8.3.4. ESXi Host setup

All ESXi hosts should enable CPU hardware virtualization support in BIOS. Please note hardware virtualization support is not enabled by default on most servers.

8.3.5. Physical Host Networking

You should have a plan for cabling the vSphere hosts. Proper network configuration is required before adding a vSphere host to CloudStack. To configure an ESXi host, you can use vClient to add it as standalone host to vCenter first. Once you see the host appearing in the vCenter inventory tree, click the host node in the inventory tree, and navigate to the Configuration tab.
vsphereclient.png: vSphere client
In the host configuration tab, click the "Hardware/Networking" link to bring up the networking configuration page as above.

8.3.5.1. Configure Virtual Switch

A default virtual switch vSwitch0 is created. CloudStack requires all ESXi hosts in the cloud to use the same set of virtual switch names. If you change the default virtual switch name, you will need to configure one or more CloudStack configuration variables as well.
8.3.5.1.1. Separating Traffic
CloudStack allows you to use vCenter to configure three separate networks per ESXi host. These networks are identified by the name of the vSwitch they are connected to. The allowed networks for configuration are public (for traffic to/from the public internet), guest (for guest-guest traffic), and private (for management and usually storage traffic). You can use the default virtual switch for all three, or create one or two other vSwitches for those traffic types.
If you want to separate traffic in this way you should first create and configure vSwitches in vCenter according to the vCenter instructions. Take note of the vSwitch names you have used for each traffic type. You will configure CloudStack to use these vSwitches.
8.3.5.1.2. Increasing Ports
By default a virtual switch on ESXi hosts is created with 56 ports. We recommend setting it to 4088, the maximum number of ports allowed. To do that, click the "Properties..." link for virtual switch (note this is not the Properties link for Networking).
vsphereclient.png: vSphere client
In vSwitch properties dialog, select the vSwitch and click Edit. You should see the following dialog:
vsphereclient.png: vSphere client
In this dialog, you can change the number of switch ports. After you've done that, ESXi hosts are required to reboot in order for the setting to take effect.

8.3.5.2. Configure vCenter Management Network

In the vSwitch properties dialog box, you may see a vCenter management network. This same network will also be used as the CloudStack management network. CloudStack requires the vCenter management network to be configured properly. Select the management network item in the dialog, then click Edit.
vsphereclient.png: vSphere client
Make sure the following values are set:
  • VLAN ID set to the desired ID
  • vMotion enabled.
  • Management traffic enabled.
If the ESXi hosts have multiple VMKernel ports, and ESXi is not using the default value "Management Network" as the management network name, you must follow these guidelines to configure the management network port group so that CloudStack can find it:
  • Use one label for the management network port across all ESXi hosts.
  • In the CloudStack UI, go to Configuration - Global Settings and set vmware.management.portgroup to the management network label from the ESXi hosts.

8.3.5.3. Extend Port Range for CloudStack Console Proxy

(Applies only to VMware vSphere version 4.x)
You need to extend the range of firewall ports that the console proxy works with on the hosts. This is to enable the console proxy to work with VMware-based VMs. The default additional port range is 59000-60000. To extend the port range, log in to the VMware ESX service console on each host and run the following commands:
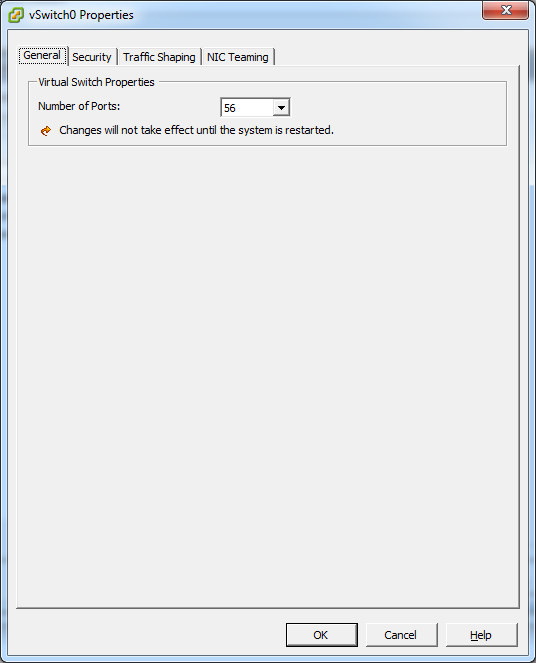
esxcfg-firewall -o 59000-60000,tcp,in,vncextras
esxcfg-firewall -o 59000-60000,tcp,out,vncextras

8.3.5.4. Configure NIC Bonding for vSphere

NIC bonding on vSphere hosts may be done according to the vSphere installation guide.

8.3.6. Storage Preparation for vSphere (iSCSI only)

Use of iSCSI requires preparatory work in vCenter. You must add an iSCSI target and create an iSCSI datastore.
If you are using NFS, skip this section.

8.3.6.1. Enable iSCSI initiator for ESXi hosts

  1. In vCenter, go to hosts and Clusters/Configuration, and click Storage Adapters link. You will see:
    vsphereclient.png: vSphere client
  2. Select iSCSI software adapter and click Properties.
    vsphereclient.png: vSphere client
  3. Click the Configure... button.
    vsphereclient.png: vSphere client
  4. Check Enabled to enable the initiator.
  5. Click OK to save.

8.3.6.2. Add iSCSI target

Under the properties dialog, add the iSCSI target info:
vsphereclient.png: vSphere client
Repeat these steps for all ESXi hosts in the cluster.

8.3.6.3. Create an iSCSI datastore

You should now create a VMFS datastore. Follow these steps to do so:
  1. Select Home/Inventory/Datastores.
  2. Right click on the datacenter node.
  3. Choose Add Datastore... command.
  4. Follow the wizard to create a iSCSI datastore.
This procedure should be done on one host in the cluster. It is not necessary to do this on all hosts.
vsphereclient.png: vSphere client

8.3.6.4. Multipathing for vSphere (Optional)

Storage multipathing on vSphere nodes may be done according to the vSphere installation guide.

8.3.7. Add Hosts or Configure Clusters (vSphere)

Use vCenter to create a vCenter cluster and add your desired hosts to the cluster. You will later add the entire cluster to CloudStack. (see Section 6.5.2, “Add Cluster: vSphere”).

8.3.8. Applying Hotfixes to a VMware vSphere Host

  1. Disconnect the VMware vSphere cluster from CloudStack. It should remain disconnected long enough to apply the hotfix on the host.
    1. Log in to the CloudStack UI as root.
    2. Navigate to the VMware cluster, click Actions, and select Unmanage.
    3. Watch the cluster status until it shows Unmanaged.
  2. Perform the following on each of the ESXi hosts in the cluster:
    1. Move each of the ESXi hosts in the cluster to maintenance mode.
    2. Ensure that all the VMs are migrated to other hosts in that cluster.
    3. If there is only one host in that cluster, shutdown all the VMs and move the host into maintenance mode.
    4. Apply the patch on the ESXi host.
    5. Restart the host if prompted.
    6. Cancel the maintenance mode on the host.
  3. Reconnect the cluster to CloudStack:
    1. Log in to the CloudStack UI as root.
    2. Navigate to the VMware cluster, click Actions, and select Manage.
    3. Watch the status to see that all the hosts come up. It might take several minutes for the hosts to come up.
      Alternatively, verify the host state is properly synchronized and updated in the CloudStack database.