| Inkscape » Quick Start » The Swedish Flag - A Short Example |    |
|---|
| Inkscape » Quick Start » The Swedish Flag - A Short Example | |
|---|
Updated for v0.46 (New Grids)
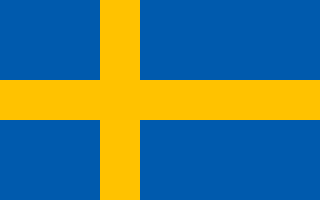
We will use Inkscape to draw a simple flag, that of Sweden. This example will cover: setting a custom drawing size, setting up a Grid to help precisely place objects, the use of the Rectangle Tool, changing the color of objects, and finally saving a drawing and exporting the drawing into a form suitable for use on a web page.
The steps we'll take are:
Start Inkscape.
Set the drawing size.
Set up a Grid to guide drawing objects.
Draw the flag background.
Draw the cross.
Set the colors of the background and cross.
Save and export the drawing.
It is assumed that you know how to start Inkscape and to use a mouse, touch pad, or tablet to select menu items and move scroll bars.
Procedure 1.1. Drawing the Swedish Flag
Start Inkscape.
The program will open a single window with a default page size.
Set the page size to the desired flag size.
The correct width to height proportion of the Swedish flag is 16 to 10. We will set the page size to a 320 by 200 pixel area. What is important here is the ratio. The size of drawing when printed or exported to a bitmap can be changed later (by default, a pixel corresponds to a screen pixel when exported).
Open the Document Properties dialog.
Open the Document Properties dialog by selecting
→
![]() Document Properties...
(Shift+Ctrl+D).
Document Properties...
(Shift+Ctrl+D).
Set page size.
In the newly opened window, set Custom size: Units to "px" using the drop-down menus. Then set the flag size by changing Custom size: Width to 320, and Height to 200. This can be done by typing the numbers into the entry boxes next to the labels (one could use the small up and down arrows to change the entered value but this does not work well when an entered number could be non-integer). Note that when you type in new values, changes don't take effect until you hit Return, click on a different entry box, or move the cursor from the Document Properties dialog to another Inkscape window. Page orientation will automatically change to Landscape.

Fit the page into the drawing area.
The page is now a small rectangle at the bottom of the drawing
area. To fit the page to the drawing area, click on the
Zoom-Page
icon
![]() in the Command Bar,
or use the keyboard shortcut: 5. The
Inkscape window should then look like this:
in the Command Bar,
or use the keyboard shortcut: 5. The
Inkscape window should then look like this:

Set a Grid.
While the Document Properties dialog is open, we will make one more change that will make drawing the background and cross easier. A Grid is a set of (usually) horizontal and vertical lines that provide a guide for drawing objects. Optionally, objects will “snap” to a Grid when being drawn or moved, enabling accurate drawing. A Grid will not show when the drawing is printed or exported as a bitmap.
Create a Grid.
Select the Grids tab in the Document Properties
dialog. Under the Creation section, select
Rectangular grid from the drop-down menu
(if not already selected) and the click on
the New button. You should see a grid of
blue lines on the canvas. If you don't, make sure both
the Enabled and
the Visible boxes are checked in
the Defined grids section. If they are
checked, toggle on the global visibility of Grids using the
command →
![]() Grid
(#).
Grid
(#).
Adjust the Grid spacing.
You can now adjust the Grid to match the cross. The dimension and position of the cross is given by Swedish law. The vertical bar is to be placed between 5/16ths and 7/16ths of the flag width while the horizontal bar is to be placed between 4/10ths and 6/10ths of the flag height.
The default Grid has minor divisions every pixel and major divisions every 5 pixels. Depending on the zoom level, not all divisions may be displayed. A more useful Grid for drawing the flag would be one with divisions every 20 pixels so that the Grid lines divide the flag width into 16 parts and the flag height into 10 parts.
To change the scale of the Grid go back to the Grids tab of the Document Properties window.

Set both Spacing X and Spacing Y to 20.
To help draw the flag accurately, we will turn on the snapping of nodes to the grid lines. Select the Snap tab. Check the Enable snapping box under the Snapping section. In the What snaps section check the box labeled Nodes. This will cause the corners of the rectangles we will draw to align with the grid. Uncheck the box labeled Bounding box corners.[5]
Next, in the Snap to grids section, uncheck the Snap only when closer than: box. This will force snapping to the Grid to always occur.

After making the changes, you may close the Document Properties window. The Inkscape window should look like this:

Draw the flag background.
The flag has a light-blue background. There are several ways to accomplish this; we'll use a filled rectangle.
Select the Rectangle Tool.
Click on the Rectangle Tool icon
![]() in the
Tool Box on the left of the Inkscape window (or use the
keyboard shortcut F4) to select the
Rectangle Tool.
in the
Tool Box on the left of the Inkscape window (or use the
keyboard shortcut F4) to select the
Rectangle Tool.
![[Tip]](../images/admons/tip.png) | Tip |
|---|---|
One nice feature of Inkscape is that there are very good built-in hints. While the mouse pointer is over the Rectangle Tool icon, you'll see a tool tip describing the use of the Rectangle Tool. This features is present for almost all icons and objects in Inkscape. The tool tip usually includes the keyboard short cut for an icon, in this case (F4), indicating that pressing F4 would be another way of selecting the Rectangle Tool. |
Once you have selected the Rectangle Tool, move the pointer over the drawing area. The pointer will become a rectangle. This signifies you are ready to draw a rectangle or square. The small cross at the upper-left corner of the pointer indicates the active point.
| Tip |
|---|---|
At the bottom of the window, there is a Notification Region (in the Status Bar). This tells you what actions you can perform with the selected tool. Note that the region isn't always large enough to show all the options. Moving the mouse over the region will pop up a tool tip showing the full content. One could also widen the Inkscape window to see more of the region. When the Select Tool is in use, the Notification Region will also tell you the number and type of objects that are currently selected. |
Draw the background rectangle.
To draw the background rectangle, follow the hint in the Notification Region. Click-drag the pointer from one corner to the opposite corner of the page area.
Note how the corners of the rectangle snap to the Grid. If your rectangle doesn't match the page size, you can use one of the drag handles (little squares) in the upper left or lower right of the rectangle to adjust the size of the rectangle. (The circle at the upper-right corner has a different function. It is used to round the four corners of a rectangle.) As you drag the squares around, they will snap to the Grid.
If you make a mistake, you can click on the
Undo icon
![]() in the
Command Bar, use →
in the
Command Bar, use →
![]() Undo
(Ctrl+Z) from the Menu Bar, or use
the keyboard shortcut
Ctrl+Z
to undo the change.
Undo
(Ctrl+Z) from the Menu Bar, or use
the keyboard shortcut
Ctrl+Z
to undo the change.

The background color will need to be changed. One could do that now, but it is easier to wait and change it at the same time the cross color is set.
Draw the cross.
The cross consists of a horizontal bar and a vertical bar.
Draw the horizontal bar.
With the Rectangle Tool still selected, create a bar by starting six grid units up on the left side of the flag and click-dragging the pointer until four units up on the right side of the flag. Notice that the rectangle Fill color is the same as the background color but you should still be able to see the new bar. Make any corrections to the size and position of the rectangle that are necessary.
If you can't see the horizontal bar... don't panic! Inkscape often uses the Current style (attributes: color, line style, etc.) to draw new objects. The Current style is set to that of the last object where the style was modified (including that of a previous Inkscape session). If the border color matches the Fill color of the rectangle or if drawing the border has been turned off, AND if the transparency or Alpha is set to 100% you will have the same situation as a polar bear in a snow storm. There are many fixes but the easiest one is to change the horizontal bar color to be different from the background color. This can be done by clicking on any of the color samples in the Palette while the newly drawn bar is still selected (indicated by the dashed line around the perimeter). If a color sample in the Palette is clicked on when no object is selected, the Current style will be changed to use that color for the Fill of the next Rectangle drawn.
Draw the vertical bar.
The vertical bar should extend between 5 and 7 units from the left.

Merge the bars into a cross.
One could stop here. After removing the border for the bars, one would have the desired cross. But it might be better (and at least more pedagogical) to merge the bars into a cross, so that the cross is one object rather than two.
Select both the rectangles.
Both bars needed to be selected at once. This can be done with the
Select Tool and
the Shift key.
Enable the Select Tool by clicking on the
![]() icon in the Tool Box or by using one of the keyboard shortcuts
F1 or
s.
icon in the Tool Box or by using one of the keyboard shortcuts
F1 or
s.
After changing to the Select Tool (indicated by the pointer changing to an arrow when over the canvas or crossed arrows when over an object), click on one of the rectangles in the cross. Then, while holding the Shift key down, click on the other rectangle in the cross. Both rectangles should be selected as indicated by their dotted borders. Note that the background rectangle is not surrounded by a dotted border and that the Notification Region reports that two objects are selected.

Merge paths.
The two rectangles can be combined by merging their
Paths.
(Here, the Path is the border of the
rectangle.) To merge the two rectangles, select
→
![]() Union
(Ctrl++) from the Menu Bar.
The rectangles are now merged into one object.
Union
(Ctrl++) from the Menu Bar.
The rectangles are now merged into one object.

The cross is no longer made of Rectangle objects but is instead defined as a Path.
Set the colors of the background and cross.
The next step is to adjust the colors of the background and cross to the colors of the Swedish flag. We'll use the Fill and Stroke dialog so that we can precisely set the correct colors.
Bring up the Fill and Stroke dialog.
Open up the Fill and Stroke dialog by clicking on the Fill and Stroke icon
![]() in the Command Bar,
clicking on the Fill part of the Style Indicator in the Status Bar,
or using the keyboard shortcut
Shift+Ctrl+F.
in the Command Bar,
clicking on the Fill part of the Style Indicator in the Status Bar,
or using the keyboard shortcut
Shift+Ctrl+F.
The dialog will by default be docked on the right inside the Inkscape window. If you have room, undock the dialog by dragging on the top bar of the dialog (the gray bar with Fill and Stroke written in it). Drop the dialog outside of the Inkscape window. Hit 5 to recenter the drawing inside the main window (or use the Middle Mouse button to drag the drawing back to the center).

Make sure that the Fill tab is highlighted at the top of the dialog; if not, click on the tab. The parameters in the Fill and Stroke dialog apply to the currently selected drawing object(s).
Set the Fill background color.
Select the background rectangle by clicking on it with the
Select Tool. The Notification Region
should report that one rectangle is selected and the
Style Indicator will show the Fill color and
the Stroke color of the rectangle. The Flat Color
![]() icon should be highlighted. If not, click on it.
icon should be highlighted. If not, click on it.
There are several ways to specify the desired Fill color. We'll use the Red-Green-Blue (RGB) mode (select the RGB tab if not already highlighted). In this mode, a color is specified by setting the amount of each of the three primary colors. The scale extends from 0 to 255. One can change the amount of each primary color via sliding the little triangles left or right on the bars labeled R, G, B, or by changing the numbers in the boxes to the right of the bars (via typing or using the up/down arrows). For the Swedish flag, the background color is specified by the the NIS standard color 4055-R95B, which is equivalent to the values: Red: 0, Green: 90, Blue: 173. The fourth entry is Alpha (A) or transparency, which indicates how opaque the object should be. We want our flag to have a solid, non-see-through background, so Alpha should be set to 255 (range is 0 to 255). Likewise, the Master opacity slide should be set to 100% (1.0 in v0.44).
One additional step is to turn off any Stroke (border) color. In
the Fill and Stroke dialog, select the
Stroke paint tab and click on the No paint
![]() icon to turn off the stroke.
icon to turn off the stroke.
Set the cross Fill color.
Select the cross and change the Fill color following the previous instructions. When the cross is selected, the Notification Region will report that a Path with 12 nodes is selected. You'll need to reselect the Fill tab. This time, set the colors to R: 255, G: 194, and B: 0. Also turn off the border as done previously.
Save and export your work.
Now is the time to save your work. Select
→
![]() Save As...
(Shift+Ctrl+S).
The dialog that appears will depend on your operating system. Select the folder or directory
where the drawing should be saved and give the drawing an appropriate name. Finally click
on the Save button.
Save As...
(Shift+Ctrl+S).
The dialog that appears will depend on your operating system. Select the folder or directory
where the drawing should be saved and give the drawing an appropriate name. Finally click
on the Save button.
One last step is to export your file as a PNG
(Portable Network Graphic) bitmap that can be used by other
graphics programs or on a web page.[6]
Bring up the Export Bitmap dialog:
( →
![]() Export Bitmap...
(Shift+Ctrl+E)).
Export Bitmap...
(Shift+Ctrl+E)).

There are four options for choosing the area to export: Page, Drawing, Selection, and Custom. In our case, the Page and Drawing areas are the same. Select either one, then enter or select a file name at the bottom and click on the Export button to save the drawing as a PNG. You should now have a PNG file with a flag as shown at the beginning of this section. Note, the dialog will remain on the screen even after a successful export.
[5] The bounding box includes (normally) the width of any visible border line. The finished flag will not have any visible border lines, but the rectangles used for the drawing of the flag, will have visible borders until they are removed in one of the last steps. If the placement of the rectangles is done using bounding boxes, the final placements of the rectangles will be off slightly.
| |  | |
| The Anatomy of the Inkscape Window |  | The European Flag - A More Elaborate Example |
© 2005-2008 Tavmjong Bah. | Get the book. |