UML: Creating Class Diagrams
Contributed and maintained by Cindy Castillo, Bob May
November 2007 [Revision number: V1-4]
This publication is applicable to NetBeans IDE 6.0 release
In this tutorial, you learn how to use the UML features of the IDE to create Class diagrams. This tutorial shows you various techniques for creating elements of a Class diagram and how to generate the Java source code for the diagram, The purpose of this tutorial is to introduce some of the IDE's UML Modeling Class diagram functionality and to show you various techniques for creating elements of a Class diagram.
A Class diagram is a visual representation of an application showing its classes and the relationships between those classes. When you open a Class diagram, the IDE displays a specific selection of UML element icons in the Modeling Palette. Using the Class diagram model, you describe the static structure of the elements in your application. The IDE lets you graphically create diagrams that contain classes. The classes are arranged in hierarchies that share common structure and behavior and are associated with other classes.
Expected duration: 30 minutes
Contents
Tutorial Requirements
Before you proceed, make sure you review the requirements in this section.
Prerequisites
To use this tutorial, the IDE must be installed on your system and you should be familiar with the basic parts of the IDE. You should also have a basic familiarity with the Java programming language and UML. For a basic understanding of the IDE, see the IDE Basics topics in the online help. A good resource for UML techniques and theory is the official UML resource page at http://www.uml.org/.
System Requirements
This tutorial assumes that your system meets the requirements specified in the Systems Requirements section of the NetBeans 6.0 Release Notes.
Software Needed for This Tutorial
Before you begin, download and install the following software:
- NetBeans IDE 6.0
Select the All Download option.
top
Using Class Diagrams
Classes define the attributes that are carried by each element instance and the operations that each element performs or undergoes. When representing a class in a UML model, you can do the following tasks:
- Create the element representing the class
- Name the class
- Define class attributes
- Define class operations
- Depict links and associations
- Add documentation
The following sections describe how to create a simple Class diagram for a hypothetical banking application. After you have completed the step-by-step procedures outlined in the tutorial, your Class diagram should look similar to Figure 1. The diagram is shown for reference only. Use the instructions beginning in the next section to draw your Class diagram.
If a procedure is labeled as optional, it is included to illustrate an additional task or alternate way of doing a task. You do not need to do the optional procedures to complete this tutorial successfully.
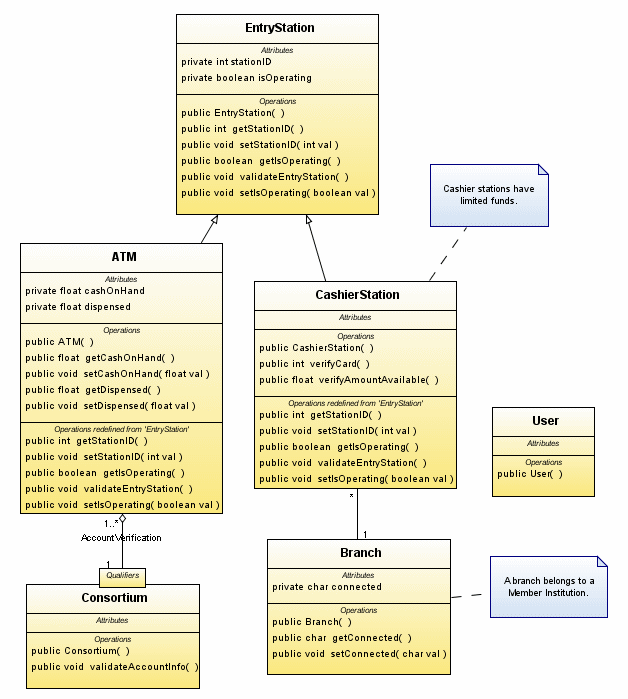
Figure 1: Sample Class Diagram
top
Creating Class Diagrams and Adding Elements
This tutorial uses the UML project that is created in the UML: Creating Use Case Diagrams tutorial. If you have not completed the use case tutorial, you can create a directory on your local system named UMLTutorial and create a Java-Platform Model UML project called UMLTutorialProject in that directory and proceed with this tutorial.
This section illustrates some basic UML tasks provided by UML to model a simple application using a Class diagram. This section contains the following procedures:
top
To Create the Class Diagram
- If necessary, start the IDE and open the previously created UMLTutorialProject project.
- In the Projects window, expand the UMLTutorialProject node and right-click the Model node.
- Choose Add > Diagram from the pop-up menu.
The New Wizard opens and displays the Create New Diagram page.
- In the Diagram Type list, select Class Diagram.
- In the Diagram Name field, type ClassDiagram.
- Leave the default setting in the Namespace field and click Finish.
The IDE does the following:
- Creates the ClassDiagram node under the Model node
- Displays the new diagram in the Diagram editor (the diagram is empty at this point)
- Opens the Modeling Palette
top
To Add and Label Class Elements
- From the Basic section of the Modeling Palette, select the Class icon
 and click once in the Diagram editor.
This action places a Class element on the diagram.
- Deselect the icon by right-clicking anywhere in the Diagram Editor.
Note: Each time that you select an icon, you can place multiple instances of that element in the Diagram editor by clicking more than once.
- If not already selected, select the newly added Class element by clicking it once.
- Type EntryStation and press Enter.
The IDE does the following:
- Labels the Class element with the name EntryStation
- Creates a public operation named EntryStation()
- Displays the Class properties in the Properties window
- Adds a Class element with the name EntryStation under the Model node in the Projects window
top
To Add Attributes Using the Pop-Up Menu
Now that you have drawn and labeled the EntryStation element, you need to describe its attributes.
- If it is not already selected, select the EntryStation element in the Diagram editor.
- Right-click the word Attributes and choose Insert Attribute from the pop-up menu.
A one-line editor opens and displays the following information:
visibility type name[ranges]=initialValue{name=value}
- Type stationID and press Enter.
An attribute named stationID of type int appears on the EntryStation class, and the following operations are created on the class:
public int getStationID()
public void setStationID(int val)
Note that the get and set operations are created because you kept the default setting.
top
To Add Operations
- In the Diagram editor, Select the EntryStation Class element.
- Right-click the word Operations and choose Insert Operation from the pop-up menu.
A one-line editor opens and displays the following information:
visibility returnType name(parameter) {properties, ...}
- Type validateEntryStation and press Enter.
The IDE creates a new operation.
top
(Optional) To Edit Attributes or Operations
When you double-click an attribute or an operation in a class, a combo box editor opens as shown in the following figure.
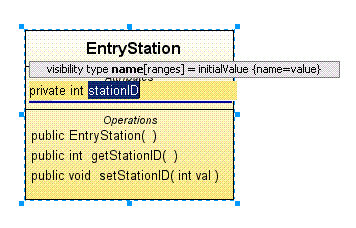
As you click each part of the attribute or operation, the label for that part appears in bold type in the combo box. If applicable, the selected part of the operation or attribute has a drop-down list of values.
For example:
- Double-click the stationID attribute in the EntryStation class.
- Click the word private.
Notice that the word visibility appears in bold type.
- Press CTRL + down arrow.
A drop-down list opens that displays values that you can select for the visibility attribute.
- Select a new value from the drop-down list and press Enter.
The attribute is updated with the new value.
Note: You can also type a new value directly in the editor. If you do not see what you need in the drop-down list, use the right and left arrow keys to position your cursor and type the appropriate value.
- For this tutorial, use the value private and press Enter to close the editor.
top
To Add and Define the Remaining Classes
Now you need to add more classes to complete a simple banking application Class diagram. After you add the classes, label them and add attributes and operations as described below using the techniques that you have learned so far in this tutorial.
- From the Basic section of the Modeling Palette, select the Class icon and click five times in the Diagram editor to place the additional class elements as shown in the following figure.

- Deselect the Class icon by right-clicking anywhere in Diagram editor.
Note: You can select and drag the new class elements to arrange them as shown in the preceding diagram, so that you can see each one clearly in the diagram.
- Select the first unnamed Class element below the EntryStation element and name it ATM.
- With the ATM Class element still selected, add an attribute as follows:
private float cashOnHand
- Add a second attribute to the ATM class and define it as follows:
private float dispensed
The attributes appear in the Class diagram.
Note: As you add attributes and operations to the classes, the size of the Class elements increases. To improve the appearance of the diagram, move the Class elements as needed so that you can see each element clearly. When doing this, be careful to select the Class element and not an individual attribute or operation.
- Select the first Class element located below the ATM class and name it Consortium.
- Add an operation to the Consortium class. Adding operations is similar to adding attributes. Right-click on the word Operations and select Insert Operations.
- Type validateAccountInfo and press Enter.
The IDE creates the new operation as follows:
public void validateAccountInfo()
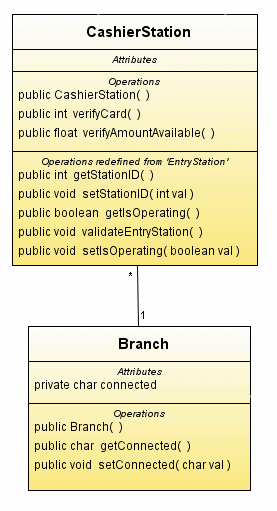
- Select the Class element to the right of the ATM class and label it CashierStation.
- Add two operations for this class as follows:
public int verifyCard()

public float verifyAmountAvailable()
- Label the two remaining Class elements Branch and User.
For the User class there are no attributes or operations.
- For the Branch class, add an attribute as follows:
private char connected
top
Generating and Editing Java Source Code
This section shows how you can generate Java source code for the Class diagram you just created in the previous section. Once you create your UML model, you can generate the corresponding Java source code for it. If you modify your model, you can re-generate the Java source code using the UML's Generate Code feature.
This section contains the following procedures:
To Generate Java Source Code
You can model your Java application and then generate the corresponding Java source code for your model. To generate the source code you need to create a Java project and use it to store the generated code for your UML project.
- From the main menu, choose File > New Project and then do the following:
- Under Categories, select General.
- Under Projects, select Java Application.
- Click Next.
- In the Project Name field, type JavaPrj1.
- For the Project Location, click Browse and select the directory UMLTutorial.
- Clear the Set as Main Project and Create Main Class checkboxes.
- Click Finish.
A progress dialog box appears. When your JavaPrj1 project is created, it appears in the Projects window.
- In the Projects window, right-click the UMLTutorialProject node and choose Generate Code from the pop-up menu.
- In the Generate Code dialog box, click Browse.
- In the Choose the Target Source Folder dialog box, locate the source folder for the JavaPrj1 project you just created.
For example: C:\Temp\UMLTutorial\JavPrj1\src
- Click Open.
- Back in the Generate Code dialog box, unselect the Backup Existing Source Files checkbox and click OK.
- In the Authorize UML Project Save dialog box, click Yes.
The IDE generates the Java source code and the Output window displays the progress of the code generation process.
- In the Projects window, expand the JavaPrj1 > Source Package node and double-click on the <default package> node.
Notice the folder contains the Java source files that are similarly named as the class elements you created in the ClassDiagram model.
top
To Add Attributes Using the Java Source Editor
Now, add another attribute to the EntryStation using the Source Editor. After modifying the Java source file, you will use the Reverse Engineer feature to reflect the change in the corresponding UML model element.
- In the Projects window, expand the UMLTutorialProject node and the Model node if necessary.
- Right-click the EntryStation node and choose Navigate To Source from the pop-up menu.
A Source Editor tab labeled EntryStation.java appears and displays the source code for the class.
- In the Source Editor, type the following code below the first attribute:
private boolean isOperating
- Press Ctrl-S to save your change.
- Right-click in the Source Editor and choose Reverse Engineer from the pop-up menu.
The Reverse Engineer dialog box appears.
- Select Use Existing UML Project in the Reverse Engineer dialog box and choose UMLTutorialProject as the target project.
- Click OK to invoke the reverse engineering process.
- In the Model Element Overwrite Authorization dialog box, click Yes to overwrite the existing model for the EntryStation class.
- Click the ClassDiagram tab to return focus to the Diagram editor.
The isOperating attribute appears in the EntryStation class element.
Note: Click the Fit to Window button  on the Diagram toolbar to center the diagram in the window. This button allows you to adjust the Zoom level if necessary to read labels or to make room to place more elements on the diagram.
top
Finding Diagram Elements
You can use several methods to quickly locate objects in a diagram or in the Projects window. All attributes and operations that you add to the Class elements in the Diagram editor appear in the Projects window. The attributes are represented by the attribute icon  . The operations are represented by the operation icon
  .
.
To Locate Objects in the Diagram Editor From the Projects Window
- In the Projects window, double-click the EntryStation node.
In the Diagram editor, the EntryStation Class element is selected and centered.
To Locate Objects in the Projects Window From the Diagram Editor
- In the Diagram editor, select the Consortium class and right-click it.
- Choose Select in Model from the pop-up menu.
In the Projects window, the name of the target object is highlighted.
top
Documenting Classes and Diagrams
There are three different ways to choose from when you want to enter descriptive documentation for classes, attributes, operations, and diagrams. This section contains the following procedures that describe these three methods:
To Use the UML Documentation Window
- (Optional) If the UML Documentation window is not visible, choose Windows > Other > UML Documentation.
- In the Diagram editor, select the EntryStation class element.
- Click inside the UML Documentation window text box.
- Type Describes the actions of the EntryStation class.
- Right-click the EntryStation class element and select Generate Code from the pop-up menu.
- In the Generate Code dialog box, click OK.
- In the Authorize UML Project Save dialog box, click Yes.
The new Java code is generated.
- Click the EntryStation.java Source Editor tab.
You see that the text you typed in Documentation window has been added to the EntryStation.java source file.
top
To Document Attributes Using the Properties Window
- Click the ClassDiagram tab to return the focus to the Diagram editor.
- In the Projects window, expand the EntryStation node.
- Select the attribute node labeled private boolean isOperating.
The properties for the attribute appear in the UML Properties window.
- In the Properties window, click the ellipsis button (...) on the Documentation row.
A custom editor opens as shown in the following figure.
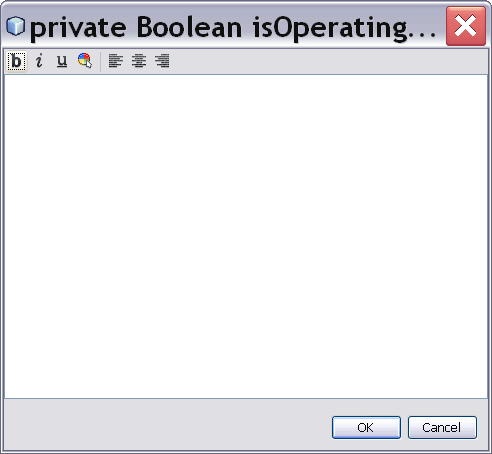
- Type the text Maintains if EntryStation is operating and click OK.
- In the Diagram editor, right-click the EntryStation class element and select Generate Code from the pop-up menu.
- In the Generate Code dialog box, click OK.
- In the Authorize UML Project Save dialog box, click Yes.
The new Java code is generated.
- Click the Source Editor tab for EntryStation.java.
You see the typed text in the source code right above the isOperating attribute.
top
To Document Diagrams Using the Comment Icon
You can add notes that describe specific information for a selected element in the diagram by using the Comment icon located on the Modeling Palette.
- Click the ClassDiagram tab to return to the Diagram editor.
- From the Comments section of the Modeling Palette, select the Comment icon
 .
.
- Click once to the right and just above the CashierStation element.
A Comment element is placed on the diagram.
- Deselect the icon by right-clicking anywhere in the Diagram editor.
- While the comment element is selected, type Cashier stations have limited funds and press Enter.
The text appears in the Comment element.
- From the Comments section of the Modeling Palette, select the Link Comment icon
 .
.
- Click once inside CashierStation and click again inside the Comment element.
A link snaps into place between the Comment element and the Class element.
- Deselect the icon by right-clicking anywhere in the Diagram editor.
- Repeat steps 2-8 to place and link a second Comment element on the diagram for the Branch Class element.
Use the following text: A branch belongs to a Member Institution.
top
Depicting Links and Associations
An association describes a group of links that share common structure and common semantics. The UML functionality supports not only associations, but also multiplicity of associations. Multiplicity specifies how many instances of one class can relate to a single instance of an associated class. Multiplicity constrains the numbers of related components. This section contains the following procedures:
To Depict a Class Association
- From the Association section of the Modeling Palette, select the Aggregation icon
 .
.
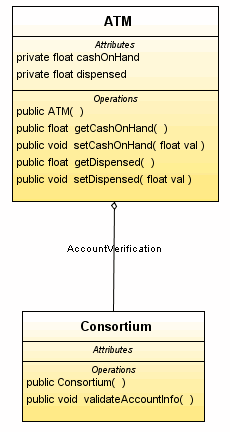
- Click inside the ATM element, and then click the Consortium element.
A link is drawn between the two classes.
- Right-click anywhere in the Diagram editor to deselect the icon.
This relationship is represented in the Projects window as shown in the following figure.
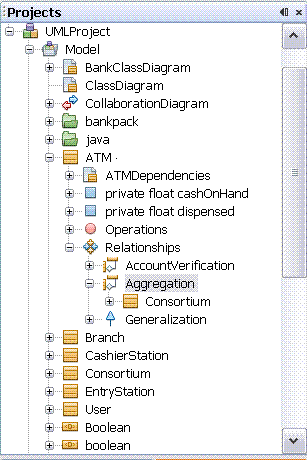
- Select the Aggregation link between ATM and Consortium.
When the link is selected, the color changes to blue.
- Point the cursor near the middle of the selected line and right-click.
- Choose Labels > Link Name from the pop-up menu.
- Type AccountVerification in the Name field and press Enter.
The link is labeled as shown in the following figure.
- From the Association section of the Modeling Palette, select the Association icon
 and draw a link from CashierStation to Branch.
- Right-click anywhere in the Diagram editor to deselect the icon.
top
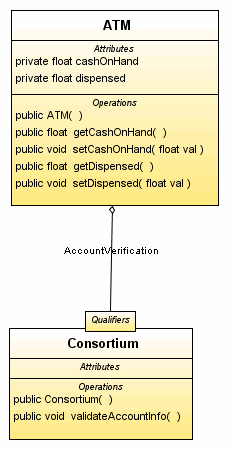
To Depict a Qualified Association
A qualified association relates two classes and a qualifier. The qualifier is a special attribute that reduces the effective multiplicity of an association. You depict a qualified association as a small box on the end of the association line near the class it qualifies.
The next step shows you how to create a qualified association between the ATM class and the Consortium class.
- Right-click the Aggregation link where it joins the Consortium class and choose Show Qualifier. A qualifier attaches to the Consortium class element as shown in the following figure.
top
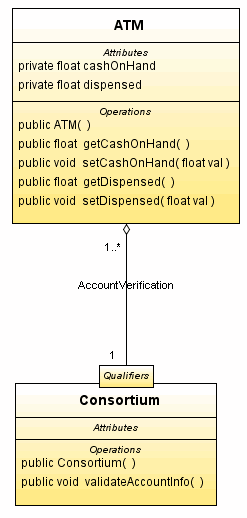
To Set Multiplicity for the Association
You want to set the multiplicity for this association. However, by default, these labels are hidden. Use the following steps to display the labels on the association link.
- Right-click the link between Consortium and ATM and choose Labels > Both End Multiplicities.
The pop-up menu closes and the labels for the link appear.
- Right-click the small diamond at the upper portion of the aggregation link (near the ATM element) and choose Set Multiplicity.
Note: If you have difficulty making the correct pop-up menu appear, lengthen the aggregate arrow by moving the Consortium element farther away from the ATM element.
- Select 1..*.
Notice that the lower portion of the link is labeled 1 as shown in the following figure.
- Follow a similar procedure and set the multiplicity for the Association link between CashierStation and Branch as shown in the following figure.
top
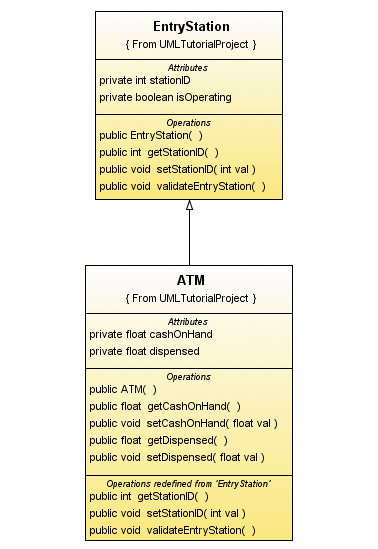
To Depict Generalization and Inheritance
Generalization is the relationship between a class and one or more refined versions of this class. The class being refined is named the superclass and each refined version is named the subclass. The attributes and operations of the superclass can be exhibited in its subclasses, as a result, each subclass is said to inherit the features of the superclass. You can organize classes by using inheritance to share common structure. A generalization link means that a class can inherit an array of attributes and operations from the parent class.
- From the Basic section of the Modeling Palette, select the Generalization icon
 .
.
- Click inside the ATM class element, and then click the EntryStation class element.
The Select Methods to Redefine dialog box appears.
- Select the checkbox next to the ATM node to select all the methods and click OK.
The selected methods are added to the ATM class element and a generalization link snaps in place between the two class elements.
- Draw another generalization link by first clicking CashierStation, and then clicking EntryStation.
- In the Select methods to Redefine dialog box, select the checkbox next to the CashierStation node to select all methods and click OK.
- Right-click anywhere in the Diagram editor to deselect the Generalization icon.
- Your finished diagram should look similar to the following figure.
top
Creating Dependency Diagrams
Using UML, you can create a diagram that shows all the dependencies for a classifier. The following types of relationships are depicted in the Dependency diagram:
- Generalizations
- Associations
- Implementations
- Operations with parameters of a given class type
Now, create a dependency diagram for the ATM class diagram.
- In the Projects window, right-click the ATM node.
- Select Generate Dependency Diagram from the pop-up menu.
A dependency diagram named ATM Dependencies is created and opened in the Diagram editor as shown in the following figure.
top
Saving Diagrams and Updating Java Source Files
Do the following steps to save your completed diagrams and regenerate the Java source files for your diagrams. Do the following:
- After you complete your diagram, right-click the ClassDiagram tab and choose Save Document from the pop-up menu.
The menu closes and the Class diagram is saved.
- In the Projects window, right-click the UMLTutorialProject node and choose Generate Code from the pop-up menu.
- In the Generate Code dialog box, accept the default JavaPrj1 source folder location and backup the existing source files.
Optionally, you can click Browse to locate and use another source folder.
- Click OK.
The IDE generates the code and the Output window displays the progress of the code generation process. The Java source folder for the JavaPrj1 project should have been updated with the changes you made to your diagrams.
Note: The source folder for the JavaPrj1 project may also include the backup files that were created if you selected the Backup Existing Source Files checkbox in the Generate Code dialog box and you chose to use the same source folder. The backup files are similarly named as the original files, but the file extensions contain numbers. For example, the ATM.java has a backup file named ATM.java1.
top
Summary
In this tutorial, you learned how to create a class diagram for a simple banking application. You learned how to perform the following tasks:
- Create a Class diagram
- Use the icons from the Modeling Palette to add elements to the diagram
- Add and define attributes and operations on the class elements
- Document the diagrams and the diagram elements
- Depict links and associations between the class elements
- Create a Dependency diagram
- Generate the Java source code files for the diagrams
- Save your diagram
top
Next Steps
To send comments and suggestions, obtain support, and stay informed of the latest
changes to the NetBeans IDE J2EE development features, join the [email protected]
mailing list.
top
>> More NetBeans IDE Documentation