Shipping section.
Once Sales Order (or Transfer Order) Line Items are ready to be shipped, they must be issued to Shipping. Shipping is a two-step process. Quantity is first issued to Shipping, and then it is shipped.
For Job Items linked to Sales Order Items, the act of issuing to Shipping serves a dual purpose. On the one hand, quantity is issued to Shipping. But at the same time, production for the linked Job Item Work Order is also posted. Issuing to Shipping is the only way to post production for a Job Item Work Order.
When Kit Items appear on a Sales Order, the Kit components may be issued to Shipping. However, the parent Kit Item may not be. The automatic "Select for Billing" option takes effect for Kit Items when all Kit Items are shipped.
To issue Stock to Shipping, select the "Issue to Shipping" option. The following screen will appear:

Tip
Before a Sales Order can be shipped successfully, Sales Account and A/R Account Assignments for the specified Customer must be in place.
When issuing Stock to Shipping, you are presented with the following options:
- Order #
Enter the Order Number of the Order whose Stock you want to issue to Shipping. Sales Orders and Transfer Orders may be issued to Shipping.
- Issue Date
Specify the date you want the transaction to be posted to the General Ledger. The current day's date will display by default.
- Require sufficient Inventory
Select to ensure you have enough Quantity on Hand of a Line Item prior to issuing to Shipping. If selected, this option will prevent you from issuing Line Item quantity to Shipping if doing so would force Quantity on Hand for the Item Site to fall below zero. Not selecting this option means issuing Stock to Shipping may drive Item Site Quantity on Hand negative.
Note
If your site is configured to enable Sales Order Reservations, which, by definition, require sufficient Inventory before Items may be shipped, then the "Require sufficient Inventory" option will be hidden.
- Line Items
Display lists Sales Order Line Items available for Shipping. If the Scheduled Date for an unshipped Line Item is in the future, the line will display in green text. If the Scheduled Date for an unshipped Line Item is not in the future, the line will display in red text. Once shipped, all Line Items revert to black text.
- Issue Items Using UPC Bar Code
This is an optional field which allows you to issue stock to Shipping using a Bar Code scanner. Enter a UPC Code for a Sales Order Line Item using a Bar Code scanner—or manually enter the UPC Code. The UPC Code for an Item is stored on the Item master. Once the code is entered, specify a quantity and then select the FIND button to issue the Line Item quantity to shipping. You may also hit the ENTER key on your keyboard to select the FIND button.
Tip
Most scanners allow you to change a setting that automatically sends the ENTER command after a scan. This allows keyboard-free entry.
Note
The issue to shipping window will accept a variety of xTuple formatted barcodes that print on standard paperwork including Sales Order header number, line number, work order number, and item number. These specially formatted barcodes allow xTuple to recognize the barcode input regardless of where the cursor is on the window. UPC barcodes, however, do not have the necessary prefix embedded in the code to explicitly tell the window it is a barcode, which is why xTuple requires the cursor to be focused on the UPC barcode field if UPC barcodes are being scanned.
- Qty.
Specify the quantity of Line Items to be issued using a UPC Code. To issue the Line Item quantity to shipping, select the FIND button—or hit the ENTER key on your keyboard to select the FIND button.
To the far right of the screen, the following buttons are available:
- CLOSE
Closes the screen without issuing stock to Shipping, returning you to the application desktop.
Note
If an Order is marked "Ship Complete," you will be prevented from shipping the Order until all Line Item quantities are issued to Shipping.
- SHIP ORDER
Select to Ship the specified Sales Order, as described in Section 4.3, “ Ship Order”.
- ISSUE STOCK
Highlight a Line Item, then select this button to issue stock to Shipping. You may also double-click on a Line Item to reach the Issue Stock screen.
Note
If an Item issued to Shipping is a Multiple Location Control (MLC) Item, you will be prompted to specify the Location you want to issue stock from.
- ISSUE LINE BAL.
Highlight a Line Item, then select this button to issue the balance of the Line to shipping.
- RETURN STOCK
Highlight a Line Item, then select this button to remove the line quantity from Shipping, returning the stock to Inventory. This button will only be enabled only if there is Line Item quantity at Shipping. If the original Line Item you shipped was either Lot/Serial or Multiple Location Controlled, the system will automatically put the Inventory back where it came from.
Tip
If your site integrates UPS WorldShip with the system, you should process Orders in WorldShip after they have been issued to Shipping—but before they have been shipped.
- ISSUE ALL BAL.
Select to issue all Line Items to Shipping simultaneously.
- FIND
Compares the UPC Code entered in the "Issue Items Using Barcode" field with the UPC Codes for the listed Sales Order Line Items, then issues to Shipping the quantity specified in the "Qty." field. The FIND button may be selected using your mouse—or by hitting the ENTER key, which corresponds to the FIND button. Because the FIND button corresponds to the ENTER key, you can scan in a UPC Code and then hit ENTER to issue a quantity of one to Shipping. If you prefer, you can scan in a UPC Code and then specify a different quantity before hitting ENTER.
To issue a Line Item to Shipping, highlight the Line Item, then select the ISSUE STOCK button. You may also double-click on the Line Item. The following screen will appear:

When issuing a Line Item to Shipping, you are presented with the following options:
- Sales Order #
Displays Sales Order Number for specified Line Item.
- Item Number
Displays Item Number for specified Line Item.
- UOM
Inventory Unit of Measure.
- Site
Displays Site identified on Sales Order Line Item.
- Qty. Ordered
Displays quantity of Item ordered.
- Selling UOM
The unit of measure you are shipping in
- Qty. Shipped
Displays quantity of Item already shipped for specified Order.
- Qty. Returned
Displays quantity of Item returned for specified Order.
- Balance Due
Displays balance of Line Item remaining to be shipped for specified Order.
- Qty. at Shipping
Displays quantity of Item at Shipping for specified Order.
- Qty. to Issue
Enter the quantity of Items you want to issue to Shipping for specified Order.
To the far right of the screen, the following buttons are available:
- CANCEL
Closes the screen without issuing Stock to Shipping, returning you to the application desktop.
- ISSUE
Select to issue the specified Line Item quantity to Shipping. If the specified Item is a Multiple Location Control Item, you will be brought to the "Distribute Stock To/From Site Locations" screen.
When Items have been issued to Shipping, you have the ability to maintain these Shipping contents in one central location, by Site. To maintain Shipping contents, select the "Maintain Shipping Contents" option. The following screen will appear:

When maintaining Shipping contents, you are presented with the following options:
- All Sites
Select to maintain Shipping contents for all Sites.
- Selected
Specify Site whose Shipping contents you want to maintain.
- Stock at Shipping
Display lists Stock at Shipping based on the specified parameters. This display is a nested list, with a plus ("+") sign located to the far left of the display next to each line that may be expanded to lower levels. By clicking your mouse on a plus sign, you reveal lower levels of information related to the Documents.
Note
The printed status for a Sales Order at Shipping may be either "No," "Yes," or "Dirty." The first two options indicate whether Shipping Forms have been printed for the Order or not. The Dirty status indicates Shipping contents have changed since Shipping Forms were printed for the Order.
To the far right of the screen, the following button is available:
- CLOSE
Closes the screen without maintaining Shipping contents, returning you to the application desktop.
Tip
Before a Sales Order can be shipped successfully, Sales Account and A/R Account Assignments for the specified Customer must be in place.
To ship an Order, select the "Ship Order" option. The following screen will appear:

Tip
Before an Order can be shipped successfully, Sales Account and Accounts Receivable (A/R) Account Assignments for the specified Customer must be in place.
When Shipping an Order, you are presented with the following options:
- Order #
Enter the Order Number of the Order you want to ship. The browse button located to the right of the field leads to a searchable list of Orders available for Shipping.
- Select for Billing
Specify this option to select the Sales Order for Billing as soon as it is shipped. If selected, the Order will appear on the Billing Selections list—making it available to be converted into an Invoice. This option will be selected by default if specified in your system-level configuration. This option will be disabled if a Transfer Order is specified.
- Create and Print Invoice
Specify this option to automatically create and print an Invoice for the Sales Order as soon as it is shipped. Selecting this option enables you to bypass the Billing Selection process. Once the Order is shipped, an Invoice will be created and printed. This Invoice will appear on the list of unposted Invoices—making it available for posting. By default, the "Select for Billing" option will also be selected. This option will be disabled if a Transfer Order is specified.
If the Customer specified on the Sales Order has an EDI Profile attached, you may encounter an EDI processing interface when printing the Invoice.
- Print Packing List
Specify this option to automatically print a Packing List as soon as the Order is shipped.
- Receive Immediately
Select if you want the Transfer Order to be received automatically at the Destination Site as soon as the Order is shipped. If this option is not used, Transfer Order Items must be received manually at the Destination Site. This option will be disabled if a Sales Order is specified.
Tip
The system will move Transfer Order Items to the specified Transit Site when the Order is shipped. If the Order is marked to be received immediately, the system will then receive Inventory at the Destination Site.
- Bill To
Displays the name of the Customer to be billed for the Sales Order.
- Ship To
Displays the appropriate Ship-To Address.
Tip
If your site integrates UPS WorldShip with the system, you should process Orders in WorldShip after they have been issued to Shipping—but before they have been shipped.
- Items to Ship
Display lists Order Line Items available for Shipping.
- Shipment Value
Displays the value of the Items being shipped. The shipment value represents the total of the extended prices for all Items included in the Shipment. The amount does not include freight or Tax.
- Freight
Enter the amount of freight charge to be added to the specified Order. Freight charges may be entered during the creation or modification of an Order—or at the time of shipment.
Note
The system supports up-to-date shipment tracking with links to the websites of many leading shipping companies (i.e., "Ship Vias").
- Ship Via
Specify the Ship Via for the Order. The Ship Via field supports free-form Ship Vias. If you want to enter a free-form Ship Via, simply type the name of the Ship Via into the field.
Tip
Get the most up-to-date tracking information directly from the shipper's website by using the "Query Shipment Status" option found in the "Shipments by Sales Order" report. This feature is enabled for a limited number of shipping companies (i.e., "Ship Vias")
- Tracking Number
Tracking Numbers associated with an Order may be viewed in the Shipments by Sales Order report.
To the far right of the screen, the following buttons are available:
- CANCEL
Closes the screen without Shipping the Order, returning you to the application desktop.
- SHIP
Ships the Order, clearing the screen of previously-displayed data.
Note
If an Order is marked "Ship Complete," you will be prevented from shipping the Order until all Line Item quantities are issued to Shipping.
If a Sales Order has been shipped in error—or if changes need to be made to an Order prior to final billing—you may recall the Order to Shipping. Once an Invoice has been posted, however, it may no longer be recalled to shipping. To recall Orders to Shipping, select the "Recall Orders to Shipping" option. The following screen will appear:

When recalling an Order to Shipping, you are presented with the following options:
- Show Invoiced Orders
Select to include Invoiced Orders in the display. When selected, any unposted Invoices will be shown. The list will not include posted Invoices. This option is only enabled for users assigned the "RecallInvoicedShipment" privilege. Users with that privilege have the ability to recall to Shipping Orders which have already been invoiced. Non-privileged users may not recall invoiced Orders to Shipping. An Order is considered "invoiced" after an Invoice has been created from a billing selection. In some cases, it may be desirable to completely back out an Invoice using the following steps:
Delete Invoice
Cancel billing selection
Recall Order to Shipping
Return stock to Inventory
- Shipped Orders
Display lists shipped Sales Orders available for recall.
To the far right of the screen, the following buttons are available:
- CLOSE
Closes the screen without recalling the Order, returning you to the application desktop.
- RECALL
Highlight a Sales Order then select this button to recall the Order to Shipping. The Order will now display on the "Ship Orders" screen.
Shipping Forms section.
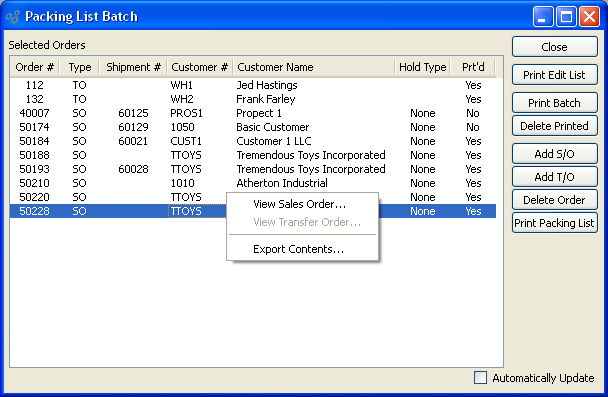
If you want to print Packing Lists or Sales Order Pick Lists in batch mode—or to gain greater visibility over your Packing and Pick Lists—select the "Packing List Batch" option. The following screen will appear:
Note
A Sales Order "Pick List" will be printed if the Sales Order does not yet have a Shipment Number associated with it—that is, if no Line Item quantity has been issued to shipping. If stock has been issued to Shipping, then the "Packing List" report definition will be used. The Pick List and Packing List Form assignments are made on the Customer Form Assignments screen.
Tip
The system includes two alternate Sales Order Pick List report definitions:
"PickingListSOClosedLines.xml"
"PickingListNoClosedLines.xml"
The first includes already closed Sales Order Line Items in the report; the other excludes closed Line Items.
When printing Packing Lists in batch mode, you are presented with the following options:
- Selected Orders
Display lists selected Orders (i.e., Sales Orders and Transfer Orders).
To the far right of the screen, the following buttons are available:
- CLOSE
Closes the screen, returning you to the application desktop.
- PRINT EDIT LIST
Select to print a copy of the contents displayed on the screen, using the specified parameters.
- PRINT BATCH
Select to print packing lists for all Orders in batch list. A Sales Order Pick List will be printed if the Sales Order does not yet have a Shipment Number associated with it—that is, if no Line Item quantity has been issued to shipping. If stock has been issued to Shipping, then the Packing List report definition will be used.
- DELETE PRINTED
Select to delete Orders from batch printing list once they have been printed.
- ADD S/O
Select to add a Sales Order to the list of selected Orders.
- ADD T/O
Select to add a Transfer Order to the list of selected Orders.
- DELETE ORDER
Highlight an Order and then select this button to remove the Order from the list.
- PRINT PACKING LIST
Highlight an Order, then select this option to print an individual Packing List or Sales Order Pick List for the specified Order. A Sales Order Pick List will be printed if the Sales Order does not yet have a Shipment Number associated with it—that is, if no Line Item quantity has been issued to shipping. If stock has been issued to Shipping, then the Packing List report definition will be used.
- Automatically Update
Select to automatically update the information displayed in the Packing List batch. The list will automatically update every 60 seconds if this option is selected.
If you want to print batches of Packing Lists according to their Ship Via method, select the "Print Packing List Batch by Ship Via" option. The following screen will appear:

Tip
If you don"t see any Ship Vias appearing in the Ship Via list, this probably means you don"t have any unprinted Orders on the Packing List Batch. To verify, open the Packing List Batch and check the printed status of the Orders listed there.
When printing batches of Packing Lists according to their Ship Via, you are presented with the following options:
Note
The system supports up-to-date shipment tracking with links to the websites of many leading shipping companies (i.e., "Ship Vias").
- Ship Via
Specify the Ship Via whose batched Packing Lists you want to print.
To the far right of the screen, the following buttons are available:
- CANCEL
Closes the screen without printing a Packing List batch, returning you to the application desktop.
Prints the Packing List batch for the specified Ship Via.
To print a Packing List or Sales Order Pick List, select the "Print Packing List" option. The following screen will appear:
Note
A Sales Order Pick List will be printed if the Sales Order does not yet have a Shipment Number associated with it—that is, if no Line Item quantity has been issued to shipping. If stock has been issued to Shipping, then the Packing List report definition will be used. Report definitions (i.e., Forms) are assigned by Customer Type.

Tip
The system includes two alternate Sales Order Pick List report definitions:
"PickingListSOClosedLines.xml"
"PickingListNoClosedLines.xml"
The first includes already closed Sales Order Line Items in the report; the other excludes closed Line Items.
When printing a Packing List, you are presented with the following options:
- Sales Order #
Enter the Sales Order Number of the Sales Order whose Packing List you want to print.
- Transfer Order #
Enter the Transfer Order Number of the Transfer Order whose Packing List you want to print.
- From
Displays the source Site for the transfer.
- To
Displays the destination Site for the transfer.
- Shipment #
Specify the Shipment Number you want to print a Packing List for. Shipment Numbers are assigned to Orders when Line Item quantity is issued to Shipping. A single Order may have multiple Shipments associated with it. If no stock has ever been issued to Shipping for an Order, then no Shipment Number will be associated with it.
- Order Date
Displays the Order date for the Sales Order.
- Cust. Name
Displays the Customer's name.
- Cust. Phone
Displays the Customer's phone number.
- P/O Number
Displays the Customer's Purchase Order Number.
To the far right of the screen, the following buttons are available:
- CANCEL
Closes the screen, returning you to the application desktop.
Prints a copy of either the Packing List or Sales Order Pick List for the specified Sales Order. A Sales Order Pick List will be printed if the Sales Order does not yet have a Shipment Number associated with it—that is, if no Line Item quantity has been issued to shipping. If stock has been issued to Shipping, then the Packing List report definition will be used.
A Bill of Lading is an example of a Shipping Form. To print a Shipping Form, select the "Shipping Form" option. The following screen will appear:

When printing a Shipping Form, you are presented with the following options:
- Sales Order #
Enter the Sales Order Number of the Sales Order whose Shipping Form you want to print. The browse button located to the right of the field leads to a searchable list of Sales Orders with quantities at Shipping. Only Sales Orders with quantities at Shipping will appear in the list.
Note
Only Sales Orders which have had Items issued to Shipping may be selected. Once an Order has been shipped, you may no longer select it and print a Shipping Form for it.
- Transfer Order #
Enter the Transfer Order Number of the Transfer Order whose Shipping Form you want to print.
- From
Displays the source Site for the transfer.
- To
Displays the destination Site for the transfer.
- Shipment #
Specify the Shipment Number you want to print a Packing List for. Shipment Numbers are assigned to Orders when Line Item quantity is issued to Shipping. A single Order may have multiple Shipments associated with it. If no stock has ever been issued to Shipping for an Order, then no Shipment Number will be associated with it.
- Ship To
Displays the Ship-To Address for the specified Order.
- Shipping Form
Specify the name of the Shipping Form you want to print.
- Shipping Charges
Specify the Shipping Charges associated with the Order
- Shipping Form Copies
Specify details for the Shipping Form copies you want to print.
- # of Copies
Indicate the number of copies you want to print using the arrow buttons. Information about the specified copies will display below.
To the far right of the screen, the following buttons are available:
- CANCEL
Closes the screen without printing a Shipping Form, returning you to the application desktop.
Prints specified number of copies of the Shipping Form for the specified Sales Order.
To add a Watermark to a Shipping Form, double-click on a copy line. The following screen will appear:

When adding a Watermark to a Shipping Form copy, you are presented with the following options:
- Watermark
Specify the name of the Watermark to be used for the selected copy.
- Show Prices
Select to show Prices in the selected copy.
To the far right of the screen, the following buttons are available:
- CANCEL
Closes the screen without adding a Watermark, returning you to the previous screen.
- SAVE
Saves the Watermark definition to the selected copy.
To print multiple Shipping Forms, select the "Shipping Forms" option. The following screen will appear:

When printing multiple Shipping Forms, you are presented with the following options:
- Print Shipping Forms for New Shipments
Select to print Shipping Forms for new Shipments.
- Print Shipping Forms for Changed Shipments
Select to print Shipping Forms for changed Shipments.
- Shipping Form Copies
Specify details for the Shipping Form copies you want to print.
- # of Copies
Indicate the number of copies you want to print using the arrow buttons. Information about the specified copies will display below. To add a Watermark, double-click on a copy line.
To the far right of the screen, the following buttons are available:
- CANCEL
Closes the screen without printing Shipping Forms, returning you to the application desktop.
Prints specified number of copies of the Shipping Forms.
To add a Watermark to Shipping Forms, double-click on a copy line. The following screen will appear:
When adding a Watermark to Shipping Form copies, you are presented with the following options:
- Watermark
Specify the name of the Watermark to be used for the selected copy.
- Show Prices
Select to show Prices in the selected copy.
To the far right of the screen, the following buttons are available:
- CANCEL
Closes the screen without adding a Watermark, returning you to the previous screen.
- SAVE
Saves the Watermark definition to the selected copy.
Shipping Labels section.
To print Shipping labels by Sales Order Number, select the "Print Shipping Labels by S/O #" option. The following screen will appear:

When printing Shipping labels by Sales Order Number, you are presented with the following options:
- Sales Order #
Enter the Sales Order Number of the Sales Order whose Shipping labels you want to print.
- Report Name
Specify the name of the Shipping Label Form you want to print.
- Labels
Specify the range of Shipping labels you want to print.
To the far right of the screen, the following buttons are available:
- CANCEL
Closes the screen without printing any Shipping labels, returning you to the application desktop.
Prints specified number of Shipping label copies for the specified Sales Order.
To print Shipping labels by Transfer Order Number, select the "Print Shipping Labels by T/O #" option. The following screen will appear:

When printing Shipping labels by Transfer Order Number, you are presented with the following options:
- Transfer Order #
Enter the Transfer Order Number of the Transfer Order whose Shipping labels you want to print.
- From
Displays the Source Site code.
- To
Displays the Destination Site code.
- Report Name
Specify the name of the Shipping Label Form you want to print.
- Labels
Specify the range of Shipping labels you want to print.
To the far right of the screen, the following buttons are available:
- CANCEL
Closes the screen without printing any Shipping labels, returning you to the application desktop.
Prints specified number of Shipping label copies for the specified Transfer Order.
To print Shipping labels by Invoice, select the "Print Shipping Labels by Invoice" option. The following screen will appear:

When printing Shipping labels by Invoice, you are presented with the following options:
- Invoice #
Enter the Invoice Number of the Invoice whose Shipping label you want to print.
- Report Name
Specify the name of the Shipping Label Form you want to print.
- Labels
Specify the range of Shipping labels you want to print.
To the far right of the screen, the following buttons are available:
- CANCEL
Closes the screen without printing any Shipping labels, returning you to the application desktop.
Prints specified number of Shipping label copies for the specified Invoice.
Shipping Reports section.
Backlog Reports section.
To view Backlog by Item, select the "Backlog by Item" option. The following screen will appear:

When displaying Backlog by Item, you are presented with the following options:
- Item Number
Enter the Item Number of the Item whose Backlog you want to view. The browse button located to the right of the field leads to a searchable list of make and buy items.
- UOM
Inventory Unit of Measure.
- All Sites
Select to display Backlog by Item for all Sites.
- Selected
Specify Site whose Backlog by Item you want to display.
- Start Date
Backlog by Item entered on and after this date will be displayed.
- End Date
Backlog by Item entered on and before this date will be displayed.
- Show Prices
Select to include pricing information in the display.
- Backlog
Display lists Backlog by Item, using the specified parameters. If the "Show Prices" option is selected, an additional column showing the amount of the backlog, with Prices normalized to the Base Currency using the Currency Exchange Rate effective on the Order Date, will display. The total backlog will also be shown.
To the far right of the screen, the following buttons are available:
- CLOSE
Closes the screen, returning you to the application desktop.
Runs the report associated with this screen.
To view Backlog by Customer, select the "Backlog by Customer" option. The following screen will appear:

When displaying Backlog by Customer, you are presented with the following options:
- Customer #
Enter the Customer Number of the Customer whose Backlog you want to display. The browse button located to the right of the field leads to a searchable Customers list. You may also access this list using the keyboard shortcut "CTRL + L". Once a Customer Number is entered, the Customer name and billing address will display. Select the "?" or "$" symbol next to the browse button to view Customer information for the specified Customer. If a Customer's credit is "In Good Standing," the button will feature a black question mark ("?") icon. If the icon turns to an orange dollar sign ("$"), the Customer's credit Status is "On Credit Warning." A red dollar sign ("$") indicates the Customer's credit Status is "On Credit Hold."
- All Sites
Select to display Backlog by Customer for all Sites.
- Selected
Specify Site whose Backlog by Customer you want to display.
- Start Date
Backlog by Customer entered on and after this date will be displayed.
- End Date
Backlog by Customer entered on and before this date will be displayed.
- Show Prices
Select to include pricing information in the display.
- Backlog
Display lists Backlog by Customer, using the specified parameters. If the "Show Prices" option is selected, an additional column showing the amount of the backlog, with Prices normalized to the Base Currency using the Currency Exchange Rate effective on the Order Date, will display. The total backlog will also be shown.
To the far right of the screen, the following buttons are available:
- CLOSE
Closes the screen, returning you to the application desktop.
- QUERY
Select to generate the display, using the specified parameters.
Runs the report associated with this screen.
To view Backlog by Product Category, select the "Backlog by Product Category" option. The following screen will appear:

When displaying Backlog by Product Category, you are presented with the following options:
- All Product Categories
Select to display Backlog for all Product Categories.
- Selected
Specify Product Category whose Backlog you want to display.
- Pattern
Enter a Product Category pattern to select a range of Product Categories. Refine your search using Regular Expressions.
- All Sites
Select to display Backlog by Product Category for all Sites.
- Selected
Specify Site whose Backlog by Product Category you want to display.
- Start Date
Backlog by Product Category entered on and after this date will be displayed.
- End Date
Backlog by Product Category entered on and before this date will be displayed.
- Show Prices
Select to include pricing information in the display.
- Backlog
Display lists Backlog by Product Category, using the specified parameters. If the "Show Prices" option is selected, an additional column showing the amount of the backlog, with Prices normalized to the Base Currency using the Currency Exchange Rate effective on the Order Date, will display. The total backlog will also be shown.
To the far right of the screen, the following buttons are available:
- CLOSE
Closes the screen, returning you to the application desktop.
- QUERY
Select to generate the display, using the specified parameters.
Runs the report associated with this screen.
To view summarized Backlog by Site, select the "Summarized Backlog by Site" option. The following screen will appear:

When displaying summarized Backlog by Site, you are presented with the following options:
- All Customer Types
Select to display summarized Backlog by Site for all Customer Types.
- Selected
Specify Customer Type whose Backlog by Site you want to display.
- Pattern
Enter a Customer Type pattern to select a range of Customer Types. Refine your search using Regular Expressions.
- All Sites
Select to display summarized Backlog for all Sites.
- Selected
Specify Site whose summarized Backlog you want to display.
- Start Date
Summarized Backlog by Site entered on and after this date will be displayed.
- End Date
Summarized Backlog by Site entered on and before this date will be displayed.
- Show Prices and Costs
Select to include pricing and Cost information in the display.
- Order By
Select one of the following options to indicate how you want the results to be organized:
- Ship Date
Select to order the display by Ship Date.
- Pack Date
Select to order the display by Pack Date.
- S/O Number
Select to order the display by Sales Order Number.
- Backlog
Display lists summarized Backlog by Site, using the specified parameters. The display is a nested list, with a plus ("+") sign located to the far left of the screen next to each line that may be expanded to lower levels. By clicking your mouse on a plus sign, you reveal lower levels of information related to the Order. If the "Show Prices and Costs" option is selected, additional columns showing sales Price, Cost, and margin will display.
Note
The Summarized Backlog by Site display is color-coded for ease of use. The following colors are used to describe the backlog status of Sales Order Line Items:
- Blue
Order is at Shipping but is not yet shipped.
- Green
Order has been shipped complete, but has not yet been selected for Billing.
- Red
Part of the Order has been shipped and selected for Billing, but Backorder Items still need to be shipped and billed.
- Black
None of the above conditions is true.
- Total Sales Orders
Displays the total number of Sales Orders on Backlog.
- Total Line Items
Displays the total number of Sales Order Line Items on Backlog.
- Total Qty (Shipping UOM)
Displays the total number of unshipped Sales Order Line Items on Backlog.
To the far right of the screen, the following buttons are available:
- CLOSE
Closes the screen, returning you to the application desktop.
- QUERY
Select to generate the display, using the specified parameters.
Runs the report associated with this screen.
Shipment Reports section.
To view shipments by Sales Order, select the "Shipments by Sales Order" option. The following screen will appear:

Tip
Get the most up-to-date tracking information directly from the shipper's website by using the "Query Shipment Status" option in the "Shipments by Sales Order" report.
When displaying shipments by Sales Order, you are presented with the following options:
- Sales Order #
Enter the Sales Order Number of the Sales Order whose shipments you want to display.
- Order Date
Displays the Order Date for the specified Sales Order.
- Cust. Name
Displays the Customer Name associated with the specified Sales Order.
- Cust. Phone
Displays the Customer's phone number.
- P/O Number
Displays the Purchase Order Number associated with the specified Sales Order.
- Shipments
Display lists shipments by Sales Order, using the specified parameters.
To the far right of the screen, the following buttons are available:
- CLOSE
Closes the screen, returning you to the application desktop.
Runs the report associated with this screen.
To view shipments by date, select the "Shipments by Date" option. The following screen will appear:

Tip
Get the most up-to-date tracking information directly from the shipper's website by using the "Query Shipment Status" option in the "Shipments by Sales Order" report.
When displaying shipments by date, you are presented with the following options:
- Start Date
Shipments occurring on or after this date will be included in the display.
- End Date
Shipments occurring on or before this date will be included in the display.
- Shipments
Display lists shipments by date, using the specified parameters.
To the far right of the screen, the following buttons are available:
- CLOSE
Closes the screen, returning you to the application desktop.
- QUERY
Select to generate the display, using the specified parameters.
Runs the report associated with this screen.