Table of Contents
- VBoxSDL, the simplified VM displayer
- Automated guest logons
- Advanced configuration for Windows guests
- CPU hot-plugging
- Advanced display configuration
- Advanced storage configuration
- Launching more than 120 VMs on Solaris hosts
- Legacy commands for using serial ports
- Fine-tuning the VirtualBox NAT engine
- Configuring the address of a NAT network interface
- Configuring the boot server (next server) of a NAT network interface
- Tuning TCP/IP buffers for NAT
- Binding NAT sockets to a specific interface
- Enabling DNS proxy in NAT mode
- Using the host's resolver as a DNS proxy in NAT mode
- Configuring aliasing of the NAT engine
- Configuring the BIOS DMI information
- Fine-tuning timers and time synchronization
- Configuring multiple host-only network interfaces on Solaris hosts
- Configuring the VirtualBox CoreDumper on Solaris hosts
- Locking down the VirtualBox manager GUI
- Starting the VirtualBox web service automatically
VBoxSDL is a simple graphical user interface (GUI) that lacks the nice point-and-click support which VirtualBox, our main GUI, provides. VBoxSDL is currently primarily used internally for debugging VirtualBox and therefore not officially supported. Still, you may find it useful for environments where the virtual machines are not necessarily controlled by the same person that uses the virtual machine.
Note
VBoxSDL is not available on the Mac OS X host platform.
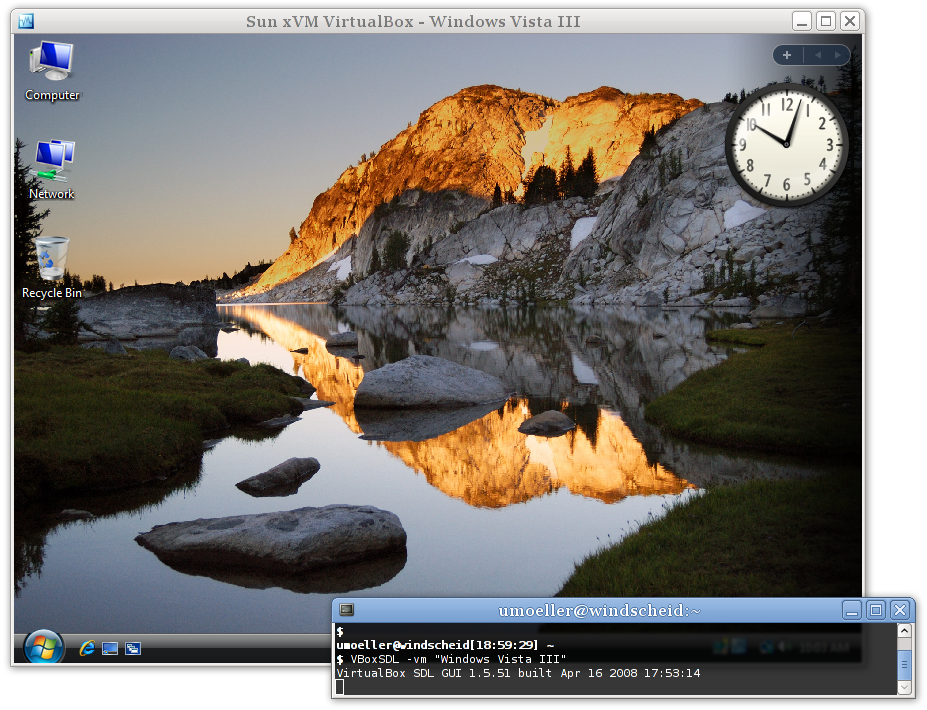
As you can see in the following screenshot, VBoxSDL does indeed only provide a simple window that contains only the "pure" virtual machine, without menus or other controls to click upon and no additional indicators of virtual machine activity:
 |
To start a virtual machine with VBoxSDL instead of the VirtualBox GUI, enter the following on a command line:
VBoxSDL --startvm <vm>
where <vm> is, as usual
with VirtualBox command line parameters, the name or UUID of an existing
virtual machine.
When running guest operating systems in fullscreen mode, the guest operating system usually has control over the whole screen. This could present a security risk as the guest operating system might fool the user into thinking that it is either a different system (which might have a higher security level) or it might present messages on the screen that appear to stem from the host operating system.
In order to protect the user against the above mentioned security risks, the secure labeling feature has been developed. Secure labeling is currently available only for VBoxSDL. When enabled, a portion of the display area is reserved for a label in which a user defined message is displayed. The label height in set to 20 pixels in VBoxSDL. The label font color and background color can be optionally set as hexadecimal RGB color values. The following syntax is used to enable secure labeling:
VBoxSDL --startvm "VM name"
      --securelabel --seclabelfnt ~/fonts/arial.ttf
      --seclabelsiz 14 --seclabelfgcol 00FF00 --seclabelbgcol 00FFFF
In addition to enabling secure labeling, a TrueType font has to be
supplied. To use another font size than 12 point use the parameter
--seclabelsiz.
The label text can be set with
VBoxManage setextradata "VM name" "VBoxSDL/SecureLabel" "The Label"
Changing this label will take effect immediately.
Typically, full screen resolutions are limited to certain "standard" geometries such as 1024 x 768. Increasing this by twenty lines is not usually feasible, so in most cases, VBoxSDL will chose the next higher resolution, e.g. 1280 x 1024 and the guest's screen will not cover the whole display surface. If VBoxSDL is unable to choose a higher resolution, the secure label will be painted on top of the guest's screen surface. In order to address the problem of the bottom part of the guest screen being hidden, VBoxSDL can provide custom video modes to the guest that are reduced by the height of the label. For Windows guests and recent Solaris and Linux guests, the VirtualBox Guest Additions automatically provide the reduced video modes. Additionally, the VESA BIOS has been adjusted to duplicate its standard mode table with adjusted resolutions. The adjusted mode IDs can be calculated using the following formula:
reduced_modeid = modeid + 0x30
For example, in order to start Linux with 1024 x 748 x 16, the standard mode 0x117 (1024 x 768 x 16) is used as a base. The Linux video mode kernel parameter can then be calculated using:
vga = 0x200 | 0x117 + 0x30
vga = 839
The reason for duplicating the standard modes instead of only supplying the adjusted modes is that most guest operating systems require the standard VESA modes to be fixed and refuse to start with different modes.
When using the X.org VESA driver, custom modelines have to be
calculated and added to the configuration (usually in
/etc/X11/xorg.conf. A handy tool to determine
modeline entries can be found at http://www.tkk.fi/Misc/Electronics/faq/vga2rgb/calc.html.)
When switching from a X virtual terminal (VT) to another VT using
Ctrl-Alt-Fx while the VBoxSDL window has the input focus, the guest will
receive Ctrl and Alt keypress events without receiving the corresponding
key release events. This is an architectural limitation of Linux. In
order to reset the modifier keys, it is possible to send
SIGUSR1 to the VBoxSDL main thread
(first entry in the ps list). For
example, when switching away to another VT and saving the virtual
machine from this terminal, the following sequence can be used to make
sure the VM is not saved with stuck modifiers:
kill -usr1 <pid>
VBoxManage controlvm "Windows 2000" savestate
VirtualBox provides Guest Addition modules for Windows, Linux and Solaris to enable automated logons on the guest.
When a guest operating system is running in a virtual machine, it might be desirable to perform coordinated and automated logons using credentials from a master logon system. (With "credentials", we are referring to logon information consisting of user name, password and domain name, where each value might be empty.)
Since Windows NT, Windows has provided a modular system logon subsystem ("Winlogon") which can be customized and extended by means of so-called GINA modules (Graphical Identification and Authentication). With Windows Vista and Windows 7, the GINA modules were replaced with a new mechanism called "credential providers". The VirtualBox Guest Additions for Windows come with both, a GINA and a credential provider module, and therefore enable any Windows guest to perform automated logons.
To activate the VirtualBox GINA or credential provider module,
install the Guest Additions with using the command line switch
/with_autologon. All the following
manual steps required for installing these modules will be then done by
the installer.
To manually install the VirtualBox GINA module, extract the Guest
Additions (see the section called “Manual file extraction”) and
copy the file VBoxGINA.dll to the
Windows SYSTEM32 directory. Then, in
the registry, create the following key:
HKEY_LOCAL_MACHINE\SOFTWARE\Microsoft\Windows NT\CurrentVersion\Winlogon\GinaDLL
with a value of VBoxGINA.dll.
Note
The VirtualBox GINA module is implemented as a wrapper around
the standard Windows GINA module
(MSGINA.DLL). As a result, it will
most likely not work correctly with 3rd party GINA modules.
To manually install the VirtualBox credential module, extract the
Guest Additions (see the section called “Manual file extraction”)
and copy the file VBoxCredProv.dll to
the Windows SYSTEM32 directory. Then,
in the registry, create the following keys:
HKEY_LOCAL_MACHINE\SOFTWARE\Microsoft\Windows\CurrentVersion\
           Authentication\Credential Providers\{275D3BCC-22BB-4948-A7F6-3A3054EBA92B}

HKEY_CLASSES_ROOT\CLSID\{275D3BCC-22BB-4948-A7F6-3A3054EBA92B}

HKEY_CLASSES_ROOT\CLSID\{275D3BCC-22BB-4948-A7F6-3A3054EBA92B}\InprocServer32
with all default values (the key named
(Default) in each key) set to
VBoxCredProv. After that a new string
named
HKEY_CLASSES_ROOT\CLSID\{275D3BCC-22BB-4948-A7F6-3A3054EBA92B}\InprocServer32\ThreadingModel
with a value of Apartment has to be
created.
To set credentials, use the following command on a running VM:
VBoxManage controlvm "Windows XP" setcredentials "John Doe" "secretpassword" "DOMTEST"
While the VM is running, the credentials can be queried by the VirtualBox logon modules (GINA or credential provider) using the VirtualBox Guest Additions device driver. When Windows is in "logged out" mode, the logon modules will constantly poll for credentials and if they are present, a logon will be attempted. After retrieving the credentials, the logon modules will erase them so that the above command will have to be repeated for subsequent logons.
For security reasons, credentials are not stored in any persistent manner and will be lost when the VM is reset. Also, the credentials are "write-only", i.e. there is no way to retrieve the credentials from the host side. Credentials can be reset from the host side by setting empty values.
Depending on the particular variant of the Windows guest, the following restrictions apply:
For Windows XP guests, the logon subsystem needs to be configured to use the classic logon dialog as the VirtualBox GINA module does not support the XP-style welcome dialog.
For Windows Vista and Windows 7 guests, the logon subsystem does not support the so-called Secure Attention Sequence (
CTRL+ALT+DEL). As a result, the guest's group policy settings need to be changed to not use the Secure Attention Sequence. Also, the user name given is only compared to the true user name, not the user friendly name. This means that when you rename a user, you still have to supply the original user name (internally, Windows never renames user accounts).
The following command forces VirtualBox to keep the credentials after they were read by the guest and on VM reset:
VBoxManage setextradata "Windows XP" VBoxInternal/Devices/VMMDev/0/Config/KeepCredentials 1
Note that this is a potential security risk as a malicious application running on the guest could request this information using the proper interface.
Starting with version 3.2, VirtualBox provides a custom PAM module (Pluggable Authentication Module) which can be used to perform automated guest logons on platforms which support this framework. Virtually all modern Linux/Unix distributions rely on PAM.
The pam_vbox.so module itself
does not do an actual verification of
the credentials passed to the guest OS; instead it relies on other
modules such as pam_unix.so or
pam_unix2.so down in the PAM stack to
do the actual validation using the credentials retrieved by
pam_vbox.so. Therefore
pam_vbox.so has to be on top of the
authentication PAM service list.
Note
The pam_vbox.so only supports
the auth primitive. Other primitives
such as account,
session or
password are not supported.
The pam_vbox.so module is shipped
as part of the Guest Additions but it is not installed and/or activated
on the guest OS by default. In order to install it, it has to be copied
from
/opt/VBoxGuestAdditions-<version>/lib/VBoxGuestAdditions/
to the security modules directory, usually
/lib/security/. Please refer to your
guest OS documentation for the correct PAM module directory.
For example, to use pam_vbox.so
with a Ubuntu Linux guest OS and GDM (the GNOME Desktop Manager) to
logon users automatically with the credentials passed by the host, the
guest OS has to be configured like the following:
The
pam_vbox.somodule has to be copied to the security modules directory, in this case it is/lib/security.Edit the PAM configuration file for GDM found at
/etc/pam.d/gdm, adding the lineauth requisite pam_vbox.soat the top. Additionaly, in most Linux distributions there is a file called/etc/pam.d/common-auth. This file is included in many other services (like the GDM file mentioned above). There you also have to add add the lineauth requisite pam_vbox.so.If authentication against the shadow database using
pam_unix.soorpam_unix2.sois desired, the argumenttry_first_passis needed in order to pass the credentials from the VirtualBox module to the shadow database authentication module. For Ubuntu, this needs to be added to/etc/pam.d/common-auth, to the end of the line referencingpam_unix.so. This argument tells the PAM module to use credentials already present in the stack, i.e. the ones provided by the VirtualBox PAM module.
Warning
An incorrectly configured PAM stack can effectively prevent you from logging into your guest system!
To make deployment easier, you can pass the argument
debug right after the
pam_vbox.so statement. Debug log output
will then be recorded using syslog.
Warning
At present, the GDM display manager only retrieves credentials at startup so unless the credentials have been supplied to the guest before GDM starts, automatic logon will not work. This limitation needs to be addressed by the GDM developers or another display manager must be used.
Beginning with Windows NT 4.0, Microsoft offers a "system
preparation" tool (in short: Sysprep) to prepare a Windows system for
deployment or redistribution. Whereas Windows 2000 and XP ship with
Sysprep on the installation medium, the tool also is available for
download on the Microsoft web site. In a standard installation of
Windows Vista and 7, Sysprep is already included. Sysprep mainly
consists of an executable called
sysprep.exe which is invoked by the
user to put the Windows installation into preparation mode.
Starting with VirtualBox 3.2.2, the Guest Additions offer a way to
launch a system preparation on the guest operating system in an
automated way, controlled from the host system. To achieve that, see
the section called “Guest control” for using the feature with the
special identifier sysprep as the
program to execute, along with the user name
sysprep and password
sysprep for the credentials. Sysprep
then gets launched with the required system rights.
Note
Specifying the location of "sysprep.exe" is not possible -- instead the following paths are used (based on the operating system):
C:\sysprep\sysprep.exefor Windows NT 4.0, 2000 and XP%WINDIR%\System32\Sysprep\sysprep.exefor Windows Vista, 2008 Server and 7
The Guest Additions will automatically use the appropriate path to execute the system preparation tool.
With virtual machines running modern server operating systems, VirtualBox supports CPU hot-plugging.[35] Whereas on a physical computer this would mean that a CPU can be added or removed while the machine is running, VirtualBox supports adding and removing virtual CPUs while a virtual machine is running.
CPU hot-plugging works only with guest operating systems that support it. So far this applies only to Linux and Windows Server 2008 x64 Data Center Edition. Windows supports only hot-add while Linux supports hot-add and hot-remove but to use this feature with more than 8 CPUs a 64bit Linux guest is required.
At this time, CPU hot-plugging requires using the VBoxManage command-line interface. First, hot-plugging needs to be enabled for a virtual machine:
VBoxManage modifyvm "VM name" --cpuhotplug on
After that, the --cpus option specifies the maximum number of CPUs that the virtual machine can have:
VBoxManage modifyvm "VM name" --cpus 8
When the VM is off, you can then add and remove virtual CPUs with the modifyvm --plugcpu and --unplugcpu subcommands, which take the number of the virtual CPU as a parameter, like this:
VBoxManage modifyvm "VM name" --plugcpu 3
VBoxManage modifyvm "VM name" --unplugcpu 3
Note that CPU 0 can never be removed.
While the VM is running, CPUs can be added with the
controlvm plugcpu/unplugcpu commands
instead:
VBoxManage controlvm "VM name" plugcpu 3
VBoxManage controlvm "VM name" unplugcpu 3
See the section called “VBoxManage modifyvm” and the section called “VBoxManage controlvm” for details.
With Linux guests, the following applies: To prevent ejection while the CPU is still used it has to be ejected from within the guest before. The Linux Guest Additions contain a service which receives hot-remove events and ejects the CPU. Also, after a CPU is added to the VM it is not automatically used by Linux. The Linux Guest Additions service will take care of that if installed. If not a CPU can be started with the following command:
echo 1 > /sys/devices/system/cpu/cpu<id>/online
Apart from the standard VESA resolutions, the VirtualBox VESA BIOS allows you to add up to 16 custom video modes which will be reported to the guest operating system. When using Windows guests with the VirtualBox Guest Additions, a custom graphics driver will be used instead of the fallback VESA solution so this information does not apply.
Additional video modes can be configured for each VM using the
extra data facility. The extra data key is called
CustomVideoMode<x> with x
being a number from 1 to 16. Please note that modes will be read from 1
until either the following number is not defined or 16 is reached. The
following example adds a video mode that corresponds to the native
display resolution of many notebook computers:
VBoxManage setextradata "VM name" "CustomVideoMode1" "1400x1050x16"
The VESA mode IDs for custom video modes start at
0x160. In order to use the above defined custom video
mode, the following command line has be supplied to Linux:
vga = 0x200 | 0x160
vga = 864
For guest operating systems with VirtualBox Guest Additions, a custom video mode can be set using the video mode hint feature.
When guest systems with the Guest Additions installed are started using the graphical frontend (the normal VirtualBox application), they will not be allowed to use screen resolutions greater than the host's screen size unless the user manually resizes them by dragging the window, switching to fullscreen or seamless mode or sending a video mode hint using VBoxManage. This behavior is what most users will want, but if you have different needs, it is possible to change it by issuing one of the following commands from the command line:
VBoxManage setextradata global GUI/MaxGuestResolution any
will remove all limits on guest resolutions.
VBoxManage setextradata global GUI/MaxGuestResolution >width,height<
manually specifies a maximum resolution.
VBoxManage setextradata global GUI/MaxGuestResolution auto
restores the default settings. Note that these settings apply globally to all guest systems, not just to a single machine.
Starting with version 1.4, as an alternative to using virtual disk images (as described in detail in Chapter 5, Virtual storage), VirtualBox can also present either entire physical hard disks or selected partitions thereof as virtual disks to virtual machines.
With VirtualBox, this type of access is called "raw hard disk access"; it allows a guest operating system to access its virtual hard disk without going through the host OS file system. The actual performance difference for image files vs. raw disk varies greatly depending on the overhead of the host file system, whether dynamically growing images are used and on host OS caching strategies. The caching indirectly also affects other aspects such as failure behavior, i.e. whether the virtual disk contains all data written before a host OS crash. Consult your host OS documentation for details on this.
Warning
Raw hard disk access is for expert users only. Incorrect use or use of an outdated configuration can lead to total loss of data on the physical disk. Most importantly, do not attempt to boot the partition with the currently running host operating system in a guest. This will lead to severe data corruption.
Raw hard disk access -- both for entire disks and individual
partitions -- is implemented as part of the VMDK image format support.
As a result, you will need to create a special VMDK image file which
defines where the data will be stored. After creating such a special
VMDK image, you can use it like a regular virtual disk image. For
example, you can use the Virtual Media Manager (the section called “The Virtual Media Manager”)
or VBoxManage to assign the image to a
virtual machine.
While this variant is the simplest to set up, you must be aware that this will give a guest operating system direct and full access to an entire physical disk. If your host operating system is also booted from this disk, please take special care to not access the partition from the guest at all. On the positive side, the physical disk can be repartitioned in arbitrary ways without having to recreate the image file that gives access to the raw disk.
To create an image that represents an entire physical hard disk (which will not contain any actual data, as this will all be stored on the physical disk), on a Linux host, use the command
VBoxManage internalcommands createrawvmdk -filename /path/to/file.vmdk
      -rawdisk /dev/sda
This creates the image
/path/to/file.vmdk (must be absolute), and all data will
be read and written from /dev/sda.
On a Windows host, instead of the above device specification,
use e.g. \\.\PhysicalDrive0. On a Mac OS X host, instead
of the above device specification use e.g. /dev/disk1.
Note that on OS X you can only get access to an entire disk if no
volume is mounted from it.
Creating the image requires read/write access for the given device. Read/write access is also later needed when using the image from a virtual machine.
Just like with regular disk images, this does not automatically
register the newly created image in the internal registry of hard
disks. If you want this done automatically, add
-register:
VBoxManage internalcommands createrawvmdk -filename /path/to/file.vmdk
      -rawdisk /dev/sda -register
After registering, you can assign the newly created image to a virtual machine with e.g.
VBoxManage storageattach WindowsXP --storagectl "IDE Controller"
      --port 0 --device 0 --type hdd --medium /path/to/file.vmdk
When this is done the selected virtual machine will boot from the specified physical disk.
This "raw partition support" is quite similar to the "full hard disk" access described above. However, in this case, any partitioning information will be stored inside the VMDK image, so you can e.g. install a different boot loader in the virtual hard disk without affecting the host's partitioning information. While the guest will be able to see all partitions that exist on the physical disk, access will be filtered in that reading from partitions for which no access is allowed the partitions will only yield zeroes, and all writes to them are ignored.
To create a special image for raw partition support (which will contain a small amount of data, as already mentioned), on a Linux host, use the command
VBoxManage internalcommands createrawvmdk -filename /path/to/file.vmdk
      -rawdisk /dev/sda -partitions 1,5
As you can see, the command is identical to the one for "full
hard disk" access, except for the additional
-partitions parameter. This example
would create the image /path/to/file.vmdk (which, again,
must be absolute), and partitions 1 and 5 of /dev/sda
would be made accessible to the guest.
VirtualBox uses the same partition numbering as your Linux host. As a result, the numbers given in the above example would refer to the first primary partition and the first logical drive in the extended partition, respectively.
On a Windows host, instead of the above device specification,
use e.g. \\.\PhysicalDrive0. On a Mac OS X host, instead
of the above device specification use e.g. /dev/disk1.
Note that on OS X you can only use partitions which are not mounted
(eject the respective volume first). Partition numbers are the same on
Linux, Windows and Mac OS X hosts.
The numbers for the list of partitions can be taken from the output of
VBoxManage internalcommands listpartitions -rawdisk /dev/sda
The output lists the partition types and sizes to give the user enough information to identify the partitions necessary for the guest.
Images which give access to individual partitions are specific to a particular host disk setup. You cannot transfer these images to another host; also, whenever the host partitioning changes, the image must be recreated.
Creating the image requires read/write access for the given device. Read/write access is also later needed when using the image from a virtual machine. If this is not feasible, there is a special variant for raw partition access (currently only available on Linux hosts) that avoids having to give the current user access to the entire disk. To set up such an image, use
VBoxManage internalcommands createrawvmdk -filename /path/to/file.vmdk
      -rawdisk /dev/sda -partitions 1,5 -relative
When used from a
virtual machine, the image will then refer not to the entire disk, but
only to the individual partitions (in the example
/dev/sda1 and /dev/sda5). As a consequence,
read/write access is only required for the affected partitions, not
for the entire disk. During creation however, read-only access to the
entire disk is required to obtain the partitioning information.
In some configurations it may be necessary to change the MBR
code of the created image, e.g. to replace the Linux boot loader that
is used on the host by another boot loader. This allows e.g. the guest
to boot directly to Windows, while the host boots Linux from the
"same" disk. For this purpose the
-mbr parameter is provided. It
specifies a file name from which to take the MBR code. The partition
table is not modified at all, so a MBR file from a system with totally
different partitioning can be used. An example of this is
VBoxManage internalcommands createrawvmdk -filename /path/to/file.vmdk
      -rawdisk /dev/sda -partitions 1,5 -mbr winxp.mbr
The modified MBR will be stored inside the image, not on the host disk.
For each of the above variants, you can register the resulting
image for immediate use in VirtualBox by adding
-register to the respective command
line. The image will then immediately appear in the list of registered
disk images. An example is
VBoxManage internalcommands createrawvmdk -filename /path/to/file.vmdk
      -rawdisk /dev/sda -partitions 1,5 -relative -register
which creates an image referring to individual partitions, and registers it when the image is successfully created.
VirtualBox reports vendor product data for its virtual hard disks which consist of hard disk serial number, firmware revision and model number. These can be changed using the following commands:
VBoxManage setextradata "VM name"
      "VBoxInternal/Devices/ahci/0/Config/Port0/SerialNumber" "serial"
VBoxManage setextradata "VM name"
      "VBoxInternal/Devices/ahci/0/Config/Port0/FirmwareRevision" "firmware"
VBoxManage setextradata "VM name"
      "VBoxInternal/Devices/ahci/0/Config/Port0/ModelNumber" "model"
The serial number is a 20 byte alphanumeric string, the firmware revision an 8 byte alphanumeric string and the model number a 40 byte alphanumeric string. Instead of "Port0" (referring to the first port), specify the desired SATA hard disk port.
Additional three parameters are needed for CD/DVD drives to report the vendor product data:
VBoxManage setextradata "VM name"
      "VBoxInternal/Devices/ahci/0/Config/Port0/ATAPIVendorId" "vendor"
VBoxManage setextradata "VM name"
      "VBoxInternal/Devices/ahci/0/Config/Port0/ATAPIProductId" "product"
VBoxManage setextradata "VM name"
      "VBoxInternal/Devices/ahci/0/Config/Port0/ATAPIRevision" "revision"
The vendor id is an 8 byte alphanumeric string, the product id an 16 byte alphanumeric string and the revision a 4 byte alphanumeric string. Instead of "Port0" (referring to the first port), specify the desired SATA hard disk port.
As an experimental feature, VirtualBox allows for accessing an iSCSI target running in a virtual machine which is configured for using Internal Networking mode. Please see the section called “iSCSI servers”; the section called “Internal networking”; and the section called “VBoxManage storageattach” for additional information.
The IP stack accessing Internal Networking must be configured in the virtual machine which accesses the iSCSI target. A free static IP and a MAC address not used by other virtual machines must be chosen. In the example below, adapt the name of the virtual machine, the MAC address, the IP configuration and the Internal Networking name ("MyIntNet") according to your needs. The following seven commands must first be issued:
VBoxManage setextradata "VM name" VBoxInternal/Devices/IntNetIP/0/Trusted 1
VBoxManage setextradata "VM name" VBoxInternal/Devices/IntNetIP/0/Config/MAC 08:00:27:01:02:0f
VBoxManage setextradata "VM name" VBoxInternal/Devices/IntNetIP/0/Config/IP 10.0.9.1
VBoxManage setextradata "VM name" VBoxInternal/Devices/IntNetIP/0/Config/Netmask 255.255.255.0
VBoxManage setextradata "VM name" VBoxInternal/Devices/IntNetIP/0/LUN#0/Driver IntNet
VBoxManage setextradata "VM name" VBoxInternal/Devices/IntNetIP/0/LUN#0/Config/Network MyIntNet
VBoxManage setextradata "VM name" VBoxInternal/Devices/IntNetIP/0/LUN#0/Config/IsService 1
Finally the iSCSI disk must be attached with the
--intnet option to tell the iSCSI
initiator to use internal networking:
VBoxManage storageattach ... --medium iscsi
         --server 10.0.9.30 --target iqn.2008-12.com.sun:sampletarget --intnet
Compared to a "regular" iSCSI setup, IP address of the target must be specified as a numeric IP address, as there is no DNS resolver for internal networking.
The virtual machine with the iSCSI target should be started before the VM using it is powered on. If a virtual machine using an iSCSI disk is started without having the iSCSI target powered up, it can take up to 200 seconds to detect this situation. The VM will fail to power up.
Solaris hosts have a fixed number of IPC semaphores IDs per process preventing users from starting more than 120 VMs. While trying to launch more VMs you would be shown a "Cannot create IPC semaphore" error.
In order to run more VMs, you will need to bump the semaphore ID
limit of the VBoxSVC process. Execute as root the
prctl command as shown below. The process
ID of VBoxSVC can be obtained using the
ps list command.
prctl -r -n project.max-sem-ids -v 2048 <pid-of-VBoxSVC>
Starting with version 1.4, VirtualBox provided support for virtual
serial ports, which, at the time, was rather complicated to set up with a
sequence of VBoxManage setextradata
statements. Since version 1.5, that way of setting up serial ports is no
longer necessary and deprecated. To set up virtual
serial ports, use the methods now described in the section called “Serial ports”.
Note
For backwards compatibility, the old
setextradata statements, whose
description is retained below from the old version of the manual, take
precedence over the new way of configuring serial
ports. As a result, if configuring serial ports the new way doesn't
work, make sure the VM in question does not have old configuration
data such as below still active.
The old sequence of configuring a serial port used the following 6 commands:
VBoxManage setextradata "VM name"
      "VBoxInternal/Devices/serial/0/Config/IRQ" 4
VBoxManage setextradata "VM name"
      "VBoxInternal/Devices/serial/0/Config/IOBase" 0x3f8
VBoxManage setextradata "VM name"
      "VBoxInternal/Devices/serial/0/LUN#0/Driver" Char
VBoxManage setextradata "VM name"
      "VBoxInternal/Devices/serial/0/LUN#0/AttachedDriver/Driver" NamedPipe
VBoxManage setextradata "VM name"
      "VBoxInternal/Devices/serial/0/LUN#0/AttachedDriver/Config/Location" "\\.\pipe\vboxCOM1"
VBoxManage setextradata "VM name"
      "VBoxInternal/Devices/serial/0/LUN#0/AttachedDriver/Config/IsServer" 1
This sets up a serial port in the guest with the default settings
for COM1 (IRQ 4, I/O address 0x3f8) and the
Location setting assumes that this
configuration is used on a Windows host, because the Windows named pipe
syntax is used. Keep in mind that on Windows hosts a named pipe must
always start with \\.\pipe\. On Linux the
same config settings apply, except that the path name for the
Location can be chosen more freely. Local
domain sockets can be placed anywhere, provided the user running
VirtualBox has the permission to create a new file in the directory. The
final command above defines that VirtualBox acts as a server, i.e. it
creates the named pipe itself instead of connecting to an already existing
one.
In NAT mode, the guest network interface is assigned to the IPv4
range 10.0.x.0/24 by default where
x corresponds to the instance of the
NAT interface +2. So x is 2 when there
is only one NAT instance active. In that case the guest is assigned to
the address 10.0.2.15, the gateway is
set to 10.0.2.2 and the name server can
be found at 10.0.2.3.
If, for any reason, the NAT network needs to be changed, this can be achieved with the following command:
VBoxManage modifyvm "VM name" --natnet1 "192.168/16"
This command would reserve the network addresses from
192.168.0.0 to
192.168.254.254 for the first NAT
network instance of "VM name". The guest IP would be assigned to
192.168.0.15 and the default gateway
could be found at 192.168.0.2.
For network booting in NAT mode, by default VirtualBox uses a built-in TFTP server at the IP address 10.0.2.3. This default behavior should work fine for typical remote-booting scenarios. However, it is possible to change the boot server IP and the location of the boot image with the following commands:
VBoxManage modifyvm "VM name" --nattftpserver1 10.0.2.2
VBoxManage modifyvm "VM name" --nattftpfile1 /srv/tftp/boot/MyPXEBoot.pxe
The VirtualBox NAT stack performance is often determined by its
interaction with the host's TCP/IP stack and the size of several buffers
(SO_RCVBUF and
SO_SNDBUF). For certain setups users
might want to adjust the buffer size for a better performance. This can
by achieved using the following commands (values are in kilobytes and
can range from 8 to 1024):
VBoxManage modifyvm "VM name" --natsettings1 16000,128,128,0,0
This example illustrates tuning the NAT settings. The first parameter is the MTU, then the size of the socket's send buffer and the size of the socket's receive buffer, the initial size of the TCP send window, and lastly the initial size of the TCP receive window. Note that specifying zero means fallback to the default value.
Each of these buffers has a default size of 64KB and default MTU is 1500.
By default, VirtualBox's NAT engine will route TCP/IP packets through the default interface assigned by the host's TCP/IP stack. (The technical reason for this is that the NAT engine uses sockets for communication.) If, for some reason, you want to change this behavior, you can tell the NAT engine to bind to a particular IP address instead. Use the following command:
VBoxManage modifyvm "VM name" --natbindip1 "10.45.0.2"
After this, all outgoing traffic will be sent through the interface with the IP address 10.45.0.2. Please make sure that this interface is up and running prior to this assignment.
The NAT engine by default offers the same DNS servers to the guest that are configured on the host. In some scenarios, it can be desirable to hide the DNS server IPs from the guest, for example when this information can change on the host due to expiring DHCP leases. In this case, you can tell the NAT engine to act as DNS proxy using the following command:
VBoxManage modifyvm "VM name" --natdnsproxy1 on
For resolving network names, the DHCP server of the NAT engine offers a list of registered DNS servers of the host. If for some reason you need to hide this DNS server list and use the host's resolver settings, thereby forcing the VirtualBox NAT engine to intercept DNS requests and forward them to host's resolver, use the following command:
VBoxManage modifyvm "VM name" --natdnshostresolver1 on
Note that this setting is similar to the DNS proxy mode, however whereas the proxy mode just forwards DNS requests to the appropriate servers, the resolver mode will interpret the DNS requests and use the host's DNS API to query the information and return it to the guest.
By default, the NAT core uses aliasing and uses random ports when generating an alias for a connection. This works well for the most protocols like SSH, FTP and so on. Though some protocols might need a more transparent behavior or may depend on the real port number the packet was sent from. It is possible to change the NAT mode via the VBoxManage frontend with the following commands:
VBoxManage modifyvm "VM name" --nataliasmode proxyonly
and
VBoxManage modifyvm "Linux Guest" --nataliasmode sameports
The first example disables aliasing and switches NAT into transparent mode, the second example enforces preserving of port values. These modes can be combined if necessary.
The DMI data VirtualBox provides to guests can be changed for a specific VM. Use the following commands to configure the DMI BIOS information:
VBoxManage setextradata "VM name"
      "VBoxInternal/Devices/pcbios/0/Config/DmiBIOSVendor"        "BIOS Vendor"
VBoxManage setextradata "VM name"
      "VBoxInternal/Devices/pcbios/0/Config/DmiBIOSVersion"       "BIOS Version"
VBoxManage setextradata "VM name"
      "VBoxInternal/Devices/pcbios/0/Config/DmiBIOSReleaseDate"   "BIOS Release Date"
VBoxManage setextradata "VM name"
      "VBoxInternal/Devices/pcbios/0/Config/DmiBIOSReleaseMajor"  1
VBoxManage setextradata "VM name"
      "VBoxInternal/Devices/pcbios/0/Config/DmiBIOSReleaseMinor"  2
VBoxManage setextradata "VM name"
      "VBoxInternal/Devices/pcbios/0/Config/DmiBIOSFirmwareMajor" 3
VBoxManage setextradata "VM name"
      "VBoxInternal/Devices/pcbios/0/Config/DmiBIOSFirmwareMinor" 4
VBoxManage setextradata "VM name"
      "VBoxInternal/Devices/pcbios/0/Config/DmiSystemVendor"      "System Vendor"
VBoxManage setextradata "VM name"
      "VBoxInternal/Devices/pcbios/0/Config/DmiSystemProduct"     "System Product"
VBoxManage setextradata "VM name"
      "VBoxInternal/Devices/pcbios/0/Config/DmiSystemVersion"     "System Version"
VBoxManage setextradata "VM name"
      "VBoxInternal/Devices/pcbios/0/Config/DmiSystemSerial"      "System Serial"
VBoxManage setextradata "VM name"
      "VBoxInternal/Devices/pcbios/0/Config/DmiSystemSKU"         "System SKU"
VBoxManage setextradata "VM name"
      "VBoxInternal/Devices/pcbios/0/Config/DmiSystemFamily"      "System Family"
VBoxManage setextradata "VM name"
      "VBoxInternal/Devices/pcbios/0/Config/DmiSystemUuid"
                                               "9852bf98-b83c-49db-a8de-182c42c7226b"
If a DMI string is not set, the default value of VirtualBox is used.
To set an empty string use
"<EMPTY>".
Note that in the above list, all quoted parameters (DmiBIOSVendor,
DmiBIOSVersion but not DmiBIOSReleaseMajor) are expected to be strings. If
such a string is a valid number, the parameter is treated as number and
the VM will most probably refuse to start with an
VERR_CFGM_NOT_STRING error. In that case,
use "string:<value>", for instance
VBoxManage setextradata "VM name"
      "VBoxInternal/Devices/pcbios/0/Config/DmiSystemSerial"      "string:1234"
Changing this information can be necessary to provide the DMI information of the host to the guest to prevent Windows from asking for a new product key. On Linux hosts the DMI BIOS information can be obtained with
dmidecode -t0
and the DMI system information can be obtained with
dmidecode -t1
By default, VirtualBox keeps all sources of time visible to the guest synchronized to a single time source, the monotonic host time. This reflects the assumptions of many guest operating systems, which expect all time sources to reflect "wall clock" time. In special circumstances it may be useful however to make the TSC (time stamp counter) in the guest reflect the time actually spent executing the guest.
This special TSC handling mode can be enabled on a per-VM basis, and for best results must be used only in combination with hardware virtualization. To enable this mode use the following command:
VBoxManage setextradata "VM name" "VBoxInternal/TM/TSCTiedToExecution" 1
To revert to the default TSC handling mode use:
VBoxManage setextradata "VM name" "VBoxInternal/TM/TSCTiedToExecution"
Note that if you use the special TSC handling mode with a guest operating system which is very strict about the consistency of time sources you may get a warning or error message about the timing inconsistency. It may also cause clocks to become unreliable with some guest operating systems depending on they use the TSC.
For certain purposes it can be useful to accelerate or to slow down the (virtual) guest clock. This can be achieved as follows:
VBoxManage setextradata "VM name" "VBoxInternal/TM/WarpDrivePercentage" 200
The above example will double the speed of the guest clock while
VBoxManage setextradata "VM name" "VBoxInternal/TM/WarpDrivePercentage" 50
will halve the speed of the guest clock. Note that changing the rate of the virtual clock can confuse the guest and can even lead to abnormal guest behavior. For instance, a higher clock rate means shorter timeouts for virtual devices with the result that a slightly increased response time of a virtual device due to an increased host load can cause guest failures. Note further that any time synchronization mechanism will frequently try to resynchronize the guest clock with the reference clock (which is the host clock if the VirtualBox Guest Additions are active). Therefore any time synchronization should be disabled if the rate of the guest clock is changed as described above (see the section called “Tuning the Guest Additions time synchronization parameters”).
The VirtualBox Guest Additions ensure that the guest's system time is synchronized with the host time. There are several parameters which can be tuned. The parameters can be set for a specific VM using the following command:
VBoxManage guestproperty set VM_NAME "/VirtualBox/GuestAdd/VBoxService/PARAMETER" VALUE
where PARAMETER is one of the
following:
--timesync-intervalSpecifies the interval at which to synchronize the time with the host. The default is 10000 ms (10 seconds).
--timesync-min-adjustThe minimum absolute drift value measured in milliseconds to make adjustments for. The default is 1000 ms on OS/2 and 100 ms elsewhere.
--timesync-latency-factorThe factor to multiply the time query latency with to calculate the dynamic minimum adjust time. The default is 8 times, that means in detail: Measure the time it takes to determine the host time (the guest has to contact the VM host service which may take some time), multiply this value by 8 and do an adjustment only if the time difference between host and guest is bigger than this value. Don't do any time adjustment otherwise.
--timesync-max-latencyThe max host timer query latency to accept. The default is 250 ms.
--timesync-set-thresholdThe absolute drift threshold, given as milliseconds where to start setting the time instead of trying to smoothly adjust it. The default is 20 minutes.
--timesync-set-startSet the time when starting the time sync service.
--timesync-set-on-restore
            0|1
Set the time after the VM was restored from a saved state when passing 1 as parameter (default). Disable by passing 0. In the latter case, the time will be adjusted smoothly which can take a long time.
All these parameters can be specified as command line parameters to VBoxService as well.
By default VirtualBox provides you with one host-only network interface. Adding more host-only network interfaces on Solaris hosts requires manual configuration. Here's how to add two more host-only network interfaces.
You first need to stop all running VMs and unplumb all existing "vboxnet" interfaces. Execute the following commands as root:
ifconfig vboxnet0 unplumb
Once you make sure all vboxnet interfaces are unplumbed, remove the driver using:
rem_drv vboxnet
then edit the file
/platform/i86pc/kernel/drv/vboxnet.conf
and add a line for the new interfaces:
name="vboxnet" parent="pseudo" instance=1;
name="vboxnet" parent="pseudo" instance=2;
Add as many of these lines as required and make sure "instance" number is uniquely incremented. Next reload the vboxnet driver using:
add_drv vboxnet
Now plumb all the interfaces using
ifconfig vboxnetX plumb (where X can be
0, 1 or 2 in this case) and once plumbed you can then configure the
interface like any other network interface.
To make your newly added interfaces' settings persistent across
reboots you will need to edit the files
/etc/netmasks, and if you are using NWAM
/etc/nwam/llp and add the appropriate
entries to set the netmask and static IP for each of those interfaces. The
VirtualBox installer only updates these configuration files for the one
"vboxnet0" interface it creates by default.
VirtualBox is capable of producing its own core files when things go wrong and for more extensive debugging. Currently this is only available on Solaris hosts.
The VirtualBox CoreDumper can be enabled using the following command:
VBoxManage setextradata "VM name" VBoxInternal2/CoreDumpEnabled 1
You can specify which directory to use for core dumps with this command:
VBoxManage setextradata "VM name" VBoxInternal2/CoreDumpDir <path-to-directory>
Make sure the directory you specify is on a volume with sufficient free space and that the VirtualBox process has sufficient permissions to write files to this directory. If you skip this command and don't specify any core dump directory, the current directory of the VirtualBox executable will be used (which would most likely fail when writing cores as they are protected with root permissions). It is recommended you explicity set a core dump directory.
You must specify when the VirtualBox CoreDumper should be triggered. This is done using the following commands:
VBoxManage setextradata "VM name" VBoxInternal2/CoreDumpReplaceSystemDump 1
VBoxManage setextradata "VM name" VBoxInternal2/CoreDumpLive 1
At least one of the above two commands will have to be provided if you have enabled the VirtualBox CoreDumper.
Setting CoreDumpReplaceSystemDump
sets up the VM to override the host's core dumping mechanism and in the
event of any crash only the VirtualBox CoreDumper would produce the core
file.
Setting CoreDumpLive sets up the VM
to produce cores whenever the VM receives a
SIGUSR2 signal. After producing the core
file, the VM will not be terminated and will continue to run. You can then
take cores of the VM process using:
kill -s SIGUSR2 <VM-process-id>
Core files produced by the VirtualBox CoreDumper are of the form
core.vb.<ProcessName>.<ProcessID>,
e.g.core.vb.VBoxHeadless.11321.
There are several advanced customization settings for locking down the VirtualBox manager, that is, removing some features that the user should not see.
VBoxManage setextradata global GUI/Customizations OPTION[,OPTION...]
where OPTION is one of the
following keywords:
noSelectorDon't allow to start the VirtualBox manager. Trying to do so will show a window containing a proper error message.
noMenuBarVM windows will not contain a menu bar.
noStatusBarVM windows will not contain a status bar.
To disable any GUI customization do
VBoxManage setextradata global GUI/Customizations
To disable all host key combinations, open the preferences and change the host key to None. This might be useful when using VirtualBox in a kiosk mode.
Furthermore, you can disallow certain actions when terminating a VM. To disallow specific actions, type:
VBoxManage setextradata "VM name" GUI/RestrictedCloseActions OPTION[,OPTION...]
where OPTION is one of the
following keywords:
SaveStateDon't allow the user to save the VM state when terminating the VM.
ShutdownDon't allow the user to shutdown the VM by sending the ACPI power-off event to the guest.
PowerOffDon't allow the user to power off the VM.
RestoreDon't allow the user to return to the last snapshot when powering off the VM.
Any combination of the above is allowed. If all options are specified, the VM cannot be shut down at all.
The VirtualBox web service
(vboxwebsrv) is used for controlling
VirtualBox remotely. It is documented in detail in the VirtualBox Software
Development Kit (SDK); please see Chapter 11, VirtualBox programming interfaces. As the
client base using this interface is growing, we added start scripts for
the various operation systems we support. The following describes how to
use them.
On Mac OS X, launchd is used. An example configuration file can be found in
$HOME/Library/LaunchAgents/org.virtualbox.vboxwebsrv.plist. It can be enabled by changing theDisabledkey fromtruetofalse. To manually start the service use the following command:launchctl load ~/Library/LaunchAgents/org.virtualbox.vboxwebsrv.plist
For additional information on how launchd services could be configured see
http://developer.apple.com/mac/library/documentation/MacOSX/Conceptual/BPSystemStartup/BPSystemStartup.html.