字符串示例:ASCII 图表Flash Player 9 和更高版本,Adobe AIR 1.0 和更高版本 此 ASCII 字符图示例说明了可以在 ActionScript 3.0 中使用 String 类实现的大量功能,其中包括:
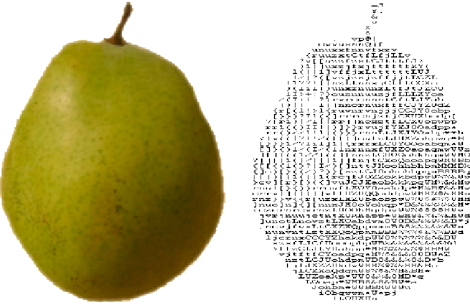
ASCII 字符图 这一术语指的是图像的文本表示形式,即使用等宽字体字符(如 Courier New 字符)的网格来绘制图像。下图便是该应用程序所生成 ASCII 字符图的一个例子:  图形的 ASCII 字符图版本显示在右侧。 若要获取此示例的应用程序文件,请参阅 www.adobe.com/go/learn_programmingAS3samples_flash_cn。可以在文件夹 Samples/AsciiArt 下找到 ASCIIArt 应用程序文件。该应用程序包含以下文件:
提取由制表符分隔的值此示例使用了将应用程序数据与应用程序本身分开存储的通行做法;通过这种方式,在数据发生更改时(例如,添加了另一幅图像或更改了图像标题),无需重新创建该 SWF 文件。在本例中,图像元数据(包括图像标题、实际图像文件的 URL 以及用来操作图像的某些值)存储在一个文本文件中(项目中的 txt/ImageData.txt 文件)。该文本文件的内容如下所示: FILENAME TITLE WHITE_THRESHHOLD BLACK_THRESHHOLD FruitBasket.jpg Pear, apple, orange, and banana d8 10 Banana.jpg A picture of a banana C8 20 Orange.jpg orange FF 20 Apple.jpg picture of an apple 6E 10 文件使用特定的制表符分隔格式。第一行为标题行。其余行包含要加载的每个位图的如下数据:
应用程序启动后,AsciiArtBuilder 类将加载并分析文本文件的内容,以便创建它要显示的图像的“堆栈”,执行这些操作时使用 AsciiArtBuilder 类的 parseImageInfo() 方法中的如下代码: var lines:Array = _imageInfoLoader.data.split("\n");
var numLines:uint = lines.length;
for (var i:uint = 1; i < numLines; i++)
{
var imageInfoRaw:String = lines[i];
...
if (imageInfoRaw.length > 0)
{
// Create a new image info record and add it to the array of image info.
var imageInfo:ImageInfo = new ImageInfo();
// Split the current line into values (separated by tab (\t)
// characters) and extract the individual properties:
var imageProperties:Array = imageInfoRaw.split("\t");
imageInfo.fileName = imageProperties[0];
imageInfo.title = normalizeTitle(imageProperties[1]);
imageInfo.whiteThreshold = parseInt(imageProperties[2], 16);
imageInfo.blackThreshold = parseInt(imageProperties[3], 16);
result.push(imageInfo);
}
}
文本文件的完整内容包含在单个 String 实例中,即 _imageInfoLoader.data 属性。使用 split() 方法并以换行符 (\n) 为参数,将该 String 实例分割到一个 Array (lines) 中,数组元素为文本文件的各个行。然后,代码使用循环来使用各行(第一行除外,因为它只包含标题而不包含实际内容)。在循环内部,再次使用 split() 方法将每行的内容分为一组值(名为 imageProperties 的 Array 对象)。在本例中,用于 split() 方法的参数为制表符 (\t),因为每行中的值均由制表符进行分隔。 使用 String 的方法标准化图像标题此应用程序的设计目标之一便是使用一种标准格式显示所有图像标题,即标题中每一个单词的第一个字母均为大写形式(在英文标题中通常不大写的少数单词除外)。应用程序并不假定文本文件已经包含格式正确的标题,它在从文本文件中提取标题时对标题格式进行设置。 在前面的代码清单中,使用了如下代码行来提取每个图像元数据值: imageInfo.title = normalizeTitle(imageProperties[1]); 在该代码中,来自文本文件的图像标题在存储到 ImageInfo 对象之前先传递给 normalizeTitle() 方法进行处理: private function normalizeTitle(title:String):String
{
var words:Array = title.split(" ");
var len:uint = words.length;
for (var i:uint; i < len; i++)
{
words[i] = capitalizeFirstLetter(words[i]);
}
return words.join(" ");
}
此方法使用 split() 方法将标题分割为各个单独的单词(由空格字符加以分隔),然后将每个单词传递给 capitalizeFirstLetter() 方法进行处理,接着使用 Array 类的 join() 方法将单词重新合并为一个字符串。 如同其名称所表达的含义,capitalizeFirstLetter() 方法实际执行将每个单词的第一个字母变为大写形式的工作: /**
* Capitalizes the first letter of a single word, unless it's one of
* a set of words that are normally not capitalized in English.
*/
private function capitalizeFirstLetter(word:String):String
{
switch (word)
{
case "and":
case "the":
case "in":
case "an":
case "or":
case "at":
case "of":
case "a":
// Don't do anything to these words.
break;
default:
// For any other word, capitalize the first character.
var firstLetter:String = word.substr(0, 1);
firstLetter = firstLetter.toUpperCase();
var otherLetters:String = word.substring(1);
word = firstLetter + otherLetters;
}
return word;
}
在英文中,如果标题中某个单词为以下单词之一,则不会 将其首字符变为大写形式:“and”、“the”、“in”、“an”、“or”、“at”、“of”或“a”。(这是相关规则的简化版本。)为了实现此逻辑,代码首先使用 switch 语句来检查单词是否为不应将其首字符大写的单词之一。如果是,代码直接跳出 switch 语句。另一方面,如果单词应大写,则在几个步骤中完成此操作,如下所示:
生成 ASCII 字符图文本BitmapToAsciiConverter 类提供了将位图图像转换为其 ASCII 文本表示形式的功能。此过程由 parseBitmapData() 方法执行,下面展示了该方法的部分工作过程: var result:String = "";
// Loop through the rows of pixels top to bottom:
for (var y:uint = 0; y < _data.height; y += verticalResolution)
{
// Within each row, loop through pixels left to right:
for (var x:uint = 0; x < _data.width; x += horizontalResolution)
{
...
// Convert the gray value in the 0-255 range to a value
// in the 0-64 range (since that's the number of "shades of
// gray" in the set of available characters):
index = Math.floor(grayVal / 4);
result += palette.charAt(index);
}
result += "\n";
}
return result;
此代码首先定义一个名为 result 的 String 实例,用于构建位图图像的 ASCII 字符图版本。然后,它遍历源位图图像的每个像素。通过使用若干颜色处理技术(为了简便起见,此处省略了对这些技术的介绍),它将每个像素的红色、绿色和蓝色值转换为单个灰度值(一个介于 0-255 之间的数字)。接着,代码将该值除以 4(如下所示)以将其转换为介于 0-63 之间的一个值,此值存储在变量 index 中。(之所以使用 0-63 的范围,是因为此应用程序使用的可用 ASCII 字符的“调色板”包含 64 个值。)该字符调色板在 BitmapToAsciiConverter 类中定义为一个 String 实例: // The characters are in order from darkest to lightest, so that their
// position (index) in the string corresponds to a relative color value
// (0 = black).
private static const palette:String = "@#$%&8BMW*mwqpdbkhaoQ0OZXYUJCLtfjzxnuvcr[]{}1()|/?Il!i><+_~-;,. ";
因为变量 index 定义调色板中的哪个 ASCII 字符对应于位图图像中的当前像素,所以可使用 charAt() 方法从 palette 字符串中检索该字符。然后,使用连接赋值运算符 (+=) 将其追加到 result 字符串实例。此外,在每行像素的末尾,会将一个换行符连接到 result 字符串的末尾,强制该行换行以创建新的一行字符“像素”。 |

|