Live folders, introduced in Android 1.5 (API Level 3), let you display any source of data
on the Home screen without forcing the user to launch an application. A live
folder is simply a real-time view of a ContentProvider.
As such, a live folder can be used to display all of the user's contacts or
bookmarks, email, playlists, an RSS feed, and so on. The possibilities are
endless!
The platform includes several standard folders for displaying contacts. For instance, the screenshot below shows the content of the live folders that displays all contacts with a phone number:

If a contacts sync happens in the background while the user is browsing this live folder, the user will see the change happen in real-time. Live folders are not only useful, but they are also easy to add to to your application and data. This articles shows how to add a live folder to an example application called Shelves. To better understand how live folders work, you can download the source code of the application and modify it by following the instructions below.
To give the user the option to create a new live folder for an application,
you first need to create a new activity with an intent filter whose action is
android.intent.action.CREATE_LIVE_FOLDER. To do so, simply open
AndroidManifest.xml and add something similar to this:
<activity
    android:name=".activity.BookShelfLiveFolder"
    android:label="BookShelf">
    <intent-filter>
        <action android:name="android.intent.action.CREATE_LIVE_FOLDER" />
        <category android:name="android.intent.category.DEFAULT" />
    </intent-filter>
</activity>
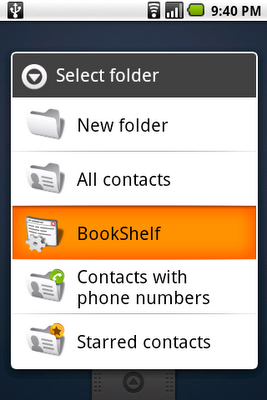
The label and icon of this activity are what the user will see on the Home screen when choosing a live folder to create:

Since you just need an intent filter, it is possible, and sometimes advised,
to reuse an existing activity. In the case of Shelves, we will create a new
activity, org.curiouscreature.android.shelves.activity.BookShelfLiveFolder.
The role of this activity is to send an Intent result to Home
containing the description of the live folder: its name, icon, display mode and
content URI. The content URI is very important as it describes what
ContentProvider will be used to populate the live folder. The code
of the activity is very simple as you can see here:
public class BookShelfLiveFolder extends Activity {
    public static final Uri CONTENT_URI = Uri.parse("content://shelves/live_folders/books");

    @Override
    protected void onCreate(Bundle savedInstanceState) {
        super.onCreate(savedInstanceState);

        final Intent intent = getIntent();
        final String action = intent.getAction();

        if (LiveFolders.ACTION_CREATE_LIVE_FOLDER.equals(action)) {
            setResult(RESULT_OK, createLiveFolder(this, CONTENT_URI,
                    "Books", R.drawable.ic_live_folder));
        } else {
            setResult(RESULT_CANCELED);
        }

        finish();
    }

    private static Intent createLiveFolder(Context context, Uri uri, String name, int icon) {
        final Intent intent = new Intent();

        intent.setData(uri);
        intent.putExtra(LiveFolders.EXTRA_LIVE_FOLDER_NAME, name);
        intent.putExtra(LiveFolders.EXTRA_LIVE_FOLDER_ICON,
                Intent.ShortcutIconResource.fromContext(context, icon));
        intent.putExtra(LiveFolders.EXTRA_LIVE_FOLDER_DISPLAY_MODE, LiveFolders.DISPLAY_MODE_LIST);

        return intent;
    }
}
This activity, when invoked with theACTION_CREATE_LIVE_FOLDER
intent, returns an intent with a URI,
content://shelves/live_folders/books, and three extras to describe
the live folder. There are other extras and constants you can use and you should
refer to the documentation of android.provider.LiveFolders for more
details. When Home receives this intent, a new live folder is created on the
user's desktop, with the name and icon you provided. Then, when the user clicks
on the live folder to open it, Home queries the content provider referenced by
the provided URI.
Live folders' content providers must obey specific naming rules. The
Cursor returned by the query() method must have at
least two columns named LiveFolders._ID and
LiveFolders.NAME. The first one is the unique identifier of each
item in the live folder and the second one is the name of the item. There are
other column names you can use to specify an icon, a description, the intent to
associate with the item (fired when the user clicks that item), etc. Again,
refer to the documentation of android.provider.LiveFolders for more
details.
In our example, all we need to do is modify the existing provider
in Shelves called
org.curiouscreature.android.shelves.provider.BooksProvider. First,
we need to modify the URI_MATCHER to recognize our
content://shelves/live_folders/books content URI:
private static final int LIVE_FOLDER_BOOKS = 4;
// ...
URI_MATCHER.addURI(AUTHORITY, "live_folders/books", LIVE_FOLDER_BOOKS);
Then we need to create a new projection map for the cursor. A projection map
can be used to "rename" columns. In our case, we will replace
BooksStore.Book._ID, BooksStore.Book.TITLE and
BooksStore.Book.AUTHORS with LiveFolders._ID,
LiveFolders.TITLE and LiveFolders.DESCRIPTION:
private static final HashMap<string, string=""> LIVE_FOLDER_PROJECTION_MAP;
static {
    LIVE_FOLDER_PROJECTION_MAP = new HashMap<string, string="">();
    LIVE_FOLDER_PROJECTION_MAP.put(LiveFolders._ID, BooksStore.Book._ID +
            " AS " + LiveFolders._ID);
    LIVE_FOLDER_PROJECTION_MAP.put(LiveFolders.NAME, BooksStore.Book.TITLE +
            " AS " + LiveFolders.NAME);
    LIVE_FOLDER_PROJECTION_MAP.put(LiveFolders.DESCRIPTION, BooksStore.Book.AUTHORS +
            " AS " + LiveFolders.DESCRIPTION);
}
Because we are providing a title and a description for each row, Home will
automatically display each item of the live folder with two lines of text.
Finally, we implement the query() method by supplying our
projection map to the SQL query builder:
public Cursor query(Uri uri, String[] projection, String selection,
        String[] selectionArgs, String sortOrder) {

    SQLiteQueryBuilder qb = new SQLiteQueryBuilder();

    switch (URI_MATCHER.match(uri)) {
        // ...
        case LIVE_FOLDER_BOOKS:
            qb.setTables("books");
            qb.setProjectionMap(LIVE_FOLDER_PROJECTION_MAP);
            break;
        default:
            throw new IllegalArgumentException("Unknown URI " + uri);
    }

    SQLiteDatabase db = mOpenHelper.getReadableDatabase();
    Cursor c = qb.query(db, projection, selection, selectionArgs, null, null, BooksStore.Book.DEFAULT_SORT_ORDER);
    c.setNotificationUri(getContext().getContentResolver(), uri);

    return c;
}
You can now compile and deploy the application, go to the Home screen and try to add a live folder. You can add a books live folder to your Home screen and when you open it, see the list of all of your books, with their titles and authors, and all it took was a few lines of code:

The live folders API is extremely simple and relies only on intents and content URI. If you want to see more examples of live folders implementation, you can read the source code of the Contacts application and of the Contacts provider.
You can also download the result of our exercise, the modified version of Shelves with live folders support.