UserService Implementation
In this section we will implement the UserService and make sure it passes the tests.
As discussed under Application Architecture,
the value object is a special packaging of attributes
from one more more entities, with the purpose of shielding the entities from other
tiers of the application and/or external applications. To implement the
getAllUsers()
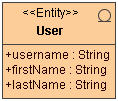
method in UserService, we will now define a User entity.
To keep things simple, we will do a straight one-to-one mapping of attributes in
UserVO to the attributes in the User entity. The model of the
User entity is shown on the right. Note that we have not explicitly
modeled the id attribute -- all entities are assumed to have an id
attribute of type Long. You need to model an id only if
this default assumption is not true, i.e. your id
attribute has a different name or type.
Note that AndroMDA will map the User entity to a database table called
USER. However USER happens to be a reserved word in several
databases. So we will force AndroMDA to map this entity to a table called USERS.
This exercise will also show you how to override AndroMDA's default code generation
behavior.
Now let us enter the User
entity in the TimeTracker model. Please follow
one of the links below to edit the model with the UML tool of your choice.
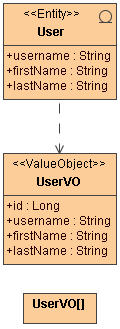
Next we will add a couple of dependency relationships to our model to tell AndroMDA
about dependencies between some of the elements we have modeled. The first is the
dependency from the User
entity to the UserVO. This dependency
is shown on the right and tells AndroMDA to generate conversion methods between
User and UserVO
objects. The conversion methods are generated
in UserDaoBase, the data access object for the User entity.
They take care of simple conversions, however if your value objects are complicated
(for example, if they have attributes fetched from related entities), then you will
have to override the default conversion methods to fill in the additional attributes.
Anyway, our UserVO
is simple enough that the default conversion methods
work perfectly!
Please follow one of the links below to enter this new dependency in the model.
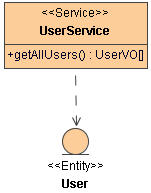
Next add a dependency from UserService to the User entity.
This dependency is shown below and tells AndroMDA to give UserService
access to the User entity. From an implementation perspective, this
injects a UserDao instance into UserService. As you may
have guessed, UserDao is the data access object that allows its clients
to read and write User entities from the database.
Please follow one of the links below to enter this new dependency in the model.
Now let's ask AndroMDA to generate code for the
User
entity:
- Execute the command
mvn install
in the Command Prompt. Note that the
build will not succeed because the test will still fail, however the code generation
part should succeed.
Open the folder C:/timetracker/core/target/src/org/andromda/timetracker/domain in
Windows Explorer. Note that there are 5 files generated in this folder as a result
of creating the single
User
entity in the application model.
-
User.java:
This is the primary class that implements the
User
entity. It contains the 3 attributes from the model along with their
getters and setters. AndroMDA automatically adds an
id attribute that represents the unique identifier for
User instances in the database. In addition, AndroMDA generates
equals() and hashCode() methods for the entity. Note that
User is an abstract class - it cannot be instantiated. The
UserImpl class described below, is a concrete
class that extends User. It can be instantiated using the factory methods
embedded in the User class.
-
UserImpl.java:
As mentioned above UserImpl is a concrete extension of the
User class. It is meant to be a container for any
custom code that developers would like to add to the
User entity.
-
UserDao.java:
Data access objects for any entity are created as
a trio of classes: an interface, an abstract base class and a concrete implementation.
UserDao is the interface for the User
data access object. It specifies CRUD methods for the DAO.
-
UserDaoBase.java:
UserDaoBase implements all of the CRUD methods specified in the
UserDao interface class.
-
User.hbm.xml:
This is the Hibernate mapping file that maps the
User
entity to its relational representation in the database.
Now open the folder C:/timetracker/core/src/main/java/org/andromda/timetracker/domain
in Windows Explorer. Note that there is 1 additional file generated in this folder:
-
UserDaoImpl.java:
UserDaoImpl is a concrete extension of the UserDaoBase
class created in the target folder above. It is
meant to be a container for any custom code that developers would like to add to
the User data access object.
Note that the
target
folder is intended for auto generated files only.
None of the files in this folder should be modified by hand because code regeneration
will wipe them out completely, thus deleting all your changes. It is also a best
practice not to check this code into your source repository. Instead let your build
script generate it on the fly.
By now you must be wondering where to add your custom code. We already said above
that developers can add custom code into UserImpl.java and UserDaoImpl.java.
But why is UserImpl.java generated in the target folder
then? Well, AndroMDA is pretty smart. You have given it no indication that you want
to write custom code in UserImpl.java. As long as that is the case
it will keep generating the UserImpl.java class in the target folder.
However, as soon as you tell AndroMDA that you want to write some custom code in
this class, it will generate the class in the src folder under the
core project. Now you are free to modify the
UserImpl.java class and
add any code to it. AndroMDA will never overwrite files in the project src
folder. They are auto-generated only once for your convenience.
Talking about custom code, note that so far we have not written even a single line
of custom code to implement the UserService! AndroMDA has done most
of the work for us, e.g. creation of the UserService, UserVO,
UserDao, Hibernate mapping file and so on. All that is really left
is to fill in the "handle" method in UserServiceImpl. To do this, add
the bold lines shown in the listing below to your
UserServiceImpl
class.
// license-header java merge-point
/**
 * This is only generated once! It will never be overwritten.
 * You can (and have to!) safely modify it by hand.
 * TEMPLATE:    SpringServiceImpl.vsl in andromda-spring cartridge
 * MODEL CLASS: Data::timetracker::org.andromda.timetracker::service::UserService
 * STEREOTYPE:  Service
 */
package org.andromda.timetracker.service;

import java.util.Collection;
import org.andromda.timetracker.domain.UserDao;
import org.andromda.timetracker.vo.UserVO;

/**
 * @see org.andromda.timetracker.service.UserService
 */
public class UserServiceImpl
    extends UserServiceBase
{
    /**
     * @see org.andromda.timetracker.service.UserService#getAllUsers()
     */
    @SuppressWarnings("unchecked")
    protected  Collection<UserVO> handleGetAllUsers()
        throws Exception
    {
        return (Collection<UserVO>)getUserDao().loadAll(UserDao.TRANSFORM_USERVO);
    }
}
Here we make a direct call to the loadAll() method in
UserDao which is completely implemented in UserDaoBase. We supply the
UserDao.TRANSFORM_USERVO parameter to the loadAll()
method which asks the method to convert the User entities to UserVO
objects before returning. That's it! You see how simple it was to implement this method,
no need to write DAOs or convert database records to objects, AndroMDA takes care
of all this for you.
Well, we think that UserService is now completely implemented. Let's
test it. Execute the command below to run UserServiceTest. Note that
this time we do not execute mvn install because this command regenerates
code and rebuilds the entire application. Since we have not made any model changes
after the last build, it makes sense to just run the test target in the
core project.
                C:\timetracker>mvn -f core/pom.xml test
                ...
                ...
                -------------------------------------------------------
                 T E S T S
                -------------------------------------------------------
                Running TestSuite
                Tests run: 1, Failures: 0, Errors: 0, Skipped: 0, Time elapsed: 2.048 sec

                Results :

                Tests run: 1, Failures: 0, Errors: 0, Skipped: 0

                [INFO] ------------------------------------------------------------------------
                [INFO] BUILD SUCCESSFUL
                [INFO] ------------------------------------------------------------------------
                [INFO] Total time: 5 seconds
                [INFO] Finished at: Sun Apr 10 16:13:14 BRT 2011
                [INFO] Final Memory: 31M/604M
                [INFO] ------------------------------------------------------------------------
Hibernate created the user table automaticaly in the database.
Follow the steps below to populate this table with test data and then run the test
again.
- Open MySQL Query Browser. Login as timetracker. You should see the
user
table in the
timetracker
schema.
- Select File > New Script Tab and paste the following SQL script in the new tab.
                        insert into USERS (ID, USERNAME, FIRST_NAME, LAST_NAME)
                        values (1, 'nbhatia', 'Naresh', 'Bhatia');
                        insert into USERS (ID, USERNAME, FIRST_NAME, LAST_NAME)
                        values (2, 'lcoude', 'Louis', 'Coude');
                        insert into USERS (ID, USERNAME, FIRST_NAME, LAST_NAME)
                        values (3, 'ecrutchfield', 'Eric', 'Crutchfield');
                        insert into USERS (ID, USERNAME, FIRST_NAME, LAST_NAME)
                        values (4, 'cmicali', 'Chris', 'Micali');
- Click the Execute button on the top right.
- Now rerun the test:
mvn -f core/pom.xml test
- Open
C:\timetracker\core\timetracker-test.log
to see results logged
by the test. You should see the usernames printed out at the end of this file:
                        16:59:28.362 INFO - nbhatia
                        16:59:28.362 INFO - lcoude
                        16:59:28.362 INFO - ecrutchfield
                        16:59:28.362 INFO - cmicali
What's Next?
Now that UserService.getAllUsers()
method is working, let's try to
use it from the front-end. Click here to implement the search
criteria panel of the search screen, which needs to call this method.
