10 steps to write a cartridge
This article shows you how to write an AndroMDA cartridge in 10 distinct steps,
using a sample cartridge which generates an Ant-like build script from a UML deployment model.
This is why the tutorial cartridge is called "andromda-deployment".
The task the new cartridge has to do
Let's have a look at a test model that the cartridge should process:
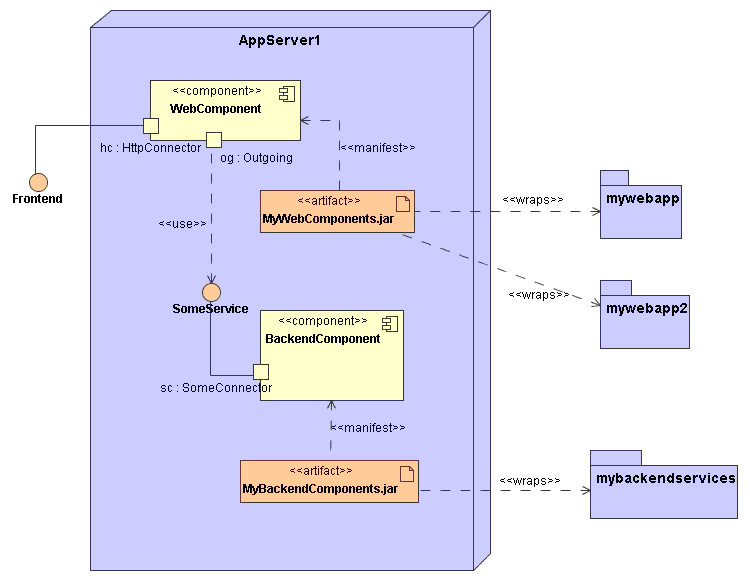
You see four important kinds of model elements on this picture:
- node: a box on which artifacts can be deployed (usually a machine, e.g. a server)
- component: a logical block of software with a defined interface
- artifact: a physical block of software, e.g. a jar file which conforms to a (in UML speak: "manifests a") component interface
- package: hull around a number of classes
The idea behind this model is: Artifacts contain packages and are deployed on nodes.
Packages contain classes which should be compiled before being packaged into an artifact.
That's it. You can do much more from such a model, but this would make this cartridge too complex for a tutorial.
From this model, the cartridge will generate two kinds of files:
- an Ant-like build script (one for each node)
- a simple report about nodes, components, artifacts and packages to be deployed (one report per model)
From the model above, the new cartridge shall generate the following output:
build.xml:
    <project name="org.andromda.cartridges.deployment.sampledeployment.AppServer1" default="deploy">
        <target name="compile">
            <javac package="org.andromda.cartridges.deployment.sampledeployment.mybackendservices"/>
            <javac package="org.andromda.cartridges.deployment.sampledeployment.mywebapp"/>
            <javac package="org.andromda.cartridges.deployment.sampledeployment.mywebapp2"/>
        </target>
        <target name="deploy" depends="compile">
            <jar name="MyBackendComponents.jar">
                <package name="org.andromda.cartridges.deployment.sampledeployment.mybackendservices"/>
            </jar>
            <jar name="MyWebComponents.jar">
                <package name="org.andromda.cartridges.deployment.sampledeployment.mywebapp"/>
                <package name="org.andromda.cartridges.deployment.sampledeployment.mywebapp2"/>
            </jar>
        </target>
    </project>
Ant experts among you will now say that this is not a valid Ant file. No, it is not. It's a fake!
There is another file to generate:
DeploymentReport.xml:
    <deployment-report generation-date="Fri Feb 17 10:12:33 CET 2006">
        <node name="AppServer1">
            <component name="BackendComponent">
                <artifact name="MyBackendComponents.jar">
                    <package
                            name="org.andromda.cartridges.deployment.sampledeployment.mybackendservices"></package>
                </artifact>
            </component>
            <component name="WebComponent">
                <artifact name="MyWebComponents.jar">
                    <package
                            name="org.andromda.cartridges.deployment.sampledeployment.mywebapp"></package>
                    <package
                            name="org.andromda.cartridges.deployment.sampledeployment.mywebapp2"></package>
                </artifact>
            </component>
        </node>
    </deployment-report>
We'll walk through the design of this cartridge in each step of the cartridge development process which I show you below.
