4.5. Management Server Installation
4.5.1. Management Server Installation Overview
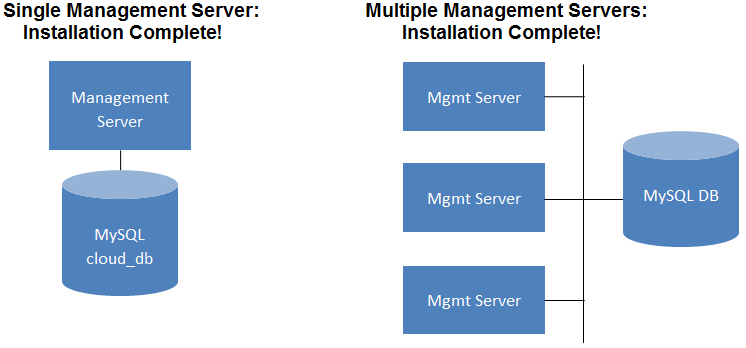
This section describes installing the Management Server. There are two slightly different installation flows, depending on how many Management Server nodes will be in your cloud:
A single Management Server node, with MySQL on the same node.
Multiple Management Server nodes, with MySQL on a node separate from the Management Servers.
In either case, each machine must meet the system requirements described in System Requirements.
For the sake of security, be sure the public Internet can not access port 8096 or port 8250 on the Management Server.
The procedure for installing the Management Server is:
Prepare the Operating System
Download and install vhd-util.
Install the First Management Server
Install and Configure the MySQL database
Prepare NFS Shares
Prepare and Start Additional Management Servers (optional)
Prepare the System VM Template
4.5.2. Prepare the Operating System
The OS must be prepared to host the Management Server using the following steps. These steps must be performed on each Management Server node.
Log in to your OS as root.
Check for a fully qualified hostname.
hostname --fqdn
This should return a fully qualified hostname such as "managament1.lab.example.org". If it does not, edit /etc/hosts so that it does.
Make sure that the machine can reach the Internet.
ping www.cloudstack.org
Turn on NTP for time synchronization.
NTP is required to synchronize the clocks of the servers in your cloud.
Install NTP.
yum install ntp
apt-get install openntpd
Repeat all of these steps on every host where the Management Server will be installed.
4.5.3. Install the Management Server on the First Host
The first step in installation, whether you are installing the Management Server on one host or many, is to install the software on a single node.
If you are planning to install the Management Server on multiple nodes for high availability, do not proceed to the additional nodes yet. That step will come later.
The CloudStack Management server can be installed using either RPM or DEB packages. These packages will depend on everything you need to run the Management server.
4.5.3.1. Downloading vhd-util
Before setting up the Management Server, download vhd-util from
vhd-util
If the Management Server is RHEL or CentOS, copy vhd-util to /usr/lib64/cloud/common/scripts/vm/hypervisor/xenserver.
If the Management Server is Ubuntu, copy vhd-util to /usr/lib/cloud/common/scripts/vm/hypervisor/xenserver/vhd-util.
4.5.3.2. Install on CentOS/RHEL
We start by installing the required packages:
yum install cloud-client
4.5.3.3. Install on Ubuntu
apt-get install cloud-client
4.5.4. Install the database server
The CloudStack management server uses a MySQL database server to store it's data. When you are installing the management server on a single node you can install the MySQL server locally. When using a multi-node installation the MySQL database has to run on an external node.
CloudStack has been tested with MySQL 5.1 and 5.5, both should work fine. These versions are included in RHEL/CentOS and Ubuntu.
4.5.4.1. Install the Database on the Management Server Node
This section describes how to install MySQL on the same machine with the Management Server. This technique is intended for a simple deployment that has a single Management Server node. If you have a multi-node Management Server deployment, you will typically use a separate node for MySQL. See
Section 4.5.4.2, “Install the Database on a Separate Node”.
Install MySQL from the package repository from your distribution:
yum install mysql-server
apt-get install mysql-server
Edit the MySQL configuration (/etc/my.cnf or /etc/mysql/my.cnf, depending on your OS) and insert the following lines in the [mysqld] section. You can put these lines below the datadir line. The max_connections parameter should be set to 350 multiplied by the number of Management Servers you are deploying. This example assumes one Management Server.
On Ubuntu you can also create a file /etc/mysql/conf.d/cloudstack.cnf and add these directives there. Don't forget to add [mysqld] on the first line of the file.
innodb_rollback_on_timeout=1
innodb_lock_wait_timeout=600
max_connections=350
log-bin=mysql-bin
binlog-format = 'ROW'
On RHEL/CentOS MySQL doesn't start after installation, start it manually.
service mysqld start
On RHEL and CentOS, MySQL does not set a root password by default. It is very strongly recommended that you set a root password as a security precaution. Run the following commands, and substitute your own desired root password. This step is not required on Ubuntu as it asks for a root password during installation.
Run this command to secure your installation. Since we are running MySQL locally you can answer "Y" to all questions.
mysql_secure_installation
Set up the database. The following command creates the "cloud" user on the database.
In dbpassword, specify the password to be assigned to the "cloud" user. You can choose to provide no password although that is not recommended.
In deploy-as, specify the username and password of the user deploying the database. In the following command, it is assumed the root user is deploying the database and creating the "cloud" user.
(Optional) For encryption_type, use file or web to indicate the technique used to pass in the database encryption password. Default: file. See About Password and Key Encryption.
(Optional) For management_server_key, substitute the default key that is used to encrypt confidential parameters in the CloudStack properties file. Default: password. It is highly recommended that you replace this with a more secure value. See About Password and Key Encryption.
(Optional) For database_key, substitute the default key that is used to encrypt confidential parameters in the CloudStack database. Default: password. It is highly recommended that you replace this with a more secure value. See About Password and Key Encryption.
cloud-setup-databases cloud:<dbpassword>@localhost \
                --deploy-as=root:<password> \
                -e <encryption_type> \
                -m <management_server_key> \
                -k <database_key>
When this script is finished, you should see a message like “Successfully initialized the database.”
4.5.4.2. Install the Database on a Separate Node
This section describes how to install MySQL on a standalone machine, separate from the Management Server. This technique is intended for a deployment that includes several Management Server nodes. If you have a single-node Management Server deployment, you will typically use the same node for MySQL. See
Section 4.5.4.1, “Install the Database on the Management Server Node”.
Install MySQL from the package repository from your distribution:
yum install mysql-server
apt-get install mysql-server
Edit the MySQL configuration (/etc/my.cnf or /etc/mysql/my.cnf, depending on your OS) and insert the following lines in the [mysqld] section. You can put these lines below the datadir line. The max_connections parameter should be set to 350 multiplied by the number of Management Servers you are deploying. This example assumes two Management Servers.
On Ubuntu you can also create a file /etc/mysql/conf.d/cloudstack.cnf and add these directives there. Don't forget to add [mysqld] on the first line of the file.
innodb_rollback_on_timeout=1
innodb_lock_wait_timeout=600
max_connections=700
log-bin=mysql-bin
binlog-format = 'ROW'
bind-address = 0.0.0.0
On RHEL/CentOS MySQL doesn't start after installation, start it manually.
service mysqld start
On RHEL and CentOS, MySQL does not set a root password by default. It is very strongly recommended that you set a root password as a security precaution. Run the following commands, and substitute your own desired root password. This step is not required on Ubuntu as it asks for a root password during installation.
Run this command to secure your installation. You can answer "Y" to all questions except to "Disallow root login remotely?". This is required to set up the databases.
mysql_secure_installation
If a firewall is present on the system, open TCP port 3306 so external MySQL connections can be established.
On RHEL/CentOS:
Edit the /etc/sysconfig/iptables file and add the following line at the beginning of the INPUT chain.
-A INPUT -p tcp --dport 3306 -j ACCEPT
Now reload the iptables rules.
service iptables restart
On Ubuntu:
UFW is the default firewall on Ubuntu, open the port with this command:
ufw allow mysql
Set up the database. The following command creates the cloud user on the database.
This command should be run on the first Management server node!
In dbpassword, specify the password to be assigned to the cloud user. You can choose to provide no password.
In deploy-as, specify the username and password of the user deploying the database. In the following command, it is assumed the root user is deploying the database and creating the cloud user.
(Optional) For encryption_type, use file or web to indicate the technique used to pass in the database encryption password. Default: file. See About Password and Key Encryption.
(Optional) For management_server_key, substitute the default key that is used to encrypt confidential parameters in the CloudStack properties file. Default: password. It is highly recommended that you replace this with a more secure value. See About Password and Key Encryption.
(Optional) For database_key, substitute the default key that is used to encrypt confidential parameters in the CloudStack database. Default: password. It is highly recommended that you replace this with a more secure value. See About Password and Key Encryption.
cloud-setup-databases cloud:<dbpassword>@<ip address mysql server> \
                --deploy-as=root:<password> \
                -e <encryption_type> \
                -m <management_server_key> \
                -k <database_key>
When this script is finished, you should see a message like “Successfully initialized the database.”
4.5.5. Prepare NFS Shares
CloudStack needs a place to keep primary and secondary storage (see Cloud Infrastructure Overview). Both of these can be NFS shares. This section tells how to set up the NFS shares before adding the storage to CloudStack.
For primary storage, you can use iSCSI instead.
The requirements for primary and secondary storage are described in:
About Primary Storage
About Secondary Storage
4.5.5.1. Using a Separate NFS Server
This section tells how to set up NFS shares for secondary and (optionally) primary storage on an NFS server running on a separate node from the Management Server.
The exact commands for the following steps may vary depending on your operating system version.
(KVM only) Ensure that no volume is already mounted at your NFS mount point.
On the storage server, create an NFS share for secondary storage and, if you are using NFS for primary storage as well, create a second NFS share. For example:
# mkdir -p /export/primary
# mkdir -p /export/secondary
To configure the new directories as NFS exports, edit /etc/exports. Export the NFS share(s) with rw,async,no_root_squash. For example:
# vi /etc/exports
Insert the following line.
/export *(rw,async,no_root_squash)
Export the /export directory.
# exportfs -a
On the management server, create a mount point for secondary storage. For example:
# mkdir -p /mnt/secondary
Mount the secondary storage on your Management Server. Replace the example NFS server name and NFS share paths below with your own.
# mount -t nfs nfsservername:/nfs/share/secondary /mnt/secondary
4.5.5.2. Using the Management Server As the NFS Server
This section tells how to set up NFS shares for primary and secondary storage on the same node with the Management Server. This is more typical of a trial installation, but is technically possible in a larger deployment. It is assumed that you will have less than 16TB of storage on the host.
The exact commands for the following steps may vary depending on your operating system version.
On the Management Server host, create two directories that you will use for primary and secondary storage. For example:
# mkdir -p /export/primary
# mkdir -p /export/secondary
To configure the new directories as NFS exports, edit /etc/exports. Export the NFS share(s) with rw,async,no_root_squash. For example:
# vi /etc/exports
Insert the following line.
/export *(rw,async,no_root_squash)
Export the /export directory.
# exportfs -a
Edit the /etc/sysconfig/nfs file.
# vi /etc/sysconfig/nfs
Uncomment the following lines:
LOCKD_TCPPORT=32803
LOCKD_UDPPORT=32769
MOUNTD_PORT=892
RQUOTAD_PORT=875
STATD_PORT=662
STATD_OUTGOING_PORT=2020
Edit the /etc/sysconfig/iptables file.
# vi /etc/sysconfig/iptables
Add the following lines at the beginning of the INPUT chain where <NETWORK> is the network that you'll be using:
-A INPUT -s <NETWORK> -m state --state NEW -p udp --dport 111 -j ACCEPT
-A INPUT -s <NETWORK> -m state --state NEW -p tcp --dport 111 -j ACCEPT
-A INPUT -s <NETWORK> -m state --state NEW -p tcp --dport 2049 -j ACCEPT
-A INPUT -s <NETWORK> -m state --state NEW -p tcp --dport 32803 -j ACCEPT
-A INPUT -s <NETWORK> -m state --state NEW -p udp --dport 32769 -j ACCEPT
-A INPUT -s <NETWORK> -m state --state NEW -p tcp --dport 892 -j ACCEPT
-A INPUT -s <NETWORK> -m state --state NEW -p udp --dport 892 -j ACCEPT
-A INPUT -s <NETWORK> -m state --state NEW -p tcp --dport 875 -j ACCEPT
-A INPUT -s <NETWORK> -m state --state NEW -p udp --dport 875 -j ACCEPT
-A INPUT -s <NETWORK> -m state --state NEW -p tcp --dport 662 -j ACCEPT
-A INPUT -s <NETWORK> -m state --state NEW -p udp --dport 662 -j ACCEPT
Run the following commands:
# service iptables restart
# service iptables save
If NFS v4 communication is used between client and server, add your domain to /etc/idmapd.conf on both the hypervisor host and Management Server.
# vi /etc/idmapd.conf
Remove the character # from the beginning of the Domain line in idmapd.conf and replace the value in the file with your own domain. In the example below, the domain is company.com.
Domain = company.com
Reboot the Management Server host.
Two NFS shares called /export/primary and /export/secondary are now set up.
It is recommended that you test to be sure the previous steps have been successful.
Log in to the hypervisor host.
Be sure NFS and rpcbind are running. The commands might be different depending on your OS. For example:
# service rpcbind start
# service nfs start
# chkconfig nfs on
# chkconfig rpcbind on
# reboot
Log back in to the hypervisor host and try to mount the /export directories. For example (substitute your own management server name):
# mkdir /primarymount
# mount -t nfs <management-server-name>:/export/primary /primarymount
# umount /primarymount
# mkdir /secondarymount
# mount -t nfs <management-server-name>:/export/secondary /secondarymount
# umount /secondarymount
4.5.6. Prepare and Start Additional Management Servers
For your second and subsequent Management Servers, you will install the Management Server software, connect it to the database, and set up the OS for the Management Server.
If the Management Server is RHEL or CentOS, copy vhd-util to /usr/lib64/cloud/common/scripts/vm/hypervisor/xenserver.
If the Management Server is Ubuntu, copy vhd-util to /usr/lib/cloud/common/scripts/vm/hypervisor/xenserver/vhd-util.
Ensure that necessary services are started and set to start on boot.
# service rpcbind start
# service nfs start
# chkconfig nfs on
# chkconfig rpcbind on
# cloud-setup-databases cloud:dbpassword@dbhost -e encryption_type -m management_server_key -k database_key
Configure the OS and start the Management Server:
# cloud-setup-management
The Management Server on this node should now be running.
Repeat these steps on each additional Management Server.
Be sure to configure a load balancer for the Management Servers. See Management Server Load Balancing.
4.5.7. Prepare the System VM Template
Secondary storage must be seeded with a template that is used for CloudStack system VMs.
When copying and pasting a command, be sure the command has pasted as a single line before executing. Some document viewers may introduce unwanted line breaks in copied text.
On the Management Server, run one or more of the following cloud-install-sys-tmplt commands to retrieve and decompress the system VM template. Run the command for each hypervisor type that you expect end users to run in this Zone.
If your secondary storage mount point is not named /mnt/secondary, substitute your own mount point name.
If you set the CloudStack database encryption type to "web" when you set up the database, you must now add the parameter -s <management-server-secret-key>. See About Password and Key Encryption.
This process will require approximately 5 GB of free space on the local file system and up to 30 minutes each time it runs.
For XenServer:
# /usr/lib64/cloud/common/scripts/storage/secondary/cloud-install-sys-tmplt -m /mnt/secondary -u http://download.cloud.com/templates/acton/acton-systemvm-02062012.vhd.bz2 -h xenserver -s <optional-management-server-secret-key> -F
For vSphere:
# /usr/lib64/cloud/common/scripts/storage/secondary/cloud-install-sys-tmplt -m /mnt/secondary -u http://download.cloud.com/templates/burbank/burbank-systemvm-08012012.ova -h vmware -s <optional-management-server-secret-key> -F
For KVM:
# /usr/lib64/cloud/common/scripts/storage/secondary/cloud-install-sys-tmplt -m /mnt/secondary -u http://download.cloud.com/templates/acton/acton-systemvm-02062012.qcow2.bz2 -h kvm -s <optional-management-server-secret-key> -F
If you are using a separate NFS server, perform this step. If you are using the Management Server as the NFS server, you MUST NOT perform this step.
When the script has finished, unmount secondary storage and remove the created directory.
# umount /mnt/secondary
# rmdir /mnt/secondary
Repeat these steps for each secondary storage server.
4.5.8. Installation Complete! Next Steps
Congratulations! You have now installed CloudStack Management Server and the database it uses to persist system data.
What should you do next?
Even without adding any cloud infrastructure, you can run the UI to get a feel for what's offered and how you will interact with CloudStack on an ongoing basis. See Log In to the UI.
When you're ready, add the cloud infrastructure and try running some virtual machines on it, so you can watch how CloudStack manages the infrastructure. See Provision Your Cloud Infrastructure.