15.5. Advanced Zone Physical Network Configuration
Within a zone that uses advanced networking, you need to tell the Management Server how the physical network is set up to carry different kinds of traffic in isolation.
15.5.1. Configure Guest Traffic in an Advanced Zone
These steps assume you have already logged in to the CloudStack UI. To configure the base guest network:
In the left navigation, choose Infrastructure. On Zones, click View More, then click the zone to which you want to add a network.
Click the Network tab.
Click Add guest network.
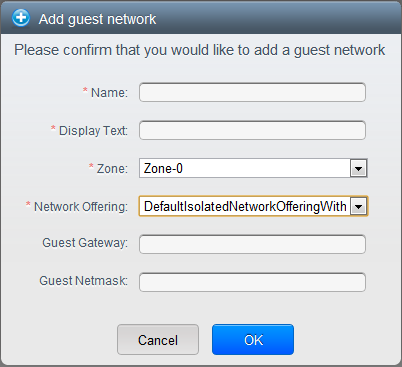
The Add guest network window is displayed:
Provide the following information:
Name. The name of the network. This will be user-visible
Display Text: The description of the network. This will be user-visible
Zone: The zone in which you are configuring the guest network.
Network offering: If the administrator has configured multiple network offerings, select the one you want to use for this network
Guest Gateway: The gateway that the guests should use
Guest Netmask: The netmask in use on the subnet the guests will use
Click OK.
15.5.2. Configure Public Traffic in an Advanced Zone
In a zone that uses advanced networking, you need to configure at least one range of IP addresses for Internet traffic.
15.5.3. Configuring a Shared Guest Network
Log in to the CloudStack UI as administrator.
In the left navigation, choose Infrastructure.
On Zones, click View More.
Click the zone to which you want to add a guest network.
Click the Physical Network tab.
Click the physical network you want to work with.
On the Guest node of the diagram, click Configure.
Click the Network tab.
Click Add guest network.
The Add guest network window is displayed.
Specify the following:
Name: The name of the network. This will be visible to the user.
Description: The short description of the network that can be displayed to users.
VLAN ID: The unique ID of the VLAN.
Isolated VLAN ID: The unique ID of the Secondary Isolated VLAN.
Scope: The available scopes are Domain, Account, Project, and All.
Domain: Selecting Domain limits the scope of this guest network to the domain you specify. The network will not be available for other domains. If you select Subdomain Access, the guest network is available to all the sub domains within the selected domain.
Account: The account for which the guest network is being created for. You must specify the domain the account belongs to.
Project: The project for which the guest network is being created for. You must specify the domain the project belongs to.
All: The guest network is available for all the domains, account, projects within the selected zone.
Network Offering: If the administrator has configured multiple network offerings, select the one you want to use for this network.
Gateway: The gateway that the guests should use.
Netmask: The netmask in use on the subnet the guests will use.
IP Range: A range of IP addresses that are accessible from the Internet and are assigned to the guest VMs.
If one NIC is used, these IPs should be in the same CIDR in the case of IPv6.
IPv6 CIDR: The network prefix that defines the guest network subnet. This is the CIDR that describes the IPv6 addresses in use in the guest networks in this zone. To allot IP addresses from within a particular address block, enter a CIDR.
Network Domain: A custom DNS suffix at the level of a network. If you want to assign a special domain name to the guest VM network, specify a DNS suffix.